Casio YP-100 - Presentation Support Tool User Manual Download Page 94

94

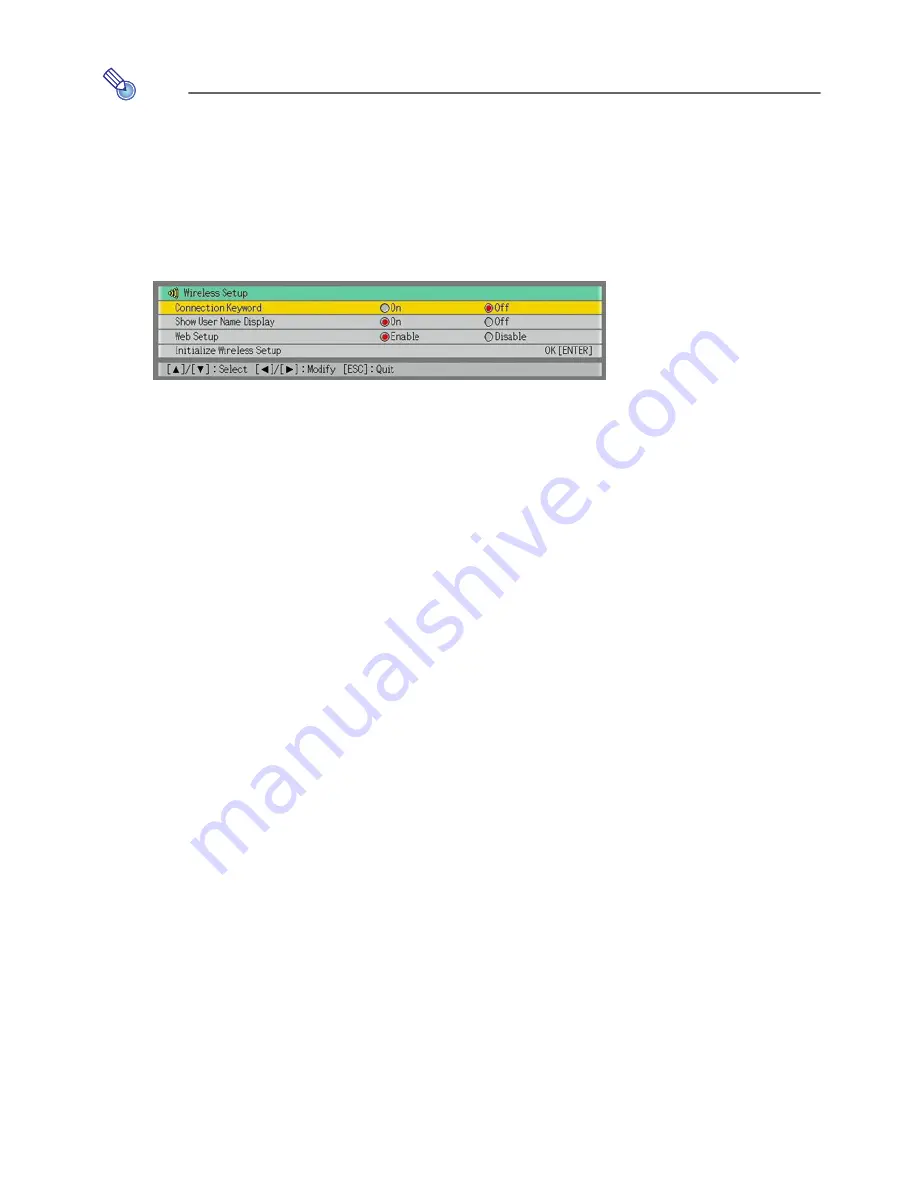
To turn display of user names in the projection area on and off

Note

Under initial default settings, the user name is displayed in the upper left corner of the 
projection area whenever you switch projection from the contents of one computer 
screen to another, or when a single computer is connected to the YP-100 over a 
wireless LAN.

1

While Wireless is shown in the projection area, press the [MENU] key on the 
YP-100 remote controller.

z

This will display the Wireless setup menu.

2

Press the [

T

T

T

T

] key to move the highlighting to “Show User Name Display”.

3

Use [

X

X

X

X

] and [

W

W

W

W

] to select “On” (user name displayed) or “Off” (user name not 

displayed).

4

To exit the Wireless setup menu, press the [ESC] key.

Summary of Contents for YP-100 - Presentation Support Tool

Page 1: ...pective owners The contents of this manual are subject to change without notice Copying of this manual either in part or its entirety is forbidden You are allowed to use this manual for your own perso...

Page 2: ...evices 13 Supported Playback Data Types 14 Preparing a Presentation with EZ Converter 14 Presentation Data 14 Main EZ Converter Functions 15 Starting Up and Exiting EZ Converter 15 Creating New Presen...

Page 3: ...0 48 About the YP 100 s Wireless LAN 49 Wireless Function and Wireless Connection Software 49 About Connection Profiles 49 Establishing a Wireless LAN Connection between the YP 100 and a Computer 50 W...

Page 4: ...Computer is Connected to the YP 100 over a Wireless LAN 90 Operations while Multiple Computers are Connected to the YP 100 over a Wireless LAN 93 Performing a Presentation Using the YC 400 Document Ca...

Page 5: ...that require parallel operations on the YP 100 and your computer The following are special terms and conventions used in this manual to differentiate between the YP 100 and computer projection area Th...

Page 6: ...e from the projector also connected to the YP 100 Refer to the following for details For more information about this Refer to this section of this manual Supported USB memory devices Supported USB Mem...

Page 7: ...o select which of the four computer screens you want to project Refer to the following for details For more information about this Refer to this section of this manual Supported wireless LAN devices S...

Page 8: ...YC 400 Document Camera to the USB port of the YP 100 and project the images of documents placed on the document stage of the YC 400 For more information see Performing a Presentation Using the YC 400...

Page 9: ...and projects the Viewer screen from the projector connected to the YP 100 YW 2 Wireless Adapter Starts up Wireless page 49 and projects the Wireless screen from the projector connected to the YP 100...

Page 10: ...on of at least 800 600 that is supported by above operating systems and the computer being used Pointing Device Mouse or other equivalent device supported by above operating systems Keyboard CD ROM dr...

Page 11: ...Install button z This will start installation 4 Keep clicking the Next button on the dialog boxes that appear z If your computer is running Windows XP and the dialog box shown below appears click the...

Page 12: ...12 z The dialog box shown below will appear after installation is complete 5 Click the Finish button...

Page 13: ...st need to install the EZ Converter software from the bundled CD ROM onto your computer For more information see Installing YP 100 Software page 10 The YP 100 supports connection of the following type...

Page 14: ...an be stored on a USB memory device which can then be connected to the YP 100 for the presentation Note that the conversion process may result in some differences between the original PowerPoint file...

Page 15: ...pages to image files you can also add individual image files directly to presentation data You can add up to 500 JPEG format or BMP format image files directly to presentation data Starting Up and Exi...

Page 16: ...u will first need to prepare the PowerPoint file that you want to convert To create presentation data by converting a PowerPoint File 1 Start up EZ Converter z This will display the empty EZ Converter...

Page 17: ...reappear with thumbnails of the converted images 5 Add delete move and otherwise edit the images as required z For details see Editing Presentation Data page 20 6 Configure presentation playback setti...

Page 18: ...to perform this procedure you will first need to prepare the image files that you want to include in the presentation data To create presentation data by inserting image files manually 1 Start up EZ C...

Page 19: ...s see Saving Presentation Data page 25 Configuring the Option Setting You can use option settings to specify the resolution of image files that are saved as EZ Converter presentation data Important An...

Page 20: ...lick the thumbnail of the image that will come either before or after the image you are about to add 2 Use Windows Explorer to select the image file you want to add to the presentation data z You can...

Page 21: ...ected image z In place of step 2 you could also press the Delete key on your computer keyboard Note Deleting an image file from the presentation data does not delete the image data file from your comp...

Page 22: ...tion effect Note The playback settings you configure are stored in the presentation plf file To configure presentation data playback settings 1 On the EZ Converter window display the presentation data...

Page 23: ...n interval value 5 seconds 10 seconds 30 seconds 1 minute and 5 minutes Have the presentation restart from the beginning after the final image file is reached Select On under Repeat Have the presentat...

Page 24: ...mples of each of the available effects Note For information about performing a presentation using playback settings that are different from those that were stored with presentation data using EZ conve...

Page 25: ...ame of the PowerPoint file will be inserted in the dialog box automatically In other cases New Presentation File will be displayed in the dialog box 4 Enter the file name you want and then click the O...

Page 26: ...isting presentation data with the edited data To save existing presentation data under a different name 1 On the EZ Converter window display the presentation data you want to save under a different na...

Page 27: ...ory device connect the device to your computer s USB port 2 Click or select Open Presentation File on the File menu z This displays a dialog box for opening presentation files 3 Select the presentatio...

Page 28: ...ta currently in the EZ Converter window under a different name File Save Presentation File As Exit EZ Converter File Exit Undo the last editing operation you performed on the EZ Converter window Edit...

Page 29: ...es with the YP 100 to the AC adaptor terminal and plug the AC adaptor into a power outlet z This will cause the YP 100 to turn on automatically z This will cause the YP 100 s POWER indicator to light...

Page 30: ...ie page 39 File Menu Operations When Viewer starts up it initially projects a menu of files contained on the USB memory device There are two different views for the file menu a thumbnail view and a tr...

Page 31: ...ess the ENTER key z This toggles between the thumbnail view and the tree view To scroll file menu pages To scroll to the next menu page press the key To scroll back to the previous page press the U ke...

Page 32: ...Thumbnail View Use the cursor keys to move the highlighting to the file or folder you want to select Tree View Use the S and T cursor keys to move the highlighting to the file or folder you want to s...

Page 33: ...rojection area 3 To return to the file menu press the ESC key Note z If the selected file is too large to fit within the projection area the message Cannot display an image file will appear z For info...

Page 34: ...he playback settings included in the presentation data For details see Configuring Presentation Data Playback Settings page 22 To move the highlighting to the previously projected image file 1 While t...

Page 35: ...wer also provides a presentation menu that makes it easy to find all of the presentation folders that are included on a USB memory device To view the presentation menu 1 While the Viewer file menu is...

Page 36: ...t will all be in accordance with the settings stored in the presentation file For more information see Configuring Presentation Data Playback Settings on page 22 3 To stop the slideshow press the ESC...

Page 37: ...te Left and then press the ENTER key To start a slideshow from the currently displayed image file content Press the key Note You can also start a slideshow from the currently displayed image file cont...

Page 38: ...keys Note After scrolling to an image file the slideshow will scroll to the next image file automatically after the preset time interval if Auto is selected for the Image Switching setting Note howeve...

Page 39: ...This section explains procedures you can use to play a movie using Viewer To play a movie file 1 On the file menu select the movie file you want to play z For information about how to select a particu...

Page 40: ...Press the ENTER key Jump to the end of the currently playing movie file and pause there 1 Press the FUNC key to display the viewer function menu 2 Use the T key to move the highlighting to Jump to End...

Page 41: ...g Slideshow Display Interval Slideshow Transition Effect and Slideshow Repeat are changed automatically to the playback settings page 22 saved in the presentation file you are running z In order to mo...

Page 42: ...elect the setting you want so its button is 4 Repeat steps 4 and 5 to configure other settings if you want 5 After all the settings are the way you want press the MENU key to exit the Viewer setup men...

Page 43: ...by the time they were last modified from the oldest to the newest Startup Mode Specifies whether the initial view when Viewer is started up is the thumbnail view or tree view See File Menu Operations...

Page 44: ...repeated Movie Display Specifies the display size during movie playback Zoom Enlarges to the size of the projection area No Zoom Specifies the original size of the movie file Initialize Viewer Setup R...

Page 45: ...annot display an image file The image file cannot be displayed because it is too large to display within the projection area or because there is something wrong with it Make sure the image files on th...

Page 46: ...s image menu it takes considerable time before the image appears To ensure that images appear quickly during your presentation use EZ Converter to convert the images to presentation data This will cau...

Page 47: ...t come with the YW 2 Wireless LAN adapter is not necessary when you connect a YW 2 to the YP 100 Computer Requirements In addition to the Minimum System Requirements page 10 the computer must also con...

Page 48: ...z For more information see Installing YP 100 Software page 10 2 Connect the YW 2 wireless adapter to your computer s USB port If you are using another wireless LAN adapter including a computer s buil...

Page 49: ...profiles simple connections and manual connections The YP 100 comes with a following connection profiles built in You can use the YP 100 s Wireless function to switch the current connection profile S...

Page 50: ...le Up to 4 Computers Configure this connection using the Manual Connection Ad Hoc Mode Make sure that all of the profile contents except for the IP address of the YP 100 and the computer are identical...

Page 51: ...to a wireless LAN access point see Advanced Wireless LAN Connection Settings page 64 z For details about projection operations after establishing a connection see Using Wireless LAN for Projection pag...

Page 52: ...also will be projected by the connected projector 2 Connect the CASIO YW 2 wireless adapter to the YP 100 s USB port z You could also turn on the YP 100 with the wireless adapter already connected to...

Page 53: ...ion z This will cause the dialog box shown below to appear z When the computer finds the YP 100 communication will start between them z This will establish a wireless LAN connection between the comput...

Page 54: ...remote controller key to display the Connection Profile menu and then select the original connection profile Simple Connection 1 for this example For details see To switch the YP 100 connection profil...

Page 55: ...o the computer s USB port If it does not go to the Windows Start menu and select All Programs CASIO Wireless Connection 2 On the Wireless Connection window of the first computer select Switch Connecti...

Page 56: ...Test here and return to the connection profile switching dialog box in step 1 The newly created profile Test will be selected on the dialog box 7 Repeat steps 1 through 5 for all of the other computer...

Page 57: ...onnection is already established between the first computer and the YP 100 proceed to step 2 2 On the Wireless Connection window of the first computer select Switch Connection Profile on the Connectio...

Page 58: ...lus 1 8 To return to the Send Settings dialog box click the Cancel button 9 Click the Close button z This will cause the dialog box shown below to appear 10 On the YP 100 remote controller press the k...

Page 59: ...nect and then click the OK button z The computer will connect with the YP 100 and the above dialog box will close Confirm that the Connection Profile setting for the connected device information on th...

Page 60: ...configuring the option setting 16 In the User Name box enter the user name the name you want to appear in the projection area when projecting the screen contents of this computer for the computer who...

Page 61: ...oller press the key z This will display a user menu like the one shown below You can use the user menu when multiple computers are connected to the YP 100 to select which computer s screen image will...

Page 62: ...he other computers click the Profile Name down arrow button and then select Test from the menu that appears 2 Click the Close button z This will cause the dialog box shown below to appear z When the c...

Page 63: ...u can select any one of the areas that has indicated z The screen contents of the second computer will appear in the area of the projection area position button you select here 8 Repeat steps 1 throug...

Page 64: ...p use a web browser running on a computer that is connected to the YP 100 over a wireless LAN To display and log into the Web Setup page 1 Use the Simple Connection profile to establish a wireless LAN...

Page 65: ...ox that appears click the Web Setup button To log out of Web setup Click Logout in the upper right corner of the page Note You also will be logged out automatically if you do not perform any Web Setup...

Page 66: ...ou can disable the Web Setup page when you want to restrict access to Web Setup while there are multiple computers connected to the YP 100 To enable and disable Web Setup 1 While Wireless is shown in...

Page 67: ...s of the YP 100 when you press the FUNC key The above example shows the menu when the FUNC key is pressed while Standing by for connection is displayed in the projection area 2 Check to make sure that...

Page 68: ...on profile you want to select and then press the ENTER key z This displays the dialog box shown below 3 Press the S S S S key to move the highlighting to Yes and then press the ENTER key z This will s...

Page 69: ...the Connection Profile down arrow button and then select the connection profile you want from the menu that appears 3 Click the Switch button z This will display the following message on the Web Setu...

Page 70: ...indow page 67 In the Projector Name box of the Wireless Connection window page 53 In the Projector Name box of the Connection dialog box page 58 To assign a name to YP 100 unit 1 Perform the procedure...

Page 71: ...nd log into the Web Setup page page 64 to display the Web Setup top page 2 In the Projector Setup area click the Edit button z This will display a projector setup page 3 Enter up to 16 single byte cha...

Page 72: ...the connection keyword that is preset for the YP 100 and then click the OK button z If the input connection keyword is correct a wireless LAN connection will be established between the YP 100 and comp...

Page 73: ...er To display and log into the Web Setup page page 64 to display the Web Setup top page 2 In the Connection Profile Setup area click the Edit button z This will display a dialog box for configuring th...

Page 74: ...this example the YP 100 name page 70 is Projector A 1 Perform the procedure under To modify YP 100 manual connection settings page 73 to modify YP 100 Manual Connection 3 profile settings as shown be...

Page 75: ...ay a dialog box for switching the connection profile 4 Click the New button z This will display a dialog box for configuring a new manual connection profile 5 On the dialog box for configuring the man...

Page 76: ...ed device 9 Move the highlighting to Projector A for the projector name and then click the OK button z This will establish a wireless LAN connection between the computer and YP 100 z This will close t...

Page 77: ...t click the Register button z This will cause the dialog box shown below to appear 7 Click the OK button z This registers the settings you modified in the manual setting in step 5 and returns to the c...

Page 78: ...1 On the Wireless Connection window select Options on the Tools menu z This will display a dialog box for configuring the option setting 2 In the User Name box enter the user name for the computer z...

Page 79: ...out creating a computer manual connection setting profile for wireless LAN connection with the YP 100 refer to To create a new computer connection profile page 74 For information about modifying a man...

Page 80: ...WEP key format and a WEP key z The letters WEP stand for Wired Equivalent Privacy It is a security protocol that uses a character string to encrypt data and protect against unauthorized access to wir...

Page 81: ...nter the WPA WPA2 pass phrase encryption key Enter the same encryption key that is currently set on the wireless LAN access point to which you are planning to connect You should enter at least eight a...

Page 82: ...c is selected for Access Mode When there is a large number of devices performing wireless LAN communication using frequencies in the same frequency band 2 4 GHz used by the YP 100 you can improve comm...

Page 83: ...While Wireless is shown in the projection area press the MENU key on the YP 100 remote controller z This will display the Wireless setup menu 2 Press the T T T T key to move the highlighting to Initi...

Page 84: ...ess Connection help select Help on the Wireless Connection window Help menu Viewing Wireless Connection Version Information To view Wireless Connection version information select About Wireless Connec...

Page 85: ...tion is not possible when different connection profiles are selected on the computer and the YP 100 such as Manual Connection 1 on the computer and Simple Connection 1 on the YP 100 Make sure the same...

Page 86: ...ENTER key To check computer settings 1 On the Wireless Connection window select Switch Connection Profile on the Connection menu 2 On the connection profile switching dialog box that appears click the...

Page 87: ...ntrol Panel click Network Connections Network and Dial up Connection in the case of Windows 2000 z This will display a Network Connections window Network and Dial up Connection window 2 On the window...

Page 88: ...to exit Wireless Connection and then restart Wireless Connection You cannot display the Web Setup page The Web Setup page can be displayed only while there is a wireless LAN connection between the YP...

Page 89: ...r and the YP 100 Connection Switch Connection Profile Terminate the wireless LAN connection between a computer and the YP 100 and quit Wireless Connection Connection Exit Select the mouse cursor shape...

Page 90: ...utton to project the image This will send the contents of the computer screen to the YP 100 which will project it The color of the button at this time will change from black to green Using Wireless LA...

Page 91: ...mage click the button To stop projection of computer screen contents while maintaining the connection On the computer screen click the button on the Wireless Connection window This will cause the butt...

Page 92: ...above To terminate the wireless LAN connection between a computer and YP 100 from the computer On the computer screen click the button on the Wireless Connection window or select Disconnect on the Co...

Page 93: ...the computer whose screen contents are currently being projected To switch projection from the screen contents of one computer to another 1 While the screen contents of one of the computer s connected...

Page 94: ...en to another or when a single computer is connected to the YP 100 over a wireless LAN 1 While Wireless is shown in the projection area press the MENU key on the YP 100 remote controller z This will d...

Page 95: ...CASIO website at http world casio com projector download en yc_400_firmup YC Camera is an application built into the YP 100 that makes it possible to control the YC 400 document camera from the YP 100...

Page 96: ...aptor into a power outlet z This will cause the YP 100 to turn on automatically z This will cause the YP 100 s POWER indicator to light green The YP 100 logo screen also will be projected by the conne...

Page 97: ...image of the document stage along with a dialog box for adjusting the document camera position z If the document camera is positioned correctly position adjustment will end automatically and the dialo...

Page 98: ...document on the stage is not being moved it will record its image and switch from the fuzzy monitor image to a high resolution image recorded image automatically 5 Now you can replace the document cur...

Page 99: ...d using the YC Camera function menu which appears when you press the FUNC key while the YC Camera application is running Some operations can be performed using the remote controller s U and keys To re...

Page 100: ...ter the zoom setting is the way you want press the ESC key z This will close the YC Camera Zoom Focus dialog box To adjust document focus manually 1 Press the FUNC key to display the YC Camera applica...

Page 101: ...ss the ENTER key z This displays the camera position adjustment dialog box 4 Point the document camera downwards so the lens is pointed towards the document stage z Aim the camera as instructed by the...

Page 102: ...causes the background of the projected image to be white enhanced which helps to make the text on a document easier to read z This operation will affect only the image that is currently being projecte...

Page 103: ...to adjust image alignment manually z This operation will affect only the image that is currently being projected The projection image produced the next time you release the shutter will be projected...

Page 104: ...the menu item whose setting you want to change 3 Press the W W W W or X X X X key to select the setting you want so its button is 4 Repeat steps 2 and 3 to configure other settings if you want 5 Afte...

Page 105: ...T T key to move the highlighting to Initialize YC Camera Setup and then press the ENTER key z This displays the dialog box shown below 3 Use the S S S S key to select Yes 4 To restore all the settings...

Page 106: ...ument stage Manual Capture Requires manual release of the shutter each time a document is placed on the document stage Monitor Screen Orientation Switches the monitor screen orientation Horizontal Rec...

Page 107: ...her or not the camera s monitor image should be projected when a document is removed from the document stage On Displays the monitor image Off Does not display the monitor image Initialize YC Camera S...

Page 108: ...like the one shown below with Language highlighted 2 Press the ENTER key z This displays the language selection dialog box shown below 3 Use the T T T T and S S S S keys to move the highlighting to th...

Page 109: ...e YP 100 press the MENU key z This will display the setup menu shown below 2 Press the T T T T key to move the highlighting to Restore All Defaults and then press the ENTER key z This displays the dia...

Page 110: ...ews to suit the thickness of the bracket plate etc z If you prefer to use other screws for anchoring the YP 100 use the following screw type Screw Type M3 z Select anchor screws in accordance with the...

Page 111: ...y z Be sure to request the services of a qualified specialist whenever mounting or maintaining the YP 100 z After installing the YP 100 with a mounting bracket check the screws periodically to make su...

Page 112: ...MA0610 B...

Reviews: