background image

E-12

Selecting and Playing a Tone

5.

Check to make sure that the lamp above the 

br


(TONE)

 button is lit.

If it is unlit, press the 

br


(TONE)

 button to light the 

upper lamp.

6.

Use the 

ck

 to 

cr

 (Tone Group) buttons to 

select the group you want.

The lamp of the button you press will light.

7.

Use the 

bt

 (

w

q

) buttons to select the 

tone you want. Now you can play on the 
keyboard using the tone you selected.

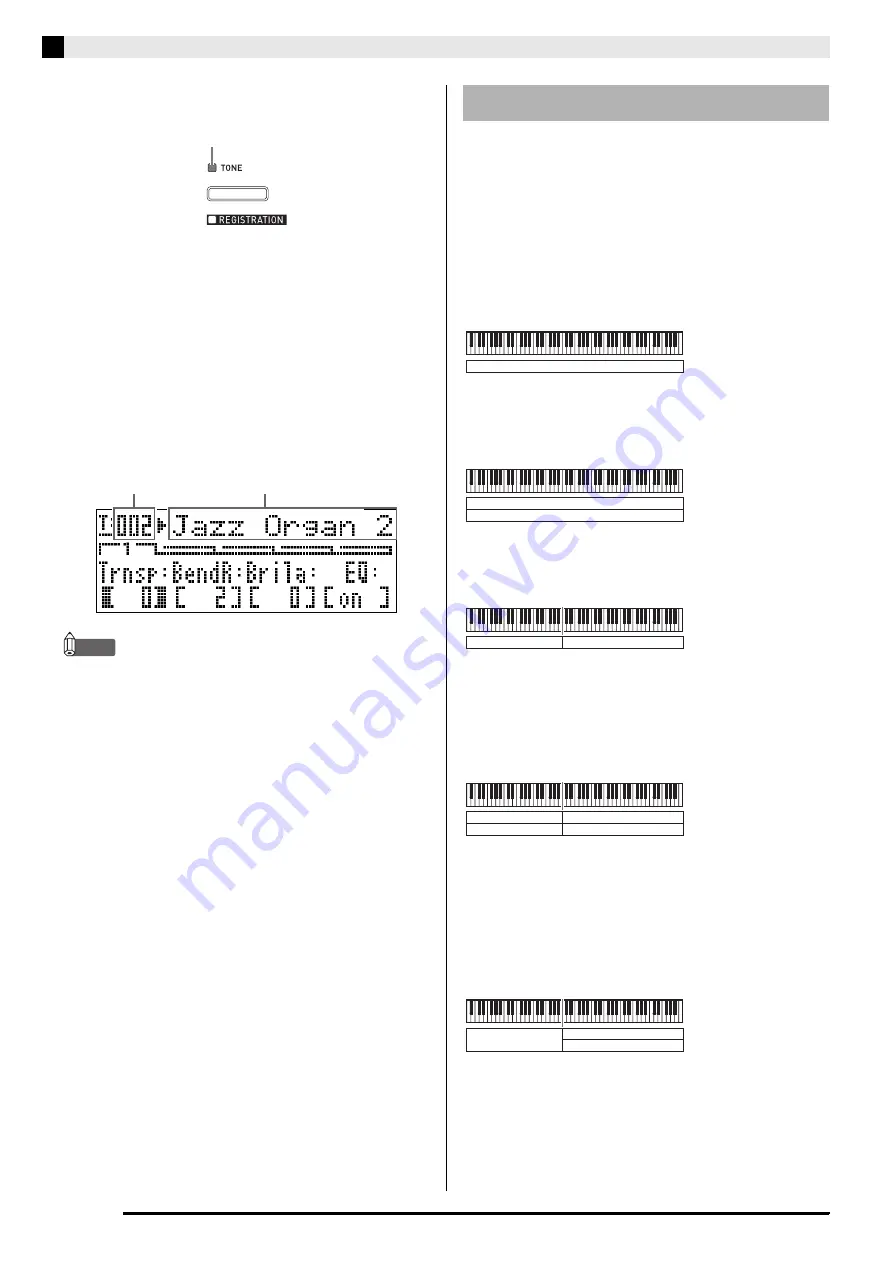
Example:

To select the “Jazz Organ 2” tone in the 
“ORGAN” group

NOTE

Pressing 

w

 and 

q

 at the same time selects tone 

001 in the currently selected group.

Holding down 

w

 or 

q

 will scroll through tones at 

high speed.

Holding down the 

bs


(FUNCTION)

 button as you 

press 

w

 or 

q

 will jump 10 tones.

You can configure the keyboard so it plays two 
different tones at the same time (Layer) or to play 
different tones in the left and right ranges (Split). You 
can even use Layer and Split in combination with each 
other.

The following describes the various possible Layer and 
Split combinations.

z

One tone across the entire keyboard (page E-11)

Use zone UPPER 1.

z

Two layered tones across the entire keyboard (page 
E-13)

Use zones UPPER 1 and UPPER 2 at the same time.

z

Two tones, one for the left range and one for the 
right range of the keyboard (page E-14)

Use zones UPPER 1 and LOWER 1 at the same time.

z

Four tones, two layered for the left range and two 
layered for the right range of the keyboard (page 
E-15)

Use  zones  UPPER 1,  UPPER 2,  LOWER 1,  and 
LOWER 2 at the same time.

z

Three tones, one for one range and two layered for 
the other range of the keyboard (page E-16)

Use all four zones at the same time, but with one 
zone’s sound turned off by configuring one of the 
zones with INT OFF to disconnect the internal sound 
source. The example below shows INT OFF 
configured for LOWER 2.

Lit

Tone number

Tone name

Layering and Splitting Tones

UPPER 1

UPPER 1 INT ON

LAYER OFF

SPLIT OFF

UPPER 1

UPPER 2

UPPER 1/2 INT ON

LAYER ON

SPLIT OFF

LOWER 1

UPPER 1

UPPER 1/LOWER 1 INT ON

LAYER OFF

SPLIT ON

LOWER 1

UPPER 1

LOWER 2

UPPER 2

UPPER 1/2 INT ON

LOWER 1/2 INT ON

LAYER ON, SPLIT ON

LOWER 1

UPPER 1

UPPER 2

UPPER 1/2, LOWER 1 INT ON

LOWER 2 INT OFF

LAYER ON, SPLIT ON

Summary of Contents for PRIVIA PX-3S

Page 1: ...rence Guarde toda documentaci n para futuras consultas Safety Precautions Before trying to use the piano be sure to read the separate Safety Precautions Precauciones de seguridad Antes de intentar usa...

Page 2: ...osed to rain or moisture does not operate normally or has been dropped The apparatus shall not be exposed to dripping or splashing and that no objects filled with liquids such as vases shall be placed...

Page 3: ...igital Piano as a MIDI Master Keyboard E 26 External MIDI Device Connection E 26 Specifying the Zone Configuration E 26 Specifying What Each Zone Controls E 27 Zone Setups E 27 Editing Zone Parameters...

Page 4: ...E 2 General Guide 2 1 do 3 4 5 6 bm bn bo bp 7 bk 8 9 bl ck cl cm cn co cp cq cr dm br bs cs ct dk dl dn bt bq dp ds dq dr dt ek el em en Bottom Left Side Back...

Page 5: ...TER SELECTOR TRANSPOSE A button bn PARAMETER SELECTOR BEND RANGE B button bo PARAMETER SELECTOR BRILLIANCE C button bp PARAMETER SELECTOR EQ ON OFF D button bq Display br TONE REGISTRATION button bs F...

Page 6: ...ound source and or external MIDI device In the case of an internal sound source zone editing can be performed to create sounds by selecting a DSP configuring DSP settings editing tones etc Following s...

Page 7: ...ort 0 Parts played by hand 1 MIDI OUT channel depends on zone editing page E 28 Port 1 MIDI file playback parts Port 2 MIDI IN parts NOTE MIDI messages output from the above Port 0 and Port 1 are grou...

Page 8: ...press of the bl MASTER CONTROL CARD PLAYER button toggles between the MASTER CONTROL and CARD PLAYER modes You can determine the current mode by noting which bl MASTER CONTROL CARD PLAYER lamp is lit...

Page 9: ...to their initial factory defaults 1 Turn off the Digital Piano 2 While holding down both the br TONE and bs FUNCTION buttons press the el POWER button The Digital Piano will turn on and initialize it...

Page 10: ...ord Never twist the cord at the base of the plug or connector The power cord should not be stretched tight while it is in use During Movement Before moving the Digital Piano be sure to unplug the AC a...

Page 11: ...ing this pedal will activate the Digital Piano s Acoustic Resonance effect which causes notes to resonate in the same way they do when the damper pedal on an acoustic piano is pressed You can adjust t...

Page 12: ...io equipment to the terminal where the Digital Piano is connected AUX IN etc To input from audio equipment Figure 3 LINE IN R jack input is output from the LINE OUT R jack and LINE IN L MONO input is...

Page 13: ...e Digital Piano has a total of four demo tunes You can use the bt buttons to jump the beginning of the previous q or next w demo tune You can use the Tone Group buttons ck to cn to select a specific d...

Page 14: ...z One tone across the entire keyboard page E 11 Use zone UPPER 1 z Two layered tones across the entire keyboard page E 13 Use zones UPPER 1 and UPPER 2 at the same time z Two tones one for the left r...

Page 15: ...28 Layering Two Tones 1 Use the Tone List page E 57 to look up the group s and numbers of the two tones UPPER 1 zone tone and UPPER 2 zone tone you want to use 2 Check to make sure that the both the...

Page 16: ...ght sides of the keyboard to confirm that the tones are assigned properly At any time you can press the 4 UPPER 1 button to change the UPPER 1 zone tone or the 2 LOWER 1 button to change the LOWER 1 z...

Page 17: ...cs LAYER button so its lamp is unlit 8 Press the ct SPLIT button so its lamp is lit This will cause the 2 LOWER 1 button lamp to light This indicates you can select the LOWER 1 zone tone 9 Select the...

Page 18: ...ther buttons to go out At this time the tone name of the zone whose button you press will appear on the display and you can change the tone if you want However the tones that sound when a keyboard key...

Page 19: ...e Effect Settings page E 32 To change the reverb type 1 Hold down the dk REVERB button until the screen shown below appears 2 Use the bt w q buttons to select the reverb type you want You can select o...

Page 20: ...whenever you turn on the Digital Piano The common menu has five pages Press the 7 PAGE button to scroll through the pages Each common menu page includes up to four parameters each of which correspond...

Page 21: ...ER SELECTOR buttons will display its full name For example LoMdG will change to LowMid Gain 5 Use the bk EDIT w q buttons to change the setting Pressing w and q at the same time returns the setting to...

Page 22: ...icated by an asterisk General Settings Adjusts overall keyboard tuning by semitone units 12 to 0 to 12 semitones Specifies the range of pitch change that occurs when the pitch bend wheel is rotated 0...

Page 23: ...d Gain and Frequency Settings Parameter Name Location Description Settings indicates default Low Gain LoG 2 A Adjusts the low range gain 12 to 0 to 12 Low Freq LoF 2 B Specifies the frequency of the l...

Page 24: ...ion see Settings when Asgn1 Asgn2 Control Change Number 0 to 127 page E 23 2 Portamento can be turned on or off for each zone For details see Editing Tones page E 31 5 A Assignable Button 2 Type Asgn2...

Page 25: ...to 127 1 Control change information in principle is sent from the Digital Piano to an external destination over the MIDI channel specified here However when a MIDI send channel of one of the Digital P...

Page 26: ...arameter Information Applying portamento causes the pitch to slide between two notes played in succession It is an effect that is used with strings and woodwind instruments With the 8 ASSIGNABLE 1 but...

Page 27: ...ith the 9 ASSIGNABLE 2 button different control change values can be specified for sending at the points the button is turned on and when it is turned off Common Parameter Information You also can con...

Page 28: ...and MIDI IN terminals It is up to you to purchase optionally available or commercially available MIDI cables when connecting to an external MIDI device IMPORTANT The MIDI terminals are disabled while...

Page 29: ...tes the internal sound source while the EXT side lamp indicates an external MIDI device Keep pressing the button until the lamp s of the device s you want the zone to control are lit 3 If you want to...

Page 30: ...parameters To configure zone parameter settings enter the MASTER CONTROL mode and then hold down the 7 ZONE EDIT button until the zone menu appears on the display The zone menu has eight pages Press t...

Page 31: ...ess will light which indicates its zone is selected 6 Use the bk EDIT w q buttons to change the setting Pressing w and q at the same time returns the setting to its initial default Holding down w or q...

Page 32: ...the value of the bank LSB that is appended when sending a program change to an external destination with operation 2 D 0 to 127 Specifies the program change number sent to an external destination Any...

Page 33: ...to 0 to 63 This item is for adjusting how the cut off filter application is applied to a tone The cut off filter is a tone adjustment filter that eliminates cuts off all components over a given freque...

Page 34: ...und source is sent to chorus 0 to 127 default setting depends on the tone Specifies how much of the signal from the sound source is sent to acoustic resonance 0 to 127 default setting depends on the t...

Page 35: ...the settings described in this section for that zone Enables and disables pedal operations OFF ON Enables and disables the do PITCH BEND wheel operations OFF ON Enables and disables the 8 ASSIGNABLE...

Page 36: ...llowing function menu settings are not included in registration data You can however perform the backup operation page E 40 to retain these settings when the Digital Piano is turned off The backup ope...

Page 37: ...ow the display would appear if you select Bank 3 Area 7 To rename a registration memory bank 1 While holding down the bs FUNCTION button press the br REGISTRATION button 2 Use the bt w q buttons to sc...

Page 38: ...file The message Replace will appear if a file with the same name already exists If you want to replace the existing file with the one you are saving press bt YES Press bt NO to return to the screen...

Page 39: ...i buttons to display one of the screens shown below To recall a file that contains data for a single bank To recall a file that contains data for all banks 6 Use the bt w q buttons to display the file...

Page 40: ...with the ct u and dk i buttons ENT to the right of an item indicates a setting group In this case press the dl ENTER button to enter the setting group Next use the ct u and dk i buttons to scroll thro...

Page 41: ...mperament Effect Tmpr Effect Temperament Temper Use this setting to select one of the temperaments tunings shown below for the internal sound source Pressing a keyboard key while this item is displaye...

Page 42: ...ME See To rename a file on a memory card page E 47 8 Other General Panel Lock PanelLock Turning on panel lock locks all of the Digital Piano s buttons except for the power button and unlock button ope...

Page 43: ...splay 5 You can use the letter buttons bm A through bp D to specify an SD card folder A MUSICDAT B MUSIC__B C MUSIC__C D MUSIC__D 6 Use the bt w q buttons to select the MIDI file you want 7 To start p...

Page 44: ...ue in the range of 20 to 255 To adjust the tempo by tapping a beat 1 While holding down the bs FUNCTION button tap the q bk TEMPO button four times in time with the beat you want to specify The tempo...

Page 45: ...eat playback is being performed After a one measure four beats in the cast of a 4 4 time song rest the Digital Piano will start playing the section you selected Playback of the selected section contin...

Page 46: ...e procedure below creates a new folder and assigns it to button bn B bo C or bp D Button assignments are stored on the SD card so if you remove it the last button assignments you used will be restored...

Page 47: ...o the applicable button without creating a new folder 7 After the name is the way you want press the dl ENTER button 8 In response to the confirmation message Sure that appears press the bt YES button...

Page 48: ...not indicate malfunction To load and remove a memory card IMPORTANT A memory card must be positioned correctly when being loaded into the Digital Piano Trying to force an improperly oriented memory c...

Page 49: ...button 7 Press the bt YES button The message Please Wait will remain on the display while the delete operation is being performed Do not perform any Digital Piano operation while this message is on t...

Page 50: ...slot 1 Correctly load the memory card into the memory card slot 2 The memory card was removed while some operation was in progress 2 Do not remove the memory card while any operation is in progress N...

Page 51: ...igital Piano If this is the first time you are connecting the Digital Piano to your computer the driver software required to send and receive data will be installed on your computer automatically 4 St...

Page 52: ...ta transfer with the connected computer The bs FUNCTION button lamp will flash and the display will appear as shown below To exit the storage mode at any time press the bs FUNCTION button This is the...

Page 53: ...operations to display folder information Windows XP On the Tools menu at the top of the folder window select Folder Options Windows Vista Windows 7 On the left side of the folder window click Organiz...

Page 54: ...hear any chorus reverb effect when I turn on chorus reverb The chorus send reverb send setting is 0 Change the chorus send reverb send setting to a greater value E 32 I cannot play back a music file f...

Page 55: ...re applied Performing a button operation while playing back a MIDI file can cause such phenomena when the Digital Piano switches internal tone effects It does not indicate malfunction Even though I pl...

Page 56: ...to 0 to 12 Tuning A4 440 0 Hz 99 cents Octave Shift 2 octaves Temperaments 17 types Stretch Tune Panel Lock MIDI 16 multi timbre received GM Level 1 standard Pitch Bend Wheel Pitch Bend Range 00 to 12...

Page 57: ...night to keep the volume at levels that do not disturb others Other steps you can take when playing late at night are closing windows and using headphones Any reproduction of the contents of this man...

Page 58: ...1 Do not allow the electrical load output to exceed the label rating 12 Make sure the surrounding area is dry before plugging into a power source 13 Make sure the product is oriented correctly 14 Unpl...

Page 59: ...RGAN 19 49 63 STRINGS ENSEMBLE 001 STEREO STRINGS 48 48 Early Reflection 64 STRINGS ENSEMBLE 002 STRINGS 48 49 65 STRINGS ENSEMBLE 003 WARM STRINGS 48 50 66 STRINGS ENSEMBLE 004 STRING ENSEMBLE 48 51...

Page 60: ...73 0 187 OTHERS GM 095 GM RECORDER 74 0 188 OTHERS GM 096 GM PAN FLUTE 75 0 189 OTHERS GM 097 GM BOTTLE BLOW 76 0 190 OTHERS GM 098 GM SHAKUHACHI 77 0 191 OTHERS GM 099 GM WHISTLE 78 0 192 OTHERS GM 1...

Page 61: ...Snare 1 Power Snare 2 Room Low Tom 2 Room Low Tom 1 Room Mid Tom 2 Room Mid Tom 1 Room High Tom 2 Room High Tom 1 Elec Kick 2 Elec Kick 1 Elec Snare 1 Elec Snare 2 Elec Low Tom 2 Elec Low Tom 1 Elec M...

Page 62: ...21 Chorus Flan 1 Chorus Flanger 1 M07 22 Chorus Flan 2 Chorus Flanger 2 M07 Pan Tremolo Fx 23 Tremolo Tremolo 06 24 Chorus Tremolo Chorus Tremolo M02 25 Comp Tremolo Compressor Tremolo M16 26 Dist Tre...

Page 63: ...Use this parameter to correct for such changes 03 Limiter Limits the input signal level so it does not rise above a preset level Parameter Value Ranges 0 Limit 0 to 127 Adjusts the volume level of th...

Page 64: ...tate 0 to 127 Adjusts the rate of LFO 1 1 Depth 1 Fast LFO Depth 0 to 127 Adjusts the depth of LFO 1 2 Rate 2 Slow LFO State 0 to 127 Adjusts the rate of LFO 2 3 Depth 2 Slow LFO Depth 0 to 127 Adjust...

Page 65: ...ger that uses a sine wave LFO Parameter Value Ranges 0 LFO Rate 0 to 127 Adjusts the LFO rate 1 LFO Depth 0 to 127 Adjusts the LFO depth 2 Feedback 64 to 0 to 63 Adjusts the strength of feedback 3 Wet...

Page 66: ...r Feedback 7 Flanger Wet Level 8 Chorus Polarity 9 Flanger Polarity M08 Multi08 Auto Wah Phaser 0 Wah Input Level 1 Wah Resonance 2 Wah Manual 3 Wah Depth 4 Phaser Resonance 5 Phaser Manual 6 Phaser R...

Page 67: ...kip M18 Multi18 Phaser Distortion 0 Phaser Resonance 1 Phaser Manual 2 Phaser Rate 3 Phaser Depth 4 Phaser Wet Level 5 Distortion Gain 6 Distortion Low 7 Distortion High 8 Distortion Level 9 Phaser Sk...

Page 68: ...n High 7 Distortion Level 8 Chorus Rate 9 Chorus Depth 10 Chorus Feedback 11 Chorus Wet Level 12 Chorus Polarity 13 Distortion Skip M25 Multi25 Compressor Distortion Auto Pan 0 Compressor Depth 1 Comp...

Page 69: ...tes OFF Active Sense Reset System Real Time O O X X Clock Commands Model PX 3S Version 1 0 Mode 1 OMNI ON POLY Mode 3 OMNI OFF POLY Mode 2 OMNI ON MONO Mode 4 OMNI OFF MONO O Yes X No 3 MIDI Implement...

Page 70: ...at the packaging conforms to the environmental protection legislation in Germany Esta marca de reciclaje indica que el empaquetado se ajusta a la legislaci n de protecci n ambiental en Alemania MA1111...

Reviews: