background image

E-21

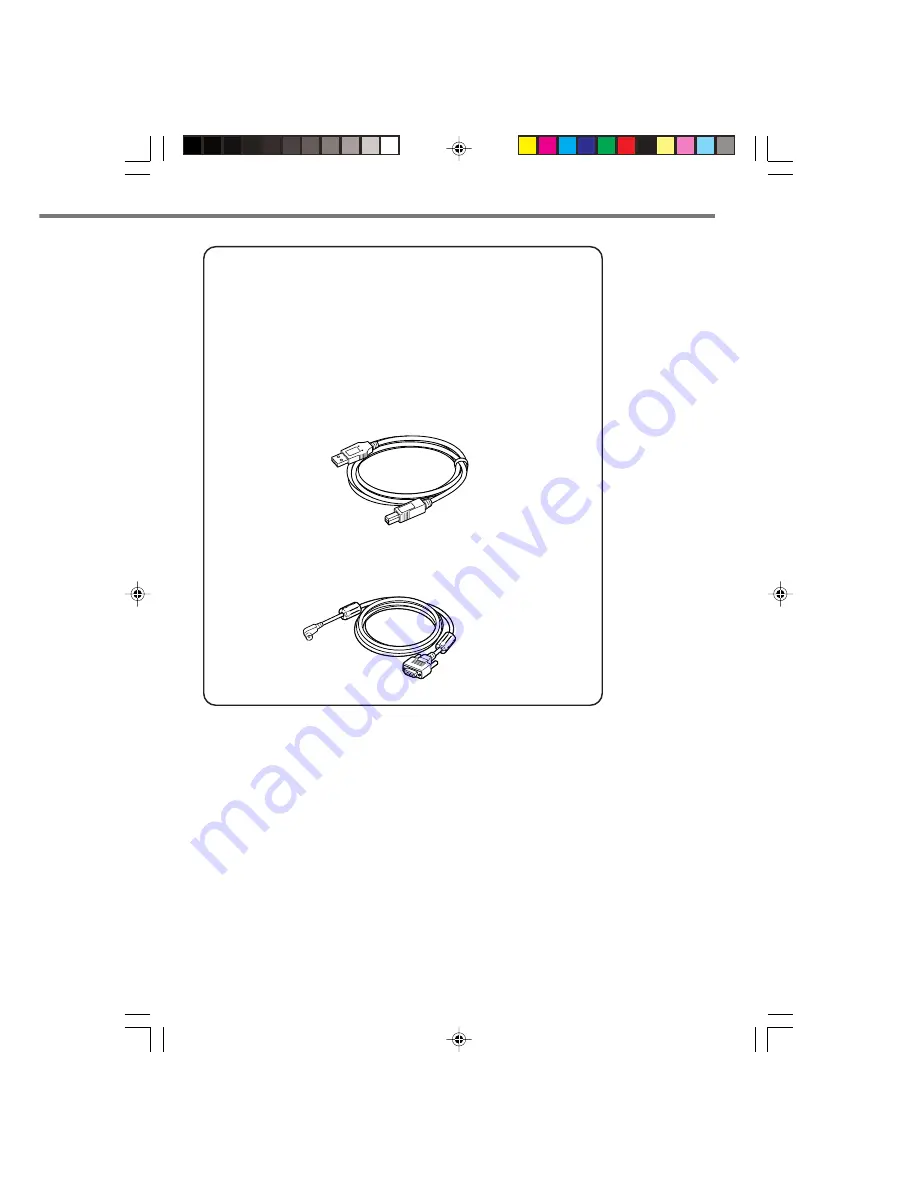
Cables

DT-882RSC

RS-232C Cross Cable for connecting Bridge Satellite
Cradle and PC

DT-883RSC

RS-232C Cross Cable for connecting Bridge Satellite
Cradle and PC

DT-887AXA

Dsub 9-Pin (Female) RS-232C Cross Cable for Bridge
Satellite Cradle

DT-888RSC

RS-422 Modular Cable for connecting Bridge Satellite
Cradle

DT-380USB

USB Cable for connecting Bridge Satellite Cradle and
PC

HA-B80AX

RS-232C Cross Cable for connecting Handheld Printer
Terminal and PC

IT-3000_E_P15_31.p65

2005.3.29, 5:55 PM

21

Summary of Contents for HA-B30CHG

Page 1: ... Series Be sure to read Safety Precautions inside this guide before trying to use your Handheld Printer Terminal After reading this guide keep it in a safe place for future reference E PN410385 005 IT 3000_E_Hyo_1_4 p65 2005 3 29 5 53 PM 3 ...

Page 2: ... Microsoft and Windows are either registered trademarks or trademarks of Microsoft Corporation in the United States and or other countries Datalight is a registered trademark of Datalight Inc FlashFXTM is a trademark of Datalight Inc Copyright 1993 2000 Datalight Inc All Rights Reserved U S Patent Office 5 860 082 Other company names and product names used in this guide are trademarks or registere...

Page 3: ...f personal injury or property damage A diagonal line indicates something you should not do The symbol shown here indicates you should not try to take the unit apart A black circle indicates something you should do The symbol shown here indicates you should unplug the unit from the wall outlet Precautions During Use Warning Disassembly and Modification Never try to disassemble or modify the Handhel...

Page 4: ... original vendor or an authorized CASIO service provider Continued use creates the danger of fire and electric shock Moisture Though your Handheld Printer Terminal is water splash resistant its Bridge Satellite Cradle and other optional peripherals are not Keep loose metal objects and containers filled with liquids away from your Handheld Printer Terminal and the optional peripherals Also never co...

Page 5: ... with flight attendant prior to the use Caution Interference with the Operation of Other Equipment Using Wireless Data Communication Function The Handheld Printer Terminal contains a built in wireless communication device of a low power data communication system The frequency band that is used is also used by microwave ovens and other industrial scientific and medical devices as well as other wire...

Page 6: ...lling which can cause personal injury LCD Screen Never apply strong pressure to the screen or subject it to strong impact Doing so can crack the screen or LCD panel glass which can cause the danger of personal injury Should the LCD panel glass break never touch the liquid inside Doing so can cause skin inflammation Should liquid from the LCD panel accidentally get into your mouth immediately wash ...

Page 7: ...xplosion and fire Never allow the positive and negative terminals of the battery pack to become connected shorted by metal Doing so creates the danger of battery pack heat emission explosion and fire Never transport or store the battery pack together with a necklace hair pins or other metal objects Doing so can short battery pack terminals creating the danger of battery pack heat emission explosio...

Page 8: ...eates the danger of explosion and fire Should fluid from the battery pack accidentally get into your eyes do not rub them Immediately rinse your eyes with clean tap water and then consult a physician immediately Caution Never use or leave the battery pack in an area exposed to direct sunlight in a car parked in direct sunlight or any other very hot area Doing so creates the danger of heat emission...

Page 9: ...rized CASIO service provider about repair or replacement Use of a damaged electrical cord creates the danger of fire and electric shock Caution Keep the power cord away from stoves and other sources of extreme heat Heat can melt the covering of the power cord and create the danger of fire and electric shock Never pull on the power cord when unplugging it Doing so can damage the cord and create the...

Page 10: ...u or any third party for any damages or loss caused by deletion or corruption of data due to use of the Handheld Printer Terminal malfunction or repair of the Handheld Printer Terminal or its peripherals or due to the batteries going dead The Handheld Printer Terminal employs electronic memory to store data which means that memory contents can be corrupted or deleted if power is interrupted due to...

Page 11: ...nction Avoid using the Handheld Printer Terminal and its options in areas subject to the following conditions The following conditions create the risk of damage to the Handheld Printer Terminal Large amounts of static electricity Extreme heat or extreme cold High humidity Sudden temperature extremes Large amounts of dust Use only the special stylus that comes with the Handheld Printer Terminal to ...

Page 12: ... if you should happen to notice any inconsistencies or errors This guide does not include any information about programming and download procedures See the applicable separate documentation for information about the procedures Warranty and After Service Should this product ever malfunction contact your original retailer providing information about the product name the date you purchased it and det...

Page 13: ...ch the receiver is connected Consult the dealer or an experienced radio TV technician for help FCC WARNING Changes or modifications not expressly approved by the party responsible for compliance could void the user s authority to operate the equipment Proper connectors must be used for connection to host computer and or peripherals in order to meet FCC emission limits Peripherals and Cables Batter...

Page 14: ...02 08 and are tested and found to conform with the essential radio test suites so that they effectively use the frequency spectrum allocated to terrestrial space radio communication and orbital resources so to as to avoid harmful interference as included in following standards Standard lssue date EN300 328V 1 4 1 2003 04 and therefore comply with the essential requirements and provisions of the Di...

Page 15: ...erminal Settings E 33 Calibrating Touch Screen Alignment E 33 Adjusting Display Contrast E 34 Adjusting Display Brightness E 34 Display Auto Dimmer E 34 Using the Printer E 35 When Using Roll Paper E 35 When Using Formed Sheet Paper E 38 Precautions When Using Printer E 42 Using the C MOS Imager E 44 Warning Label E 45 Magnetic Card Reader E 46 Performing Data Communication E 47 IR Communication E...

Page 16: ... Adaptor DT 9020ADP Specifications E 64 AC Adoptor GT 21089 0909 T3 Specifications for China only E 64 Using PC Cards E 65 Attachment of PC Card Removal Tape to a PC Card E 65 Inserting a PC Card When Using the Roll Paper Holder E 65 Inserting a PC Card When Using the Paper Holder E 67 Using SD Memory Cards E 70 Inserting an SD Memory Card E 70 Removing an SD Memory Card E 70 Connecting a Bar Code...

Page 17: ...Battery Charger or Bridge Satellite Cradle to charge the battery pack When charging the battery pack with these options first install the battery pack in the Handheld Printer Terminal For information about use of the options see pages 53 60 and 64 Handheld Printer Terminal n Handheld Printer Terminal Stylus Hand strap Battery pack Roll paper Neck strap and stylus holder PC card fixers User s Guide...

Page 18: ...T 9723LIC Push it all way to the end inside the compartment until the eject button at the front of the battery compartment comes up and sounds Make sure the battery pack is aligned correctly when you install it 4 Return the battery pack cover to its original position as shown in the illustration and then turn the battery pack cover lock switch to the LOCK position Before Getting Started IT 3000_E_...

Page 19: ...E 17 4 Hold down the power key for about one second to turn on the power Start up the application you want to run IT 3000_E_P15_31 p65 2005 3 29 5 55 PM 17 ...

Page 20: ... AC Adaptor for Bridge Satellite Cradle Cradle type Battery Charger AD S42120A Cradle type Battery Charger HA B30CHG HA B61IO Bridge Satellite Cradle Handheld PrinterTerminal System Configuration IT 3000_E_P15_31 p65 2005 3 29 5 55 PM 18 ...

Page 21: ...E 19 Battery Pack DT 9723LIC Formed Sheet Paper Holder HA B93PH Splash Protect Cover HA B92PCV Screen Protect Cover HA B90DCV IT 3000_E_P15_31 p65 2005 3 29 5 55 PM 19 ...

Page 22: ...al countries other than the US DT 9020ADP U The AC adaptor can be used in several countries including the US Bar Code Reader DT 9650BCR DT 9656BCR Handheld Priter Terminal System Configuration GT 21089 0909 T3 for China only IT 3000_E_P15_31 p65 2005 3 29 5 55 PM 20 ...

Page 23: ...ite Cradle and PC DT 887AXA Dsub 9 Pin Female RS 232C Cross Cable for Bridge Satellite Cradle DT 888RSC RS 422 Modular Cable for connecting Bridge Satellite Cradle DT 380USB USB Cable for connecting Bridge Satellite Cradle and PC HA B80AX RS 232C Cross Cable for connecting Handheld Printer Terminal and PC IT 3000_E_P15_31 p65 2005 3 29 5 55 PM 21 ...

Page 24: ... 13 14 15 16 17 18 23 19 20 18 21 22 IT 3000M53E M54E2 M55E M55U M56E M56U The C MOS Imager is only installed on the IT 3000M55E M55U M56E M56U Magnetic Card Reader is only installed on the IT 3000M54E2 M55E M55U IT 3000_E_P15_31 p65 05 4 14 11 45 AM 22 ...

Page 25: ...cording to the settings of the application software Generates audio and buzzer tones This sensor detects the brightness of the surroundings The display backlight and key backlight can be controlled automatically according to programmed settings Be careful not to inadvertently block this sensor Displays text operations indicators and so forth In addition operations can be performed and data can be ...

Page 26: ... inside For connection of a separately sold PC card Remove the cover to install a PC card Hook the hand strap here Provided for future use Terminals for supplying power from the Bridge Satellite Cradle and Cradle type Battery Charger Hook the neck strap here Magnetic cards are read by passing through this magnetic card reader Remove the cover to use Press to reset the Handheld Printer Terminal Be ...

Page 27: ...sor to the right This is also used to feed paper when pressed after pressing the Fn key when printing paper is loaded This key is pressed when inputting a hyphen or bar This key is pressed when inputting a period This key is pressed when canceling an operation and input This key is pressed when deleting the character to the left of the cursor This key is pressed when entering an input Key Function...

Page 28: ...s power required to maintain memory contents while the backup battery provides backup power to maintain memory contents Because of this you should not remove the main battery while the backup battery is dead Removing the battery pack while the backup battery is dead causes data in the memory to be corrupted or lost Note that once data is lost it cannot be recovered Always keep separate backup copi...

Page 29: ...he side of the Handheld Printer Terminal to the FREE position 3 Open the battery pack cover 4 Remove the battery pack Press down the battery pack eject button see the arrow Remove the battery pack by pulling on the tape 5 Install a charged battery pack in the Handheld Printer Terminal Make sure the battery pack is aligned correctly when you install it IT 3000_E_P15_31 p65 2005 3 29 5 55 PM 27 ...

Page 30: ...Doing so can cause data in the memory to be deleted Never try to use another type of battery than the one that is specified for this product 6 Return the battery pack cover to its original position as shown in the illustration and then turn the battery pack cover lock switch to the LOCK position Replacing the Battery IT 3000_E_P15_31 p65 2005 3 29 5 55 PM 28 ...

Page 31: ...tom of the Handheld Printer Terminal 2 Pull on the hand strap in the direction shown in the illustration and then fasten Hook A onto hook on the back of the Handheld Printer Terminal 3 Fasten the wire of Hook A by inserting into the indentation in the Handheld Printer Terminal Pull up on the center of the wire when unfastening Attaching the Hand Strap 1 1 1 The illustration shows the IT 3000M53E I...

Page 32: ...ck the locking bars of the neck strap mounting hooks and insert the hooks into the mounting brackets on the Handheld Printer Terminal Removal Procedure Pull back the locking bars of the neck strap mounting hooks to release the hooks from the mounting brackets on the Handheld Printer Terminal After removing the mounting hooks push down the neck strap mounting hooks on the Handheld Printer Terminal ...

Page 33: ... Handheld Printer Terminal In addition remove the stylus from the stylus holder Bracket A Mounting Hook C Bracket B Attach the stylus holder following the procedure described below 1 Remove the end of the strap from Bracket A and Bracket B 2 Remove Mounting Hook C 3 Pass the stylus holder through the strap as shown in the illustration IT 3000_E_P15_31 p65 05 4 14 11 02 AM 31 ...

Page 34: ... and Bracket B Do not pass the strap through the stylus holder when folding it back Place the stylus in the stylus holder after first re attaching the neck strap to the Handheld Printer Terminal Important Do not swing the Handheld Printer Terminal with the neck strap Attaching the Neck Strap IT 3000_E_P32_52 p65 05 4 14 11 03 AM 32 ...

Page 35: ...key after confirming that F is displayed in the lower right corner of the screen The following screen can also be displayed by consecutively tapping the stylus on the control panel Press the stylus against the center of the target mark mark as indicated on the screen The screen shown below appears after you press stylus against the target at five different locations Configuring Handheld PrinterTer...

Page 36: ...justs brightness for a brighter display In order to continue to make adjustments press the 5 key or 6 key after again first pressing the Fn key Brightness settings can also be made by consecutively tapping Brightness on the control panel Important If you use your Handheld Printer Terminal in a location where it is hot it automatically dims the screen to protect against damage Display Auto Dimmer T...

Page 37: ...ading apart the locks on the left and right sides to disengage them as shown in the illustration followed by opening the splash protect cover 3 Slide the lock knobs on the left and right sides of the roll paper holder as shown in the illustration to align at the FREE position and then push up the ridged portion to open Please note that the positions of the lock knobs on the left and right sides ar...

Page 38: ...pen the roll paper holder by following the procedure described in steps 1 and 3 of the procedure for Installing the Roll Paper and then remove the jammed paper Be careful not to touch the printer at this time since it may have become hot during the course of printing The printer is not protected against splashing water when the splash protect cover is closed with roll paper present outside the rol...

Page 39: ... Press the attachments of the 58 mm Paper Width Adjuster from the left and right sides as shown in the illustration 3 Insert the attachment of the 58 mm Paper Width Adjuster into the mounting holes inside the left side of the roll paper holder to lock in position Important Always make sure to attach the 58 mm Paper Width Adjuster when using 58 mm wide roll paper Failure to attach the 58 mm Paper W...

Page 40: ...2 Press the ridged portions of the splash protect cover while spreading apart the left and right locks to disengage as shown in the illustration and then open the splash protect cover 3 Slide the lock knobs on the left and right sides of the roll paper holder as shown in the illustration to align at the FREE position and then push up the ridged portion to open Please note that the positions of the...

Page 41: ...card slot cover as shown in the illustration 7 Loosen and remove the four screws shown in the illustration Store the removed screws in a safe place so that they do not become lost 8 Turn the Handheld Printer Terminal back over 9 Remove the entire roll paper holder IT 3000_E_P32_52 p65 2005 3 29 5 55 PM 39 ...

Page 42: ...l the projections reach the upper edges of the grooves of Part B and then press on Part C and Part D from the left and right sides Next push on both ends of Part A to fasten to the Handheld Printer Terminal Remove the Holder 1 Check that the power is off If the power is on always make sure to turn it off by pressing the power key 2 Remove the Paper Holder by following the reverse procedure for Att...

Page 43: ...cing downward The paper will be fed into the printer automatically and be positioned at the printing position If the formed sheet paper becomes jammed open the top cover Part A of the Paper Holder as shown in the illustration and remove the jammed paper Important Always make sure to load formed sheet paper in the printer before printing Printing without loading paper can cause the printer to malfu...

Page 44: ...his can be prevented by feeding the roll paper before starting printing again 5 The printer will not print unless the paper is loaded properly Always make sure to properly load the paper before starting printing 6 Only use the recommended printer paper Use of paper other than the recommended printer paper can reduce printing quality shorten printer service life or cause other detrimental effects t...

Page 45: ...ead must be cleaned when this happens Contact your nearest CASIO distributor or an authorized CASIO service provider to have cleaning performed 5 Printing quality may decrease when the surrounding temperature becomes excessively low 6 If once the printer is set for 58 mm width paper it cannot be changed again for 80mm width paper 7 Load paper in the printer when not using for a long period of time...

Page 46: ...oblem not properly reading a code change the angle and or the distance between the code and the Handheld Printer Terminal and try reading it again A bar code can be read from a distance of 40mm to 410mm 19 16 to 161 8 and a stacked 2D code can be read from a distance of 50mm to 250mm 115 15 15 15 15 16 16 16 16 16 to 913 13 13 13 13 16 16 16 16 16 and matrix 2D code can be read from a distance of ...

Page 47: ...lt in hazardous radiation exposure The laser light emitted by the C MOS Imager has a maximum output of less than 1 mW and a wavelength of 650 nm Warning Never look directly into the laser light This product scans using laser light Never look directly into the laser light or shine the laser light into the eyes Laser light is emitted from this port IT 3000M55U M56U IT 3000M55E M56E IT 3000_E_P32_52 ...

Page 48: ...proximity to the magnetic card since this can prevent data on the card from being read In addition do not stack magnetic cards on top of each other Cards that have been excessively misshaped or bent may not be able to be read Soiling of the magnetic strip may make it difficult to read the card If a card has become soiled wipe with a clean soft cloth Regularly clean the magnetic card reader by pass...

Page 49: ...es or other devices that emit radio wave in the area where you are performing IR communication If you need to use such a device move away from the communicating Handheld Printer Terminals In case of a cellular phone keep it at least 30cm 117 7 7 7 7 8 8 8 8 8 away RS 232C Communication IT 3000M53E IT 3000M54E2 only You can also transfer data directly between the Handheld Printer Terminal and your ...

Page 50: ...proaching such a device with its power is turned on proper data communication may prove impossible while this may also cause interference with TV and radio reception images produced by certain UHF and broadcast satellite channels may become blurry Normal data communication may not be possible in an area near a broadcast transmitter or wireless transmitter If this happens move to a different locati...

Page 51: ...erminal This starts the reset operation If reset does not find a memory problem The Handheld Printer Terminal restarts and normal operation is restored If reset finds a memory problem A message like the one shown below appears on the display when the reset operation discovers a memory problem When this message appears press the program key R to continue with the reset operation Note however that r...

Page 52: ...etes all data currently stored in the memory RAM If possible backup data of the Handheld Printer Terminal to a computer Flash Memory a memory card or some other medium before performing a full reset 1 The message shown below appears on the display when the reset switch is pressed for about 1 second with the stylus while simultaneously pressing the power key and cancel key To cancel the full reset ...

Page 53: ... Within approximately 60 mm to 150 mm 23 8 to 515 16 3 IR Communication Interface Compatible with IrDA Ver 1 1 Synchronization Start stop synchronous frame synchronization Transfer Rate Up to 4 Mbps max 4 Serial Interface IT 3000M53E M54E2 Interface 8 pin Synchronization Start stop synchronous Transfer Rate 300 bps to 115 2 Kbps 5 14 pin Serial Interface Interface 14 pin Synchronization Start stop...

Page 54: ...weeks without main battery Power Consumption DC 4 5 A 7 4 10 V 11 Operating Environment Temperature 20 to 50 C 5 35 C when printing on 2 ply paper or labels Humidity 10 80 RH no condensation 12 Dimensions and Weight Dimensions IT 3000M53E Approx 80 108 W 265 D 28 68 H mm 31 8 41 4 W 107 16 D 11 8 211 16 H IT 3000M54E2 Approx 80 108 W 295 D 28 68 H mm 31 8 41 4 W 115 8 D 11 8 211 16 H IT 3000M55E M...

Page 55: ...data and file data between the Handheld Printer Terminal and a computer using an RS 232C interface or USB interface You can also use the Bridge Satellite Cradle to charge the battery pack installed on the Handheld Printer Terminal General Guide Using the Bridge Satellite Cradle HA B61IO IT 3000_E_P53_81 p65 2005 3 29 5 56 PM 53 ...

Page 56: ... Handheld Printer Terminal Off Power off Green Power on Handheld Printer Terminal mounted correctly Red Power on Handheld Printer Terminal not mounted These switches detect when the Handheld Printer Terminal is seated correctly on the Bridge Satellite Cradle This port transfers data with the Handheld Printer Terminal IR port by non contact data communication Power is supplied to the Handheld Print...

Page 57: ...ptor into the AC adaptor jack on the back 2 Next after connecting the power cable to the AC Adaptor plug the AC adaptor into a power outlet 3 After making sure that the Bridge Satellite Cradle and your computer are both turned off connect the RS 232C interface or USB interface after removing the respective cap on the back of the Bridge Satellite Cradle to your computer with an RS 232C Cross Cable ...

Page 58: ...alled when charging Important A high sensitivity communication element is used during IR data communication In order to ensure successful communication avoid using cellular phones or other devices that emit radio waves in the area where you are performing IR data communication If you need to use such a device move it away from the communicating Handheld Printer Terminals In case of a cellular phon...

Page 59: ...ays off Host Computer Interface Setting RS 232C USB 6 OFF ON Setting Intermediate Unit Daisy Chain Disabled Termination 5 OFF ON Setting Host Computer Daisy Chain 3 OFF ON 4 OFF OFF Daisy Chain Connection Type Setting 115 200bps Initial factory setting 1 ON 2 OFF Bridge Satellite Cradle Data Rate Important Note that other DIP settings are used for testing and inspection purposes Because of this yo...

Page 60: ...to C IN of the next Bridge Satellite Cradle you want to connect Important You can use the optional RS 422 modular cables DT 888RSC to link up to eight Bridge Satellite Cradles Using the Bridge Satellite Cradle HA B61IO RS 422 modular cables DT 888RSC RS 232C cable or USB cable To host computer IT 3000_E_P53_81 p65 2005 3 29 5 56 PM 58 ...

Page 61: ...t stop synchronous Transfer Rate 115 200bps 5 Charging Charging System Fixed voltage with current limiter Charge Time Approximately 8 0 hours 6 Power Supply Power Requirement AC adaptor AD S42120A Power Consumption DC12V approximately 2 200mA Output to Handheld Printer Terminal DC10V 1 800mA max The printer cannot be operated with this power supply alone 7 AC Adaptor Model AD S42120A Input 100V to...

Page 62: ...A B30CHG lets you charge the Handheld Printer Terminal s battery simply by placing the Handheld Printer Terminal onto the charger General Guide Top Front Bottom Right Back Using the Cradle type Battery Charger HA B30CHG IT 3000_E_P53_81 p65 2005 3 29 5 56 PM 60 ...

Page 63: ... Terminal Off Power off Red Power on Handheld Printer Terminal not mounted Green Power on Handheld Printer Terminal mounted correctly These switches detect when the Handled Printer Terminal is seated correctly on the Cradle Power is supplied to the Handheld Printer Terminal via these contacts Turns the power on and off Connect the AC adaptor here IT 3000_E_P53_81 p65 2005 3 29 5 56 PM 61 ...

Page 64: ...ht green When charging is initiated Indicator 1 left side on the Handheld Printer Terminal lights red When charging has been completed it changes the color from red to green The indicator may light even if the battery pack is not installed Make sure that the battery pack is installed in the Handheld Printer Terminal when charging Important Take care to avoid allowing the Cradle type Battery Charge...

Page 65: ...approximately 2 100mA Output to Handheld Printer Terminal 10V DC 1 800mA max 3 AC Adaptor Model AD S42120A Input 100V to 240V AC 50 60Hz Output 12V DC 3 500mA 4 Dimensions and Weight Dimensions Desktop Approximately 130 W X 206 D X 104 H mm 51 8 W 81 8 D 41 8 H Weight Approximately 630g 22 22oz 5 Operating Environment Temperature 0 C to 40 C 32 F to 104 F Humidity 30 to 80 RH non condensation IT 3...

Page 66: ...ting the AC Adaptor When the battery pack has been reinstalled with the battery charger still plugged into the Handheld Printer Terminal always make sure to first unplug the battery charger and then plug it in again AC Adaptor DT 9020ADP Specifications 1 Charging Specifications Charging Method Constant voltage constant current charging internal charging circuit Charging Time Approximately 8 hours ...

Page 67: ...he PC Card Adapter always make sure to attach the PC card removal tape to the PC Card Adapter If the PC card removal tape is mistakenly attached to the CF card and so forth only the CF card will come out when the PC Card Adapter is attempted to be removed preventing the PC Card Adapter from being able to be removed Inserting a PC Card When Using the Roll Paper Holder 1 Check that the power is off ...

Page 68: ...so that it does not get caught in the way when closing the cover 6 Attach the PC Card Holder to lock the end of the PC card and prevent it from coming out due to impacts and so forth Decide on the type of PC Card Holder Fixer three types are available and the orientation and attachment position of the holder according to the location of the end of the PC card 7 Close the cover PC card slot cover a...

Page 69: ...e Paper Holder before beginning work 1 Check that the power is off If the power is on always make sure to turn it off by pressing the power key 2 Spread apart both ends of Part A of the Paper Holder and remove it from the Handheld Printer Terminal and then remove Part C and Part D Remove Part C and Part D using an ordinary screwdriver as shown in the illustration Part B Part D Part C Part A Screws...

Page 70: ...the way when reattaching the Paper Holder 5 Attach the PC card cushion to Part B of the Paper Holder to immobilize the end of the PC card and prevent it from being dislodged by an impact and so forth Select the type of cushion three types are provided according to the location of the end of the PC card Position the cushion as shown in the illustration Insert all the way in to the center of Part B ...

Page 71: ...rt D from the left and right sides Next push on both ends of Part A to fasten to the Handheld Printer Terminal When Removing the PC card Press the eject button on the left side of the PC card slot with the stylus and then pull out the PC card while grabbing onto the end of the PC card removal tape The illustration shows the Handheld Printer Terminal turned over 1 1 2 3 3 1 2 3 IT 3000_E_P53_81 p65...

Page 72: ...D memory card all the way in until the top of the SD memory card aligns with the entrance of the slot of the Handheld Printer Terminal 3 Close the cover of the SD memory card slot Removing an SD Memory Card 1 Check that the power is off If the power is on always make sure to turn it off by pressing the power key 2 Open the cover of the SD memory card slot and press on the SD memory card The SD mem...

Page 73: ...er 1 Check that the power is off If the power is on always make sure to turn it off by pressing the power key Open the cover of the RS 232C interface connector 2 Insert the plug of the bar code reader into the connector as shown in the illustration Disconnecting bar code reader Turn off the power of the Handheld Printer Terminal Unplug the bar code reader 1 2 Connecting a Bar Code Reader IT 3000M5...

Page 74: ...anning angle at scanning resolution of 0 19 mm PCS value 0 85 How to hold the bar code reader Effective angle Angle up to 45 degrees Angle up to 45 degrees 2 Bar code scanning position Margin Correct Correct Correct Wrong Wrong Wrong Margin Start Stop IT 3000_E_P53_81 p65 2005 3 29 5 56 PM 72 ...

Page 75: ...ward backward inclined reading window α 1α 0 10 front part is inclined forward 2α 0 30 back part is inclined backward h 0 β 0 R The angle of inclination to the right left β β 0 10 h 0 α 0 R Curve R R 25 mm and above at scannning resolution 0 33 mm PCS value 0 45 h 5 mm α 0 β 0 h α β R are commonly defined Position of bar code must be in the center of the reading window IT 3000_E_P53_81 p65 2005 3 ...

Page 76: ...E 74 Connecting a Bar Code Reader 2 Bar code scanning angle Margin Correct Correct Correct Wrong Wrong Wrong Wrong Margin IT 3000_E_P53_81 p65 2005 3 29 5 56 PM 74 ...

Page 77: ...tely 85 g 3 0 oz including cable DT 9656BCR Readable Symbologies WPC JAN EAN UPC NW 7 CODE 39 93 128 ITF MSI Plessey IATA Cable Length Approximately 60 cm extended Resolution 0 127 mm min PCS value 0 9 min Non contact Distance 0 to 20 mm Read Angle Forward 10 degrees Back 30 degrees Left Right 10 degrees Rotating 10 degrees Curved R 25 mm min with resolution of 0 33 mm Read Width 60 mm Operating T...

Page 78: ...ld Printer Terminal Store the screws in a safe place after they have been removed 2 Fasten the Screen Protect Cover with the two screws provided with the Screen Protect Cover 3 Close the Screen Protect Cover and fasten by pressing on the cover hook at the right side 4 Lift up on the cover hook when opening the cover Attaching the Screen Protect Cover IT 3000_E_P53_81 p65 2005 3 29 5 56 PM 76 ...

Page 79: ...n to align at the FREE position and then push up the ridged portion to open Please note that the positions of the lock knobs on the left and right sides are different 3 Spread apart the bearing supports of the paper outlet cover towards the left and right directions and remove 4 Attach the inner cover as shown in the illustration First insert a tab on one side of the roll paper holder into one of ...

Page 80: ...m of the inner cover is at the position shown in the illustration Furthermore the transparent film may shift from the position shown in the illustration when the roll paper is torn off Check the position of the transparent film after roll paper has been torn off Check that the tabs on the inside of the Splash Protect Cover located on the left and right sides have entered the indentations on the le...

Page 81: ...mical decomposition by the battery pack itself If the battery pack fails to hold its operating duration after it has been fully charged replace it with a new one The battery pack may reach the end of its service life Battery Pack Specifications Model DT 9723LIC Nominal Capacity 2200mAh Nominal Voltage 7 4V Dimensions 39 W 71 D 21 H mm 19 16 W 213 16 D 5 16 H Weight Approximately 110 g 3 88oz Acces...

Page 82: ...E 80 Memo IT 3000_E_P53_81 p65 2005 3 29 5 56 PM 80 ...

Page 83: ...E 81 IT 3000_E_P53_81 p65 2005 3 29 5 56 PM 81 ...

Reviews: