background image

CLEANING 

For ALL cleaning procedures, turn the main power switch OFF and unplug 
the cabinet to before cleaning.  DO NOT spray or splash water on the elec-
trical components, tablet, control panel, or wiring. Cleaning should be per-
formed when cabinet is cool and empty.


1. Clean the interior and exterior with a clean, moist soapy towel.  Rinse with 

clean damp towel. Do not use steel wool or scouring pads. 

2. To clean stainless steel surfaces use only cleansers, detergents, degreasers, 

or sanitizers that are certified to be "chloride-free" and "phosphate-free," and 
cleansers, degreasers, or sanitizers only in the recommended concentra-
tions*.  

DO NOT 

exceed recommended concentrations or mixing ratios.  After 

cleaning and sanitizing, rinse all exposed surfaces thoroughly with large 
amounts of clean, clear water. Wipe off any standing liquid or residue from all 
surfaces, corners and rear edges.  

3. To clean windows, use a window cleaner or damp soapy towel.  Rinse with 

clean moist towel.  Use only soft towels. Do not use scouring pads, steel wool 
or any other towel that could scratch the polycarbonate windows.  Damage 
caused by rough towels is permanent. 

4. Vinyl trim should be washed with a chlorine-free detergent and water.  Rinse 

thoroughly  with clear water and allow to dry.  Never use abrasive cleaners, 
waxes, car polish, or substances containing strong aromatic solvents or alco-
hol.  Use of 

direct steam / hot water 

cleaning at temperatures above 

190

°

may result in “bubbling” or loosening of vinyl  adhesive. 

*IMPORTANT: 

Cleansers, detergents, degreasers, sanitizers or bleaching agents that contain 

chlorides or phosphates will 

cause permanent damage 

to stainless steel products.  This damage appears as pits, eruptions, voids, small holes, cracks, 

severe discolorations or dulling of the metal finish.  Water with a high chlorine content  can also damage stainless steel.  If unsure 
of your water quality, we recommend you have it tested

.  THIS DAMAGE IS PERMANENT, COSTLY TO REPAIR, AND IS NOT 

COVERED BY WARRANTY.  

WARNING: ELECTRIC 
SHOCK HAZARD 


Unplug the unit from 


electric 

power 

before    

performing cleaning or maintenance. 


WARNING: ELECTRIC 
SHOCK HAZARD 

DO NOT spray or splash 
water on the control panel 

or wiring. 

CAUTION:  CABINET 
DAMAGE 

Do not tip cabinet to 
drain excess water. Per-

manent damage to the cabinet will 
result.  This is also dangerous and 
may cause personal injury. Use a 
clean dry cloth to mop any excess 
water inside cabinet after cleaning. 

16 

Routine cleaning on a regular basis is vital to the proper operation and 
overall performance of your cabinet.  Follow these procedures to keep 
your cabinet sanitary and running at peak performance.


CAUTION! Hot Surface! 

Allow cabinet to cool com-
pletely prior to cleaning. 

WARNING: 

Risk of personal injury 

Caution must be taken 
when using, cleaning and 

servicing the appliance.  Liquids may 
spill creating a slip hazard on the floor.  

Summary of Contents for PUCA-14SAO

Page 1: ...ece of equip ment Turn OFF the unit anytime the cabinet is not in use If an electrical shock is felt when touching the cabinet dis connect the power immediately and call Carter Hoffmann Technical Serv...

Page 2: ...vice this appliance 9 DO NOT cover or block any openings on the appliance These appliances are intended to be used for commercial applications for example in kitchens of restau rants canteens hospital...

Page 3: ...an order code for notification They feature a capacitive touchscreen with scanner for order loading and pick up They can be stand alone for manual order entry or can be integrated with POS software f...

Page 4: ...nnected via Ethernet or WI FI to generate an order code for notification They feature a capacitive touchscreen with scanner for order loading and pick up They can be stand alone for manual order entry...

Page 5: ...ning can result in electrical shock Disconnect this appliance from electrical power before performing any maintenance or servicing WARNING Injury Hazard All installation procedures must be performed b...

Page 6: ...liarize yourself with the appliance controls Read entire manual before operating this cabinet 1 2 3 4 Figure 1 1 Location of bracket screws Floor mount units are shipped with anti slip brackets to aff...

Page 7: ...net by consulting the serial tag on the cabinet for the model number and electrical rating DO NOT MODIFY CORD PLUG NETWORK CONNECTION 1 Plug network connection into the Ethernet jack located at the re...

Page 8: ...the black ON OFF switch located at the top rear of the cabinet on the control side The cabinet will turn on and boot up to the home screen on the tablet 1 3 2 NOTE If there are add on cabinets plug in...

Page 9: ...hen press NETWORK START UP CONNECTING WIFI continued Enter the password for your preferred WiFi network 9 On the ORDER MANAGEMENT screen press the gear symbol Select your preferred WiFi network 4 5 6...

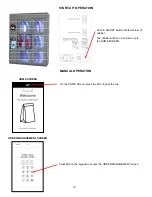
Page 10: ...CREEN Push in ON OFF switch located at rear of cabinet The cabinet will turn on and boot up to the HOME SCREEN On the HOME Screen press the PUC logo at the top Press 008 on the keypad to access the OR...

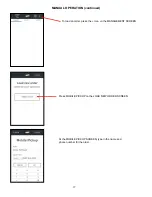
Page 11: ...UAL OPERATION continued To load an order press the icon on the MANAGEMENT SCREEN Press MOBILE PICKUP on the LOAD NEW ORDER SCREEN At the MOBILE PICKUP SCREEN type in the name and phone number for the...

Page 12: ...ll not allow you to move past this screen if the order is not loaded or if it is placed in the incorrect locker On front loading cabinets close the door s after loading The cabinet will revert to the...

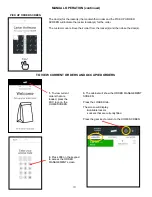
Page 13: ...e the locker location s for the order The customer can retrieve their order from the locker s and then close the door s TO VIEW CURRENT ORDERS AND OCCUPIED ORDERS 2 Press 008 on the keypad to access t...

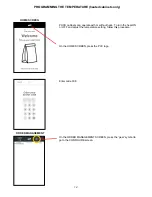
Page 14: ...ess the PUC logo HOME SCREEN On the ORDER MANAGEMENT SCREEN press the gear symbol to go to the CONFIGURE screen ORDER MANAGEMENT PUCH cabinets can operate with or without heat To turn the heat ON or O...

Page 15: ...re setting function will appear To adjust the temperature setting Press the UP arrow to increase the temperature Press the DOWN arrow to decrease the temperature The temperature setting appears on the...

Page 16: ...ing strong aromatic solvents or alco hol Use of direct steam hot water cleaning at temperatures above 190 F may result in bubbling or loosening of vinyl adhesive IMPORTANT Cleansers detergents degreas...

Page 17: ...accordance with the procedures described in the Operation Manual 6 Carter Hoffmann is NOT responsible for any loss of the customer s income loss of food product extra labor charges or any other incide...

Page 18: ...s under this warranty will be performed unless otherwise authorized in writing by CARTER HOFFMANN at its factory All parts or components to be repaired or replaced under this warranty are to be shippe...

Reviews: