


8–11
62-11785
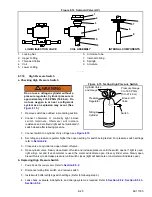
4. Connect a cylinder of dry nitrogen. Use the nitrogen to increase the compressor pressure 20 to 150 psig (1.4 to
10.2 bar) to detect the leak. The larger the leak the less pressure is required. The smaller the leak, the greater
pressure required.
5. The recommended procedure for finding leaks from a compressor connection is with an electronic leak detector.
Checking joints with soapsuds is satisfactory only for locating large leaks, or pinpointing small leaks once a
general area has been located.
6. Once leak checking is complete, remove the refrigerant/nitrogen vapor from the compressor.
7. If no leaks are found the compressor is ready for evacuation. (Skip to Step 10.)
8. If any leaks are found they must be repaired before proceeding.
9. Repeat steps 4 - 9 as necessary.
10. Disconnect the nitrogen cylinder. Evacuate the compressor after all leaks are repaired. (Refer to
.)
8.5.4
Evacuation And Dehydration
Moisture is detrimental to refrigerant systems. The presence of moisture in a refrigeration system can have many
undesirable effects such as: copper plating, acid sludge formation, “freeze-up” of the expansion valve, and
formation of acids, resulting in metal corrosion. Proper evacuation of the system will remove any moisture from
inside the system.
NOTES
• Essential tools to properly evacuate any system include a good vacuum pump (5 cfm/8m
3
H volume dis-
placement, Carrier Transicold P/N 07-00176-11) and a good vacuum indicator such as a digital vacuum
gauge (micrometer). Carrier Transicold P/N 07-00414-00.
• The use of a compound gauge is not recommended for use in determining when the evacuation process is
completed because of its inherent inaccuracy.
• Standard service hoses are not recommended for evacuation purposes. Evacuation hoses are recom-
mended for this procedure.
a. Evacuation of the Complete System
1. Evacuate only after leak check. (Refer to
.)
2. If possible keep the temperature of the major components (condenser, evaporator, compressor and receiver)
above 60°F (15.6°C) to speed evaporation of moisture. If the temperature is lower than 60°F (15.6°C), ice might
form before moisture removal is complete. Heat lamps, heat guns or alternate sources of heat may be used to
raise temperature.
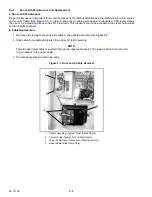
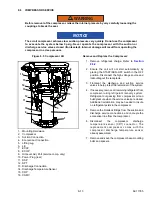
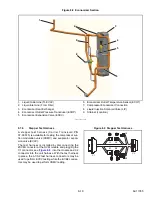
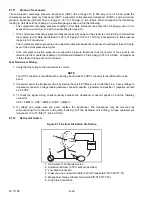
3. The recommended method to evacuate the system is to connect three evacuation hoses with vacuum pump and
vacuum indicator (see
4. Ensure that the operator message panel displays “RECOVER/LEAK CHK/EVAC MODE” during the evacuation
and dehydration procedures. (Refer to
.) If the control system switches to Charge Mode during the
process, switch it back to the “RECOVER/LEAK CHK/EVAC MODE”.
5. Backseat (turn counter-clockwise) the liquid line service valve, suction service and discharge service valves.
6. With the unit service valves closed (back seated) and the vacuum pump and vacuum indicator valves open,
start the pump and draw a deep vacuum. Shut off the pump and check to see if the vacuum holds. This
operation is to test the evacuation setup for leaks. Repair if necessary.
7. Midseat the refrigerant system service valves and install the service valve caps. Ensure that the operator
message panel displays “RECOVER/LEAK CHK/ EVAC MODE”.
NOTE
The service valve caps help minimize leakage through valve stems during midseat operation.
8. Start the vacuum pump. Evacuate unit until the vacuum indicator indicates 2000 microns. Close the vacuum
pump valve and shut off the pump. Wait a few minutes to ensure the vacuum holds.
9. Break the vacuum with dry nitrogen through the discharge service valve. Raise system pressure to
approximately 2 psig (0.1 bar). Ensure that the control system does not switch to the Charge Mode. If this
occurs, switch it back to the “RECOVER/LEAK CHK/EVAC MODE” (Refer to
Summary of Contents for VECTOR 8100
Page 2: ......
Page 4: ......
Page 12: ...62 11785 viii ...
Page 16: ...62 11640 12 ...
Page 18: ...62 11785 ...
Page 24: ...62 11785 1 6 1 3 SAFETY DECALS ...
Page 25: ...1 7 62 11785 ...
Page 26: ...62 11785 1 8 ...
Page 27: ...1 9 62 11785 ...
Page 28: ...62 11785 1 10 ...
Page 30: ...62 11785 ...
Page 50: ...62 11785 ...
Page 82: ...62 11785 ...
Page 96: ...62 11785 4 14 ...
Page 98: ...62 11785 ...
Page 129: ...5 31 62 11785 ...
Page 130: ...62 11785 5 32 ...
Page 134: ...62 11785 6 4 ...
Page 138: ...62 11785 ...
Page 230: ...62 11785 ...
Page 271: ...8 41 62 11785 ...
Page 272: ...62 11785 8 42 ...
Page 274: ...62 11785 ...
Page 286: ......
Page 287: ......
Page 288: ...62 11785 10 8 ...
Page 292: ......
Page 293: ......