background image

10

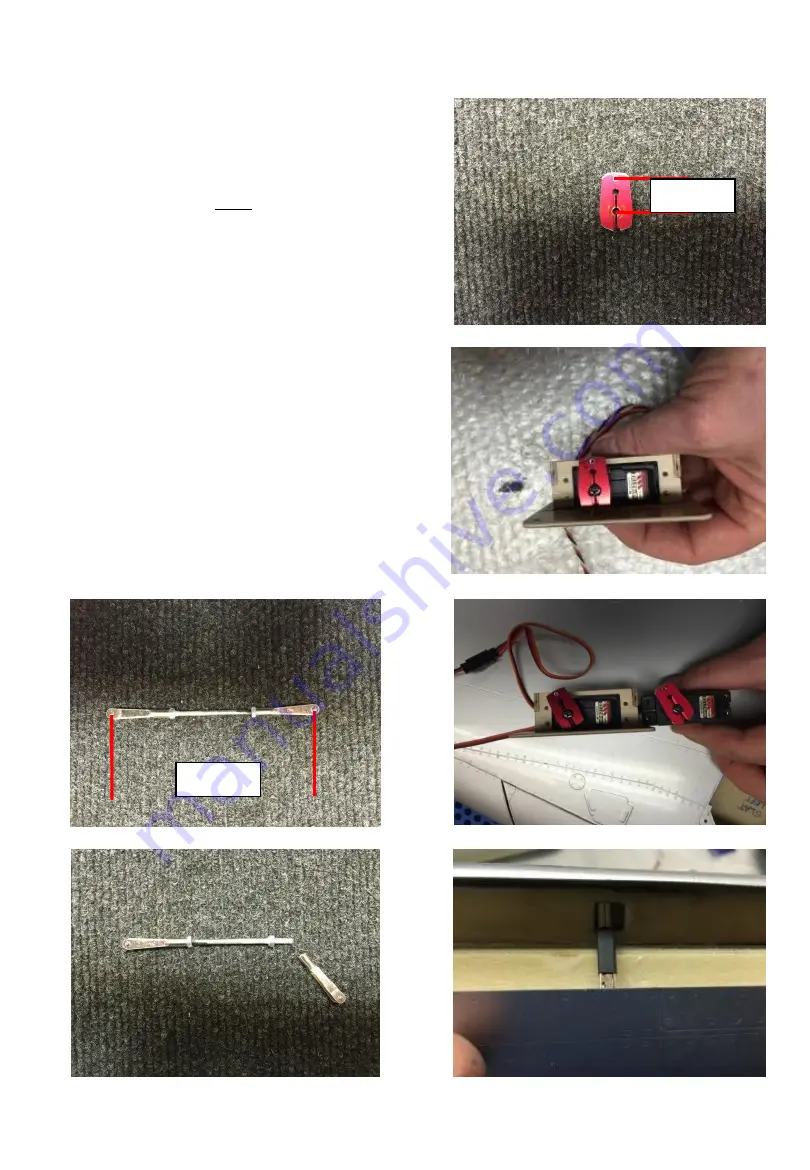
Prepare the servo horns for both slat 
servos with a length of 14mm. 

Mount the servo horns with a servo 
tester right-angled. Then rotate both 
servos in this position (slat – in). 

Adjust the linkage for the outer servo to 
approx. 92mm. Glue 1 of the 2 counter 
nuts to the rod. Then remove the clevis 
of that side. 

Clip the removed clevis to the slat horn.

14mm

92mm

Slat servo installation

Summary of Contents for Sukhoi SU-27

Page 1: ...1 Instruction Manual V 1 2 Sukhoi SU 27 30...

Page 2: ...e or cost which are incurred due to the incompetent or incorrect application and operation of our products or which are connected with such operation in any way Unless otherwise prescribed by binding...

Page 3: ...e the transmitter antenna retracted or in case of 2 4GHz depress the range check button and check the distance you can walk before FAILSAVE occurs Then start the engines run at about half a throttle a...

Page 4: ...ide foam sandwich It is only necessary to rough up the surface with 120grit and wipe of any dust with acetone or de natured alcohol before gluing to make a perfect joint Of course you should always pr...

Page 5: ...s with at least 6 kg Sav x 0211MG MKS 6625 or similar 3 1 x Pneumatic pack for speed brake 130650 4 1 x Cockpit 360104 5 1 x Tank set 360106 6 1 x Retract set for SU27 360500 or Su30 360510 7 1 x Whee...

Page 6: ...asured at the leading edge of the taileron Aileron up 40mm measured at the leading edge of the taileron Aileron down 45mm measured at the leading edge of the taileron Rudder left right 30mm measured a...

Page 7: ...al information The fuselage and the wings are made of total area sandwich technology TAVS and are reinforced with carbon in the highly stressed areas Carbon reinforced gear formers are installed and a...

Page 8: ...8 Included hardware Fin Pack Fuselage Pack Gear door Pack Taileron Pack Wing Pack Accessories...

Page 9: ...side of the servo cover Then copy the mark to the inside of the servo cover Glue the servo mount with temporarily installed servo in correct and centered position Important After removal of the servo...

Page 10: ...ns with a servo tester right angled Then rotate both servos in this position slat in Adjust the linkage for the outer servo to approx 92mm Glue 1 of the 2 counter nuts to the rod Then remove the clevi...

Page 11: ...again remove the servo horn connect it to the clevis and then permanently install the servo horn right angled Tighten the center screw with Loctite Install the wiring for the Slat servo through the wi...

Page 12: ...all the removed clevis to the inner horn of the slat Mount the servo in the wing and install the linkage analog to the outer slat servo Now it is important to match both servo connection extreme exact...

Page 13: ...position of the linkage on the outside of the servo cover carry over to the inside glue the servo mount with temporarily installed flap servo to the correct position and reinforce with epoxy and fibe...

Page 14: ...center position servo tester Grind the corners of the servo mount for easier installation Grind the lip cover as shown on the photo for easier installation of the clevis Note Only grind away as much...

Page 15: ...etrical way to do it Connect the clevis with the flap horn Then close the cover with 4 sheet metal screws Please note The first kits manufactured in 2015 had the flap control horn installed too deep i...

Page 16: ...s out Glue the wooden framework into the fin Check your marks Install the servo horn 15 mm and center it with a servo tester Use a little Loctite for the center screw Make sure it is strong enough to...

Page 17: ...h 4 sheet metal screws and install the linkage If necessary enlarge the slot in the servo hatch so that the servo can move freely its full throw without binding 10 mm low profile servo Please note Onl...

Page 18: ...below into the fuselage in the center of the tube positions These will act as vent holes see picture above Grind both carbon rods in the gluing area Insert the carbon rods into the fins and bolt them...

Page 19: ...extremely exact Either with your transmitter or even better with a matching device like PowerBox JR Match Box or Futaba MSA10 Note The neutral position of the elevator servo arms is 15 degree forward...

Page 20: ...must stay on the servo arm while inserting and installing this front servo Through the access hatch clip the clevis of the connection rod into the corresponding hole of the rear servo using a screwdri...

Page 21: ...eron by clipping the large aluminium with steel pin on to the phenolic control horn The taileron must be moved to full down position in order to access the control horn and the clevis If you followed...

Page 22: ...the into each nozzle Right and left former should be at approx the same position measure around the distance and align accordingly Install the nozzles and insert the trust pipes Align so that you hav...

Page 23: ...everything and mark the end of the funnel and the hole positions to the wood construction Use a sharp and red glowing 3mm rod to drill resp burn the holes on the outer side of the fuselage Use 3mm sc...

Page 24: ...een rear edge of the engine s exit nozzle and the front edge of the stainless steel thrust tube At the engine sizes commonly used for this aircraft 20 25 mm is a good starting point With this informat...

Page 25: ...picture Make the internal tubing like the picture Check the tubes position of the smashing and the clunck Both fuel tanks are made especially for the SU and fit perfectly into the fuselage Fueltank Ho...

Page 26: ...anks Push both tanks towards the wing tube Prepare the aluminium bracket as shown on the photo and the wood with the drive in nut It will be easier if you double it up to 6mm thickness Close the hole...

Page 27: ...olts are removed you can remove the fuel tanks Now you should fill the glue joint of the wood to the fuselage bottom and also take a patch of fiberglass cloth and reinforce the joint between the alumi...

Page 28: ...that time also think about placement of the ECU and the receiver It is easy to open a large access hole in the area where the intake attaches to and then place ECU and receiver with a distance of appr...

Page 29: ...fly bys It is the easiest solution to mount the pneumatic cylinder of the speed brake door right on to the tanks The distance A is 36cm at the maximum opening angle The distance B is 26cm and the posi...

Page 30: ...led pneumatic cylinder in its extended position The installed pneumatic cylinder in its retracted position Cut a rectangular hole in the cover of the speed brake opening for the pneumatic cylinder lik...

Page 31: ...function or looks Once you are satisfied with the movement and alignment drill the other 4 holes with a battery drill Then remove the gear drill the remaining 2 holes enlarge all holes to 5 mm for the...

Page 32: ...the alignment is acceptable Important Have a sharp view from the front and from the side to make sure that the struts are symmetrical when extended if the gear is not aligned 100 use very small thin...

Page 33: ...of washers packed between brake and strut and the correct length of the anti rotation grub screw A B C E D Note If it appears that you need to grind down some areas of the gear formers and you really...

Page 34: ...the plastic ball link needs to be shortened 3mm before assembly Connect the ball links with the M2 bolts and nuts to the control horns as shown on the photos Fully extend all cylinders and glue all c...

Page 35: ...rs into the main retract loop and have the front main gear door together with the nose gear door put on a time delayed separate circuit Either use separate channels and a gear door sequencer or progra...

Page 36: ...is a basic cockpit kit which can be enhanced individually if required All parts are hand laminated composite parts 2 trays 2 dash boards with covers and 2 seats Several die cast plastic parts complet...

Page 37: ...o 130mm Trial fit the cockpit tub into the fuselage and mark the position where the tube contacts the fuselage Install a support from scrap balsa pieces as shown Place the longitudinal stops so that t...

Page 38: ...o on it The rear cockpit tube is overlapping the front cockpit tub See the top view on both cockpit tubs on the right Cut the instrument holder like shown here Glue a scrap light ply piece to the inst...

Page 39: ...the front dash board cover like shown on the above photo Glue the panel into the cover and cut the instrument panel like shown on the right Before you glue the front dash board cover into the fuselage...

Page 40: ...opper installed Place the seats like the measures from cockpit overview page Cockpit front Cockpit rear Feel free to add details as you wish then paint the cockpit Finally cut out and apply the instru...

Page 41: ...Then glue the canopy permanently with Canopy Glue or silicon or any other method you normally use to glue in clear canopies There are plenty of methods If you use CA glue use only very little and do...

Page 42: ...s 1 big pitot tub only See next page how you can install them removable There are two versions of the infrared camera The SU 27 has it mounted in the center in front of the wind screen The SU 30 has i...

Page 43: ...d use any kind of electrical connector which is usually spring loaded such as single pin gold connectors This allows a very fast removal of the antenna but might be a little more difficult to create i...

Page 44: ...44 Thank you Your CARF Models Team...

Reviews: