Captaris RightFax 2.5 Manual Download Page 25

Chapter 3

Advanced Configuration Settings in the Sharp DataFlow

25

In the 

Value

 field, select 

Email a notification back to the 

sender

 if you want a transmission status message to be 

automatically e-mailed to the sender each time a document is 
sent. If you do not want a status message to be e-mailed to the 
sender, select 

Do not email the sender

. Click 

OK

 to return to 

the 

Sharp Module Configuration

 dialog box. The remaining 

configuration options discussed in this section are required only 
if you selected the option to send notifications via e-mail.

12.

Select 

EmailServer

 and click 

Edit

. This opens the 

Editing 

Macro EmailServer

 dialog box.

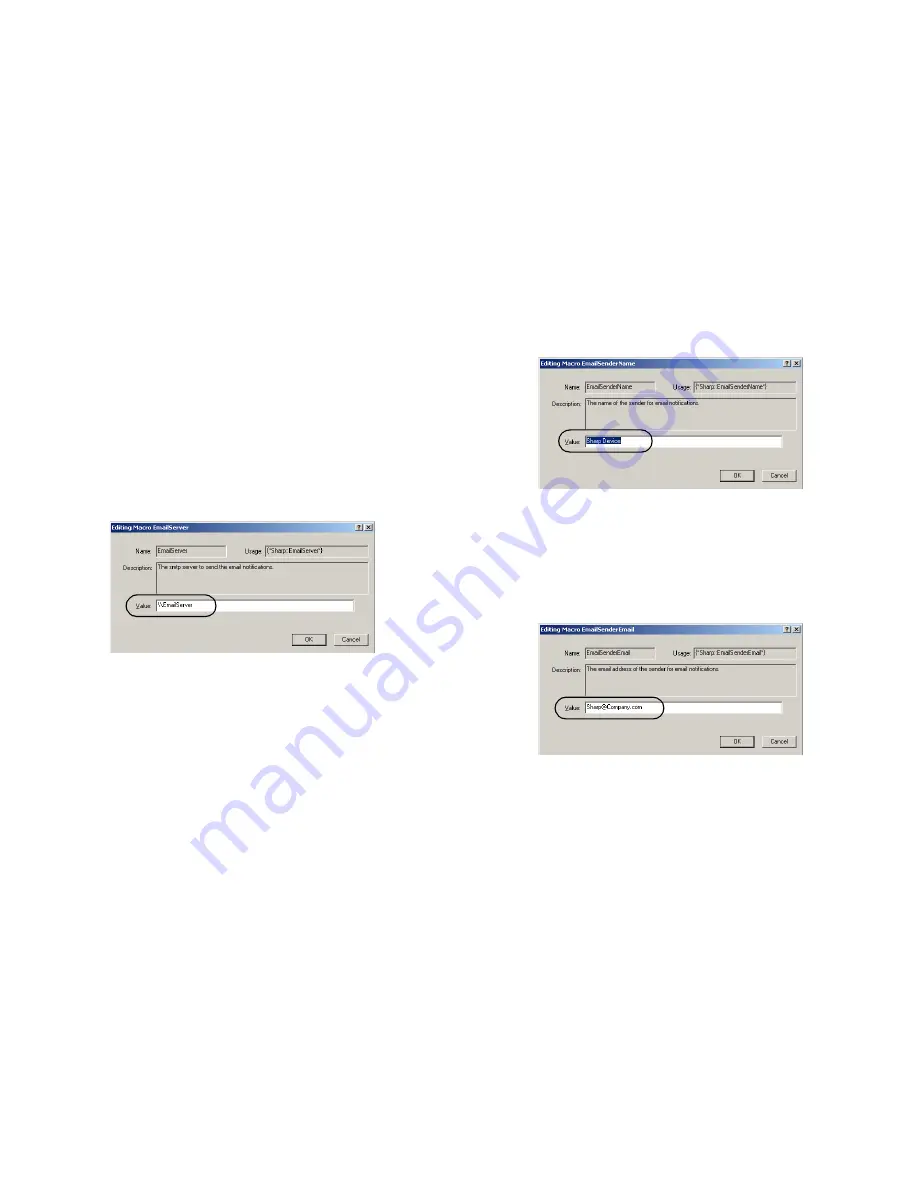
Figure 3.10  Specifying the name of the e-mail server

In the 

Value

 field, enter the name or IP address of an SMTP 

server that will be used to route e-mail notification messages. 
Click 

OK

 to return to the 

Sharp Module Configuration

 dialog 

box.

13.

Select 

EmailSenderName

 and click 

Edit

. This opens the 

Editing Macro EmailSenderName

 dialog box.

Figure 3.11  Specifying the from-name for e-mail notifications

In the 

Value

 field, enter a name that will be used as the name of 

the sender on e-mail notifications. Click 

OK

 to return to the 

Sharp Module Configuration

 dialog box.

14.

Select 

EmailSenderEmail

 and click 

Edit

. This opens the 

Editing Macro EmailSenderEmail

 dialog box.

Figure 3.12  Specifying the source e-mail address for e-mail 
notifications

In the 

Value

 field, enter an e-mail address that will be used as 

the address of origin for e-mail notifications from the Sharp 
device. Many SMTP servers, for security reasons, require a 
sender’s e-mail address before processing a message. Click 

OK

 to return to the 

Sharp Module Configuration

 dialog box.

15.

Click 

Close

 to close the 

Sharp Module Configuration

 dialog 

box.

Summary of Contents for RightFax 2.5

Page 1: ...Version 2 5 MFP Module Guide for the Sharp Extension...

Page 2: ...se noted Portions of this product Copyright 2002 2006 Glyph Cog LLC Portions Copyright 2001 artofcode LLC This software is based in part on the work of the Independent JPEG Group This software is base...

Page 3: ...d to link a multifunction printer or other multifunction device to a RightFax server is limited to a single multifunction printer or device identified to Captaris by serial number or otherwise at the...

Page 4: ...any judicial proceeding based upon a third party claim that the Product infringes any U S patent U S trademark copyright or trade secret and will indemnify you against any damages judgments and costs...

Page 5: ...s suppliers Termination Without prejudice to any other rights Captaris may terminate this EULA if you do not abide by the terms and conditions contained herein In such event you must cease use of the...

Page 6: ...RightFax MFP Module 2 5 Guide for the Sharp Extension vi...

Page 7: ...e Repository Folder 15 Create a RightFax User Interface on the Sharp 17 Sending a Document to a Phonebook Group 18 Using SecureDocs and Certified Delivery 19 Chapter 3 Advanced Configuration Settings...

Page 8: ...RightFax MFP Module 2 5 Guide for the Sharp Extension viii...

Page 9: ...setting this folder location To create an interface for users on the Sharp device you must create a Metadata dialog on the Sharp using the browser based software installed on the Sharp device This Me...

Page 10: ...ettings will simplify the process of configuring the new module Sharp MFP Support and Requirements The RightFax MFP Module supports the following Sharp models AR M350N AR M450N AR M550N AR M620N AR M7...

Page 11: ...ough the RightFax MFP module can be downloaded freely it does require that a valid software license be purchased before the software can be enabled by a Captaris Support representative For information...

Page 12: ...en click Next 12 On the Select Module screen select Sharp MFP in the list of modules and click Next This opens the Device Repository screen 13 In the New Path field type or browse to the path to the S...

Page 13: ...e fax cover sheet if no recipient name is specified by the sender 17 In the Default From Name field enter a name that will be used as the name of the sender on the fax cover sheet if no RightFax user...

Page 14: ...RightFax MFP Module 2 5 Guide for the Sharp Extension 14...

Page 15: ...tered in that field Create and Configure the Repository Folder Important Your Sharp device includes configuration software can be accessed via a Web browser To access this software you must know the I...

Page 16: ...has write permissions 7 Close IIS Manager To configure the repository folder on the Sharp device 1 Open a Web browser and navigate to the IP address of the Sharp device This opens a page containing S...

Page 17: ...Fax user interface on the Sharp device you must create one or more custom Metadata sets that include specific RightFax input fields To add a RightFax Metadata set 1 Open a Web browser and navigate to...

Page 18: ...er the phonebook group there When you use this Metadata field you must also enter a number in the Fax Number field on the Sharp device before the document will send In all cases the phonebook group na...

Page 19: ...ves an e mail message indicating that a document is available with a link to the Certified Delivery Web site The link connects the user to the Web site where he can view all waiting documents Both Sec...

Page 20: ...default send method 8 Select the option Certified Delivery Tip Selecting the Force Send Type option on this dialog box will prevent other types of document transmission from functioning If you select...

Page 21: ...External Document Connector has many configuration settings only a few of which are required to enable the Sharp Extension This chapter describes only the required configuration settings for the most...

Page 22: ...Select Tools Advanced EDC Configuration to open the Captaris EDC Configuration dialog box 3 Click the Modules tab 4 Select Sharp MFP in the list of modules and click Edit This opens the Sharp Module C...

Page 23: ...ting Macro DefaultRightFaxUserID dialog box Figure 3 5 Entering the default RightFax user ID The Default RightFax user ID is set to WALKUP by default This is the RightFax user ID that will be used for...

Page 24: ...nder on the fax cover sheet if no RightFax user ID is specified by the sender Click OK to return to the Sharp Module Configuration dialog box 10 Select PrintNotification and click Edit This opens the...

Page 25: ...used to route e mail notification messages Click OK to return to the Sharp Module Configuration dialog box 13 Select EmailSenderName and click Edit This opens the Editing Macro EmailSenderName dialog...

Page 26: ...n FlowPoints describes all of the FlowPoints in the Sharp_MFP DataFlow Table 3a Sharp Extension FlowPoints FlowPoint Name Description Begin Initializes the DataFlow No configuration necessary Check_Fo...

Page 27: ...the results page to a specified network folder print queue HTTP port or FTP site Lets you select and configure the destination Check_For_Email_Notify Determines if an e mail notification should be ge...

Page 28: ...9 Save the changes and exit Setting up e mail notifications E mail notifications can be sent to Sharp users only if the user has provided an e mail address in the Reply To field on Metadata sets that...

Page 29: ...ilter criteria will be ignored by the FlowPoint and passed on to the next FlowPoint in the chain Figure 3 16 Example of filter options on a FlowPoint configuration screen By default the Process all jo...

Page 30: ...llowing table lists some of the keywords most commonly used for creating filters Example BillingInfo1 international UserID sales UserID marketing In some cases the same filter must be added in several...

Page 31: ...anagement tool called the External Document Connector Monitor EDC Monitor Use the EDC Monitor to monitor the status of the connectors and processors under the control of the EDC add and delete process...

Page 32: ...of the processors as well as the status of the individual processors To start or stop a service select the service name and click Start Service or Stop Service To start or stop all of the services sel...

Page 33: ...rvice This opens the Add a Service dialog box Figure 3 19 The Add a Service Dialog Box 4 Under Services select the type of service to add 5 Under Login Account enter the user name and password of the...

Page 34: ...the RightFax EDC folder on the computer on which the External Document Connector is installed the RightFax server Example RFSERV Program Files RightFax EDC 4 In the Shared Directory box enter the UNC...

Page 35: ...nnector See EDC F FlowPoints configuring 26 27 I installing the MFP Module 10 13 M MFP Module downloading 11 installing 10 13 overview 9 monitor services 32 O overview 9 P phonebook groups 18 processo...

Page 36: ...RightFax MFP Module 2 5 Guide for the Sharp Extension 36...

Reviews: