


10
3. Exiting the OSD MENU
-
To return to the main menu, select the <Return> icon and press the MENU button.
-
To exit the OSD menu, select <Exit> icon .
5.2 OSD MENU Adjustments and Settings
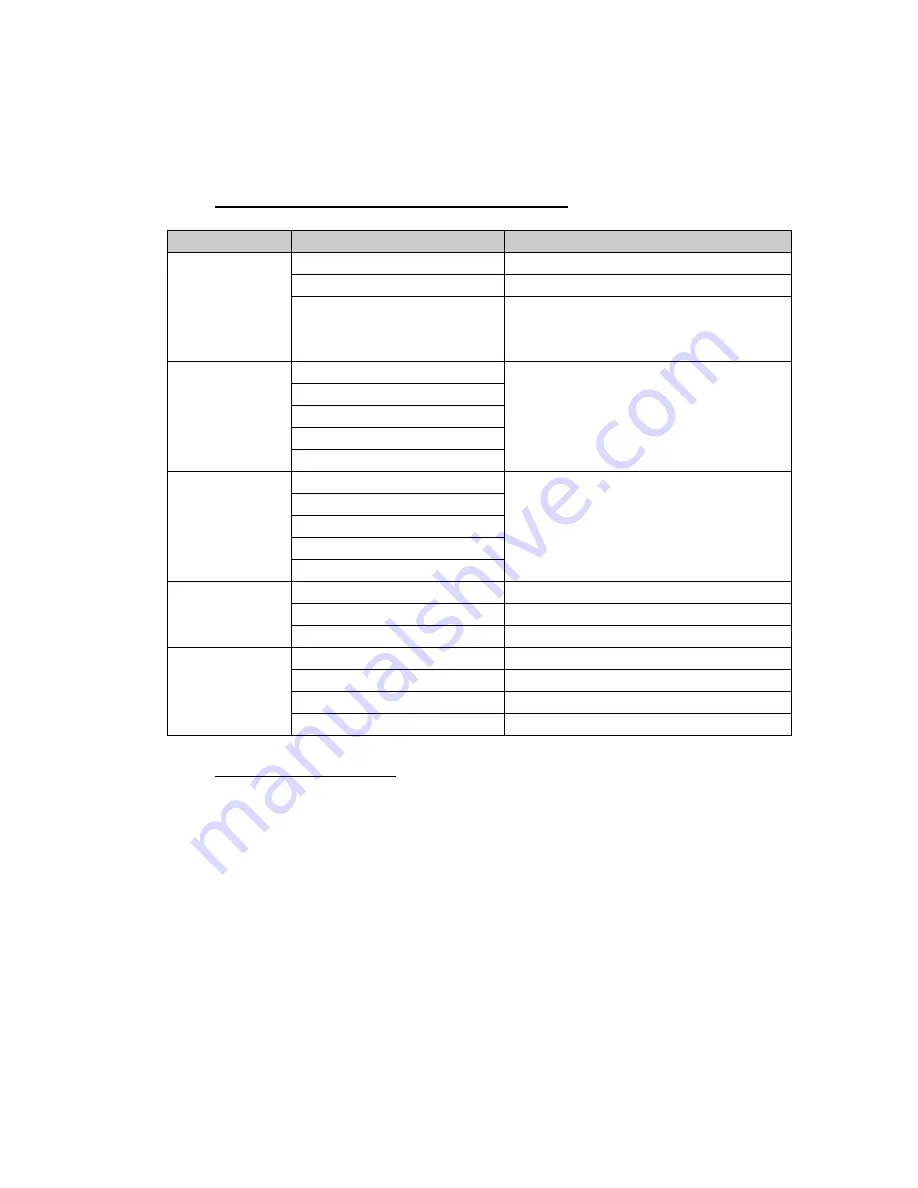
The following table shows all adjustment and setting menus.
Main Menu
Sub Menu
Reference
Contrast
Set Screen Contrast
Brightness
Set backlight Brightness
Color Setting
Color Temp
Select color temperature 9300º K,
6500º K and User color, and set user
color temperature
Auto Adjust
H-position
V-position
Clock
Image Setting
Phase
Gamma 1
Gamma 2
Gamma 3
Gamma 4
LUT Setting
Gamma 5
Select display GAMMA
OSD H-pos.
Set horizontal position of OSD Menu
OSD V-pos.
Set vertical position of OSD Menu
OSD Setting
OSD Timer
Set display time of OSD Menu
Signal Source
Select input signal
Sharpness
Select the sharpness of image
Reset
Reset to the default value
Others
Mode
Monitor mode
5.3 Screen Adjustment
Screen adjustments for the monitor should be used in suppressing screen flickering and also
for adjusting the screen to its proper position. There is only one correct position for each
display mode. It is also recommended to use the OSD Menu function when first installing the
display or whenever changing the system.
Note:
Allow the monitor to stabilize for at least 20 minutes before making image
adjustments.
Adjustment Procedure
1. Adjust by <Auto Adjust> menu in the OSD Menu.
To automatically adjust the clock, phase, screen position and resolution.
Note:
The Auto sizing function is intended for use on the computer running Windows. It may not
work properly when the computer is running on MS-DOS (Not windows) or the background
color for the "wall paper" or "desktop" pattern is set to black.
If the appropriate screen cannot be made by using the Auto adjustment button, adjust the
screen through the following procedures.


