background image

202

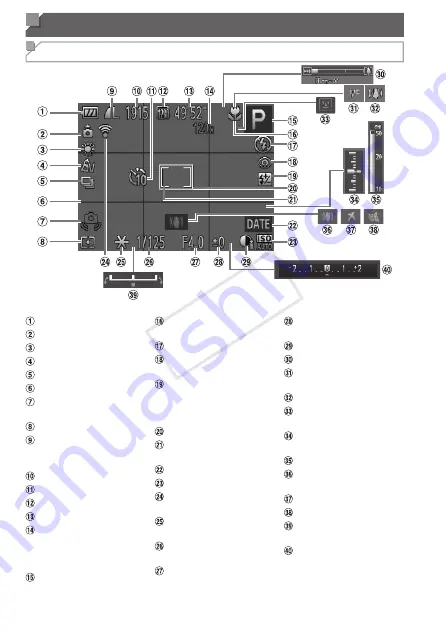
On-Screen Information

Shooting (Information Display)

  Battery level (

=

  203)

  Camera orientation*
  White balance (

=

  98)

  My Colors (

=

  100)

  Drive mode (

=

  102)

  Grid lines (

=

  72)

  Camera shake warning 

(

=

  55)

  Metering method (

=

  95)

  Still image compression 

(

=

  114), Resolution 

(

=

  68)

  Recordable shots
  Self-timer (

=

  62)

  Movie resolution (

=

  70)

  Remaining time
  Digital zoom 

magnification (

=

  60), 

Digital tele-converter 

(

=

  105)

  Shooting mode (

=

  206), 

Scene icon (

=

  57)

  Focusing range 

(

=

  103)

  Flash mode (

=

  111)

  Red-eye correction 

(

=

  69)

  Flash exposure 

compensation / Flash 

output level (

=

  112, 

119)

  AF frame (

=

  105)

  Spot AE point frame 

(

=

  95)

  Date stamp (

=

  65)

  ISO speed (

=

  96)

  Eye-Fi connection 

status (

=

  193)

  AE lock (

=

  94), FE 

lock (

=

  113)

  Shutter speed (

=

  116, 

118)

  Aperture value 

(

=

  117, 118)

  Exposure compensation 

level (

=

  93)

  i-Contrast (

=

  97)

  Zoom bar (

=

  52)

  AF lock (

=

  110)

Manual focus (

=

  103)

  IS mode icon (

=

  58)

  Blink detection 

(

=

  74)

  Exposure level 

(

=

  118)

  MF indicator (

=

  104)

  Image stabilization 

(

=

  114)

  Time zone (

=

  164)

  Wind filter (

=

  71)

  Exposure shift bar 

(

=

  89)

  Exposure compensation 

bar (

=

  93)

COP

Y

Summary of Contents for PowerShot SX500 IS

Page 1: ...re you read this guide including the Safety Precautions section before using the camera Reading this guide will help you learn to use the camera properly Store this guide safely so that you can use it in the future ENGLISH COPY ...

Page 2: ...ack NB 6L with terminal cover Battery Charger CB 2LY CB 2LYE Interface Cable IFC 400PCU Neck Strap NS DC11 Lens Cap with cord DIGITAL CAMERA Solution Disk CD ROM Getting Started Warranty Card Contains software and PDF manuals 31 A memory card is not included Any supplements or revisions to the Camera User Guide are included at the end of this guide COPY ...

Page 3: ...th the camera About Eye Fi Cards This product is not guaranteed to support Eye Fi card functions including wireless transfer In case of an issue with an Eye Fi card please check with the card manufacturer Also note that an approval is required to use Eye Fi cards in many countries or regions Without approval use of the card is not permitted If it is unclear whether the card has been approved for u...

Page 4: ...copyright or other legal rights at some performances or exhibitions or in some commercial settings The camera warranty is valid only in the area of purchase In case of camera problems while abroad return to the area of purchase before contacting a Canon Customer Support Help Desk Although the LCD monitor is produced under extremely high precision manufacturing conditions and more than 99 99 of the...

Page 5: ...ded each used for different purposes Basic Guide 17 Gives basic instructions from initial preparations to shooting playback and saving on a computer Advanced Guide 41 Practical guide that introduces other camera basics and describes shooting and playback options COPY ...

Page 6: ...ormation you should know Notes and tips for expert camera use xx Pages with related information in this example xx represents a page number Instructions in this guide apply to the camera under default settings For convenience all supported memory cards are simply referred to as the memory card The tabs shown above titles indicate whether the function is used for still images movies or both Still I...

Page 7: ... FUNC SET button h Flash Right button Q Self timer Down button z z Turning the control dial is one way to choose setting items switch images and perform other operations Most of these operations are also possible with the o p q r buttons In this guide icons are used to represent the corresponding camera buttons and dials on which they appear or which they resemble The following camera buttons and ...

Page 8: ...oting Smart Auto 52 Common Convenient Features 60 Image Customization Features 67 Helpful Shooting Features 72 Customizing Camera Operation 75 3 Other Shooting Modes 77 Discreet Mode 78 Brightness Color Customization Live View Control 79 Specific Scenes 80 Image Effects Creative Filters 82 Special Modes for Other Purposes 87 Shooting Various Movies 88 4 P mode 91 Shooting in Program AE Mode P Mode...

Page 9: ...ing Menu 155 Adjusting Basic Camera Functions 156 8 Accessories 169 Tips on Using Included Accessories 170 Optional Accessories 171 Using Optional Accessories 173 Printing Images 179 Using an Eye Fi Card 193 9 Appendix 195 Troubleshooting 196 On Screen Messages 200 On Screen Information 202 Functions and Menu Tables 206 Handling Precautions 216 Specifications 217 Index 221 COPY ...

Page 10: ...ght 80 t Fireworks 81 Applying special effects Vivid Colors 82 Poster Effect 82 Fish Eye Effect 83 Miniature Effect 83 Toy Camera Effect 85 Monochrome 86 z z Where sound and flash are not allowed Discreet Mode 78 z z While adjusting image settings Live View Control 79 z z Focus on faces 52 80 106 z z With myself in the shot Self Timer 62 87 z z Add a date stamp 65 COPY ...

Page 11: ...tomatic playback Slideshow 130 z z On a TV 173 z z On a computer 32 z z Browse through images quickly 126 z z Erase images 136 E Shoot View Movies z z Shoot movies 52 88 z z View movies Playback Mode 122 c Print z z Print pictures 179 Save z z Save images to a computer 32 COPY ...

Page 12: ...ound a child s neck could result in asphyxiation Use only recommended power sources Do not attempt to disassemble alter or apply heat to the product Avoid dropping or subjecting the product to severe impacts To avoid the risk of injury do not touch the interior of the product if it has been dropped or otherwise damaged Stop using the product immediately if it emits smoke a strange smell or otherwi...

Page 13: ...diately flush with water Turn the camera off in places where camera use is prohibited The electromagnetic waves emitted by the camera may interfere with the operation of electronic instruments and other devices Exercise adequate caution when using the camera in places where use of electronic devices is restricted such as inside airplanes and medical facilities Do not play the supplied CD ROM s in ...

Page 14: ...nt Do not aim the camera at bright light sources such as the sun on a clear day Doing so may damage the image sensor When using the camera on a beach or at a windy location be careful not to allow dust or sand to enter the camera This may cause the product to malfunction In regular use small amounts of smoke may be emitted from the flash This is due to the high intensity of the flash burning dust ...

Page 15: ...t plugged in for a long period of time may cause it to overheat and distort resulting in fire Do not place the battery near pets Pets biting the battery could cause leakage overheating or explosion resulting in fire or damage When putting the camera in your bag ensure that hard objects do not come into contact with the screen Do not attach any hard objects to the camera Doing so may cause malfunct...

Page 16: ...16 COPY ...

Page 17: ...17 Basic Guide Gives basic instructions from initial preparations to shooting playback and saving on a computer COPY ...

Page 18: ...he strap z z Remove the lens cap from the camera and attach the lens cap cord to the strap z z Always remove the lens cap before turning the camera on z z Keep the lens cap on the lens when the camera is not in use Holding the Camera z z Place the strap around your neck z z When shooting keep your arms close to your body and hold the camera securely to prevent it from moving If you have raised the...

Page 19: ...LY Flip out the plug and plug the charger into a power outlet z z CB 2LYE Plug the power cord into the charger then plug the other end into a power outlet X X The charging lamp turns orange and charging begins X X When the charging is finished the lamp turns green 3 Remove the battery z z After unplugging the battery charger remove the battery by pushing it in and up To protect the battery and kee...

Page 20: ...rite protect tab z z Recording is not possible on memory cards with a write protect tab when the tab is in the locked downward position Slide the tab up until it clicks into the unlocked position 2 Open the cover z z Slide the cover and open it Terminals Battery Lock 3 Insert the battery z z While pressing the battery lock in the direction of the arrow insert the battery as shown and push it in un...

Page 21: ...rds facing the wrong way may damage the camera 5 Close the cover z z Lower the cover and hold it down as you slide it until it clicks into the closed position For guidelines on how many shots or hours of recording can be saved on one memory card see Specifications 217 Removing the Battery and Memory Card Remove the battery z z Open the cover and press the battery lock in the direction of the arrow...

Page 22: ...Information you specify this way is recorded in image properties when you shoot and it is used when you manage images by shooting date or print images showing the date You can also add a date stamp to shots if you wish 65 1 Turn the camera on z z Press the power button X X The Date Time screen is displayed 2 Set the date and time z z Press the q r buttons to choose an option z z Press the o p butt...

Page 23: ...z z To turn off the camera press the power button Unless you set the date time and home time zone the Date Time screen will be displayed each time you turn the camera on Specify the correct information To set daylight saving time 1 hour ahead choose in step 2 and then choose by pressing the o p buttons or turning the 5 dial Changing the Date and Time Adjust the date and time as follows 1 Access th...

Page 24: ...menu Date time settings can be retained for about 3 weeks by the camera s built in date time battery backup battery after the battery pack is removed The date time battery will be charged in about 4 hours once you insert a charged battery or connect the camera to an AC adapter kit sold separately 171 even if the camera is left off Once the date time battery is depleted the Date Time screen will be...

Page 25: ...e o p q r buttons or turn the 5 dial to choose a language and then press the m button X X Once the display language has been set the setting screen is no longer displayed The current time is displayed if you wait too long in step 2 after pressing the m button before you press the n button In this case press the m button to dismiss the time display and repeat step 2 You can also change the display ...

Page 26: ...button X X The startup screen is displayed 2 Enter A mode z z Set the mode dial to A z z Aim the camera at the subject The camera will make a slight clicking noise as it determines the scene X X Icons representing the scene and image stabilization mode are displayed in the upper right of the screen X X Frames displayed around any detected subjects indicate that they are in focus 3 Compose the shot...

Page 27: ...r use If you prefer not to use the flash push it down with your finger into the camera Shoot z z Press the shutter button all the way down X X As the camera shoots a shutter sound is played and in low light conditions when you have raised the flash it fires automatically z z Keep the camera still until the shutter sound ends X X Your shot remains displayed on the screen for about two seconds z z E...

Page 28: ...sed time X X Black bars displayed on the top and bottom edges of the screen indicate image areas not recorded X X Frames displayed around any detected faces indicate that they are in focus z z Once recording begins you can take your finger off the movie button Finish shooting z z Press the movie button again to stop shooting The camera beeps twice as recording stops COPY ...

Page 29: ... q button or turn the 5 dial counterclockwise To view the next image press the r button or turn the 5 dial clockwise z z Press and hold the q r buttons to browse through images quickly Images appear grainy at this time z z To access Scroll Display mode turn the 5 dial rapidly In this mode turn the 5 dial to browse through images z z To return to single image display press the m button z z Movies a...

Page 30: ... halfway Erasing the Images You can choose and erase unneeded images one by one Be careful when erasing images because they cannot be recovered 1 Choose an image to erase z z Press the q r buttons or turn the 5 dial to choose an image 2 Erase the image z z Press the a button z z After Erase is displayed press the q r buttons or turn the 5 dial to choose Erase and then press the m button X X The cu...

Page 31: ... Auto Update Function Using the included software you can update to the latest version and download new functions via the Internet some software excluded Be sure to install the software on a computer with an Internet connection so you can use this function Internet access is required to use this function and any ISP account charges and access fees must be paid separately PDF Manuals Camera User Gu...

Page 32: ...er Mac OS X 10 7 Core 2 Duo or higher Mac OS X 10 6 Core Duo 1 83 GHz or higher RAM Still images Windows 7 64 bit 2 GB or more Windows 7 32 bit Vista 1 GB or more Windows XP 512 MB or more Movies 1 GB or more Mac OS X 10 7 2 GB or more Mac OS X 10 6 1 GB or more Interfaces USB Free Hard Disk Space 440 MB or more 550 MB or more Display 1024 x 768 resolution or higher Silverlight 4 or later max 100 ...

Page 33: ... to install the software on a computer with an Internet connection 1 Insert the CD ROM in the computer s CD ROM drive z z Insert the included CD ROM DIGITAL CAMERA Solution Disk 2 in the computer s CD ROM drive z z On a Macintosh computer after inserting the disc double click the desktop disc icon to open it and then double click the icon displayed 2 Begin the installation z z Click Easy Installat...

Page 34: ...port For details about USB connections on the computer refer to the computer user manual 4 Install the files z z Turn the camera on and follow the on screen instructions to complete the installation process X X The software will connect to the Internet to update to the latest version and download new functions Installation may take some time depending on computer performance and the Internet conne...

Page 35: ...e computer drivers will be installed so it may take a few minutes until camera images are accessible If you have several cameras that were bundled with ImageBrowser EX on the included CD ROMs be sure to use each camera with their included CD ROM and follow the on screen installation instructions for each Doing so will ensure that each camera will receive the correct updates and new functions via t...

Page 36: ...urn the camera on to access CameraWindow z z Press the 1 button to turn the camera on z z On a Macintosh computer CameraWindow is displayed when a connection is established between the camera and computer z z For Windows follow the steps introduced below z z In the screen that displays click the link to modify the program z z Choose Downloads Images From Canon Camera using Canon CameraWindow and t...

Page 37: ...lick Import Untransferred Images X X Images are now saved to the Pictures folder on the computer in separate folders named by date z z After images are saved close CameraWindow press the 1 button to turn the camera off and unplug the cable z z For instructions on viewing images on a computer refer to the Software Guide 31 COPY ...

Page 38: ...e computer until camera images are accessible Images shot in vertical orientation may be saved in horizontal orientation Image protection settings may be cleared from images saved to a computer Some problems may occur when saving images or image information depending on the operating system version the software in use or image file sizes Some functions provided by the included software may not be ...

Page 39: ...ion Disk Lens Cap with cord Also available for purchase separately Use of genuine Canon accessories is recommended This product is designed to achieve excellent performance when used with genuine Canon accessories Canon shall not be liable for any damage to this product and or accidents such as fire etc caused by the malfunction of non genuine Canon accessories e g a leakage and or explosion of a ...

Page 40: ...40 COPY ...

Page 41: ...41 Camera Basics Practical guide that introduces other camera basics and describes shooting and playback options 1 Advanced Guide COPY ...

Page 42: ...1 button Power Saving Features Auto Power Down As a way to conserve battery power the camera automatically deactivates the screen Display Off and then turns itself off after a specific period of inactivity Power Saving in Shooting Mode The screen is automatically deactivated after about one minute of inactivity In about two more minutes the lens is retracted and the camera turns itself off To acti...

Page 43: ...ra beeps twice and AF frames are displayed around image areas in focus 2 Press all the way down From the halfway position press fully to shoot X X The camera shoots as a shutter sound is played z z Keep the camera still until the shutter sound ends Images may be out of focus if you shoot without initially pressing the shutter button halfway Length of shutter sound playback varies depending on the ...

Page 44: ...by pressing the movie button P Tv Av and M Modes Take a variety of shots using your preferred settings 91 115 Auto Mode Fully automatic shooting with camera determined settings 26 52 Scene Mode Shoot with optimal settings for specific scenes 80 Creative Filters Mode Add a variety of effects to images when shooting 82 Discreet Mode Shoot without the flash or camera sounds 78 You can turn the mode d...

Page 45: ...mation is displayed Screen brightness is automatically increased by the night display function when you are shooting under low light making it easier to check how shots are composed However on screen image brightness may not match the brightness of your shots Note that any on screen image distortion or jerky subject motion will not affect recorded images For playback display options see 124 COPY ...

Page 46: ...le options are shown at the bottom of the screen 3 Choose an option z z Press the q r buttons or turn the 5 dial to choose an option z z Options labeled with a icon can be configured by pressing the l button z z To return to the menu items press the l button 4 Finish the setup process z z Press the m button X X The screen before you pressed the m button in step 1 is displayed again showing the opt...

Page 47: ...on 2 Choose a tab z z Move the zoom lever to choose a tab z z After you have pressed the o p buttons to choose a tab initially you can switch between tabs by pressing the q r buttons 3 Choose a setting z z Press the o p buttons or turn the 5 dial to choose a setting z z To choose settings with options not shown first press the m or r button to switch screens and then either press the o p buttons o...

Page 48: ...r buttons to choose an option 5 Finish the setup process z z Press the n button to return to the screen displayed before you pressed the n button in step 1 To undo any accidental setting changes you can restore the camera s default settings 167 COPY ...

Page 49: ...y card battery cover or shake or jolt the camera which may corrupt images or damage the camera or memory card Clock You can check the current time z z Press and hold the m button X X The current time appears z z If you hold the camera vertically while using the clock function it will switch to vertical display Press the q r buttons or turn the 5 dial to change the display color z z Press the m but...

Page 50: ...50 COPY ...

Page 51: ...51 Smart Auto Mode Convenient mode for easy shots with greater control over shooting 2 COPY ...

Page 52: ...e X X Icons representing the scene and image stabilization mode are displayed in the upper right of the screen 57 58 X X Frames displayed around any detected subjects indicate that they are in focus Zoom Bar Focus Range approx 3 Compose the shot z z To zoom in and enlarge the subject move the zoom lever toward i telephoto and to zoom away from the subject move it toward j wide angle A zoom bar sho...

Page 53: ...your finger to prepare it for use If you prefer not to use the flash push it down with your finger into the camera Shoot z z Press the shutter button all the way down X X As the camera shoots a shutter sound is played and in low light conditions when you have raised the flash it fires automatically z z Keep the camera still until the shutter sound ends X X Your shot remains displayed on the screen...

Page 54: ...ng begins you can take your finger off the movie button Resize the subject and recompose the shot as needed z z To resize the subject do the same thing as in step 3 on 52 However note that the sound of camera operations will be recorded and movies shot at zoom factors shown in blue will look grainy z z When you recompose shots the focus brightness and colors will be automatically adjusted Finish s...

Page 55: ...e the flash firing move closer to the subject For details on the flash range see Specifications 217 The subject may be too close if the camera only beeps once when you press the shutter button halfway For details on the focusing range shooting range see Specifications 217 To reduce red eye and to assist in focusing the lamp may be activated when shooting in low light conditions A blinking h icon d...

Page 56: ...icrophone when shooting a movie Leaving the flash raised or blocking the microphone may prevent audio from being recorded or may cause the recording to sound muffled Avoid touching camera controls other than the movie button when shooting movies because sounds made by the camera will be recorded Audio is recorded in stereo COPY ...

Page 57: ... Subjects Icon Background Color In Motion 1 Shadows on Face 1 In Motion 1 At Close Range Bright Gray Backlit With Blue Sky Light Blue Backlit Sunsets Orange Spotlights Dark Blue Dark Tripod Used 2 2 1Not displayed for movies 2Displayed in dark scenes when the camera is held still as when mounted on a tripod Try shooting in G mode 91 if the scene icon does not match actual shooting conditions or if...

Page 58: ... for slow camera shake such as when shooting movies at telephoto Powered IS Image stabilization for macro shots Hybrid IS No image stabilization because the camera is mounted on a tripod or held still by other means Displayed when you pan following moving subjects with the camera When you follow subjects moving horizontally image stabilization only counteracts vertical camera shake and horizontal ...

Page 59: ...s Frames follow moving subjects within a certain range to keep them in focus However if the camera detects subject movement only the white frame will remain on the screen When you are pressing the shutter button halfway and the camera detects subject movement a blue frame is displayed and the focus and image brightness are constantly adjusted Servo AF Try shooting in G mode 91 if no frames are dis...

Page 60: ...zooms in even closer on the subject using digital zoom Moving the zoom lever will display the zoom bar which indicates the zoom position The color of the zoom bar will change depending on the zoom range White range optical zoom range where the image will not appear grainy Yellow range digital zoom range where the image is not noticeably grainy ZoomPlus Blue range digital zoom range where the image...

Page 61: ...oming Framing Assist Seek If you lose track of a subject while zooming in you can find it more easily by temporarily zooming out 1 Look for the lost subject z z Press and hold the button X X The camera zooms out and displays a white frame around the area previously shown before you pressed the button 2 Reacquire the subject z z Aim the camera so that the subject in the white frame and then release...

Page 62: ...s you hold the button to resize the white frame To adjust how much the camera zooms out when the button is pressed press the n button and choose one of the three levels in Display Area on the 4 tab The zoom factor cannot be changed with the button after you press the shutter button all the way down in self timer mode see below Still Images Movies Using the Self Timer With the self timer you can in...

Page 63: ...remain lit in case the flash fires z z To cancel shooting after you have triggered the self timer press the n button z z To restore the original setting choose in step 1 Still Images Movies Using the Self Timer to Avoid Camera Shake This option delays shutter release until about two seconds after you have pressed the shutter button If the camera is unsteady while you are pressing the shutter butto...

Page 64: ... displayed z z Follow step 2 on 63 to shoot For movies shot using the self timer Delay represents the delay before recording begins but the Shots setting has no effect When you specify multiple shots image brightness and white balance are determined by the first shot More time is required between shots when the flash fires or when you have specified to take many shots Shooting will stop automatica...

Page 65: ...e setting is complete DATE is displayed 2 Shoot X X As you take shots the camera adds the shooting date or time to the lower right corner of images z z To restore the original setting choose Off in step 1 Date stamps cannot be edited or removed Shots taken without adding a date stamp can be printed with one as follows However adding a date stamp this way to images that already have one may cause i...

Page 66: ...the camera so that is on the desired subject and then press the shutter button halfway X X A blue frame is displayed and the camera will keep the subject in focus and image brightness adjusted Servo AF 3 Shoot z z Press the shutter button all the way down to shoot z z Press the o button to cancel Tracking AF Tracking may not be possible when subjects are too small or move too rapidly or when subje...

Page 67: ...e the screen aspect ratio will be updated z z To restore the original setting repeat this process but choose Used for display on widescreen HDTVs or similar display devices Same aspect ratio as 35mm film used for printing images at 5 x 7 inch or postcard sizes Native aspect ratio of the camera screen also used for display on standard definition televisions or similar display devices or for printin...

Page 68: ...d see Specifications 217 Configure the setting z z Press the m button choose in the menu and choose the desired option 46 X X The option you configured is now displayed z z To restore the original setting repeat this process but choose Guidelines for Choosing Resolution Based on Paper Size for 4 3 Images A2 16 5 x 23 4 in A3 A5 11 7 x 16 5 5 8 x 8 3 in 5 x 7 in Postcard 3 5 x 5 in z z For e mailin...

Page 69: ...ure the setting z z Choose Red Eye Corr and then choose On 47 X X Once the setting is complete R is displayed z z To restore the original setting repeat this process but choose Off Red eye correction may be applied to image areas other than eyes if the camera misinterprets red eye makeup as red pupils for example You can also correct existing images 151 You can also access the screen in step 2 whe...

Page 70: ... Press the m button choose in the menu and choose the desired option 46 X X The option you configured is now displayed z z To restore the original setting repeat this process but choose Image Quality Resolution Frame Rate Details 1280 x 720 25 fps For shooting in HD 640 x 480 30 fps For shooting in standard definition movies are played back at 30 fps In mode black bars displayed on the top and bot...

Page 71: ...en the wind is strong can be reduced However the recording may sound unnatural when this option is used when there is no wind Configure the setting z z Press the n button choose Wind Filter on the 4 tab and then choose On 47 z z To restore the original setting repeat this process but choose Off COPY ...

Page 72: ...X X Once the setting is complete grid lines are displayed on the screen z z To restore the original setting repeat this process but choose Off Grid lines are not recorded in your shots Still Images Magnifying the Area in Focus You can check the focus by pressing the shutter button halfway which will enlarge the portion of the image in focus in the AF frame 1 Configure the setting z z Press the n b...

Page 73: ...e original setting choose Off in step 1 The area in focus will not be magnified when you press the shutter button halfway if a face was not detected if the person is too close to the camera and their face is too large for the screen or if the camera detects subject movement The display will not magnify when using the digital zoom 60 or Tracking AF 107 COPY ...

Page 74: ...button choose Blink Detection on the 4 tab and then choose On 47 2 Shoot X X A frame accompanied by is displayed when the camera detects a person whose eyes are closed z z To restore the original setting choose Off in step 1 When you have specified multiple shots in mode this function is only available for the final shot The frame is not displayed when Review is set to Quick 76 COPY ...

Page 75: ... choose AF assist Beam on the 4 tab and then choose Off 47 z z To restore the original setting repeat this process but choose On Still Images Deactivating the Red Eye Reduction Lamp You can deactivate the red eye reduction lamp that lights up to reduce red eye when the flash is used in low light shots 1 Access the Flash Settings screen z z Press the n button choose Flash Settings on the 4 tab and ...

Page 76: ...ou press the shutter button halfway Off No image display after shots Still Images Changing the Image Display Style After Shots Change the way images are displayed after shots as follows Configure the setting z z Press the n button choose Review Info on the 4 tab and then choose the desired option 47 z z To restore the original setting repeat this process but choose Off Off Displays only the image ...

Page 77: ...77 Other Shooting Modes Shoot more effectively in various scenes and take shots enhanced with unique image effects or captured using special functions 3 COPY ...

Page 78: ...era sounds the flash or lamp as follows Use this mode where camera sounds the flash and lights are prohibited 1 Enter mode z z Set the mode dial to 2 Shoot In mode even playback sounds are muted Sounds of camera operations are muted and movie audio is also muted COPY ...

Page 79: ...ttons to choose a setting item and then press the q r buttons or turn the 5 dial to adjust the value as you watch the screen z z Press the m button 3 Shoot Brightness For brighter images adjust the level to the right and for darker images adjust it to the left Color For more vivid images adjust the level to the right and for more subdued images adjust it to the left Tone For a warm reddish tone ad...

Page 80: ... the mode dial to K 2 Choose a shooting mode z z Press the m button choose I in the menu and then choose a shooting mode 46 3 Shoot Still Images Movies I Shoot portraits Portrait z z Take shots of people with a softening effect Still Images Shoot under low light Low Light z z Shoot with minimal camera shake and subject blur even in low light conditions COPY ...

Page 81: ...Still Images Movies tShoot fireworks Fireworks z z Vivid shots of fireworks In t mode mount the camera on a tripod or take other measures to keep it still and prevent camera shake Additionally you should set IS Mode to Off when using a tripod or other means to hold the camera still 114 mode resolution is 2304 x 1728 and cannot be changed COPY ...

Page 82: ...he m button choose in the menu and then choose a shooting mode 46 3 Shoot Still Images Movies Shoot in vivid colors Super Vivid z z Shots in rich vivid colors Still Images Movies Posterized shots Poster Effect z z Shots that resemble an old poster or illustration In and modes try taking some test shots first to make sure you obtain the desired results COPY ...

Page 83: ...pplied 3 Shoot Try taking some test shots first to make sure you obtain the desired results Still Images Movies Shots Resembling Miniature Models Miniature Effect Creates the effect of a miniature model by blurring image areas above and below your selected area You can also make movies that look like scenes in miniature models by choosing the playback speed before the movie is recorded People and ...

Page 84: ... speed by pressing the q r buttons or turning the 5 dial 4 Return to the shooting screen and shoot z z Press the n button to return to the shooting screen and then shoot Playback Speed and Estimated Playback Time for One Minute Clips Speed Playback Time Approx 12 sec Approx 6 sec Approx 3 sec The zoom is not available when shooting movies Be sure to set the zoom before shooting Try taking some tes...

Page 85: ...g movies Still Images Shooting with a Toy Camera Effect Toy Camera Effect This effect makes images resemble shots from a toy camera by vignetting darker blurred image corners and changing the overall color 1 Choose z z Follow steps 1 2 on 82 and choose 2 Choose a color tone z z Press the l button choose a color tone either press the q r buttons or turn the 5 dial and then press the l button again ...

Page 86: ... z Follow steps 1 2 on 82 and choose 2 Choose a color tone z z Press the l button choose a color tone either press the q r buttons or turn the 5 dial and then press the l button again X X A preview is shown of how your shot will look with the effect applied 3 Shoot B W Black and white shots Sepia Sepia tone shots Blue Blue and white shots COPY ...

Page 87: ...me is displayed around the face you focus on and white frames around other faces 3 Press the shutter button all the way down X X The camera now enters shooting standby mode and Look straight at camera to start count down is displayed X X The lamp blinks and the self timer sound is played 4 Join the subjects in the shooting area and look at the camera X X After the camera detects a new face the lam...

Page 88: ...se a value and then press the l button again The zoom factor cannot be changed with the button after you press the shutter button all the way down Movies Shooting Various Movies Movies Shooting Movies in E Mode 1 Enter E mode z z Set the mode dial to E X X Black bars displayed on the top and bottom edges of the screen indicate image areas not recorded 2 Configure the settings to suit the movie 206...

Page 89: ... z Turn the 5 dial to adjust the exposure as you watch the screen 3 Shoot 88 Movies Shooting iFrame Movies Shoot movies that can be edited with iFrame compatible software or devices You can quickly edit save and manage iFrame movies using the included software 31 1 Choose z z Set the mode dial to E z z Press the m button choose E in the menu and then choose 46 X X Black bars displayed on the top a...

Page 90: ...90 COPY ...

Page 91: ...ng style Instructions in this chapter apply to the camera with the mode dial set to G mode G Program AE AE Auto Exposure Before using a function introduced in this chapter in modes other than G make sure the function is available in that mode 206 213 4 COPY ...

Page 92: ...not be obtained when you press the shutter button halfway shutter speeds and aperture values are displayed in orange To obtain adequate exposure try adjusting the following settings Activate the flash 111 Change the ISO speed 96 Movies can be recorded in G mode as well by pressing the movie button However some FUNC 46 and Menu 47 settings may be automatically adjusted for movie recording For detai...

Page 93: ...sation The standard exposure set by the camera can be adjusted in 1 3 stop increments in a range of 2 to 2 z z Press the b button As you watch the screen turn the 5 dial to adjust brightness and then press the b button again when finished X X The correction level you specified is now displayed COPY ...

Page 94: ...ure locked With the shutter button pressed halfway press the b button X X is displayed and the exposure is locked z z To unlock AE release the shutter button and press the b button again In this case is no longer displayed 2 Compose the shot and shoot z z After one shot AE is unlocked and is no longer displayed AE Auto Exposure After the exposure is locked you can adjust the combination of shutter...

Page 95: ...n 46 X X The option you configured is now displayed Evaluative For typical shooting conditions including backlit shots Automatically adjusts exposure to match the shooting conditions Center Weighted Avg Determines the average brightness of light across the entire image area calculated by treating brightness in the central area as more important Spot Metering restricted to within the Spot AE Point ...

Page 96: ... For shooting outdoors in fair weather For shooting in cloudy conditions or at twilight For shooting night scenes or in dark rooms To view the automatically set ISO speed when the camera is set to press the shutter button halfway Although choosing a lower ISO speed may reduce image graininess there may be a greater risk of subject blurriness in some shooting conditions Choosing a higher ISO speed ...

Page 97: ...ted to the optimal brightness Insufficient overall image contrast can also be automatically corrected before shooting to make subjects stand out better z z Press the n button choose i Contrast on the 4 tab and then choose Auto 47 X X Once the setting is complete is displayed Under some shooting conditions correction may be inaccurate or may cause images to appear grainy You can also correct existi...

Page 98: ... optimal white balance for the shooting conditions Day Light For shooting outdoors in fair weather Cloudy For shooting in cloudy conditions in the shade or at twilight Tungsten For shooting under ordinary incandescent tungsten lighting and similarly colored fluorescent lighting Fluorescent For shooting under warm white or similarly colored or cool white fluorescent lighting Fluorescent H For shoot...

Page 99: ...hooting Set the white balance under the same light source that will illuminate your shot z z Follow the steps on 98 to choose z z Aim the camera at a plain white subject so that the entire screen is white Press the l button X X The tint of the screen changes once the white balance data has been recorded Colors may look unnatural if you change camera settings after recording white balance data COPY...

Page 100: ...s Sepia Creates sepia tone images B W Creates black and white images Positive Film Combines the effects of Vivid Blue Vivid Green and Vivid Red to produce intense yet natural looking colors resembling images on positive film Lighter Skin Tone Lightens skin tones Darker Skin Tone Darkens skin tones Vivid Blue Emphasizes blues in images Makes the sky ocean and other blue subjects more vivid Vivid Gr...

Page 101: ...ation red green blue and skin tones in a range of 1 5 1 Access the setting screen z z Follow the steps on 100 to choose and then press the l button 2 Configure the setting z z Press the o p buttons to choose an option and then specify the value by pressing the q r buttons or turning the 5 dial z z For stronger more intense effects or darker skin tones adjust the value to the right and for weaker l...

Page 102: ...lfway Continuous Shooting AF Continuous shooting and focusing AF Frame is set to Center and cannot be changed Continuous Shooting LV Continuous shooting with the focus fixed at the position determined in manual focusing In t mode focus is determined by the first shot In t mode 81 AF lock 110 or manual focus mode 103 is changed to For details on the continuous shooting speed in each mode see Specif...

Page 103: ...he camera will not focus To prevent camera shake try mounting the camera on a tripod and shooting with the camera set to 63 Still Images Movies Shooting in Manual Focus Mode When focusing is not possible in AF mode use manual focus You can specify the general focal position and then press the shutter button halfway to have the camera determine the optimal focal position near the position you speci...

Page 104: ...MF AF frame mode or size cannot be changed while focusing manually 105 If you want to change the AF frame mode or size cancel manual focus mode first Focusing is possible when using the digital zoom 60 or digital tele converter 105 but the magnified display will not appear To focus more accurately try attaching the camera to a tripod to stabilize it To hide the magnified display area press the n b...

Page 105: ...factor is displayed on the screen The digital tele converter cannot be used with digital zoom 60 and AF point zoom 72 The respective focal lengths when using 1 6x and 2 0x are 38 4 1152 mm and 48 1440 mm 35mm film equivalent The shutter speed may be equivalent when you move the zoom lever all the way toward i for maximum telephoto and when you zoom in to enlarge the subject to the same size follow...

Page 106: ... aim the camera to capture the subject in an AF frame and then hold the shutter button halfway down As you continue to hold the shutter button halfway recompose the shot as desired and then press the shutter button all the way down Focus Lock Still Images Movies Face Detect Detects people s faces and then sets the focus exposure evaluative metering only and white balance only After you aim the cam...

Page 107: ...jects that are distant or extremely close Subjects that are dark or light Faces in profile at an angle or partly hidden The camera may misinterpret non human subjects as faces No AF frames are displayed if the camera cannot focus when you press the shutter button halfway Still Images Choosing Subjects to Focus On Tracking AF Shoot after choosing a subject to focus on as follows 1 Choose Tracking A...

Page 108: ...ss the shutter button all the way down to shoot X X Even after your shot is still displayed and the camera continues to track the subject Servo AF 109 is set to On and cannot be changed Tracking may not be possible when subjects are too small or move too rapidly or when subject color or brightness matches that of the background too closely AF Point Zoom on the 4 tab is not available e is not avail...

Page 109: ...frame is displayed while you are pressing the shutter button halfway Focusing may not be possible in some shooting conditions In low light conditions Servo AF may not be activated AF frames may not turn blue when you press the shutter button halfway In this case the focus and exposure are set according to the specified AF frame mode If adequate exposure cannot be obtained shutter speeds and apertu...

Page 110: ...camera constantly focuses on subjects until you press the shutter button halfway Off Conserves battery power because the camera does not focus constantly Still Images Movies Shooting with the AF Lock The focus can be locked After you lock the focus the focal position will not change even when you release your finger from the shutter button 1 Lock the focus z z With the shutter button pressed halfw...

Page 111: ...button when the flash is lowered Lift the flash with your finger in advance Still Images Shooting with Slow Synchro With this option the flash fires to increase the brightness of the main subject such as people while the camera shoots at a slow shutter speed to increase the brightness of the background that is out of the flash range For details on the flash range see Specifications 217 1 Lift the ...

Page 112: ...in 1 3 stop increments z z Press the m button choose X in the menu and adjust the setting by either pressing the q r buttons or turning the 5 dial 46 X X Once the setting is complete X is displayed When there is a risk of overexposure the camera automatically adjusts the shutter speed or aperture value during the flash shots to reduce washed out highlights and shoot at optimal exposure However you...

Page 113: ...era at the subject to shoot with the exposure locked With the shutter button pressed halfway press the b button X X The flash fires and when is displayed the flash output level is retained z z To unlock FE release the shutter button and press the b button again In this case is no longer displayed 3 Compose the shot and shoot z z After one shot FE is unlocked and is no longer displayed FE Flash Exp...

Page 114: ...ing the IS Mode Settings z z Press the n button choose IS Mode on the 4 tab and then press the q r buttons to choose the desired option 47 Continuous Optimal image stabilization for the shooting conditions is automatically applied Intelligent IS 58 Shoot Only Image stabilization is active only at the moment of shooting Off Deactivates image stabilization The setting is changed to Continuous for mo...

Page 115: ...115 Tv Av and M Mode Take smarter more sophisticated shots Instructions in this chapter apply to the camera as set to the respective mode 5 COPY ...

Page 116: ...peed z z Turn the 5 dial to set the shutter speed With shutter speeds of 1 3 seconds or slower there will be a delay before you can shoot again as images are processed to remove noise When shooting at low shutter speeds on a tripod you should set IS Mode to Off 114 Orange display of aperture values when you press the shutter button halfway indicates that the settings deviate from standard exposure...

Page 117: ...shutter speeds when you press the shutter button halfway indicates that the settings deviate from standard exposure Adjust the aperture value until the shutter speed is displayed in white or use safety shift see below B Aperture value size of the opening made by the iris in the lens To avoid exposure problems in M and B modes you can have the camera automatically adjust the shutter speed or apertu...

Page 118: ...e level indicator for comparison to the standard exposure level X X The exposure level mark is shown in orange when the difference from standard exposure exceeds 2 stops 2 or 2 is displayed in orange in the lower right when you press the shutter button halfway After you set the shutter speed or aperture value the exposure level may change if you adjust the zoom or recompose the shot Screen brightn...

Page 119: ... in the menu and adjust the setting by either pressing the q r buttons or turning the 5 dial 46 X X Once the setting is complete X is displayed You can also set the flash level by accessing n 47 and choosing Flash Output in Flash Settings on the 4 tab You can set the flash level in M or B mode by accessing n 47 choosing Flash Settings on the 4 tab and then setting Flash Mode to Manual You can also...

Page 120: ...120 COPY ...

Page 121: ...browse or edit them in many ways To prepare the camera for these operations press the 1 button to enter Playback mode It may not be possible to play back or edit images that were renamed or already edited on a computer or images from other cameras 6 COPY ...

Page 122: ...To view the next image press the r button or turn the 5 dial clockwise z z Press and hold the q r buttons to browse through images quickly Images appear grainy at this time z z To access Scroll Display mode turn the 5 dial rapidly In this mode turn the 5 dial to browse through images z z To return to single image display press the m button z z To browse images grouped by shooting date press the o ...

Page 123: ...n X X After the movie is finished is displayed To switch to Shooting mode from Playback mode press the shutter button halfway To deactivate Scroll Display press the n button choose Scroll Display on the 1 tab and then choose Off If you prefer to have the most recent shot displayed when you enter playback mode press the n button and on the 1 tab choose Resume and then Last shot To change the transi...

Page 124: ...played However simple information display is not available To change the initial display mode press the n button and choose Review Info on the 4 tab 76 Still Images Movies Overexposure Warning for Image Highlights Washed out highlights in the image flash on the screen in detailed information display Still Images Movies Histogram High Dark Low Bright z z The graph in detailed information display is...

Page 125: ...ed over faces detected later in Playback mode X X The portion of the image in the orange frame is magnified 2 Switch frames z z Move the zoom lever toward k once X X The screen at left is displayed z z To switch to a different frame when there are multiple frames press the m button 3 Zoom in or out or view other image areas z z As you examine the focus use the zoom lever to zoom in or out Press th...

Page 126: ...display images in an index Moving the lever again will increase the number of images shown z z To display fewer images move the zoom lever toward k Fewer images are shown each time you move the lever 2 Choose an image z z Turn the 5 dial to scroll through the images z z Press the o p q r buttons to choose an image X X An orange frame is displayed around the selected image z z Press the m button to...

Page 127: ...r movies Still Images Movies 1 Choose the first condition for image display or navigation z z In single image display press the o button and then press the o p buttons to choose a display filter z z When is selected you can view only images matching this condition by pressing the q r buttons To perform an action for all of these images together press the m button and go to step 3 2 Choose the seco...

Page 128: ...not be available To show or hide information press the l button in step 2 Options for viewing the images found in step 3 include Navigating Through Images in an Index 126 Viewing Slideshows 130 and Magnifying Images 129 You can protect erase or print all images found or add them to a photobook by choosing Select All Images in Search in Protecting Images 132 Erasing All Images 137 Adding Images to ...

Page 129: ...ut 10x by continuing to hold the zoom lever z z To zoom out move the zoom lever toward g You can return to single image display by continuing to hold it 2 Move the display position and switch images as needed z z To move the display position press the o p q r buttons z z To switch to other images while zoomed turn the 5 dial You can return to single image display from magnified display by pressing...

Page 130: ... Press the o p buttons or turn the 5 dial to choose Start and then press the m button X X The slideshow will start a few seconds after Loading image is displayed z z Press the n button to stop the slideshow The camera s power saving functions 42 are deactivated during slideshows To pause or resume slideshows press the m button You can switch to other images during playback by pressing the q r butt...

Page 131: ...ress the m button 47 X X Four candidate images are displayed 2 Choose an image z z Press the o p q r buttons to choose the image you want to view next X X Your chosen image is displayed in the center surrounded by the next four candidate images z z For full screen display of the center image press the m button To restore the original display press the m button again z z Press the n button to resto...

Page 132: ...ss the n button and choose Protect on the 1 tab 47 2 Choose a selection method z z Choose a menu item and a setting as desired 47 z z To return to the menu screen press the n button Protected images on a memory card will be erased if you format the card 160 161 Protected images cannot be erased using the camera s erasure function To erase them this way first cancel protection COPY ...

Page 133: ...button is displayed z z To cancel protection press the m button again is no longer displayed z z Repeat this process to specify other images 3 Protect the image z z Press the n button A confirmation message is displayed z z Press the q r buttons or turn the 5 dial to choose OK and then press the m button Images will not be protected if you switch to Shooting mode or turn the camera off before fini...

Page 134: ... the m button z z Press the q r buttons or turn the 5 dial to choose an image and then press the m button 3 Choose an ending image z z Press the r button to choose Last image and then press the m button z z Press the q r buttons or turn the 5 dial to choose an image and then press the m button z z Images before the first image cannot be selected as the last image COPY ...

Page 135: ...ps 2 and 3 is displayed Specifying All Images at Once 1 Choose Select All Images z z Following step 2 on 132 choose Select All Images and press the m button 2 Protect the images z z Press the o p buttons or turn the 5 dial to choose Protect and then press the m button To cancel protection for groups of images choose Unlock in step 4 of Selecting a Range or in step 2 of Specifying All Images at Onc...

Page 136: ...sed 1 Choose an image to erase z z Press the q r buttons or turn the 5 dial to choose an image 2 Erase the image z z Press the a button z z After Erase is displayed press the q r buttons or turn the 5 dial to choose Erase and then press the m button X X The current image is now erased z z To cancel erasure press the q r buttons or turn the 5 dial to choose Cancel and then press the m button COPY ...

Page 137: ...oose Erase on the 1 tab 47 2 Choose a selection method z z Choose a menu item and a setting as desired 47 z z To return to the menu screen press the n button Choosing Images Individually 1 Choose Select z z Following step 2 above choose Select and press the m button 2 Choose an image z z Once you follow step 2 on 133 to choose an image is displayed z z To cancel erasure press the m button again is...

Page 138: ...dial to choose OK and then press the m button Selecting a Range 1 Choose Select Range z z Following step 2 in Choosing a Selection Method 137 choose Select Range and press the m button 2 Choose images z z Follow steps 2 3 on 134 to specify images 3 Erase the images z z Press the p button to choose Erase and then press the m button COPY ...

Page 139: ...Once 1 Choose Select All Images z z Following step 2 in Choosing a Selection Method 137 choose Select All Images and press the m button 2 Erase the images z z Press the q r buttons or turn the 5 dial to choose OK and then press the m button COPY ...

Page 140: ... choose Rotate on the 1 tab 47 2 Rotate the image z z Press the q r buttons or turn the 5 dial to choose an image z z The image is rotated 90 each time you press the m button z z To return to the menu screen press the n button Movies with an image quality of cannot be rotated Rotation is not possible when Auto Rotate is set to Off 141 COPY ...

Page 141: ...mera z z Press the n button choose Auto Rotate on the 1 tab and then choose Off 47 Images cannot be rotated 140 when you set Auto Rotate to Off Additionally images already rotated will be displayed in the original orientation In Smart Shuffle 131 mode even if Auto Rotate is set to Off images shot vertically will be displayed vertically and rotated images will be displayed in the rotated orientatio...

Page 142: ... z z Press the n button and choose Favorites on the 1 tab 47 2 Choose an image z z Press the q r buttons or turn the 5 dial to choose an image and then press the m button is displayed z z To untag the image press the m button again is no longer displayed z z Repeat this process to choose additional images 3 Finish the setup process z z Press the n button A confirmation message is displayed z z Pre...

Page 143: ...hat images are automatically categorized at the time of shooting according to shooting conditions Images with detected faces or images shot in I mode Images detected as or in A mode Images shot in P or t mode Choosing a Selection Method 1 Access the setting screen z z Press the n button and then choose My Category on the 1 tab 47 2 Choose a selection method z z Choose a menu item and a setting as ...

Page 144: ...y and then press the m button is displayed z z To cancel selection press the m button again is no longer displayed z z Repeat this process to choose additional images 4 Finish the setup process z z Press the n button A confirmation message is displayed Press the q r buttons or turn the 5 dial to choose OK and then press the m button Images will not be assigned to a category if you switch to Shooti...

Page 145: ... on 134 to specify images 3 Choose a category z z Press the p button to choose the type of image and then press the q r buttons or turn the 5 dial to choose a category 4 Finish the setup process z z Press the p button to choose Select and then press the m button You can clear the selection of all images in the Select Range category by choosing Deselect in step 4 COPY ...

Page 146: ...e Resize on the 1 tab 47 2 Choose an image z z Press the q r buttons or turn the 5 dial to choose an image and then press the m button 3 Choose an image size z z Press the q r buttons or turn the 5 dial to choose the size and then press the m button X X Save new image is displayed 4 Save the new image z z Press the q r buttons or turn the 5 dial to choose OK and then press the m button X X The ima...

Page 147: ... is now displayed Editing is not possible for images saved as in step 3 Images cannot be resized to a higher resolution Still Images Cropping You can specify a portion of an image to save as a separate image file 1 Choose Cropping z z Press the n button and then choose Cropping on the 1 tab 47 2 Choose an image z z Press the q r buttons or turn the 5 dial to choose an image and then press the m bu...

Page 148: ... frame press the o p q r buttons z z To change the frame orientation press the l button z z Faces detected in the image are enclosed in gray frames in the upper left image To crop the image based on this frame turn the 5 dial to switch to the other frame z z Press the m button 4 Save as a new image and review z z Follow steps 4 5 on 146 147 Editing is not possible for images shot at a resolution o...

Page 149: ...buttons or turn the 5 dial to choose an image and then press the m button 3 Choose an option z z Press the q r buttons or turn the 5 dial to choose an option and then press the m button 4 Save as a new image and review z z Follow steps 4 5 on 146 147 Image quality of pictures you repeatedly edit this way will be a little lower each time and you may not be able to obtain the desired color The color...

Page 150: ...ast z z Press the n button and then choose i Contrast on the 1 tab 47 2 Choose an image z z Press the q r buttons or turn the 5 dial to choose an image and then press the m button 3 Choose an option z z Press the q r buttons or turn the 5 dial to choose an option and then press the m button 4 Save as a new image and review z z Follow steps 4 5 on 146 147 For some images correction may be inaccurat...

Page 151: ...ge z z Press the q r buttons or turn the 5 dial to choose an image 3 Correct the image z z Press the m button X X Red eye detected by the camera is now corrected and frames are displayed around corrected image areas z z Enlarge or reduce images as needed Follow the steps in 129 4 Save as a new image and review z z Press the o p q r buttons or turn the 5 dial to choose New File and then press the m...

Page 152: ...ges Some images may not be corrected accurately To overwrite the original image with the corrected image choose Overwrite in step 4 In this case the original image will be erased Protected images cannot be overwritten COPY ...

Page 153: ... turn the 5 dial to move Cut the beginning of the movie from by choosing and cut the end of the movie by choosing z z Even if you move to a position other than a mark choosing will only cut the portion from the nearest to the left and choosing will cut the portion from the nearest to the right 3 Review the edited movie z z Press the o p buttons to choose and then press the m button The edited movi...

Page 154: ...e movie is now saved as a new file To overwrite the original movie with the cut one choose Overwrite in step 4 In this case the original movie will be erased Overwrite is only available when memory cards lack sufficient free space Movies may not be saved if the battery runs out while saving is in progress When editing movies you should use a fully charged battery or an AC adapter kit sold separate...

Page 155: ...155 Setting Menu Customize or adjust basic camera functions for greater convenience 7 COPY ...

Page 156: ...lso be silenced by holding down the l button as you turn the camera on Sound is not played during movies if you mute camera sounds 122 To restore sound during movies press the o button Adjust volume with the o p buttons as needed Sound settings cannot be changed in mode 78 Adjusting the Volume Adjust the volume of individual camera sounds as follows z z Choose Volume and then press the m button z ...

Page 157: ... press the q r buttons to choose an option 1 Preset sounds cannot be modified 2 Preset sounds Can be changed by using the included software Sound settings cannot be changed in mode 78 Hiding Hints and Tips Hints and tips are normally shown when you choose FUNC menu 46 or Menu 47 items If you prefer you can deactivate this information z z Choose Hints Tips and then choose Off COPY ...

Page 158: ... will override the LCD Brightness setting on the 3 tab To restore the original brightness press and hold the l button again for at least one second or restart the camera Start up Screen Customize the start up screen shown after you turn the camera on as follows z z Choose Start up Image and then press the m button z z Press the q r buttons or turn the 5 dial to choose an option No start up image 1...

Page 159: ...n 2 Choose one of your shots z z Choose an image and press the m button After Register is displayed choose OK either press the q r buttons or turn the 5 dial and then press the m button The previous start up setting is overwritten when you assign a new start up image You can assign the operating sounds and start up image for your camera from the included software Refer to the Software Guide 31 for...

Page 160: ... the o p buttons to choose Cancel choose OK either press the q r buttons or turn the 5 dial and then press the m button 3 Format the memory card z z To begin the formatting process press the o p buttons or turn the 5 dial to choose OK and then press the m button z z When formatting is finished Memory card formatting complete is displayed Press the m button Formatting or erasing data on a memory ca...

Page 161: ...mputer or take other steps to back them up Perform low level formatting z z On the screen in step 2 on 160 press the o p buttons or turn the 5 dial to choose Low Level Format and then select this option mark with a by pressing the q r buttons z z Follow steps 2 3 on 160 to continue with the formatting process Low level formatting takes longer than Formatting Memory Cards 160 because data is erased...

Page 162: ...ory cards or when a new folder is created Regardless of the option selected in this setting shots may be numbered consecutively after the last number of existing images on newly inserted memory cards To start saving shots from 0001 use an empty or formatted 160 memory card Refer to the Software Guide 31 for information on the card folder structure and image formats Date Based Image Storage Instead...

Page 163: ...c Power Saving Adjustment Adjust the timing of automatic camera and screen deactivation Auto Power Down and Display Off respectively as needed 42 1 Access the Power Saving screen z z Choose Power Saving and then press the m button 2 Configure the settings z z After choosing an item press the q r buttons to adjust it as needed To conserve battery power you should normally choose On for Auto Power D...

Page 164: ... zone 1 Specify your destination z z Choose Time Zone and then press the m button z z Press the o p buttons or turn the 5 dial to choose World and then press the m button z z Press the q r buttons or turn the 5 dial to choose the destination z z To set daylight saving time 1 hour ahead press the o p buttons to choose z z Press the m button 2 Switch to the destination time zone z z Press the o p bu...

Page 165: ... press the m button 2 Configure the setting z z Press the q r buttons to choose an item and then adjust the setting either by pressing the o p buttons or turning the 5 dial Metric Non Metric Display Change the unit of measurement shown in the MF indicator 104 and zoom bar 52 from m cm to ft in as needed z z Choose Units and then choose ft in COPY ...

Page 166: ...lay Language Change the display language as needed 1 Access the Language screen z z Choose Language and then press the m button 2 Configure the setting z z Press the o p q r buttons or turn the 5 dial to choose a language and then press the m button You can also access the Language screen in Playback mode by pressing and holding the m button and immediately pressing the n button Adjusting Other Se...

Page 167: ...fault settings z z Press the q r buttons or turn the 5 dial to choose OK and then press the m button X X Default settings are now restored The following functions are not restored to default settings 3 tab settings Date Time 22 Language 25 Time Zone 164 Video System 176 and the image assigned to Start up Image 158 Custom white balance data you have recorded 99 Shooting mode chosen in K 80 or 82 mo...

Page 168: ...168 COPY ...

Page 169: ...169 Accessories Use included accessories effectively and enjoy the camera in more ways with optional Canon accessories and other compatible accessories sold separately 8 COPY ...

Page 170: ... on an uncharged battery Long term battery storage After using up all remaining battery power remove the battery from the camera Store the battery with the cover attached Storing a partially charged battery over extended periods about a year may shorten its life or affect performance Using the battery charger abroad The charger can be used in areas with 100 240 V AC power 50 60 Hz For power outlet...

Page 171: ...hold power Recommended when using the camera over extended periods or when connecting the camera to a printer or computer Cannot be used to charge the camera battery The battery charger and AC adapter kit can be used in areas with 100 240 V AC power 50 60 Hz For power outlets in a different format use a commercially available adapter for the plug Never use an electrical transformer designed for tr...

Page 172: ... the larger TV screen HDMI Cable HTC 100 z z For connecting the camera to an HDMI input of a high definition TV Printers Canon PictBridge Compatible Printers z z Printing images without a computer is possible by connecting the camera to a Canon PictBridge compatible printer For details visit your nearest Canon dealer COPY ...

Page 173: ...4 Still Images Movies Playback on a High Definition TV Connecting the camera to an HDTV with the HDMI Cable HTC 100 sold separately enables you to view your shots on the larger screen of the TV Movies shot at a resolution of can be viewed in high definition 1 Make sure the camera and TV are off 2 Connect the camera to the TV z z On the TV insert the cable plug fully into the HDMI input as shown z ...

Page 174: ...ecting the cable Camera operating sounds are not played while the camera is connected to an HDTV Still Images Movies Controlling the Camera with a TV Remote Connecting the camera to an HDMI CEC compatible TV enables playback including slideshow playback using the TV remote control In this case you will need to adjust some TV settings For details refer to the TV user manual 1 Configure the setting ...

Page 175: ...n the TV Return Closes the menu Play Movie Starts movie playback Only displayed when a movie is selected Slideshow Starts slideshow playback To switch images during playback press the q r buttons on the remote control Index Playback Displays multiple images in an index l Change Display Switches display modes 45 Pressing the n button on the camera will switch control to the camera itself which will...

Page 176: ...Red Red White Yellow Yellow White 2 Connect the camera to the TV z z On the TV insert the cable plugs fully into the video inputs as shown z z On the camera open the terminal cover and insert the cable plug fully into the camera terminal 3 Display images z z Follow steps 3 4 on 174 to display images Correct display is not possible unless the camera video output format NTSC or PAL matches the TV fo...

Page 177: ...g battery level 1 Make sure the camera is off Terminals 2 Insert the coupler z z Follow step 2 on 20 to open the cover z z Insert the coupler facing the direction shown just as you would a battery following step 3 on 20 z z Follow step 5 on 21 to close the cover 3 Connect the adapter to the coupler z z Open the cover and insert the adapter plug fully into the coupler 4 Connect the power cord z z I...

Page 178: ...nnect the adapter or unplug the power cord while the camera is still on This may erase your shots or damage the camera Do not attach the adapter or adapter cord to other objects Doing so could result in malfunction or damage to the product COPY ...

Page 179: ...lso refer to the printer manual for additional information Still Images Easy Print Easily print your shots by connecting the camera to a PictBridge compatible printer sold separately with the included interface cable 2 1 Make sure the camera and printer are off 2 Connect the camera to the printer z z Open the cover Holding the smaller cable plug in the orientation shown insert the plug fully into ...

Page 180: ...7 Print the image z z Press the o p buttons or turn the 5 dial to choose Print and then press the m button X X Printing now begins z z To print other images repeat steps 5 7 after printing is finished z z When you are finished printing turn the camera and printer off and disconnect the interface cable For Canon PictBridge compatible printers sold separately see 172 COPY ...

Page 181: ...ches current printer settings Date Prints images with the date added File No Prints images with the file number added Both Prints images with both the date and file number added Off Default Matches current printer settings Off On Uses information from the time of shooting to print under optimal settings Red Eye 1 Corrects red eye No of Copies Choose the number of copies to print Cropping Specify a...

Page 182: ...ing frame is now displayed indicating the image area to print 2 Adjust the cropping frame as needed z z To resize the frame move the zoom lever or turn the 5 dial z z To move the frame press the o p q r buttons z z To rotate the frame press the l button z z When finished press the m button 3 Print the image z z Follow step 7 on 180 to print Cropping may not be possible at small image sizes or at s...

Page 183: ...size z z Press the o p buttons or turn the 5 dial to choose an option and then press the m button 3 Choose a type of paper z z Press the o p buttons or turn the 5 dial to choose an option and then press the m button 4 Choose a layout z z Press the o p buttons or turn the 5 dial to choose an option z z When choosing N up press the q r buttons to specify the number of images per sheet z z Press the ...

Page 184: ...on of L and an aspect ratio of 4 3 Fixed Size Choose the print size Choose from 3 5 x 5 in postcard or wide format prints Still Images Printing ID Photos 1 Choose ID Photo z z Following steps 1 4 on 183 choose ID Photo and press the m button 2 Choose the long and short side length z z Press the o p buttons or turn the 5 dial to choose an item Choose the length by pressing the q r buttons and then ...

Page 185: ... the 5 dial to choose and then press the q r buttons to choose the printing method 3 Print the image Movie Printing Options Single Prints the current scene as a still image Sequence Prints a series of scenes a certain interval apart on a single sheet of paper You can also print the folder number file number and elapsed time for the frame by setting Caption to On To cancel printing in progress pres...

Page 186: ...ngs Specify the printing format whether to add the date or file number and other settings as follows These settings apply to all images in the print list z z Press the n button and then choose Print Settings on the 2 tab Choose and configure settings as desired 47 Print Type Standard One image is printed per sheet Index Smaller versions of multiple images are printed per sheet Both Both standard a...

Page 187: ...e date is printed in a format matching setting details in Date Time on the 3 tab accessible by pressing the n button 22 Index printing is not available on some Canon PictBridge compatible printers sold separately Still Images Setting Up Printing for Individual Images 1 Choose Select Images Qty z z Press the n button choose Select Images Qty on the 2 tab and then press the m button 2 Choose an imag...

Page 188: ...fied for index prints You can only choose which images to print by following step 2 z z When finished press the n button to return to the menu screen Still Images Setting Up Printing for a Range of Images 1 Choose Select Range z z Following step 1 on 187 choose Select Range and press the m button 2 Choose images z z Follow steps 2 3 on 134 to specify images 3 Configure the print settings z z Press...

Page 189: ... print settings z z Press the q r buttons or turn the 5 dial to choose OK and then press the m button Still Images Clearing All Images from the Print List 1 Choose Clear All Selections z z Following step 1 on 187 choose Clear All Selections and press the m button 2 Confirm clearing the print list z z Press the q r buttons or turn the 5 dial to choose OK and then press the m button COPY ...

Page 190: ...mages to a Photobook Photobooks can be set up on the camera by choosing up to 998 images on a memory card and importing them into the included software on your computer where they are stored in their own folder This is convenient when ordering printed photobooks online or printing photobooks with your own printer Choosing a Selection Method z z Press the n button choose Photobook Set up on the 1 t...

Page 191: ...Following the procedure on 190 choose Select and press the m button 2 Choose an image z z Press the q r buttons or turn the 5 dial to choose an image and then press the m button X X is displayed z z To remove the image from the photobook press the m button again is no longer displayed z z Repeat this process to specify other images z z When finished press the n button to return to the menu screen ...

Page 192: ...e print settings z z Press the q r buttons or turn the 5 dial to choose OK and then press the m button Still Images Removing All Images from a Photobook 1 Choose Clear All Selections z z Following the procedure on 190 choose Clear All Selections and press the m button 2 Confirm clearing the photobook z z Press the q r buttons or turn the 5 dial to choose OK and then press the m button COPY ...

Page 193: ...d computer settings For details refer to the card s user manual Poor Eye Fi connections may cause image transfer to take a long time and transfer may be interrupted in some cases Eye Fi cards may become hot due to their transfer functions Battery power will be consumed faster than in normal use Camera operation may become sluggish To resolve this try setting Eye Fi trans to Disable Connection stat...

Page 194: ...splayed Disabling Eye Fi Transfer Configure the setting as follows to disable Eye Fi transfer by the card if necessary Choose Disable in Eye Fi trans z z Press the n button choose Eye Fi Settings on the 3 tab and then press the m button z z Choose Eye Fi trans and then choose Disable Eye Fi Settings is not shown unless an Eye Fi card is in the camera with its write protect tab in the unlocked posi...

Page 195: ...195 Appendix Helpful information when using the camera 9 COPY ...

Page 196: ...oon after charging it has reached the end of its life Purchase a new battery The lens is not retracted Do not open the memory card battery cover while the camera is on Close the cover turn the camera on and then turn it off again 21 The battery is swollen Battery swelling is normal and does not pose any safety concerns However if battery swelling prevents the battery from fitting in the camera con...

Page 197: ...the way down to shoot 43 Make sure subjects are within focusing range 217 Set AF assist Beam to On 75 Confirm that unneeded functions such as macro are deactivated Try shooting with focus lock or AF lock 106 110 No AF frames are displayed and the camera does not focus when the shutter button is pressed halfway To have AF frames displayed and the camera focus correctly try composing the shot with h...

Page 198: ...ooting at closer range Edit images using red eye correction 151 Recording to the memory card takes too long or continuous shooting is slower Use the camera to perform low level formatting of the memory card 161 Shooting settings or FUNC menu settings are not available Available setting items vary by shooting mode Refer to Functions Available in Each Shooting Mode FUNC Menu and Shooting Menu 206 21...

Page 199: ...r frames may be dropped and audio may skip if computer performance is inadequate Sound is not played during movies Adjust the volume 30 123 if you have activated Mute 156 or the sound in the movie is faint No sound is played for movies shot in 83 mode because audio is not recorded in this mode Memory Card The memory card is not recognized Restart the camera with the memory card in it 20 Computer C...

Page 200: ...pace 20 Charge the battery 20 No Image The memory card does not contain any images that can be displayed Protected 132 Unidentified Image Incompatible JPEG Image too large Cannot play back AVI RAW Unsupported or corrupt images cannot be displayed It may not be possible to display images that were edited or renamed on a computer or images shot with another camera Cannot magnify Cannot play back thi...

Page 201: ...n the 3 menu change File Numbering to Auto Reset 162 or format the memory card 160 Lens Error This error may occur if the lens is held while it is moving or when the camera is used in dusty or sandy locations Frequent display of this error message may indicate camera damage In this case contact a Canon Customer Support Help Desk A camera error was detected error number If this error message is dis...

Page 202: ...oting mode 206 Scene icon 57 Focusing range 103 Flash mode 111 Red eye correction 69 Flash exposure compensation Flash output level 112 119 AF frame 105 Spot AE point frame 95 Date stamp 65 ISO speed 96 Eye Fi connection status 193 AE lock 94 FE lock 113 Shutter speed 116 118 Aperture value 117 118 Exposure compensation level 93 i Contrast 97 Zoom bar 52 AF lock 110 Manual focus 103 IS mode icon 5...

Page 203: ...on the camera automatically rotates images as needed However the orientation may not be detected correctly when the camera is pointed straight up or down Battery Level An on screen icon or message indicates the battery charge level Display Details Sufficient charge Slightly depleted but sufficient Blinking red Nearly depleted charge the battery soon Charge the battery Depleted charge the battery i...

Page 204: ...ed via Eye Fi 193 Battery level 203 Metering method 95 Folder number File number 162 Current image no Total no of images Shutter speed still images 116 118 Image quality Frame rate movies 70 Aperture value 117 118 i Contrast 97 150 Flash 111 Flash exposure compensation 112 Focusing range 103 File size Still images Resolution Movies Playback time Protection 132 Favorites 142 My Colors 100 149 Red e...

Page 205: ...ng down the m button Previous Frame For fast rewind keep holding down the m button Next Frame For fast forward keep holding down the m button Skip Forward To continue skipping forward keep holding down the m button Edit 153 c Shown when the camera is connected to a PictBridge compatible printer 179 Displays the frame approx 4 sec before or after the current frame To skip forward or back during mov...

Page 206: ... Aperture Value O O Shutter Speed O O Program Shift 94 O O O AE Lock FE Lock 94 113 4 O O O AE Lock Movie Exposure Shift 89 Focusing Range 103 O O O O O e f O O O O O Tracking AF 66 107 O O O O O Screen Display 45 Information Display No Information Display O O O O O 1 Cannot be set to 0 seconds in modes without selection of the number of shots 2 One shot cannot be modified in modes without selecti...

Page 207: ...O O O O O O O O O O O O O O O O O O O O O O O O O O O O O O O O O O O O O O O O O O O O O O O O O O O O O O O O O O O O O O O O O O O O O O O O 3 O O O O O O O O O O O O O O O O O O O O O O O O O O O O O O O O O O O O O O O O O O O O O O O O O O O O Available or set automatically Not available COPY ...

Page 208: ...4 O O O Metering Method 95 O O O O O O O O O O O O O Still Image Aspect Ratio 67 O O O O Resolution 68 O O O O O O O O O O O O O Compression 70 O O O O O O O O O Movie Quality 70 O O O O O O O O O 1 White balance is not available 2 Set in a range of 1 5 contrast sharpness color saturation red green blue and skin tone 3 is set with f AF lock or t 4 Only and are available 5 Synchronizes with the asp...

Page 209: ...O O O O O O O O O O O O O O O O O O O O O O O O O O O O O O O O O O O O O O O O O O O O O O O O O O O O O O O O O 4 O O O O O O O O O O O O O O O O O O O O O O O O O O O O O O O O O O O O O O O O O O O O O O O O O O O O O O O O O 5 O O O O O O O O O O O O O O 5 O O O O O O O Available or set automatically Not available COPY ...

Page 210: ...2 0x O O O O O AF Point Zoom 72 On O O O O O Off O O O O O Servo AF 109 On O O O O O Off 4 O O O O O Continuous AF 110 On O O O O O Off O O O O O AF assist Beam 75 On O O O O O Off O O O O O MF Point Zoom 103 On O O O O O Off O O O O O Safety MF 104 On O O O O O Off O O O O O 1 Operation when no faces are detected varies by shooting mode 2 Only available by pressing the o button 66 3 Available whe...

Page 211: ...O O O O O O O O O O O O O O O O O O O O O O O O O O O O O O O O O O O O O O O O O O O O O O O O O O O O O O O O O O O O O O O O O O O O O O O O O O O O O O O O O O O O O O O O O O O O O O O O O O O O O O O O O O O O O O O O O O O O O O O O O O O O O O O O O O O O O O O O O O O O O O O O O O O O O O O O O O O O O O O O O O Available or set automatically Not available COPY ...

Page 212: ... O O O O i Contrast 97 Auto O O O O Off O O O O O Safety Shift 117 On O O Off O O O O O Wind Filter 71 On Off O O O O O Review 76 Off Quick 2 10 sec Hold O O O O O Review Info 76 Off Detailed Focus Check O O O O O Blink Detection 74 On O O O O O Off O O O O O Grid Lines 72 On O O O O O Off O O O O O IS Mode 114 Off Continuous O O O O O Shoot Only O O O O O Framing Assist 61 Large Medium Small O O ...

Page 213: ... O O O O O O O O O O O O O O O O O O O O O O O O O O O O O O O O O O O O O O O O O O O O O O O O O O O O O O O O O O O O O O O O O O O O O O O O O O O O O O O O O O O O O O O O O O O O O O O O O O O O O O O O O O O O O O O O O O O O O O O O O O O O O O O O O O O O O O O O O O O O O O O O O O O O O O O O O O O O O O O O O O O O O O O Available or set automatically Not available COPY ...

Page 214: ...e 156 Lens Retract 163 Sound Options 157 Power Saving 42 163 Hints Tips 157 Units 165 Date Time 22 Video System 176 Time Zone 164 Ctrl via HDMI 174 LCD Brightness 158 Eye Fi Settings 193 Start up Image 158 159 Certification Logo Display 166 Format 160 161 Language 25 File Numbering 162 Reset All 167 COPY ...

Page 215: ... Erase 136 Resize 146 Protect 132 My Colors 149 Rotate 140 Scroll Display 122 Favorites 142 Auto Rotate 141 My Category 143 Resume 123 Photobook Set up 190 Transition 123 i Contrast 150 2 Print Menu Item Ref Page Item Ref Page Print Select All Images 189 Select Images Qty 187 Clear All Selections 189 Select Range 188 Print Settings 186 COPY ...

Page 216: ... solvents to clean the camera or screen Use a blower brush to remove dust from the lens If cleaning is difficult contact a Canon Customer Support Help Desk To prevent condensation from forming on the camera after sudden temperature changes when the camera is transferred from cold to warm environments put the camera in an airtight resealable plastic bag and let it gradually adjust to the temperatur...

Page 217: ...sed on CIPA Guidelines Approx 341 g approx 12 0 oz including the battery and memory card Approx 318 g approx 11 2 oz camera body only Number of Shots Recording Time Playback Time Number of Shots Approx 195 Movie Recording Time 1 Approx 50 min Continuous Shooting 2 Approx 1 hr 30 min Playback Time Approx 4 hr 1Time under default camera settings when normal operations are performed such as shooting ...

Page 218: ...ver since 16 9 images have a setting of 1920 x 1080 pixels their data size will be larger than 4 3 images Recording Time per Memory Card Image Quality Recording Time per Memory Card 8 GB 32 GB 49 min 18 sec 1 3 hr 19 min 03 sec 2 1 hr 28 min 59 sec 5 hr 59 min 10 sec 1 27 min 28 sec for iFrame movies 89 2 1 hr 50 min 52 sec for iFrame movies 89 The values in the table are measured according to Can...

Page 219: ...ous Shooting Mode Speed G W Approx 0 8 shots sec Approx 0 5 shots sec Approx 0 6 shots sec Approx 2 8 shots sec Shutter Speed A mode automatically set range 1 1 1600 sec Range in all shooting modes 15 1 1600 sec M mode available values sec 15 13 10 8 6 5 4 3 2 2 5 2 1 6 1 3 1 0 8 0 6 0 5 0 4 0 3 1 4 1 5 1 6 1 8 1 10 1 13 1 15 1 20 1 25 1 30 1 40 1 50 1 60 1 80 1 100 1 125 1 160 1 200 1 250 1 320 1...

Page 220: ...ted Input 100 240 V AC 50 60 Hz 0 085 A 100 V 0 05 A 240 V Rated Output 4 2 V DC 0 7 A Charging Time Approx 1 hour 55 min when using NB 6L Charge Indicator Charging orange Fully charged green two indicator system Operating Temperature 0 40 C 32 104 F Dimensions 58 6 x 86 4 x 24 1 mm 2 31 x 3 40 x 0 95 in Weight CB 2LY Approx 70 g approx 2 47 oz CB 2LYE Approx 61 g approx 2 15 oz excluding power co...

Page 221: ...te balance 99 D Date time Adding to images 65 Changing 23 Setting 22 World clock 164 DC coupler 177 Defaults Reset all DIGITAL CAMERA Solution Disk 2 Digital tele converter 105 Digital zoom 60 Discreet mode shooting mode 78 Display language 25 DPOF 186 Drive mode 102 E Editing Cropping 147 i Contrast 150 My Colors 149 Red eye correction 151 Resizing images 146 Erasing 136 Error messages 200 Exposu...

Page 222: ...ISO speed 96 L Lamp 75 Live View Control shooting mode 79 Low light shooting mode 80 M Macro focus mode 103 Magnified display 129 Manual focus focus mode 103 Memory cards 3 Menu Basic operations 47 Table 206 Metering method 95 Miniature effect shooting mode 83 Monochrome shooting mode 86 Movies Editing 153 Image quality resolution frame rate 70 Recording time 218 M shooting mode 118 My Category 14...

Page 223: ...e Shooting information 202 Single image display 29 Slideshow 130 Smart Shuffle 131 Snow shooting mode 81 Software DIGITAL CAMERA Solution Disk 2 Installation 33 Sounds 156 Stereo AV cable 173 Strap 2 18 Super vivid shooting mode 82 T Terminal 34 173 176 177 179 Toy camera effect shooting mode 85 Tracking AF 66 107 Traveling with the camera 164 170 Troubleshooting 196 TV display 173 Tv shooting mod...

Page 224: ...224 MEMO COPY ...

Page 225: ...RUCTIONS DANGER TO REDUCE THE RISK OF FIRE OR ELECTRIC SHOCK CAREFULLY FOLLOW THESE INSTRUCTIONS For connection to a supply not in the U S A use an attachment plug adapter of the proper configuration for the power outlet if needed USA and Canada only The Lithium ion polymer battery that powers the product is recyclable Please call 1 800 8 BATTERY for information on how to recycle this battery COPY...

Page 226: ... be determined by turning the equipment off and on the user is encouraged to try to correct the interference by one or more of the following measures Reorient or relocate the receiving antenna Increase the separation between the equipment and receiver Connect the equipment into an outlet on a circuit different from that to which the receiver is connected Consult the dealer or an experienced radio ...

Page 227: ... that was encoded only 1 for a personal and non commercial purpose or 2 by a video provider licensed under the AT T patents to provide MPEG 4 compliant video No license is granted or implied for any other use for MPEG 4 standard Notice displayed in English as required Disclaimer Reprinting transmitting or storing in a retrieval system any part of this guide without the permission of Canon is prohi...

Page 228: ...CDD E493 010 CANON INC 2012 COPY ...

Reviews: