background image

8

1  Initializing using the machine’s Operation Panel

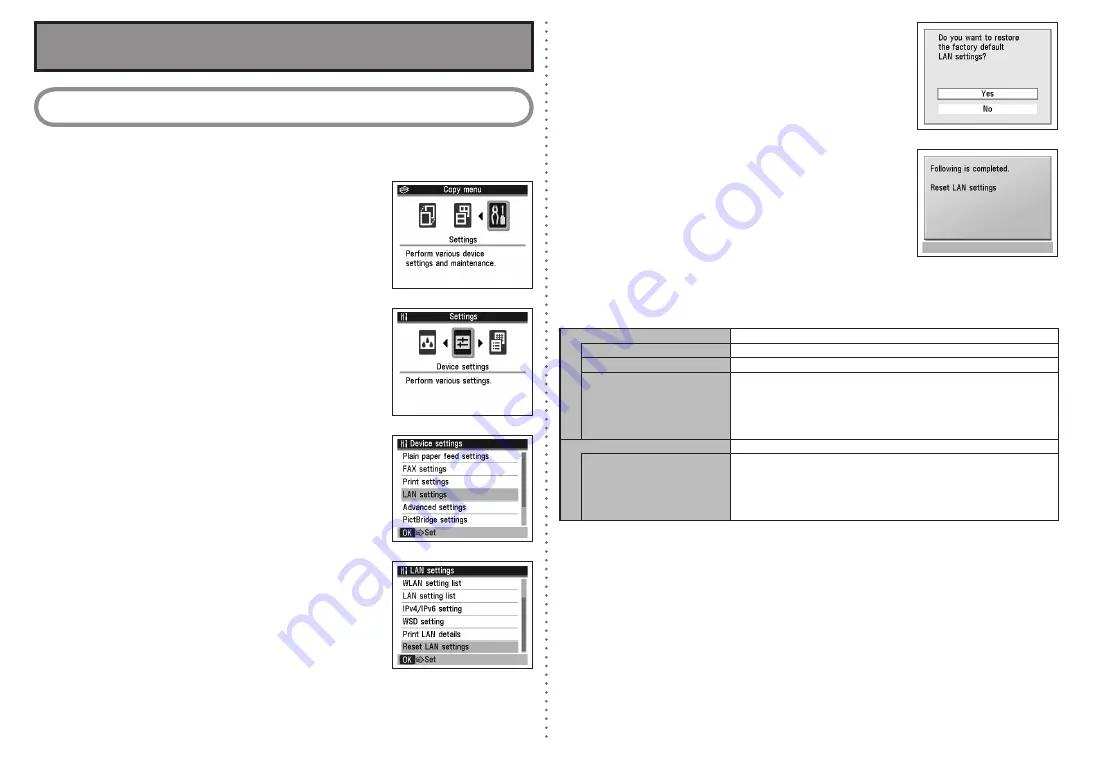
Follow these steps to restore the machine’s network settings to factory defaults.

a

  Press the 

Menu

 button, use the 

[

 or 

]

 button to select 

Settings

then press the 

OK

 button.

b

  Select 

Device settings

 and press the 

OK

 button.

c

  Use the 

{

 or 

}

 button to select 

LAN settings

, then press the 

OK

 button.

d

  Select 

Reset LAN settings

 and press the 

OK

 button.

e

  Make sure that 

Yes

 is selected and press the 

OK

 button.

f

  Confirm that the right screen appears.

The machine’s network settings are restored to factory defaults.

Restoring the Machine to the Factory Settings

Factory Default

Wireless LAN

Active

SSID

BJNPSETUP

Data encryption

Disable

TCP/IP settings

Obtain an IP address automatically

IP address: 192.168.1.123 (default)
Subnet mask: 255.255.255.0
Default gateway: 0.0.0.0


Wired LAN

Inactive

TCP/IP settings

Obtain an IP address automatically

IP address: 192.168.2.123 (default)
Subnet mask: 255.255.255.0
Default gateway: 0.0.0.0


After a while, the 

LAN settings

 screen returns.

Summary of Contents for PIXMA MX860 series

Page 1: ...ENGLISH ESPA OL Soluci n de problemas de configuraci n de red Network Setup Troubleshooting...

Page 2: ...meout error screen is displayed during WPS setup P 7 2 Cannot connect to the access point the access point is not detected P 2 2 1 The target access point is not detected P 2 2 2 Cannot connect to the...

Page 3: ...er connect the machine and computer to the LAN side same network segment The machine s LAN setting is configured according to your connection method To connect over wireless LAN set Change WLAN LAN to...

Page 4: ...point the machine and the computer Enter the passphrase configured on the access point a sequence of between 8 and 63 alphanumeric characters or a 64 character hexadecimal number If you do not know th...

Page 5: ...nual Setup dialog box For details refer to 3 1 About Network Key Windows Network Password Macintosh on page 3 5 1 The Access Points screen is displayed during setup continued C Configuration The detai...

Page 6: ...e procedures in Install the Software and onward in the printed manual Getting Started 5 6 The Set Printer IP Address screen is displayed during setup continued C IP Address Subnet Mask Default Gateway...

Page 7: ...K 5 9 The Communication with the Card Slot failed is displayed during setup continued To open port 137 139 a Open the screen for setting Windows Firewall Windows Vista Click Start Control Panel Allow...

Page 8: ...d in the printed manual Getting Started 8 Changing the port name 8 1 Changing the port name To change the port name click View Setup Results in the Setup Completion dialog box then click Set Port Name...

Page 9: ...hat Yes is selected and press the OK button f Confirm that the right screen appears The machine s network settings are restored to factory defaults Restoring the Machine to the Factory Settings Factor...

Page 10: ...lb With the Print Head and ink tanks installed Print Head Ink Total 2 368 nozzles PgBK 320 nozzles Y DyeBK each 256 nozzles C M each 768 nozzles ADF capacity A4 or Letter size Max 35 sheets 20 lb 75 g...

Page 11: ...Public Switched Telephone Network PSTN Compatibility G3 Super G3 Mono Color Fax Data compressing system MH MR MMR JPEG Modem type Fax modem Modem speed 33600 31200 28800 26400 24000 21600 19200 16800...

Page 12: ...s de unidad est n asignadas Cannot map any more drives because all the drive letters are assigned durante la configuraci n p g 7 5 12 Aparece la pantalla Error de tiempo de espera Timeout error durant...

Page 13: ...el mensaje de advertencia ajuste el software de seguridad para que permita siempre el acceso Cuando utilice un router conecte el equipo y el ordenador en la parte LAN mismo segmento de red La configur...

Page 14: ...tenticaci n la frase de paso y el tipo de codificaci n din mica deben ser los mismos en el punto de acceso el equipo y el ordenador Introduzca la frase de paso configurada en el punto de acceso una se...

Page 15: ...de red Windows contrase a de red Macintosh de la p gina 3 5 1 Aparece la pantalla Puntos de acceso Access Points durante la configuraci n continuaci n C Configuraci n Configuration Se muestra el cuadr...

Page 16: ...Instale el software del manual impreso Gu a de inicio Getting Started 5 6 Aparece el cuadro de di logo Establecer direcci n IP de impresora Set Printer IP Address durante la configuraci n continuaci n...

Page 17: ...ci n del Firewall de Windows Windows Vista Haga clic en Inicio Start Panel de control Control Panel Dejar pasar un programa a trav s de Firewall de Windows Allow a program through Windows Firewall Se...

Page 18: ...a los procedimientos que se describen a partir de la secci n Instale el software del manual impreso Gu a de inicio Getting Started 8 Cambio del nombre del puerto 8 1 Cambio del nombre del puerto Para...

Page 19: ...es y pulse el bot n OK f Compruebe que aparece la pantalla que se muestra a la derecha La configuraci n de red de f brica del equipo se habr restaurado Restauraci n de la configuraci n de f brica del...

Page 20: ...l de impresi n y los dep sitos de tinta instalados Cabezal de impresi n tinta 2368 inyectores en total PgBK 320 inyectores Y DyeBK 256 inyectores cada uno C M 768 inyectores cada uno Capacidad del AAD...

Page 21: ...itos de tinta Cartuchos FINE estar n disponibles durante los 5 a os siguientes a la finalizaci n de la fabricaci n del producto Especificaciones del fax L nea aplicable Red telef nica p blica conmutad...

Page 22: ...QT5 2119 V01 XXXXXXXX CANON INC 2009 PRINTED IN THAILAND...

Reviews: