


5
5
5-2
5-2
Adjustment > Mechanical Adjustment > Confirming Nip Width
Adjustment > Mechanical Adjustment > Confirming Nip Width
Mechanical Adjustment
Confirming Nip Width
Caution :
Be sure to follow the procedures below, otherwise the fixing film or the fixing sleeve
may be damaged.
The nip width of the fixing unit is not adjustable in this printer, however, the incorrect nip width
may cause the faulty fixing.
Follow the procedures below to check the nip width.
1) Prepare an all-black print of A4 size made by the same type of EP Toner cartridge for this
printer before visiting the customer site.
2) Load the printed sheet facing DOWN on the pickup tray.
3) Print a test-page.
4) Turn off the printer when the leading edge of the paper appears in the face-down delivery
slot.
Wait for 60 seconds and open the cartridge door to remove the paper from the printer.
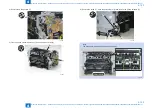
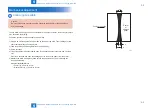
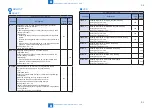
5) Measure the width of the glossy band across the paper and check if it is meeting the
requirements below.
Wasp/Horsethief/Blackrock
• Center (a): 5.5mm to 8.1mm
• Right and left (b, c): 5.5mm to 8.1mm
Feed out direction
c
a
b
Center
of
A4-sized
paper
F-5-1
Summary of Contents for MF4500 Series
Page 222: ...5 5 Adjustment Adjustment Mechanical Adjustment ...
Page 224: ...6 6 Trouble Shooting Trouble Shooting Test Print Trouble Shooting Items Version Upgrade ...
Page 230: ...7 7 Error Codes Error Codes Overview Error Codes ...
Page 234: ...8 8 Service Mode Service Mode Overview COPIER FEEDER FAX TESTMODE ...
Page 251: ... Service Tools Solvent Oil List General Circuit Diagram General Timing Chart Appendix ...


