3. Adjusting the installation position of envelope multiple feed sensor
The installation position of envelope multiple feed sensor is normally adjusted at the factory.
However, if the screw which hold the sensor is removed or accidentally loosened for replacement
of the sensor or its peripheral parts, the installation position of envelope multiple feed sensor
must be adjusted correctly.
The adjustment procedures are shown below.
1) Prepare the printer driver tester (RY9-0124) and the thickness gauge (RY9-0122).
2) Remove the top cover of the envelop feeder.
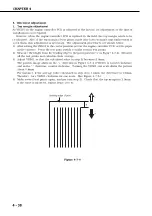
3) Connect the two connectors of the printer driver tester with the printer and the envelop mul-
tiple feed sensor connector as shown in Figure 4-7-3.
4) Insert the 0.7mm thickness gauge (RY9-0122) between the upper and lower feed rollers of
the envelope feeder from the side where the envelope is to be set.
5) Turn ON the printer.
6) The Sensor Test LED of the printer driver tester lights up.
7) Tighten the screw that holds the sensor until the LED goes off.
Figure 4-7-3
4 - 36
CHAPTER 4
Thickness gauge (RY9-0122)
Screw
Envelope multiple feed sensor
Connecting to the multiple feed sensor connecter.
Printer driver tester (RY9-0124)
Sensor Test LED
Connecting to the printer's connector for the envelope feeder.
Summary of Contents for LBP1760P
Page 8: ......
Page 10: ......
Page 12: ...This page intentionally left blank 1 2 CHAPTER 1...
Page 23: ...Figure 1 5 1 1 13 CHAPTER 1 100mm 1220mm 600mm 630mm...
Page 28: ...Figure 1 5 3 1 18 CHAPTER 1...
Page 34: ...This page intentionally left blank 1 24 CHAPTER 1...
Page 36: ......
Page 38: ......
Page 75: ...This page intentionally left blank 2 37 CHAPTER 2...
Page 80: ...Figure 2 5 3 2 42 CHAPTER 2...
Page 83: ...Figure 2 5 6 2 45 CHAPTER 2...
Page 85: ...This page intentionally left blank 2 47 CHAPTER 2...
Page 92: ......
Page 114: ......
Page 160: ......
Page 162: ......
Page 195: ...This page intentionally left blank 4 33 CHAPTER 4...
Page 199: ...This page intentionally left blank 4 37 CHAPTER 4...
Page 222: ...C Clutches Solenoids Figure 4 9 4 4 60 CHAPTER 4 SL102 CL101 SL101 SL701...
Page 224: ...D Motors Others Figure 4 9 6 4 62 CHAPTER 4 FM101 H901 M101 FM701 M702 M701...
Page 226: ...E PCBs Figure 4 9 7 4 64 CHAPTER 4...
Page 229: ...Figure 4 9 9 4 67 CHAPTER 4 J604 J602 J601 J104 J105 J72 J110 J603 J6 J7 J1 J8 J5 J4 J3 J2...
Page 232: ......
Page 234: ......
Page 270: ...COPYRIGHT C 1998 CANON INC CANON LBP 1760 REV 0 MAY 1998 PRINTED IN JAPAN IMPRIME AU JAPON...
Page 277: ......
Page 279: ......
Page 280: ......
Page 286: ......
Page 288: ......
Page 289: ......
Page 295: ......
Page 296: ......
Page 304: ......
Page 306: ...PRINTED IN JAPAN IMPRIME AU JAPON 0698AB0 50 CANON INC...
Page 310: ...COPYRIGHT C 1998 CANON INC CANON LBP 1760 REV 0 MAY 1998 PRINTED IN JAPAN IMPRIME AU JAPON iv...
Page 312: ...COPYRIGHT C 1998 CANON INC CANON LBP 1760 REV 0 MAY 1998 PRINTED IN JAPAN IMPRIME AU JAPON vi...
Page 313: ...COPYRIGHT C 1998 CANON INC CANON LBP 1760 REV 0 MAY 1998 PRINTED IN JAPAN IMPRIME AU JAPON vii...
Page 315: ......
Page 335: ......
Page 356: ......
Page 358: ......
Page 359: ......
Page 366: ......
Page 368: ......
Page 369: ......
Page 378: ......
Page 388: ......
Page 392: ......


