background image

Chapter 7

7-11

7.5 Parts Replacement Procedure

7.5.1 Pickup Roller

7.5.1.1 Removing the Cassette Paper Pickup Roller

0017-8563

1) Remove the cassette.

2) Open the lower-left cover.

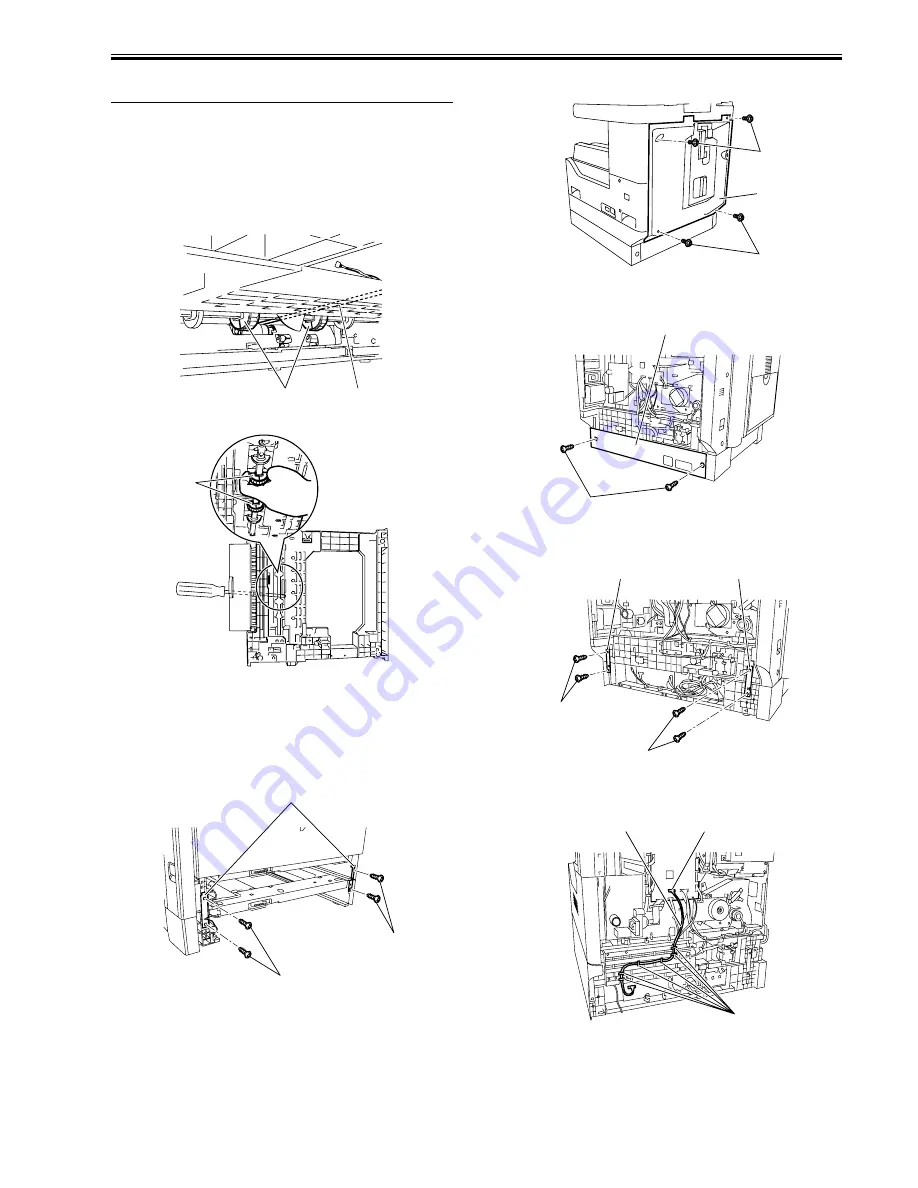
3) With the pickup roller [1] down, insert a screwdriver [2] or the like from

the left side of the host machine as shown below.

4) Remove the pickup roller [3] with your fingers as shown below. 

F-7-16

F-7-17

7.5.2 Cassette

7.5.2.1 Removing the Cassette Unit

0017-8564

1) Remove the upper and lower cassette from the machine. 

2) Detach the two connecting plates [1].

- Screw [2], 4 pcs.

F-7-18

3) Detach the rear cover [1].

- Screw [2], 4 pcs.

F-7-19

4) Detach the cassette rear cover [1].

- Screw [2], 2 pcs.

F-7-20

5) Detach the two connecting plates [1].

- Screw [2], 4 pcs.

F-7-21

6) Detach the harness [1] from harness guide [2].

- Connector [3], 1 pc.

F-7-22

[1]

[2]

[3]

[2]

[2]

[1]

[2]

[1]

[2]

[2]

[1]

[1]

[1]

[2]

[2]

[3]

[1]

[2]

Summary of Contents for iR2018 Series

Page 1: ...Oct 11 2007 Service Manual iR2030 2025 2022 2018 Series iR2030 ...

Page 2: ......

Page 3: ... need arises In the event of major changes in the contents of this manual over a long or short period Canon will issue a new edition of this manual The following paragraph does not apply to any countries where such provisions are inconsistent with local law Trademarks The product names and company names used in this manual are the registered trademarks of the individual companies Copyright This ma...

Page 4: ...quiring care to avoid combustion fire Indicates an item prohibiting disassembly to avoid electric shocks or problems Indicates an item requiring disconnection of the power plug from the electric outlet Indicates an item intended to provide notes assisting the understanding of the topic in question Indicates an item of reference assisting the understanding of the topic in question Provides a descri...

Page 5: ...sed to indicate Low The voltage value how ever differs from circuit to circuit In addition the asterisk as in DRMD indicates that the DRMD signal goes on when 0 In practically all cases the internal mechanisms of a microprocessor cannot be checked in the field Therefore the operations of the microprocessors used in the machines are not discussed they are explained in terms of from sensors to the i...

Page 6: ......

Page 7: ... 1 10 1 2 3 4 Report Settings iR2030i iR2030 iR2025i iR2025 iR2022i iR2018i 1 10 1 2 3 5 System Settings iR2030i iR2030 iR2025i iR2025 iR2022i iR2018i 1 11 1 2 3 6 Copy Settings iR2030i iR2030 iR2025i iR2025 iR2022i iR2018i 1 12 1 2 3 7 Communication Settings iR2030i iR2030 iR2025i iR2025 iR2022i iR2018i 1 12 1 2 3 8 Printer Settings iR2030i iR2030 iR2025i iR2025 iR2022i iR2018i 1 13 1 2 3 9 Addre...

Page 8: ... 2 25 2 8 1 Preparing the parts 2 25 2 8 2 Installing the Cassette Heater 2 26 2 9 Installing the Control Card Cable 2 28 2 9 1 Preparing the parts 2 28 2 9 2 Installing the Control Card Cable 2 29 Chapter 3 Main Controller 3 1 Construction 3 1 3 1 1 Construction and Mechanisms 3 1 3 2 Construction of the Electrical Circuitry 3 1 3 2 1 Image Processor PCB 3 1 3 3 Image Processing 3 2 3 3 1 Overvie...

Page 9: ... 1 Outline 4 9 4 3 4 2 Outline of Original Size Detection 4 9 4 3 5 Dirt Sensor Control 4 11 4 3 5 1 Outline 4 11 4 3 6 Image Processing 4 13 4 3 6 1 Outline 4 13 4 3 6 2 CMOS Sensor Drive 4 14 4 3 6 3 CMOS Sensor Output Gain Correction and Offset Correction 4 14 4 3 6 4 CMOS Sensor Output A D Conversion 4 14 4 3 6 5 Shading Correction Outline 4 14 4 3 6 6 Shading Adjustment 4 15 4 3 6 7 Shading C...

Page 10: ... 1 2 Major Components of Image Formation System 6 1 6 2 Image Formation Process 6 3 6 2 1 Image Formation Process 6 3 6 3 Basic Sequence 6 3 6 3 1 Basic Sequence of Operation 6 3 6 4 Driving and Controlling the High Voltage System 6 5 6 4 1 Outline 6 5 6 5 Drum Unit 6 5 6 5 1 Outline of the Drum Unit 6 5 6 5 1 1 Outline 6 5 6 5 2 Charging Mechanism 6 5 6 5 2 1 Primary Charging Bias Control 6 5 6 6...

Page 11: ... Jam at First Delivery Sensor Stationary Jam at First Delivery Sensor 7 7 7 2 3 Other Jams 7 7 7 2 3 1 Door Open Jam 7 7 7 3 Cassette Pick Up Unit 7 7 7 3 1 Overview 7 7 7 3 2 Cassette Pickup Operation 7 7 7 3 3 Cassette Paper Size Detection 7 8 7 4 Manual Feed Pickup Unit 7 9 7 4 1 Overview 7 9 7 4 2 Post pickup Control after Multi Manual Feed Pickup 7 10 7 5 Parts Replacement Procedure 7 11 7 5 ...

Page 12: ...ons 8 4 8 4 Parts Replacement Procedure 8 6 8 4 1 Fixing Unit 8 6 8 4 1 1 Removing the Fixing Unit 8 6 8 4 2 Pressure Roller 8 7 8 4 2 1 Removing the Pressure Roller 8 7 8 4 3 Fixing Film 8 7 8 4 3 1 Removing the Fixing Film Unit 8 7 8 4 4 Fixing Delivery Sensor 8 9 8 4 4 1 Removing the Fixing Delivery Sensor 8 9 8 4 5 Fixing Film Sensor 8 11 8 4 5 1 Removing the Fixing Film Sensor 8 11 Chapter 9 ...

Page 13: ...mbly 9 12 9 4 11 1 Removing the Main Motor 9 12 9 4 12 Fixing Driver Motor 9 12 9 4 12 1 Removing the Fixing Unit Drive Motor 9 12 9 4 13 Left Door 9 12 9 4 13 1 Removing the Left Door Non Duplex Unit Type 9 12 9 4 13 2 Removing the Left Door With Duplex Unit Type 9 13 Chapter 10 RDS 10 1 RDS 10 1 10 1 1 Overview 10 1 10 1 2 Application Operation Mode 10 1 10 1 3 Communication Test 10 1 10 1 4 Com...

Page 14: ...g the Paper 13 1 13 1 3 Checking the Placement of Paper 13 1 13 1 4 Checking the Durables 13 1 13 1 5 Checking the Units and Functional Systems 13 1 13 1 6 Others 13 1 13 2 Outline of Electrical Components 13 2 13 2 1 Clutch Solenoid 13 2 13 2 1 1 List of Clutches Solenoids 13 2 13 2 2 Motor 13 3 13 2 2 1 List of Motors 13 3 13 2 3 Fan 13 4 13 2 3 1 List of Fans 13 4 13 2 4 Sensor 13 5 13 2 4 1 Li...

Page 15: ... Bit 4 15 11 15 3 4 5 Detailed Discussions of Bit 5 15 11 15 3 4 6 Detailed Discussions of Bit 6 15 11 15 3 4 7 Detailed Discussions of Bit 7 15 11 15 3 5 SSSW SW05 15 11 15 3 5 1 List of Functions 15 11 15 3 5 2 Detailed Discussions of Bit 1 15 11 15 3 5 3 Detailed Discussions of Bit 2 15 11 15 3 6 SSSW SW12 15 11 15 3 6 1 List of Functions 15 11 15 3 7 SSSW SW13 15 12 15 3 7 1 List of Functions ...

Page 16: ...al pattern ON time length 021 pseudo CI signal pattern OFF time length short 022 pseudo CI signal pattern OFF time length long 15 18 15 5 11 023 CNG detention level for fax tel switchover 15 18 15 5 12 024 pseudo RBT transmission level at time of fax tel switchover 15 18 15 5 13 025 Answering machine connection function signal detection time 15 18 15 5 14 027 V 21 low speed flag preamble identific...

Page 17: ...ixing temperature adjustment manual feed tray 15 29 15 7 2 12 045 Fixing film speed change manual feed tray 15 29 15 7 2 13 046 Fixing film speed change cassette 15 29 15 7 2 14 053 Margin adjustment at the leading edge of the copy 15 29 15 7 2 15 054 Margin adjustment at the trailing edge of the copy 15 29 15 7 2 16 055 Margin adjustment at the right edge of the copy 15 29 15 7 2 17 056 Margin ad...

Page 18: ...2 SCAN TEST 15 46 15 19 5 Print Test 3 PRINT TEST 15 46 15 19 6 Modem Test 4 MODEM TEST 15 46 15 19 7 Function Test 6 FUNCTION TEST 15 48 15 19 8 Roller cleaning mode 0 ROLLER CLEAN 15 52 Chapter 16 Upgrading 16 1 Outline 16 1 16 1 1 Overview of Upgrade Touch panel type 16 1 16 1 2 Overview of Service Support Tool Touch panel type 16 2 16 2 Making Preparations 16 2 16 2 1 Registering the System So...

Page 19: ...Chapter 1 Introduction ...

Page 20: ......

Page 21: ...2 3 2 Timer Settings iR2030i iR2030 iR2025i iR2025 iR2022i iR2018i 1 10 1 2 3 3 Adjustment Cleaning iR2030i iR2030 iR2025i iR2025 iR2022i iR2018i 1 10 1 2 3 4 Report Settings iR2030i iR2030 iR2025i iR2025 iR2022i iR2018i 1 10 1 2 3 5 System Settings iR2030i iR2030 iR2025i iR2025 iR2022i iR2018i 1 11 1 2 3 6 Copy Settings iR2030i iR2030 iR2025i iR2025 iR2022i iR2018i 1 12 1 2 3 7 Communication Sett...

Page 22: ......

Page 23: ...ation is as shown in the following figure F 1 1 1 There are models of the standard equipment 1 DADF P2 1 7 Cassette Heater Attachment Kit E1 2 Platen Cover Type J 1 8 Duplex Unit B1 1 3 Finisher U2 9 Power Supply Kit Q1 4 Additional Finisher Tray C1 10 Document Tray J1 5 Inner 2 way Tray E2 11 Card Reader E1 6 Cassette Feeding Module Q1 7 3 2 10 4 5 6 7 8 9 11 1 ...

Page 24: ...he configuration is as shown in the following figure F 1 2 1 There are models of the standard equipment 1 Finisher U2 6 Duplex Unit B1 1 2 Additional Finisher Tray C1 7 Power Supply Kit Q1 3 Inner 2 way Tray E2 8 Document Tray J1 4 Cassette Feeding Module Q1 9 Card Reader E1 5 Cassette Heater Attachment Kit E1 8 1 2 3 4 5 5 6 7 9 ...

Page 25: ... iR2022i iR2025 iR2025i iR2030 iR2030i 0017 9194 The configuration is as shown in the following figure F 1 3 1 To operate the heaters a heater PCB is required These parts are supplied as service parts not the standard items 1 Reader Heater 1 2 Cassette Heater 1 3 Heater PCB 1 2 3 ...

Page 26: ...197 The configuration is as shown in the following figure F 1 4 1 There are models of the standard equipment 1 UFRII LT P Kit V1 1 5 Color SEND Kit L1 license certificate 1 2 Serial Interface Board A2 6 Barcorde Printing Kit B1 license certificate 3 PCL Printer Kit V1 W1 1 7 Serial Interface Kit H1 4 SUPER G3 FAX BD AA1 1 7 4 2 1 3 5 6 ...

Page 27: ... available optionally UFR II printer function Resolution 1200dpi UFRII LT Printer Kit V1 PCL print function PCL Printer Kit W1 FAX function Super G3 FAX Board AA1 Coin vender function Serial Interface board A2 Coin vender function RS232C type Serial Interface kit H1 Color SEND function Color Send Kit L1 Barcode print function Barcode Printing Kit B1 1 Copyboard cover 1 10 Left door 2 Reader front ...

Page 28: ...l path roller 3 Laser scanner unit 12 Manual feed pickup roller 4 DC power supply PCB 13 Registration roller 5 HVT PCB 14 Transfer roller 6 Cassette 15 Drum unit 7 Toner bottle 16 Pressure roller 8 Pickup roller 17 Fixing film unit 9 Feed roller 18 Delivery roller 1 2 3 4 5 6 18 16 15 14 13 12 11 10 9 8 7 17 ...

Page 29: ...R2030 iR2030i 0017 5921 The machine possesses 2 power switches main power switch and control power switch Normally i e unless the machine is in a sleep state the machine will be supplied with power when you turn on its main power switch F 1 7 1 Control panel power switch 2 Main power lamp 3 Main power switch 1 2 3 ...

Page 30: ...rate the main power switch while the Processing Data lamp on the control panel is not lit Turning off the main switch during printing or fax data transmission reception can erase the data being processed F 1 8 During downloading Do not turn off the power switch or ON OFF switch on the control panel Turning off the main power switch during downloading can make this machine inoperative F 1 9 ...

Page 31: ...lected Function Audible Tones Entry Tone On 1 1 1 to 3 levels 2 Off Error Tone On 1 1 1 to 3 levels 2 Off Send Done Tone On 1 to 3 levels 2 Off 1 Receive Done Tone On 1 to 3 levels 2 Off 1 Print Done Tone On 1 1 1 to 3 levels 2 Off Scan Done Tone On 1 1 1 to 3 levels 2 Off Toner Save Mode High Low Off 1 Printer Density 1 to 9 levels 5 1 Inch Entry On 1 Off Drawer Eligibility For APS ADS Copy Stack...

Page 32: ...n 1 Off Data Compress Ratio for Remote Scans High Ratio Normal 1 Low Ratio Gamma Value for Remote Scans Gamma 1 0 Gamma 1 4 Gamma 1 8 1 Gamma 2 2 Initialize Common Settings Initialize Yes No Item Settings Date Time Settings Date and Time Setting 12 digit number Time Zone Settings GMT 12 00 to GMT 12 00 GMT 5 00 1 Daylight Saving Time Settings On Off 1 Auto Sleep Time Use Auto Sleep Time On 1 Off 3...

Page 33: ... Forwarding Conditions Receive Type Fax 2 I Fax Erase Yes No Print List Yes No Device Info Settings Device Name 32 characters maximum Location 32 characters maximum User ID Management On Off 1 Communications Settings E mail I Fax Settings Maximum TX Data Size 0 to 99 MB 3 MB 1 Divided TX over Max Data Size On Off 1 Default Subject 40 characters maximum Attached Image 1 Fax Settings 2 Send Start Sp...

Page 34: ...or Color Send Jobs Gamma 1 0 Gamma 1 4 Gamma 1 8 1 Gamma 2 2 Sharpness 1 to 7 levels 4 1 Register Favorites Button M1 to M18 Color TX Scan Settings Speed Priority 1 Image Priorit Default Screen for Send Favorite Buttons One touch Buttons Initial Function 1 Initialize TX Settings Yes No Common Settings RX Settings 2 Sided Print On Off 1 Select Cassette Switch A On 1 Off Switch B On 1 Off Switch C O...

Page 35: ...OTATE COLLATE 1 ROTATE GROUP 1 OFFSET COLLATE 2 OFFSET GROUP 2 STAPLE 2 STAPLE POSITION TOP LEFT TOP RIGHT BOTTOM LEFT INIT PRINTER SET OFF ON RESET PRINTER OFF ON PCL Settings PAPER SAVE OFF ON ORIENTATION PORTRAIT LANDSCAPE FONT NUMBER 0 to 89 0 POINT SIZE 4 00 to 999 75 point 12 00 point PITCH 0 44 to 99 99 cpi 10 00 cpi FORM LINES 5 to 128 lines 60 lines SYMBOL SET PC8 PC850 PC852 PC858 PC8DN ...

Page 36: ...es of Total Parts Copy B W Scan Color Scan or Print Setting method Register Department ID in Department ID Management under Additional Functions key System Setting Operation outline Department ID can be registered in Department ID management from the operation unit of the machine even though System Manager Settings is not done When registering data in Department ID Management using RUI you need to...

Page 37: ... 2 Select Adjustment Cleaning on the touch panel 3 Select Fixing Unit Cleaning and then press Cleaning Sheet Print The cleaning pattern will be printed 4 Open the manual feed tray F 1 13 5 Place the cleaning pattern printed in step 3 in the manual feed tray with V up F 1 14 6 Select the size of the loaded paper and then press Next 7 Select the size of the loaded paper and then press OK 8 Press Sta...

Page 38: ...on all laser products that are sold in the United States F 1 15 1 2 5 3 Handling the Laser Unit 0017 2611 The laser scanner unit emits invisible laser light inside it If exposed to laser light the human eye can irreparably be damaged Never attempt to disassemble the laser scanner unit It is not designed for servicing in the field Warning labels are affixed to the top cover of the laser scanner uni...

Page 39: ...react easily 1 2 5 5 Point to Note about Fire 0017 2613 It is dangerous to throw lithium batteries and parts and components containing flammable substances such as cartridges etc into fire Such parts and components must be disposed of in accordance with local laws and regulations 1 2 5 6 Cautions as to the replacement and disposal of lithium battery 0017 2614 Risk of explosion if Battery is replac...

Page 40: ... tray capacity 100 sheets A4 B5 LTR 64 g m2 50 sheets A3 B4 LDR LGL 64 g m2 100 sheets A5 A5R STMT 64 g m2 80 sheets A4 B5 LTR 80 g m2 50 sheets A3 B4 LDR LGL 80 g m2 80 sheets A5 A5R STMT 80 g m2 50 sheets heavy paper A4 B5 LTR 105 g m2 50 sheets heavy paper A3 B4 LDR LGL 105 g m2 50 sheets heavy paper A5 A5R STMT 105 g m2 50 sheets heavy paper A4 B5 LTR 128 g m2 35 sheets heavy paper A3 B4 LDR L...

Page 41: ...x 638mm x 580 4mm WxDxH Platen 2 casettes model 622mm x 638mm x 665 4mm WxDxH ADF 1 casette model 622mm x 676mm x 672mm WxDxH ADF 2 casettes model 622mm x 676mm x 757mm WxDxH Weight Platen 1 casette model approx 41 kg Platen 2 casettes model approx 47 kg ADF 1 casette model approx 47 kg ADF 2 casettes model approx 53 kg ...

Page 42: ...Chapter 1 1 20 1 2 7 Function List 1 2 7 1 Printing Speed iR2030 iR2030i 0017 5909 ...

Page 43: ......

Page 44: ...3 22 22 A5 47 5 17 5 7 5 A5R 10 7 8 B5 16 5 16 5 8 16 16 B5R 8 8 7 5 7 5 7 5 A4R 9 5 9 5 5 5 9 9 B4 9 5 9 5 6 5 8 5 8 5 A3 14 14 14 9 5 9 5 STMT 9 9 8 8 STMTR 8 7 5 EXE 16 5 8 15 5 LTR 22 5 22 5 22 5 22 22 LTRR 9 5 9 5 4 5 9 9 LGL 9 5 9 5 4 5 8 5 8 5 LDR 13 5 13 5 13 5 9 5 9 5 8K 9 9 4 5 8 8 16K 16 5 16 5 8 16 16 16KR 9 5 9 5 4 5 8 5 8 5 Bond paper 3 Bond paper H 4 A4 7 5 6 7 5 6 A5 6 5 A5R 6 5 6 ...

Page 45: ...Adjust Cleaning Spesial Mode S Speed Priority 1 or 2 1 2 7 2 Types of Paper 0017 5914 Envelope Monarch 6 1 COM10 6 ISO B5 6 1 ISO C5 6 DL 6 Postcard Postcard 11 5 Double postal card 10 5 4 plane post card 23 5 Type Paper size Source Manual Feed Tray Cassette Plain paper eco paper recycled paper 64 90g m2 A3 B4 A4 A4R B5 B5R A5 LDR LGL LTR LTRR STMT 8K 16K Yes Yes A5R STMTR Yes No Special paper Hea...

Page 46: ......

Page 47: ...Chapter 2 Installation ...

Page 48: ......

Page 49: ...Accessary Installation 230V CLA CHK CSPL 2 9 2 5 Installing the Card Reader 2 10 2 5 1 Points to Note 2 10 2 5 2 Checking the Contents 2 10 2 5 3 Installation Procedure 2 11 2 5 4 Registering the Card IDs 2 13 2 6 Installing the Heater PCB 2 15 2 6 1 Preparing the parts 2 15 2 6 2 Preparing the Host Machine 2 15 2 6 3 Installing the Heater PCB 2 16 2 7 Installing the Reader Heater 2 18 2 7 1 Prepa...

Page 50: ......

Page 51: ...ound it Some however may find its odor unpleasant as while remaining in contact with it for long hours Be sure that the room is well ventilated 5 The floor of the machine must be level so that the feet of the machine will remain in contact and the machine will remain level 6 The machine must be at least 10 cm away from any wall permitting unobstructed use F 2 2 7 The machine must be placed in a we...

Page 52: ...very tray 13 Reader right cover 5 Front cover 14 Reader erar cover 6 Cassette 1 15 Rear cover 7 Cassette 2 16 Cassette rear cover 8 Left cover front 17 Right cover upper 9 Manual feed tray 18 Right cover lower A3 B5 LTR A4 LGL 8K B4 LTR A4 B5 STMT A5 11 17 16K A3 B5 LTR A4 LGL 8K B4 LTR A4 B5 STMT A5 11 17 16K 1 3 2 4 Bitte stellen Sie den Hebel zum Erkennen des Papierformats auf das neue Format e...

Page 53: ...oor 2 until it stops F 2 7 3 Open the packaging bag of the new drum unit take the new drum out of it and then remove packing tape F 2 8 4 Holding the protective cover 1 of the new drum unit place the drum unit against the iR body F 2 9 The maximum weight of this machine is approximately 46kg Two or more persons are required to lift the machine 1 1 1 The left door must be opened fully to prevent th...

Page 54: ...lose the front cover 1 F 2 14 2 2 3 Installing the Toner Bottle 0017 5527 1 Shake the toner bottle 5 6 times F 2 15 2 Open the front cover 1 F 2 16 3 Insert the toner bottle F 2 17 MEMO The protective cover will not be reused 1 1 2 1 1 The image density may be slightly lower than usual on the first approx 100 sheets printed after installation of the machine Therefore perform the steps mentioned in...

Page 55: ...nd confirm the message key 1 key 4 key Message PRINT SW 014 00000000 8 Position the cursor to Bit 1 second from right using or and press the 1 key and then confirm the following message Message PRINT SW 014 00000010 9 Press the OK Confirm that SW 014 changes to SW 015 Message PRINT SW 015 00000000 10 Press the Reset key to exit the service mode 11 Close the front cover The machine will run in the ...

Page 56: ...priate language F 2 28 9 Align the left right and leading edges of sheets and load the stack of paper 1 in the cassette Make sure that the paper is below the claws 2 of the cassette F 2 29 10 Holding the knob at the center of the cassette insert the cassette in the machine it stops 2 2 5 Attaching the Ferrite Core 0017 5530 A3 A4 A4 A5 B5 LTR STMT B4 B5 11 17 LTR U1 U2 U3 LGL 1 2 1 1 MEMO Insertin...

Page 57: ...of sheets 2 2 7 Setting the Country Region 0017 5533 1 Press the following keys to display the service mode screen 2 Key 8 Key 2 Select CLEAR using or and then press the OK 3 Select TYPE using or and then press the OK 4 Using or select the country region type that conforms to the com munication standard used in the country region where the machine is used 5 Press the OK When Please Wait disappears...

Page 58: ...g the procedure below 1 Press the following keys to display the service mode screen 2 Key 8 Key 2 Select REPORT using or and then press the OK 3 Select REPORT OUTPUT using or and then press the OK 4 Select SPEC LIST using or and then press the OK 5 When SPEC REPORT is displayed check that NETWORK is set to ON 6 Contact the system administrator of the customer to make network set tings ...

Page 59: ... Host machine installation Inner 2 way tray installation Finisher installation Cassette feeding module installation Cassette heater attachment kit installation Power supply kit installation Heater PCB installation Cassette heater installation Reader heater installation PCL printer kit installation Card reader installation Serial interface board installation Duplex unit installation Super G3 FAX bo...

Page 60: ...Card reader E1 1 pc 2 TP screw M3x12 1 pc 3 Toothed washer 1 pc 4 Repeating harness A 1 pc The repeating harness TP screw M3x12 and toothed washer are not used 1 2 3 4 1 Card reader mount 1 pc 2 Card reader cover 1 pc 3 Harness cover base lid 3 pcs 4 Repeating harness B 1 pc 5 Edge saddle 1 pc 6 TP screw 2 pcs 7 Binding screw M4x6 4 pcs 8 Cord retainer 1 pc 9 Reuse band 1 pc Do not use the cord re...

Page 61: ...card reader mount 1 Using the screw 3 removed in step 1 secure the card reader to the card reader mount F 2 40 6 Connect the ground cable 2 to the reader mount Attach the supplied edge saddle 3 to the card reader mount Supplied binding screw M4x6 1 1pc 7 Attach the supplied edge saddle 3 to the card reader mount F 2 41 MEMO The removed screw will be used later 1 2 1 1 2 1 3 When removing the harne...

Page 62: ...er Supplied TP screws M4x16 1 2 pcs F 2 45 14 Slide the card reader cover 1 to attach it to the card reader mount F 2 46 F 2 47 15 Secure the card reader cover 2 Supplied binding screw M4x6 1 1pc F 2 48 Connect the repeating harness B s connector which is closer to the clamp 6 to the connector of the card reader If the shorting connector 5 is not disconnected a malfunction or error can result MEMO...

Page 63: ...ting harness B clamp 2 Supplied binding screw M4x6 1 1pc F 2 52 20 Using the three harness covers lids 2 secure the repeating harness B 1 to the harness covers bases F 2 53 21 Using a nipper remove the precut portion 1 of the rear cover as shown below F 2 54 22 Attach the rear cover with the repeating harness B routed through the cut portion 1 of the rear cover F 2 55 2 5 4 Registering the Card ID...

Page 64: ... then press the OK 5 Specify the first ID number of the card ID numbers to be registered and then press the OK Sequential Card ID numbers of 1000 cards are automatically registered in the department ID starting with the specified card ID number 6 Press key to enter the user mode 7 Select System Settings 8 Select Department ID Management 9 Select ON and then press the OK 10 Turn main power switch o...

Page 65: ...let F 2 58 2 Open the front cover 1 F 2 59 3 Remove the rear cover 1 RS tightening screws M3 x 8 2 4 pcs 4 Release the 3 hooks 1 and then remove the lower right cover 2 RS tightening screws M3 x 8 3 5 pcs 1 Heater PCB unit 1 pc 2 Heater switch harness 1 pc 3 Cassette heater harness 1 pc 4 Heater control harness 1 pc 5 Clamp 4 pcs 6 Edge saddle small 2 pcs 7 Edge saddle large 1 pc 8 P screw M3x8 2 ...

Page 66: ...g the Heater PCB 0017 5556 1 Install the heater PCB unit 2 Supplied TP screws M3x8 1 2pcs 2 Install the heater switch 3 on the right side panel F 2 62 When detaching the derivery tray be careful not to damage the paper holder 3 MEMO When the Finisher U2 is connected detach the tray unit of finisher refer to the service manual of the Finisher U2 1 2 3 1 2 Install the heater switch with the OFF posi...

Page 67: ...rness through the clamps installed in step 5 F 2 65 7 Install the edge saddle small 1 8 Connect the heater harness 2 to the connector 3 J1902 on the heater PCB unit pass it through the attached edge saddle and then connect it to the connector 4 J224 on the DC controller PCB Put the harness in the guide F 2 66 9 Install the delivery tray RS tightening screws M3 x 8 2pcs 10 Install the upper right c...

Page 68: ...ts 0017 5557 1 Prepare the following parts F 2 67 Before installing make sure the heater PCB has been installed 1 Reader heater 2 pcs 2 Heater harness 1 pc 3 Harness guide 1 pc 4 Right heater base 1 pc 5 Heater cover 2 pcs 6 Clamp 6 pcs 7 TP screw M3x6 5 pcs 1 4 5 6 7 2 3 ...

Page 69: ...S tightening screws M3 x 8 2 4 pcs 4 Remove the rear left cover 2 RS tightening screws M3 x 8 2 1 pc F 2 70 5 Open the core 1 on the rear side of the host machine Disconnect the two leader flexible cables 3 6 Detach the flexible cable guide 5 Screws 4 3 pcs 7 Release the harness 6 from the three wire saddles 7 and one edge sad dle 8 8 Disconnect the leader flexible cable cover 9 Screw 10 2 pcs F 2...

Page 70: ...mporarily using a screw 2 F 2 72 10 Pass the heater harness 1 though the harness guide 2 with the clamp 3 of the heater harness aligned with the notch 4 in the harness guide F 2 73 11 Remove the metal plate 2 Screws 1 4 pcs F 2 74 1 2 Don t mistake the notch 4 and the notch 5 for screw stop 5 3 4 1 2 1 1 2 ...

Page 71: ...8 and then pass the heater cable through them 17 Connect the heater harness 2 to the connector J1904 10 on the heater PCB F 2 75 18 Install the metal plate removed in step 13 Screws 4 pcs 19 Install the reader flexible cover temporarily secured in step 11 at the original position and then perform steps 6 to 9 in reverse to connect the reader flexible cable to the image processor PCB MEMO Rout the ...

Page 72: ...d the machine with a DADF Follow the appropriate procedure a Machine with a Copyboard Cover 1 Remove the upper left cover 1 of the reader Screws 2 5 pcs F 2 77 2 Remove the blind plate 1 Screws 1 2 cps F 2 78 b Machine with a DADF 1 Remove the stream reading glass holder 2 Screws 1 2 pcs 2 Remove the stream reading glass 3 F 2 79 Installation precautions are as follows Do not touch the top surface...

Page 73: ... the reader heater 3 on the header base 2 Screw 4 1 pc 2 Install the heater base 2 using a screw 1 3 Install the reader heater 3 on the header base 2 using a screw 4 Connect the connector 5 of the heater Install the wire saddle 6 and route the cable 7 4 Install the wire saddle 6 and route the cable 7 5 Connect the connector 5 of the heater F 2 84 Mount the stream reading glass with the notch 1 of ...

Page 74: ...Attach the front cover of the reader Screws 2 pcs 12 Install the copyboard glass 13 Install the right glass holder of the reader Screws 2 pcs 14 Attach the rear left cover of the host machine Screws 3 pcs 15 Attach the upper right cover of the host machine Screw 1 pc 16 Attach the lower right cover of the host machine Screws 5 pcs 17 Attach the rear cover of the host machine Screws 4 pcs Tighten t...

Page 75: ...make sure the heater PCB has been installed 1 Cassette heater 1 pc 2 edge saddle 1 1 pc 3 P tightning screw M4x8 1 pc 4 Wire saddle large 1 pc 5 Wire saddle small 1 1 pc 1 Use the edge saddle 2 and wire saddle small 5 only when attaching the cassette heater to the host machine Do not use them when attaching the cassette heater to the optional cassette 1 3 2 4 5 ...

Page 76: ... host machine 5 Secure the cassette heater 1 Screw 3 1 pc 6 Pass the cassette heater harness 4 in the wire saddle large 5 edge sad dle 6 and wire saddle small 7 7 Connect the connector of the cassette harness to the connector 8 F 2 91 8 When attaching the cassette heater to the first optional cassette 1 per form step 9 after attaching it Install the wire saddle 3 on the molded part side 1 2 2 1 2 ...

Page 77: ...quent optional cassette perform step 11 after attaching the cassette heater 11 Install the wire saddle large 2 lace the cassette heater harness 3 through the harness guide 4 and wire saddle large 2 and then con nect the connector of the cassette heater harness to the connector 5 F 2 94 12 Attach the rear covers of the host machine and cassette Screws 4 pcs Host machine rear cover Screws 2 pcs Cass...

Page 78: ...Chapter 2 2 28 2 9 Installing the Control Card Cable 2 9 1 Preparing the parts 0017 5564 1 Prepare the following parts F 2 95 1 Control card cable 1 pc 2 Binding screw M4x6 1 pc 1 2 ...

Page 79: ...nect the connector of the control card cable 1 to the connector J320 2 on the image processor PCB F 2 98 4 Secure the control card cable clamp 2 Binding screw M4X6 1 1pc F 2 99 5 Using a nipper remove the precut portion 1 of the rear cover as shown below F 2 100 6 Attach the rear cover with the control card cable routed through the cut portion 1 of the rear cover F 2 101 7 Continue work for the co...

Page 80: ...Chapter 2 2 30 ...

Page 81: ...Chapter 3 Main Controller ...

Page 82: ......

Page 83: ...f Image Data 3 5 3 4 1 Flow of Image Data According to Copy Functions 3 5 3 4 2 Flow of Image Data for the SEND Function 3 5 3 4 3 Flow of Image Data for the Fax Transmission 3 6 3 4 4 Flow of Image Data for the Fax Reception Function 3 6 3 4 5 Flow of Image Data for the PDL Function 3 7 3 5 Parts Replacement Procedure 3 8 3 5 1 Main Controller PCB 3 8 3 5 1 1 Preparation for Removing the Image Pr...

Page 84: ......

Page 85: ...trol mechanisms of the Image Processor PCB according to connectors Item Description Image Processor PCB Controls system operation memory printer unit output image processing printer unit image input processing card printer unit interface fax image processing etc Image memory SDRAM Temporarily retains image data 128 MB 256 MB max Flash ROM Stores system software and retains user data service data U...

Page 86: ...ction slot J309 Reader Book connection slot J310 Power supply connection slot J312 SERIAL PCB connection slot J314 DC controller PCB connection slot J315 SOFT ID PCB connection slot J316 SOFT counter PCB connection slot J317 New Card Reader connection slot J318 Control panel connection slot J319 Extend ROM PCB connection slot J320 Not used J1 DDR DIMM PCB connection slot main J2 DDR DIMM PCB conne...

Page 87: ... The image data colleted by the contact image sensor is processed by the Image processor PCB SEND FAX PullScan E Mail PDL Print PC Original Copy A A A Print output Scan Image data Other iR machine SDRAM Reader controller PCB image memory program temporary storage Processes the image data read by the reader unit Reader unit input image processing block Processes image data for output to the printer...

Page 88: ...e reader unit for output to the printer unit Binary processing error diffusion To compression expansion editing block Edge emphasis Enlargement reduction intensify to density conversion density adjustment F adjustment gamma correction Image processor PCB Reader unit Image processor PCB to printer unit output image processing block Reader image processing block PDL image processing block SDRAM Enla...

Page 89: ...the SEND Function 0017 2391 The following is the flow of image data when the SEND function is in use Image processor PCB To DC controller PCB Compression expansion editing block Binary density conversion Enlargement reduction Smoothing Image processing block for printer unit Image processing block for reader unit Reader unit Image processor PCB Data compression Data rotation Data expansion SDRAM D...

Page 90: ...2393 The following is the flow of image data when the fax reception function is in use Image processing block for reader unit Reader unit mage processor PCB Data rotation Data expansion Resolution conversion SDRAM USB1 1 To network compression data Ethernet port Image processing block for reader unit Image processing block for FAX Super G3 Fax Board Image processor PCB Data rotation Data compressi...

Page 91: ... use F 3 12 Image processing block for printer unit Image processing block for fax Super G3 Fax Board Image processor PCB Data compression Data rotation Data expansion SDRAM DC controller PCB Rendering processing block Compression expansion editing block Processing block for printer unit DC controller PCB Image processor PCB SDRAM Ethernet PDL ...

Page 92: ...able F 3 16 6 Detach the modem PCB or the capacitor PCB 1 In the case of the modem PCB 3 connectors 2 2 screws 3 If disconnecting connecting the modem PCB capacitor PCB without implementing this operation the SDRAM may be broken When turning off the main power switch and disconnecting the power plug from the power outlet the power is supplied between the SDRAM and the super capacitor for image mem...

Page 93: ...connect the USB memory 1 F 3 19 8 Free the relay cable 1 and disconnect the connector 2 1 edge saddle 3 4 wire saddles 4 F 3 20 9 Detach the cable guide 2 in the upward direction 1 claw 1 F 3 21 10 Open the core 1 F 3 22 11 Detach the cable retainer 1 1 3 2 3 1 1 3 2 1 4 4 1 2 1 ...

Page 94: ...t correction will be performed and parameters will be set automatically Read position adjustment Stream reading Only when the ADF is installed 1 Enter the service mode Press the User Mode key 2 key 8 key User Mode key on the operation panel of the host machine 2 Using the arrow keys on the operation panel display TEST MODE 3 Press the OK key 4 Press the 2 key SCAN TEST appears 5 Press the 3 key SH...

Page 95: ...power is supplied between the SDRAM and the super capacitor for image memory backup If the jumper plug JP100 is disconnected with the image being backed up the contents in the memory are all cleared Be sure to output all data in the memory before disconnecting the jumper plug JP100 MEMO The jumper plug is small A needlenose pliers or tweezers may be useful in this operation To prevent short circui...

Page 96: ......

Page 97: ...Chapter 4 Original Exposure System ...

Page 98: ......

Page 99: ... of Original Size Detection 4 9 4 3 5 Dirt Sensor Control 4 11 4 3 5 1 Outline 4 11 4 3 6 Image Processing 4 13 4 3 6 1 Outline 4 13 4 3 6 2 CMOS Sensor Drive 4 14 4 3 6 3 CMOS Sensor Output Gain Correction and Offset Correction 4 14 4 3 6 4 CMOS Sensor Output A D Conversion 4 14 4 3 6 5 Shading Correction Outline 4 14 4 3 6 6 Shading Adjustment 4 15 4 3 6 7 Shading Correction 4 15 4 4 Parts Repla...

Page 100: ...Contents 4 4 8 2 Removing the Reader Heater Left 4 20 ...

Page 101: ...tion 256 Carriage position detection Contact image sensor CIS HP sensor SR401 Magnification range 50 to 200 Vertical scan direction Image processing is by image processor PCB Horizontal scan direction BOOK mode Carriage movement speed change and image processing by image processor PCB 1 ADF mode Original feed speed change and image processing by image processor PCB 1 Lens Rod lens array CMOS senso...

Page 102: ...ts the original size for all destinations 4 Original sensor 4 SR407 Detects the original size AB INCH AB 5 Original sensor 5 SR408 Detects the original size INCH A 6 Reader motor M401 Pulse motor Controls drive of the carriage 7 Reader heater 1 Prevents condensation inside the original glass 8 Original sensor 1 SR404 Detects the original size AB INCH A INCH AB 9 Original sensor 2 SR405 Detects the...

Page 103: ...close sensor Front SR403 13 Copyboard cover open close sensor Front SR402 4 1 4 Reader Controller PCB iR2030i iR2030 iR2025i iR2025 iR2022i iR2022N iR2022 0017 5571 The functional configuration of the reader controller PCB is shown below F 4 3 T 4 3 Jack No Function J401 Supplies power 24 VDC from the main body printer J402 Supplies power 5 VC 3 3 VDC from the main body printer J404 J403 J412 J411...

Page 104: ...original sensor 2 J408 Connected to the contact image sensor CIS J409 Connected to the reader motor J410 Supplies power to the ADF J411 Communicates with the ADF to drive the sensor J412 Communicates with the ADF to drive the motor J413 Connected to the original sensor 3 original sensor 4 and original sensor 5 Jack No Function Backward movement Forward movement Main power switch ON SREADY STBY Rea...

Page 105: ...ailing edge of original Original glass reading start position 1 Moves to the start position after black shading white shading 3 Moves to the standby position 2 Original scan Shading position Leading edge of original Trailing edge of original CISHP sensor HP Backward movement Forward movement Black shading White shading Start key ON SCFW SCRW STBY STBY Reader motor M401 LED CISHP sensor SR401 Strea...

Page 106: ...yboard cover 4 3 1 2 Reader Motor Control 0017 2627 The reader motor driver controls rotation stop and rotational direction speed of the reader motor based on the signals from IC2 F 4 11 MEMO The scan speed of this machine is as follows Copy 100 118 mm sec Color send 300 dpi x 300 dpi 28 mm sec 1 2 3 Forward movement Backward movement Sensor shading plate Carriage CISHP sensor SR401 Reader motor C...

Page 107: ...y line basis T 4 4 Component Function LED Illuminates the original Light guide Illuminates the entire image line with the LED light Rod lens array Collects the light reflected by the original CMOS sensor array Receives the light that passed through the rod lens array Start position Acceleration Leading edge of original Constant speed Trailing edge of original Stop Movement speed Movement distance ...

Page 108: ...14 After replacing the contact image sensor CIS go through the following steps to perform inter channel output correction 1 Enter the service mode Sequentially press the Additional functions key 2 key 8 key and Additional functions key on the operation panel 2 Press the arrow key on the touch panel to display TEST MODE 3 Press OK 4 Press the 2 key to display SCAN TEST 5 Press the 1 key to display ...

Page 109: ...r PCB 4 3 4 Detecting the Size of Originals 4 3 4 1 Outline 0017 2633 The original size is identified by the combination of presence and absence of output levels of the reflection type sensors as summarized in the tables below Absence of paper The light reflected from the reflection type sensor changes when the copyboard cover is open close Presence of paper The light reflected from the reflection...

Page 110: ...a are identical Note that a wrong original size may be identified because the sensor output level does not change in the following cases When the original is A3 sized black When the original is a book its thickness does not allow the copyboard cover to close fully making it difficult to detect the sensor level change When the copyboard cover is not closed fully the sensor level change is not detec...

Page 111: ...imum six times in 3 point of A B and C First dust detection is performed once at position A If no dust is detected at position A dust detection is performed twice there If no dust is detected the original is scanned at position A If dust is detected at position A move to position B and dust detection is performed twice at position B If no dust is detected at position B the original is scanned at p...

Page 112: ...ct dust The original is read at the position determined at job end or start If presence of dust is detected there the read image is corrected At job start Dust bypass Presence absence of dust is detected at all points A B and C in this order at job end The original is read at the point where least dust is detected A B C ...

Page 113: ...rence position to the inside of the roller CMOS sensor Number of lines 1 Number of pixels Total 7488 incl 7176 effective pixels Pixel size 32 x 46 9 um Shading correction Shading correction Made for each job Shading adjustment Made in the Service mode Stream reading glass Platen roller 0 5mm 0 5mm A B C Lens LED Contact image sensor CIS Reader controller PCB CMOS sensor Analog image processor Digi...

Page 114: ...et level offset correction 4 3 6 4 CMOS Sensor Output A D Conversion 0017 2639 After completion of the above corrections the analog video signals are converted to digital signals corresponding to individual pixel voltage levels by the A D converter 4 3 6 5 Shading Correction Outline 0017 2640 The CMOS sensor outputs are necessary even for the following reasons even when the density of the original...

Page 115: ...s the density of the standard white plate and compares the measured value with the target value stored in the shading correction circuit to use the difference between the two as the shading correction value The machine uses this shading correction value to correct the variation among CMOS sensor pixels when scanning the original thus evening out the image density level F 4 28 CMOS sensor output Or...

Page 116: ...ader Controller PCB 4 4 2 1 Removing the Reader Controller PCB 0017 8440 1 Detach the rear cover 2 Open the front cover 3 Detach the right cover lower 4 Detach the right cover Upper 5 Detach the left cover rear 6 Open the copyboard cover or ADF 7 Detach the small cover 8 Disconnect the ground cable of the ADF harness 9 Remove the ADF harness 10 Detach the reader rear cover 11 Remove the glass reta...

Page 117: ...move the harness from the edge saddle clamp 2 19 Remove the flexible cable holder 3 and then disconnect the two flexi ble cables 4 20 Remove the two screws 5 F 4 37 21 Remove the flexible cable guide 1 Screws 2 2 pcs 22 Remove the reader controller PCB 3 together with the mount F 4 38 23 Remove the reader controller PCB 1 from the mount Screws 2 3 pcs F 4 39 4 4 3 Scanner Motor 4 4 3 1 Removing th...

Page 118: ...correction 1 Enter the service mode Sequentially press the Additional functions key 2 key 8 key and Additional functions key on the operation panel 2 Press the arrow key on the touch panel to display TEST MODE 3 Press OK 4 Press the 2 key to display SCAN TEST 5 Press the 1 key to display SHADING 6 Press OK After completion of the above procedure the contact sensor output is com pensated and parame...

Page 119: ... F 4 46 4 Disconnect the flexible cable 1 and then detach the cover 2 Screw 3 1 pcs 5 Pull the drive belt front 4 in the direction of the arrow to move the con tact sensor 5 to the left F 4 47 6 Disconnect the connector 1 and then remove the harness from the edge saddle clamp 2 7 remove the original sensor vertical scan direction 3 together with the mount Screw 4 3 pcs F 4 48 8 Remove the original...

Page 120: ...or 2 F 4 52 4 4 8 Reader Heater option 4 4 8 1 Removing the Reader Heater Right 0017 8511 1 Open the copyboard cover or ADF 2 remove the copyboard glass 3 Detach the heater cover 1 Screw 2 1 pcs F 4 53 4 Remove the screw 1 5 remove the reader heater right 2 wire saddle 3 1 pcs connector 4 1 pcs F 4 54 4 4 8 2 Removing the Reader Heater Left 0017 8513 1 Open the copyboard cover or ADF 2 Detach the ...

Page 121: ...ew 2 2 pcs 7 Pull the drive belt front 3 in the direction of the arrow to move the con tact sensor 4 to the center F 4 56 4 Detach the heater cover 1 Screw 2 1 pcs F 4 57 9 Remove the reader heater left 1 Connector 2 1 pcs Screw 3 1 pcs F 4 58 2 1 4 3 2 1 2 3 1 ...

Page 122: ......

Page 123: ...Chapter 5 Laser Exposure ...

Page 124: ......

Page 125: ...1 1 Laser Emission ON OFF Control 5 2 5 2 1 2 Horizontal Synchronization Control 5 3 5 2 2 Controlling the Intensity of Laser Light 5 3 5 2 2 1 Automatic Photocurrent Control APC 5 3 5 2 3 Controlling the Laser Scanner Motor 5 3 5 2 3 1 Laser Scanner Motor Control 5 3 5 2 4 Controlling the Laser Shutter 5 3 5 2 4 1 Laser Shutter Control 5 3 5 3 Parts Replacement Procedure 5 5 5 3 1 Laser Scanner U...

Page 126: ......

Page 127: ...or drum rotates at a constant speed and the photoconductor is scanned with laser beams at a constant speed a latent image is formed on the photoconductor drum 5 1 2 Specifications and Control Mechanism 0017 2646 T 5 1 5 1 3 Main Components 0017 2647 F 5 1 T 5 2 Laser beam Number of laser beams 2 beams Scanner Motor Type of motor DC brushless motor Rotation control Constant speed rotaion control Po...

Page 128: ...f this control is to turn ON OFF the laser diode LD in response to video signals The DC controller PCB sends laser control signals CNTRL0 CNTRL1 and CNTRL2 which are used to switch between laser driver operation modes to the laser driver IC along with video signals VDO1 VDO1 VDO2 and VDO2 The laser driver IC controls laser emission ON OFF according to the combination of CNTRL0 CNTRL1 and CNTRL2 si...

Page 129: ...e of paper at the end of the continuous BD signal 5 2 2 Controlling the Intensity of Laser Light 5 2 2 1 Automatic Photocurrent Control APC 0017 3097 The purpose of this control is to monitor the laser beam emitted to the photodiode on the laser driver circuit board in order to adjust the light quantity Laser control signal Laser status Description CTL2 CTL1 CTL0 Laser A Laser B 0 0 0 OFF OFF Lase...

Page 130: ...ed with reference to the laser scanner motor revolution speed signal FG signal After the target revolution speed is reached the revolution speed is controlled so that the BD cycle and the laser scanner motor revolution cycle are in the same phase The revolution speed of the laser scanner motor is controlled using an acceleration signal ACC signal and deceleration signal DEC signal F 5 3 DC Control...

Page 131: ...e interlocked laser shutter moves down shutting off the laser beam path When opening of the front cover or left door is detected the laser scanner motor and laser outputs turn off F 5 4 Laser shutter control 1 Laser shutter 2 Laser mirror 1 3 Laser mirror 2 4 Polygonal mirror 5 Laser beam 1 2 3 5 1 2 3 4 1 2 3 5 5 OPEN CLOSE ...

Page 132: ...1 Removing the Laser Scanner Unit 0017 8556 1 Detach the rear cover 2 Open the front cover 3 Detach the right cover lower 4 Detach the delivery tray 5 Remove the metal plate 1 and laser scanner unit 2 Sponge 3 2 pcs Connector 4 3 pcs Screw 5 3 pcs F 5 5 2 4 1 5 3 5 ...

Page 133: ...Chapter 6 Image Formation ...

Page 134: ......

Page 135: ...6 7 Toner Container 6 7 6 7 1 Outline 6 7 6 8 Transfer Unit 6 7 6 8 1 Outline of the Transfer Unit 6 7 6 8 1 1 Outline 6 7 6 8 2 Controlling the Transfer Bias 6 8 6 8 2 1 Transfer Roller Bias Control 6 8 6 8 3 Separation Mechanism 6 8 6 8 3 1 Static Eliminator Bias Control 6 8 6 9 Photosensitive Drum Cleaning 6 9 6 9 1 Outline 6 9 6 9 2 Waste Toner Full Detection 6 9 6 10 Parts Replacement Procedu...

Page 136: ......

Page 137: ...d 131 95mm sec Primary charging Charging method Roller charging AC DC ng roller diameter 14mm Transfer charging Charging method Roller charging DC Charging roller diameter 16mm Developing assembly Developing cylinder diameter 20mm Developing method Dry 1 component jumping AC DC Toner 1 component negative toner Remaining toner level detection Remaining toner level sensor in developing assembly Othe...

Page 138: ...Chapter 6 6 2 6 Developing assembly 7 Toner bottle 8 Developing cylinder 9 Transfer charging roller 10 Static eliminator ...

Page 139: ...basic sequence of operation of this machine is explained below For more details refer to the explanation of various types of bias control At power on when the door is opened closed The main motor starts rotating after completion of the error check To prevent fogging of the drum the developing DC bias voltage is held higher than usual during application of the developing AC bias voltage F 6 3 7 Dru...

Page 140: ...mage formation To prevent the toner remaining on the photosensitive drum from sticking to the transfer charging roller the transfer roller bias which is lower than that applied during printing the is applied at the prescribed timing F 6 5 1 Time until post rotation PRINT 1 PRINT STBY INTR Print command is received Main motor M204 Scanner motor M203 Primary charging AC bias Primary charging DC bias...

Page 141: ...e density information sent from the image processor PCB thus adjusting the image density A negative DC voltage is applied to the electrostatic discharge needle and fixing film F 6 6 6 5 Drum Unit 6 5 1 Outline of the Drum Unit 6 5 1 1 Outline 0017 4348 Major components of the drum unit are as follows F 6 7 1 Photosensitive drum 2 Cleaning blade 3 Primary charging roller ASIC CPU Primary bias circu...

Page 142: ...cuit and is fed back to the AC generator circuit via the comparison circuit The primary DC bias is detected by the primary DC bias current detection circuit and is fed back to the DC generator circuit via the comparison circuit Thus this machine controls the primary DC bias voltage The primary DC bias voltage changes with the developing DC bias voltage according to the image density informa tion s...

Page 143: ...essor PCB The remaining toner level is detected during warm up rotation and when the developing AC bias is applied for printing The remaining toner level detection signal TNRCHKT sampled from the antenna for remaining toner level check in the developing assembly is compared with the reference signal TNRCHKD received from the developing bias detection circuit F 6 10 6 7 Toner Container 6 7 1 Outlin...

Page 144: ...cribed timing to moves the toner from the transfer charging roller to the photosensitive drum for cleaning The sheet to sheet bias is lower than that applied during printing and it is applied at the prescribed timing to prevent the toner remaining on the photosensitive drum from adhering to the transfer charging roller The positive bias is applied to transfer toner images from the photosensitive d...

Page 145: ...ner Full Detection 0017 4362 The waste toner collected by the cleaner blade is fed to the waste toner box using the waste toner feed screw in the drum unit A torque limiter is provided at the end of the waste toner feed screw is provided with a torque limiter When the waste toner box is filled with waste toner the torque limiter goes on to stop the waster toner feed screw As a result the sensor fl...

Page 146: ... in the back of the main body in the support hole 2 pro vided at the back of the developing assembly F 6 20 6 10 2 3 Procedure after Replacing the Developing Assembly 0017 8560 Going through the Developer Idling Mode 1 Plug the power cord into the outlet 2 Open the front cover 3 With the front cover open turn on the main power switch 4 When a message appears on the operation panel display press th...

Page 147: ...ute 12 When the machine stops the idling mode ends Install the toner bottle following the above mentioned procedure 6 10 3 Transfer Charging Roller 6 10 3 1 Removing the Transfer Charging Roller 0017 8561 1 Open the left door 2 Remove the transfer charging roller 1 F 6 21 Do not touch the transfer charging roller surface MEMO The transfer charging roller bearing 1 could be the same shape as the fi...

Page 148: ......

Page 149: ...Chapter 7 Pickup Feeding System ...

Page 150: ......

Page 151: ...iew 7 7 7 3 2 Cassette Pickup Operation 7 7 7 3 3 Cassette Paper Size Detection 7 8 7 4 Manual Feed Pickup Unit 7 9 7 4 1 Overview 7 9 7 4 2 Post pickup Control after Multi Manual Feed Pickup 7 10 7 5 Parts Replacement Procedure 7 11 7 5 1 Pickup Roller 7 11 7 5 1 1 Removing the Cassette Paper Pickup Roller 7 11 7 5 2 Cassette 7 11 7 5 2 1 Removing the Cassette Unit 7 11 7 5 3 Cassette Pickup Asse...

Page 152: ...ents 7 5 12 1 Removing the Registration Clutch 7 15 7 5 13 Separation Roller 7 15 7 5 13 1 Removing the Feed and Separation Rollers 7 15 7 5 14 Separation Pad 7 16 7 5 14 1 Removing the Separation Pad 7 16 ...

Page 153: ...in paper 1 Large Half Small Large Half Small Large Half Small Large Half Small 50 sheets 64g m2 100 sheets 64g m2 100 sheets 64g m2 50 sheets 75g m2 100 sheets 75g m2 100 sheets 75g m2 50 sheets 80g m2 80 sheets 80g m2 80 sheets 80g m2 50 sheets 90g m2 50 sheets 90g m2 50 sheets 90g m2 Thick paper 1 Large Half Large Half 50 sheets 105g m2 50 sheets 105g m2 35 sheets 128g m2 50 sheets 128g m2 Multi...

Page 154: ... option 1 6 Fixing assembly 7 First delivery assembly 8 Second delivery assembly option 2 1 There are models of the standard equipment 2 Inner 2way tray E2 7 1 3 Roller Layout Drawing 0017 4367 The layout of the rollers used in the pickup feeding system is shown below F 7 2 1 Pickup roller 2 Cassette pickup roller 3 Feed roller 1 4 Multi pickup roller 5 Registration roller 6 Duplex paper feed roll...

Page 155: ...r 1 11 Second delivery roller 12 First delivery roller 7 1 4 Paper Path Drawing Printer on its own 0017 4368 F 7 3 1 Cassette pickup 2 Manual feed pickup 3 Delivery to copy tray 1 7 1 5 Paper Path Drawing Finisher U2 0017 4369 F 7 4 1 Cassette pickup 2 Manual feed pickup 3 Finisher U2 option 1 3 2 3 2 1 ...

Page 156: ...3 Duples paper feed assembly option 1 4 Finisher U2 option 1 There are models of the standard equipment 7 1 7 Paper Path Drawing Duplex Unit B1 0017 4372 F 7 6 1 Cassette pickup 2 Manual feed pickup 3 Duplex paper feed assembly option 1 4 Delivery to copy tray 1 1 There are models of the standard equipment 3 4 2 1 1 3 2 4 ...

Page 157: ...feed assembly option 2 1 There are models of the standard equipment 2 Inner 2way tray E2 7 1 9 Paper Path Drawing Inner 2Way Tray E2 0017 4374 F 7 8 1 Cassette pickup 2 Manual feed pickup 3 Delivery to copy tray 1 4 Delivery to copy tray 2 option 1 1 Inner 2way tray E2 7 1 10 Sensor Layout Drawing 0017 9281 The layout of the sensors used in the pickup feeding system is shown below 1 3 2 4 5 1 3 2 ...

Page 158: ...e of paper within the jam detection time interval after paper pickup started T 7 2 7 2 1 2 Delay Jam in Delivery Assembly Paper Leading Edge Jam at First Delivery Sensor Wound Paper Jam at Fixing Assembly 0017 4381 Paper Leading Edge Jam at First Delivery Sensor The first delivery sensor cannot detect presence of paper within the prescribed time after the registration clutch has been turned on T 7...

Page 159: ...ms 7 2 3 1 Door Open Jam 0017 4385 Door Open Jam The door is opened when paper to be printed is in the paper feed path 7 3 Cassette Pick Up Unit 7 3 1 Overview 0017 4386 The paper picked up from the cassette is fed to the registration roller using the vertical path roller driven by the main motor M204 The registration roller is not rotating when paper reaches there so an arch is formed at the lead...

Page 160: ...r is transferred to the feed roller shaft gear and consequently the feed roller starts rotating 4 When the pickup roller rotates once the toothless portion of the pickup roller drive gear comes to the position of the relay gear and consequently drive power of the main motor is not transferred stopping the rotation of pickup and feed rollers 5 The picked up paper is fed to the registration roller t...

Page 161: ...gears Only one sheet of paper is picked up by the combination of the manual feed pickup roller and manual feed pickup paper separation pad and then fed to the registration roller These operations are performed for each sheet to be picked The user must set the size of the paper in the multi manual feed tray using the operation panel or the user must register a fixed size in the user mode A3 A4 A4R ...

Page 162: ... a manual feed pickup solenoid drive signal MFPD When the solenoid turns on the stopper operates to rotate the pickup roller once Next the stopper operates again to stop rotation of the pickup roller 7 4 2 Post pickup Control after Multi Manual Feed Pickup 0017 5467 Paper pickup operation ends when paper is pressed against the registration roller After this the registration roller starts rotating ...

Page 163: ...e the pickup roller 3 with your fingers as shown below F 7 16 F 7 17 7 5 2 Cassette 7 5 2 1 Removing the Cassette Unit 0017 8564 1 Remove the upper and lower cassette from the machine 2 Detach the two connecting plates 1 Screw 2 4 pcs F 7 18 3 Detach the rear cover 1 Screw 2 4 pcs F 7 19 4 Detach the cassette rear cover 1 Screw 2 2 pcs F 7 20 5 Detach the two connecting plates 1 Screw 2 4 pcs F 7 ...

Page 164: ... 5 4 Cassette Size Sensor 7 5 4 1 Removing the Paper Size Detection Switches 0017 8568 1 Remove the paper size switches 1 Screw 2 1 pc F 7 26 7 5 5 Cassette Retry Paper Sensor 7 5 5 1 Removing the Retry Sensor 0017 8569 1 Detach the lower left cover 2 Detach the cassette rear cover 3 Remove the cassette pickup 1 Remove the retry sensor 1 Connector 2 1 pc F 7 27 7 5 6 Cassette Paper Sensor 7 5 6 1 ...

Page 165: ...over 2 Turn the developer pressure release lever clockwise and then open the left door 3 Draw out the drum unit 4 Remove the transfer registration unit 1 Screw 2 4 pcs F 7 30 5 Remove the feed guide 1 Screw 2 2 pcs F 7 31 6 Remove the multi paper roller 1 Bearing 1 1 pc F 7 32 7 5 9 Manual Feed Tray paper sensor 7 5 9 1 Removing the Multifeeder Paper Presence Absence Sensor 0017 8579 1 Open the fr...

Page 166: ... Manual Feed Pickup Solenoid 7 5 10 1 Removing the Multifeeder Pickup Solenoid 0017 8580 1 Open the front cover 2 Turn the developer pressure release lever clockwise and then open the left door 3 Draw out the drum unit 4 Remove the transfer registration unit 1 Screw 2 4 pcs F 7 36 5 Remove the feed guide 1 Screw 2 2 pcs F 7 37 6 Detach the multifeeder connector cover 1 Connector 2 3 pcs F 7 38 2 2...

Page 167: ...he left door 3 Draw out the drum unit 4 Remove the two metal plates 1 and remove the registration roller 2 Screw 3 2 pcs F 7 41 7 5 12 Registration Clutch 7 5 12 1 Removing the Registration Clutch 0017 8582 1 Detach the rear cover 2 Disconnect the connector 1 and then remove the harness from the three wire saddles 2 3 Remove the resin ring 3 and then remove the registration clutch 4 F 7 42 7 5 13 ...

Page 168: ... 5 14 1 Removing the Separation Pad 0017 8584 1 Open the front cover 2 Turn the developer pressure release lever clockwise and then open the left door 3 Draw out the drum unit 4 Remove the transfer registration unit 1 Screw 2 4 pcs F 7 44 5 Remove the feed guide 1 Screw 2 2 pcs F 7 45 6 Remove the multi paper roller 7 I use a minus screwdriver and remove separation pad 1 F 7 46 3 1 2 2 2 1 2 1 1 ...

Page 169: ...Chapter 8 Fixing System ...

Page 170: ......

Page 171: ...8 2 2 3 Target Temperatures by Mode iR2030 iR2030i 8 3 8 2 3 Detecting the Passage of Paper 8 4 8 2 3 1 Detecting the Passage of Paper 8 4 8 3 Protective Functions 8 4 8 3 1 Protective Functions 8 4 8 4 Parts Replacement Procedure 8 6 8 4 1 Fixing Unit 8 6 8 4 1 1 Removing the Fixing Unit 8 6 8 4 2 Pressure Roller 8 7 8 4 2 1 Removing the Pressure Roller 8 7 8 4 3 Fixing Film 8 7 8 4 3 1 Removing ...

Page 172: ......

Page 173: ...lt detection 2 Sub thermistor TH2 Fault detection 3 Thermo switch TP1 Fault detection Fixing temperature control 1 Warm up temperature control 2 Normal temperature control 3 Sheet to sheet temperature control Protection functions 1 Detection of error in temperature control by thermistor 2 Detection of temperature rise by thermo switch Fixing drive control Speed control by detecting fixing film rot...

Page 174: ...ine 0017 5473 The surface temperature of the fixing heater is detected to control the fixing heater drive signal so that the fixing heater temperature becomes the target temperature The temperature of the fixing heater is detected by the thermistor TH1 TH2 provided on the fixing heater If the surface temperature rises the resistance of the thermistor lowers and the voltage of the fixing heater tem...

Page 175: ...n 130 deg C paper feed and printing stop to prevent the temperature from rising at the edge If the sub thermistor detects a temperature equal to or lower than 130 deg C or two or more minutes lapse normal control resumes 1 The large size is a paper of which the width is 10 mm larger than the previous job 8 2 2 3 Target Temperatures by Mode iR2030 iR2030i 0017 5475 This machine controls the fixing ...

Page 176: ...f the fixing heater failure 2 If the temperature of the fixing heater rises abnormally and the thermistor TH1 detects a voltage lower than about 0 7 V equivalent of 240 deg C the fixing heater high temperature detection circuit cuts off the power supplied to the fixing heater 3 If the temperature of the fixing heater rises abnormally and the thermo switch TP1 detects a temperature higher than 250 ...

Page 177: ...ntrol the main or sub thermistor has detected low temperatures continuously for 400 or more msec after the target temperature was reached c Abnormally high temperature detection 1 The main thermistor has detected 240 C deg irrespective of whether the fixing heater is of or off 2 The sub thermistor has detected 295 deg C irrespective of whether the fixing heater is of or off d Drive circuit failure...

Page 178: ...e the earth wire 3 Screw 4 1 pc F 8 6 5 Remove the screw 1 securing the door support band Remove the con nector 2 and reusable band 3 and release the duplex unit harness from the wire saddle 4 F 8 7 6 Open the left door until it sops and pull out the hinge shaft 1 F 8 8 7 Lift the left door with both hands to release it from the door rotation shaft 1 and then remove the left door F 8 9 8 Detach th...

Page 179: ...ving the Pressure Roller 0017 8925 1 Remove the fixing unit 2 Remove the fixing film unit 3 Raise the claw 1 of the fixing unit inlet guide and remove the slide the fixing unit inlet guide 2 by sliding it in the direction of the arrow F 8 14 4 Remove the pressure roller 3 E ring 1 Gear 2 F 8 15 When installing the pressure roller bring the ground plate 4 into contact with the roller shaft 5 F 8 16...

Page 180: ...the wire saddle 1 F 8 19 4 Remove the fixing paper guide 2 Screw 1 1 pc F 8 20 5 Remove the right side stay 1 and left side stay 2 Screw 1 2 pcs F 8 21 6 Disconnect the connector 1 and release the fixing DC harness 2 from the harness guide 3 Unhook the claw 4 and remove the sensor holder 5 Screw 6 2 pcs F 8 22 When installing the electrode plate 1 place it under the three claws 2 as shown below F ...

Page 181: ...fixing unit AC harness F 8 24 8 Remove the roller guide unit 1 Screw 2 2 pcs F 8 25 9 Release the pressure plates 1 Screw 2 2 pcs F 8 26 10 After rotating the pressure plates 1 to release them from the fixing film unit remove the fixing film unit 2 F 8 27 1 2 2 1 2 1 2 1 2 1 1 ...

Page 182: ...e block 4 F 8 29 3 Remove the fixing unit harness 2 from the wire saddle 1 F 8 30 4 Remove the fixing paper guide 2 Screw 1 1 pc F 8 31 5 Remove the right side stay 1 and left side stay 2 Screw 1 2 pcs F 8 32 6 Disconnect the connector 1 and release the fixing DC harness 2 from the harness guide 3 Unhook the claw 4 and remove the sensor holder 5 Screw 6 2 pcs F 8 33 7 Release the four sensor claws...

Page 183: ...ace it under the three claws 2 as shown below F 8 35 8 4 5 Fixing Film Sensor 8 4 5 1 Removing the Fixing Film Sensor 0017 8169 1 Remove the fixing unit 2 Disconnect the connector 1 release the two hooks 2 and then remove the film sensor 3 F 8 36 2 1 1 2 3 ...

Page 184: ......

Page 185: ...Chapter 9 External and Controls ...

Page 186: ......

Page 187: ...5 9 4 1 7 1 Removing the Reader Front Cover 9 5 9 4 1 8 Reader Rear Cover 9 5 9 4 1 8 1 Removing the Reader Rear Cover 9 5 9 4 2 Main Drive Assembly 9 5 9 4 2 1 Removing the Main Drive Unit 9 5 9 4 3 Fixing Drive Assembly 9 6 9 4 3 1 Removing the Fixing Drive Unit 9 6 9 4 4 Power Supply Unit 9 7 9 4 4 1 Removing the Main Power Supply PCB 9 7 9 4 5 Control Panel 9 7 9 4 5 1 Removing the Operation P...

Page 188: ...Contents 9 4 12 1 Removing the Fixing Unit Drive Motor 9 12 9 4 13 Left Door 9 12 9 4 13 1 Removing the Left Door Non Duplex Unit Type 9 12 9 4 13 2 Removing the Left Door With Duplex Unit Type 9 13 ...

Page 189: ...view iR2030i iR2030 iR2025i iR2025 iR2022K iR2022i iR2018i 0017 5481 This machine is provided with a fan to cool the fixing unit F 9 2 9 2 2 Fan Control 0017 5482 The fan motor control circuit is shown below F 9 3 ASIC CPU Image processor PCB Control panel CPU PCB Panel switch PCB LED Key SW LCD Control panel inverter PCB Touch panel FM1 J219 24V FM1 FANDRV GND FAN_LOCK Fan drive voltage switching...

Page 190: ...ow voltage power supply circuit supplies 3 3 V 5 V and 24 V to operate the machine 24 V is supplied to the motors fan electromagnetic clutch solenoid etc 5 V and 3 3 V are supplied to the sensor etc There are two types of 24 V voltages 24 V which is normaly supplied from the low voltage power supply and 24 VR which is cut off when the front cover or the left door is opened The 24 VR also plays the...

Page 191: ...when an excessive current flows in the AC line Output 24V 5V 5VR 3 3V 3 3VR Rated output voltage 24V 5 1V 5 1V 3 4V 3 4V Output voltage tolerance 10 5 3 4 3 4 3 3 3 3 Rated output current 3 5A 1 0A 1 0A 2 0A 0 75A Overcurrent protection trigger current 9 0A 4 0A 4 0A 4 0A 4 0A Overvoltage protection trigger voltage 32 5V 8 0V 8 0V 5 5V 5 5V P1 NF NF Power supply PCB AC DC F1 F2 SW1 TP1 H2 H1 Heate...

Page 192: ...F 9 7 9 4 1 3 Right Cover Lower 9 4 1 3 1 Removing the Right Cover Lower 0017 8617 1 Detach the rear cover 2 Open the front cover 3 Remove the two hooks 2 and then detach the right cover lower 3 Screw 4 5 pcs F 9 8 9 4 1 4 Right Cover Upper 9 4 1 4 1 Removing the Right Cover Upper 0017 8620 1 Detach the rear cover 2 Open the front cover 3 Detach the right cover lower 4 Detach the right cover upper...

Page 193: ...Disconnect the ground cable 1 of the ADF harness Screw 2 1 pc 9 Remove the ADF harness 3 Connector 4 4 pcs F 9 14 10 Detach the reader rear cover 1 Screw 2 4 pcs F 9 15 9 4 2 Main Drive Assembly 9 4 2 1 Removing the Main Drive Unit 0017 8627 1 Open the front cover 2 Turn the developing assembly locking lever clockwise to open the left door 3 Draw out the drum unit 4 Detach the rear cover 5 Detach ...

Page 194: ...ease the gear stopper 1 from the shaft and then remove the gear 2 F 9 20 14 Remove the main drive unit 1 Screw 2 6 pcs F 9 21 9 4 3 Fixing Drive Assembly 9 4 3 1 Removing the Fixing Drive Unit 0017 8653 1 Draw out the drum unit 2 Detach the rear cover 2 1 3 3 3 2 1 2 2 1 Since the gears in the main drive unit are not secured gears will fall if the main drive unit is inclined If gears should fall i...

Page 195: ...stopper 1 and then remove the gear 2 F 9 23 13 Remove the fixing drive unit 1 Connector 2 1 pc Screw 3 4 pcs F 9 24 9 4 4 Power Supply Unit 9 4 4 1 Removing the Main Power Supply PCB 0017 8657 1 Detach the rear cover 2 Detach the right cover lower 3 Detach the delivery tray 4 Remove the power supply PCB 1 Connector 2 7 pcs Screw 3 6 pcs F 9 25 F 9 26 9 4 5 Control Panel 9 4 5 1 Removing the Operat...

Page 196: ...onnector 3 of the flexible cable 2 to remove the operation panel unit 4 F 9 30 9 4 6 DC Controller PCB 9 4 6 1 Removing the DC Controller PCB 0017 8661 1 Detach the rear cover 2 Remove the DC controller PCB 1 Connector 2 16 pcs Screw 3 4 pcs F 9 31 9 4 7 Option Power Supply PCB 9 4 7 1 Removing the Option Power Supply PCB 0017 8666 1 Detach the rear cover 2 Detach the right cover lower 3 Detach th...

Page 197: ...ector 2 1 pc Screw 3 2 pcs F 9 34 9 4 9 Fixing Heat Discharge Fan 9 4 9 1 Removing the Fixing Heat Discharge Fan Non Duplex Unit Type 0017 8826 1 Open the left door until it stops 2 Remove the transfer registration unit 1 Screw 2 4 pcs F 9 35 3 Disconnect the connector 1 and then release the harness from the wire saddle 2 F 9 36 4 Remove the duct 1 Screw 2 2 pcs F 9 37 When installing the HVT PCB ...

Page 198: ...ground cable 3 Screw 4 1 pc 6 Remove the reusable band 5 from the duplex unit harness at the rear left of the main body and then return the duplex unit harness 6 to the left door side F 9 39 7 Remove the transfer registration unit 1 Screw 2 4 pcs F 9 40 8 Remove the duplex unit 1 from the left door Screw 2 6 pcs F 9 41 9 Disconnect the connector 1 and then release the harness from the wire saddle ...

Page 199: ... the Fan Filter With Duplex Unit Type 0017 8832 1 Draw out the drum unit 2 Detach the rear cover 3 Detach the left cover rear 4 Disconnect the relay harness 2 from the connector 1 5 Disconnect the ground cable 3 Screw 4 1 pc 6 Remove the reusable band 5 from the duplex unit harness at the rear left of the main body and then return the duplex unit harness 6 to the left door side F 9 48 7 Rremove th...

Page 200: ...017 8693 1 Detach the rear cover 2 Detach the left cover rear 3 Detach the RAM cover 4 Remove the SDRAM 5 Detach the LAN cover 6 Detach the IP cover 7 Remove the image processor PCB with the PCB mount 8 Remove the fixing motor 1 Connector 2 1 pc Screw 3 2 pcs F 9 52 9 4 13 Left Door 9 4 13 1 Removing the Left Door Non Duplex Unit Type 0017 8756 1 Draw out the drum unit 2 Detach the rear cover 3 De...

Page 201: ...ver rear 4 Disconnect the relay harness 2 from the connector 1 of the duplex unit harness 5 Disconnect the ground cable 3 Screw 4 1 pc 6 Remove the reusable band 5 from the duplex unit harness at the rear left of the main body and then return the duplex unit harness 6 to the left door side F 9 56 4 Release the duplex unit harness 1 Screw 2 1 pc Connector 3 1 pc Reusable band 4 1 pc Wire saddle 5 1...

Page 202: ... pull out the hinge shaft 1 F 9 58 3 Lift the left door with both hands to release it from the door rotation shaft 1 and then remove the left door F 9 59 MEMO When a duplex unit is installed remove it before pulling out the hinge shaft for each access 1 1 ...

Page 203: ...Chapter 10 RDS ...

Page 204: ......

Page 205: ... Function 10 1 10 1 8 Retransmission at the time of SOAP Transmission Error 10 3 10 1 9 e RDS Setting Screen 10 3 10 1 10 Report Output of Communication Error Log 10 4 10 1 11 Sleep Operation 10 4 10 1 12 Alarm Filtering Alert Filtering 10 4 10 1 13 CA Certificate 10 4 10 1 14 Settings of Network Connection Installation Maintenance 10 5 10 1 15 Settings of e RDS Installation Maintenance 10 5 10 1 ...

Page 206: ......

Page 207: ... error log e RDS obtains the schedule information from UGW by performing COM TEST The obtainment of the schedule information from UGW enables e RDS to start its operation 10 1 4 Communication Log 0017 6737 In case of a communication error such as proxy server error error log is recorded for 5 cases Error code and error information can be displayed on the control panel as a list service mode COM LO...

Page 208: ...ransmission postGlobalClickCount Once every 16 hours The detailed counter data for each paper size such as Total Service mode counter collection transmission postSeviceModeCounter Once every 16 hours The counter data tied to the service mode number Mainly used for billing Mode counter collection transmission postModeCounter Once every 16 hours The counter data by operation mode Parts counter colle...

Page 209: ...rror log transmission error of counter and various logs up to the present as well as the error occurred date error code and error information at the communication test By pressing the arrow key key key the communication error log from No 1 to No 5 can be checked Only the No in which an error is registered can be selected Service Mode Setting Items Meaning Description E RDS SWITCH e RDS OFF ON 0 OF...

Page 210: ...icate CA KEY is included in the system software System Default CA certificate For UGW The CA certificate other than the default is installable with SST Outline of the step See Downloading System Software for details 1 Move it from SST to CA Certificate Install Flash File System 2 Turn the power off on Read the CA Certificate file from Flash file system during initialization and register CA Certifi...

Page 211: ... e RDS Press the arrow key to move to the menu E RDS of e RDS 2 Set E RDS SWITCH to 1 in order to enable e RDS 3 If necessary enter URL of UGW in RGW ADDRESS The setting has normally been done 4 Enter the port number of UGW in RGW PORT normally the setting done 5 Select COM TEST and press OK key to execute the test of communication with UGW 6 If the result is COM TEST NG correct the settings of RG...

Page 212: ...address and port number and correct the settings accordingly The device needs rebooting when network related settings such as Proxy settings are modified 7 Proxy authentication error Proxy authentication error Authentication for the Proxy server has failed Check the user name and password to log in to the Proxy server and re set them 8 Proxy address resolution error Proxy address resolution error ...

Page 213: ...e to wrong path for server URL Check the server URL including path and set it again Service mode E RDS RGW ADDRESS 19 E RDS switch is setted OFF e RDS is not enabled Executed communication test COM TEST while e RDS operation switch E RDS SWITCH is turned OFF Enable operation switch of e RDS and execute communication test again Service mode E RDS E RDS SWITCH 20 Server schedule is not exist Schedul...

Page 214: ...Obtain parts counter 4 postFirmwareInfo Obtain ROM version 5 getOperationList Check whether there is an operation execution command for you in UGW 6 postOperationOutcome Transmit execution result of operation commanded in getOperationList 7 postConfiguration Periodical environment information 8 postGlobalClickCount Obtain counter details data 9 postJamLog Obtain jam notification 10 postServiceCall...

Page 215: ...Chapter 11 Maintenance and Inspection ...

Page 216: ......

Page 217: ... 1 11 1 1 Overview 11 1 11 1 2 Reader Unit 11 1 11 1 3 Printer Unit 11 1 11 2 Durables and Consumables 11 1 11 2 1 Overview 11 1 11 2 2 Reader Unit 11 1 11 2 3 Printer Unit 11 2 11 3 Scheduled Servicing Basic Procedure 11 2 11 3 1 Scheduled Servicing 11 2 ...

Page 218: ......

Page 219: ...5961 The printer unit does not have parts that require periodical replacement 11 2 Durables and Consumables 11 2 1 Overview 0017 5962 The machine has parts that may require replacement once or more during the period of product warranty because of wear or damage Replace them as needed by referring to their indicated estimated lives Checking the Timing of Replacement Use the following service mode i...

Page 220: ...ler FF6 1621 000 1 100K The 2 stage cassette type uses two rollers 3 Manual feed pickup roller FL2 3202 000 1 150K 4 Manual feed separation pad FL2 3201 000 1 150K 5 Devrloping unit FM2 3286 000 1 150K 6 Transfer roller FC6 4313 000 1 150K 7 Fixing unit 100V FM3 3652 000 1 150K Fixing unit 120V FM3 3651 000 1 150K Fixing unit 230V FM3 3650 000 1 150K The value is the mean value collected from the ...

Page 221: ...Chapter 12 Standards and Adjustments ...

Page 222: ......

Page 223: ...With ADF 12 1 12 2 Image Formation System 12 1 12 2 1 Procedure after Replacing the Developing Assembly 12 1 12 3 Electrical Components 12 1 12 3 1 Procedure after Replacing the Image Processor PCB Touch panel type 12 1 12 3 2 Procedure after Replacing the USB Memory Touch panel type 12 1 12 3 3 Actions to Take before All Clearing Backing up the User Data 12 1 ...

Page 224: ......

Page 225: ...ions key 2 key 8 key and Additional functions key on the operation panel 2 Press the arrow key on the touch panel to display TEST MODE 3 Press OK 4 Press the 2 key to display SCAN TEST 5 Press the 1 key to display SHADING 6 Press OK After completion of the above procedure the contact sensor output is com pensated and parameters are set automatically After completion of automatic adjustment OK is d...

Page 226: ...ss the OK key Check that SW003 changes to SW004 Message SYSTEM SW004 00000000 7 Press the Reset key to exit the service mode 8 Turn off the main power switch and then turn it on again 9 Open My Computer on the PC to check that the Removal Disk icon is displayed 10 Write the user data address_book abk and user_data dat copied onto the Desktop as described in a Exporting user data over the removable...

Page 227: ...Chapter 12 12 3 ...

Page 228: ......

Page 229: ...Chapter 13 Correcting Faulty Images ...

Page 230: ......

Page 231: ... 1 6 Others 13 1 13 2 Outline of Electrical Components 13 2 13 2 1 Clutch Solenoid 13 2 13 2 1 1 List of Clutches Solenoids 13 2 13 2 2 Motor 13 3 13 2 2 1 List of Motors 13 3 13 2 3 Fan 13 4 13 2 3 1 List of Fans 13 4 13 2 4 Sensor 13 5 13 2 4 1 List of Sensors 13 5 13 2 5 Switch 13 6 13 2 5 1 List of Switches 13 6 13 2 6 Lamps Heaters and Others 13 7 13 2 6 1 List of Lamps Heaters and Others 13 ...

Page 232: ......

Page 233: ...st Also check whether these rollers are free from wear scratches dirt and deformation Check whether the registration roller and paper path are free from wear scratches dirt and deformation Check whether the transport guide is free from wear scratches dirt and deformation Check whether the leading edge of paper is not folded curled wavy or damp Check whether use of the Canon recommended paper trans...

Page 234: ...become fully used to the temperature of the site 13 2 Outline of Electrical Components 13 2 1 Clutch Solenoid 13 2 1 1 List of Clutches Solenoids 0017 5994 Reader Unit The reader unit has no clutch solenoid Printer Unit F 13 1 Symbol Name Function CL201 Manual pickup clutch Drives the manual pickup roller CL202 Cassette feed clutch Drives the cassette feed roller CL203 Registration clutch Drives t...

Page 235: ...ymbol Part No Reader controller PCB Error M401 FK2 1066 J409 Symbol Name Function M201 Fixing motor Drives the fixing unit M203 Polygon motor Drives the laser scanner M204 Main motor Drives the main parts of the printer Symbol Part No DC controller PCB Error M201 FK2 5348 J202 E007 E808 M203 Scanner unit FM3 3695 J205 M204 FK2 5347 J208 E010 M401 M204 M201 M203 ...

Page 236: ...n 13 2 3 1 List of Fans 0017 5997 Reader Unit The reader unit has no fan Printer Unit T 13 1 F 13 4 Symbol Name Function FM1 Heat discharge fan Cools fixing unit Symbol Part No DC controller PCB Error FM1 FK2 5368 J219 E805 FM1 ...

Page 237: ...B or INCH AB SR406 Original sensor 3 Detects the original size all destinations SR407 Original sensor 4 Detects the original size AB or INCH AB SR408 Original sensor 5 Detects the original size INCH A SR409 Original sensor 5 Detects the original size INCH SR410 Original sensor 5 Detects the original size A CIS1 CIS Reads the original Symbol Part No Reader controller PCB Jam code SR401 WG8 5696 J40...

Page 238: ...r Detects the waste toner full status SR207 No 1 paper full sensor Detects the No 1 paper full status SR208 Manual paper sensor Detects presence absence of manually fed paper SR209 Registration sensor Detects registration paper SR210 Timing sensor Detects refeeding 1 Humidity sensor PCB Detects humidity TH1 Fixing main thermistor Detects the fixing heater temperature TH2 Fixing sub thermistor Dete...

Page 239: ...0c 0210 0214 1118 SR204 WG8 5696 J213 SR206 WG8 5696 J216 SR207 WG8 5696 J201 SR208 WG8 5696 J219 SR209 WG8 5696 J212 0104 0208 010c 0214 1118 SR210 WG8 5696 J213 1 WP2 5254 J222 Symbol Part No DC controller PCB Power supply PCB TH1 TH2 Fixing film unit FM3 3654 120V FM3 3653 230V J217 TP1 J13 SR101 SR206 SR202 SR204 SR209 SR208 TH1 TH2 TP1 SR203 SR207 SR210 1 ...

Page 240: ...mbol Name Function SW2 Front cover switch Detects opening closing of the front cover SW3 Left door switch Detects opening closing of the left door SW4 Cassette 1 size detection switch Detects the cassette 1 paper size Symbol Part No DC controller PCB Power supply PCB SW2 FM2 4433 J12 SW3 FM2 4020 J12 SW4 WC2 5332 J213 SW2 SW4 SW3 ...

Page 241: ...condensation on the ADF reading glass H4 Reader heater right NPN Prevents dew condensation on the copyboard glass Symbol Name Function H1 Fixing main heater Used as the main heater for fixing H2 Fixing sub heater Used as the sub heater for fixing H6 Cassette heater Prevents paper in the cassette from absorbing moisture VA1 Varistor Used as a varistor SP1 Speaker Used as a speaker for fax unit H4 H...

Page 242: ...Unit F 13 10 Symbol Part No H1 H2 Fixing film unit FM3 3654 120V FM3 3653 230V H6 FM3 3712 100V FM3 3714 230V Symbol Part No Modem PCB VA1 FH5 3543 SP1 FK2 1265 J1203 Symbol Name Part No Function 1 Reader controller PCB FM2 4792 controls the reader unit ADF H1 H2 H6 VA1 SP1 1 ...

Page 243: ...ntrols the line switching operation 10 modular PCB FM2 4777 120V FM2 4772 230V fax line interface 11 DC controller PCB FM3 2992 120V 18cpm FM3 2993 230V 18cpm FM3 2994 120V 22cpm FM3 2995 230V 22cpm FM3 2996 120V 25cpm FM3 2997 230V 25cpm FM3 2998 120V 30cpm FM3 2999 230V 30cpm controls the printer unit option 12 Option power supply PCB FK2 1085 120V FK2 1086 230V Option power supply 13 Heater PCB...

Page 244: ...F 13 11 F 13 12 1 2 3 4 5 6 7 8 9 10 11 12 13 14 15 16 17 ...

Page 245: ...Chapter 14 Self Diagnosis ...

Page 246: ......

Page 247: ...ated to Finisher 14 5 14 3 3 Jam Codes Related to ADF 14 5 14 3 4 Jam Codes Related to Duplex Unit 14 5 14 3 5 Jam Codes Related to Inner 2 way Tray 14 6 14 4 Finisher Error Codes 14 7 14 4 1 Error Code Details 14 7 14 5 FAX Error Codes 14 10 14 5 1 Outline 14 10 14 5 1 1 Error Code Outline 14 10 14 5 2 User Error Code 14 10 14 5 2 1 User Error Code 14 10 14 5 3 Service Error Code 14 10 14 5 3 1 S...

Page 248: ......

Page 249: ...E261 0000 Zero cross signal error E500 0001 Finisher communication error E520 0000 Offset error E531 0000 Stapling error E540 0001 Paper surface not detected standard tray 0002 Not moved within the specified time standard tray 0003 Sensor not reached within 3 seconds standard tray 0005 Encoder clock failure standard tray E542 0001 Paper surface not detected optional tray 0002 Not moved within the ...

Page 250: ...stor has reached the specified value it does not reach the specified value during initial rotation Check the connector of the fixing film unit Replace the fixing film unit Replace the DC controller PCB E007 0000 Fixing film sensor failure The fixing film sensor is faulty Check the connector of the fixing film sensor Replace the fixing film sensor Replace the DC controller PCB E010 0000 Main motor ...

Page 251: ... error has occurred The serial communication error cannot be recovered Check the connection between the image processor PCB and serial PCB Check the connectors of the serial PCB and coin vendor for normal connection Replace the serial PCB Check the coin vendor Replace the image processor PCB E730 0000 Inside error of the image processor PCB PDL system error The inside of the image processor PCB is...

Page 252: ...ot turn on A fixing drive motor failure was detected Check the connector of the fixing film unit Replace the fixing film unit Replace the fixing drive motor Replace the DC controller PCB Replace the power supply PCB Display Code Detail Code Main Cause Symptom Countermeasure ...

Page 253: ...e specified time after reception of a paper ejection signal from the host machine 0231 Staying paper jam PI5 The inlet sensor is not turned off even if paper is fed by the specified distance after the leading edge of the paper from the host machine has passed through the sensor 0033 Stack ejection jam PI1 When a paper stack is ejected the HP sensor is not turned off within the specified time 0035 ...

Page 254: ...ith a longitudinal length of 280 mm reaches the standby position about 90 mm from the duplex paper sensor 2 0228 Stationary jam at duplex paper sensor 2 SR1003 The duplex paper sensor 2 does not turn off when the specified time has lapsed since the feed motor started Code Name Sensor No Description 010e Delay jam at No 2 delivery section SR1101 The No 2 delivery sensor does not detect presence of ...

Page 255: ...nisher controller PCB failure Offset HP sensor failure The offset motor was driven for 1000 ms in the HP sensor escape direction but the offset HP sensor did not turn off Check the connector of the offset HP sensor Check the connector of the offset motor Replace the offset HP sensor Replace the offset motor Replace the finisher controller PCB E531 0001 Staple unit failure Staple HP sensor failure ...

Page 256: ... tray shift motor Replace the finisher controller PCB 0003 Standard tray shift motor or finisher controller PCB failure Standard tray HP sensor failure Standard tray clock sensor failure Standard tray shift motor load failure The standard tray was operated but it did not reach the sensor within 300 ms Check the connector of the standard tray HP sensor Check the connector of the standard tray clock...

Page 257: ...nector of the optional tray shift motor Replace the optional tray HP sensor Replace the optional tray clock sensor Replace the optional tray shift motor Replace the finisher controller PCB E575 0001 Stack delivery motor or finisher controller PCB failure Stack delivery HP sensor failure The stack delivery motor was driven for 2000 ms in the stack delivery direction HP sensor approach direction but...

Page 258: ... absent at the other party 0018 Tx Rx auto call initiation has failed 0037 Rx image memory overflow at time of reception has occurred 0059 Tx The number you dial and connected number CSI does not match 0995 0099 Tx Rx a memory communication reservation has been cancelled No Tx Rx Description 0100 Tx at time of transmission the procedural signal has been transmitted more than specified 0101 Tx Rx t...

Page 259: ...me out 60 sec has occurred 0764 Tx at time of ECM transmission the procedural signal has been transmitted more than specified after transmission of PPS EOM 0765 Tx at time of ECM transmission no meaningful signal is received after transmission of PPS EOP causing the procedural signal to be transmitted more than specified 0767 Tx at time of ECM transmission DCN is received after transmission of PPS...

Page 260: ......

Page 261: ...Chapter 15 Service Mode ...

Page 262: ......

Page 263: ...ed Discussions of Bit 1 15 11 15 3 5 3 Detailed Discussions of Bit 2 15 11 15 3 6 SSSW SW12 15 11 15 3 6 1 List of Functions 15 11 15 3 7 SSSW SW13 15 12 15 3 7 1 List of Functions 15 12 15 3 7 2 Detailed Discussions of Bit 2 15 12 15 3 8 SSSW SW14 15 13 15 3 8 1 List of Functions 15 13 15 3 8 2 Detailed Discussions of Bit 2 15 13 15 3 8 3 Detailed Discussions of Bit 4 15 13 15 3 9 SSSW SW25 15 13...

Page 264: ...witchover 15 18 15 5 13 025 Answering machine connection function signal detection time 15 18 15 5 14 027 V 21 low speed flag preamble identification length 15 18 15 5 15 055 Acquisition period of environmental log data 15 18 15 5 16 056 061 Count type select 15 18 15 6 Setting of Scanner Functions SCANNER 15 21 15 6 1 Setting of Bit Switch 15 21 15 6 2 Numeric Parameter Functional configuration 1...

Page 265: ...on adjustment cassette 15 28 15 7 2 4 033 Top registration adjustment duplex unit 15 28 15 7 2 5 034 Left end registration adjustment manual feed tray 15 28 15 7 2 6 035 Left end registration adjustment cassette 1 15 28 15 7 2 7 036 Left end registration adjustment cassette 2 15 29 15 7 2 8 037 Left end registration adjustment cassette 3 15 29 15 7 2 9 038 Left end registration adjustment cassette...

Page 266: ...4 3 System Dump List 15 35 15 14 4 Counter List 15 36 15 14 5 Error Log List 15 37 15 14 6 Spec List 15 39 15 14 7 Service Label 15 41 15 14 8 e RDS Communication Error Log List 15 41 15 14 9 Environmental Log Report 15 41 15 15 Download DOWNLOAD 15 42 15 15 1 Download 15 42 15 16 Initialization of Set Value CLEAR 15 42 15 16 1 Clear 15 42 15 17 Error Display ERROR DISPLAY 15 42 15 17 1 Error Disp...

Page 267: ...selection signal transmission conditions and the detection conditions for the control signals sent from the exchange Do not change the settings FAX Do not use SCAN These setting items are for image adjustment in scanning PRINT These setting items are for image adjustment in printer assembly and for special mode for the field related measures NETWORK Use it to confirm the contents of the installed ...

Page 268: ... Selecting Service Mode Press the Additionalfunctions key 2key 8key Additional functions key sequentially SSSW NUMERIC Param NUMERIC Param 2 Selecting a Menu Item Select the Menu item using the left arrow right arrow on the touch panel 3 Press OK 5 Registering Setting Data Enter data using the keypad and then press OK 6 Press the Stop Additional functions Reset key to end the service mode NUMERIC ...

Page 269: ...ing 007 009 not used 010 5500 55sec 0 9999 line connection identification time length 011 3500 35sec 0 9999 T 30 T1 timer for reception 012 not used 013 1300 13sec 500 3000 T30 EOL timer 014 not used 015 120 1200ms 0 999 hooking detection time setting 016 4 4sec 0 9 fax tel switch over function between line acquisition and pseudo RBTtransmission 017 100 1000ms 0 999 pseudo RBT signal pattern ON ti...

Page 270: ...0 999 count type select 5 061 0 0 999 count type select 6 062 080 not used SPECIAL Do not change NCU Do not change FAX Not used SCAN No Initial setting Range setting Explanation SCAN SW SW1 00000000 Outputting an Image for ADF Squareness Adjsutment SW2 SW50 Not used NUMERIC Param No Initial setting Range of setting Function ...

Page 271: ... 200 one unit 0 1mm Horizontal scan end position correction standard 047 16 0 to 32 one unit 0 1 Vertical scan magnification correction scanning on ADF 048 16 0 to 32 one unit 0 1 Horizontal scan magnification correction scanning on ADF 049 053 Not used 054 16 0 to 32 one unit 0 1 Pickup motor speed correction when the ADF is used 055 192 Not used 193 0 0 LEGAL 1 FOOLSCAP 2 M_OFFICIO 3 A_FOOLSCAP ...

Page 272: ...ion adjustment duplex unit 40 44 Not used 45 16 0 to 30 1 unit 0 4 Fixing film speed adjustment manual paper feed tray 46 16 0 to 30 1 unit 0 4 Fixing film speed adjustment cassette 47 52 Not used 53 0 0 to 9999 one unit 5 deg C Adjustment of margin at leading edge of copy 54 0 0 to 9999 one unit 5 deg C Adjustment of margin at trailing edge of copy 55 0 0 to 9999 one unit 5 deg C Adjustment of ma...

Page 273: ...STEM No Initial setting Range of setting Function SYSTEM SW SW01 SW02 not used SW03 00001000 Import export of the user information via USB SW04 SW50 not used SYSTEM NUMERIC 001 100 not used ACC Item Initial setting Range of setting Function CARD 0 0 99999 Card reader installation setting CC SPSW 0 0 or 1 Control card I F support setting COIN 0 0 or 1 Coin vendor change setting CONTROL 0 0 or 1 Pin...

Page 274: ...ettings HST ACTIVITY Use it to clear the contents of the communications control report ACCOUNT Use it to clear each print history JAM Use it to clear the contents of the jam history ERR Use it to clear the contents of the error E code history ALARM Use it to clear the contents of the alarm history ENVIROMENT Initializes the enviroment log data CARD Use it to clear the control cars error data ERR E...

Page 275: ... to indicate the version of the ROM SYSTEM on the image processor PCB MAIN2 Use it to indicate the version of the ROM BOOT on the image processor PCB OPROM Use it to indicate the version of option ROM ECONT Use it to indicate the version of the ROM on the DC controller PCB TEST MODE 1 9 Item Function 1 DRAM 1 2 Data check in D RAM 2 SCAN TEST 1 8 CS automatic correction and document scan position ...

Page 276: ...select an appropriate reception mode after transmission of the CFR signal If errors occur frequently at time of reception because of the condition of the line select high speed for reception mode and at the same time selects do not receive for ECM reception Memo Any of the following error codes may be indicated at time of reception because of line condition 0107 0114 0201 Be sure to change bit 4 b...

Page 277: ... conversion in sub scanning direction for images read in text mode Scanning direction in conversion follows the Bit 2 setting of SW14 15 3 5 3 Detailed Discussions of Bit 2 0017 6067 Use it to enable disable millimeter inch conversion in sub scanning direction for images read in text photo mode while bit 1 is set to 1 Scanning direction in conversion follows the Bit 2 setting of SW14 15 3 6 SSSW S...

Page 278: ...t7 Bit6 Bit5 Bit4 Bit3 Bit2 Bit1 Bit0 8 min 0 0 0 16 min 0 0 1 32 min 0 1 0 64 min 0 1 1 Time Out Length for Transmission in text mode Bit7 Bit6 Bit5 Bit4 Bit3 Bit2 Bit1 Bit0 8 min 1 0 0 16 min 1 0 1 32 min 1 1 0 64 min 1 1 1 Time Out Length for Reception Bit7 Bit6 Bit5 Bit4 Bit3 Bit2 Bit1 Bit0 8 min 1 0 0 16 min 1 0 1 32 min 1 1 0 64 min 1 1 1 Bit Function 1 0 0 not used 1 not used 2 Convert inch...

Page 279: ...he Initiation number is selected report will indicate the telephone number of the initiation side If the Receiver s number is selected report will indicate the phone number CSI signal data which is sent by the receiver s side 15 3 9 3 Detailed Discussions of Bit 2 0017 8529 At 1 on this Bit ignore the void CSI if received and if the dial has been made at this point the dialed number will be indica...

Page 280: ...rohibit is selected the receiver does not fall back 15 3 10 7 Detailed Discussions of Bit 5 0017 6080 Select whether the transmitter falls beck during V 34 transmission If Prohibit is selected teh transmitter does not fall back 15 3 11 SSSW SW30 15 3 11 1 List of Functions 0017 6081 T 15 13 15 3 11 2 Detailed Discussions of Bit 5 0017 6082 When Detect with the new method is selected tone is detect...

Page 281: ...4 paper will be counted as small size paper 15 3 12 5 Detailed Discussions of Bit 3 Bit4 0017 6087 Select whether to switch the counter display type in effect in Japan and USA to the conventional or new type Select Yes to display counters in the new type Select No to display counters in the conventional type T 15 15 15 3 13 SSSW SW34 15 3 13 1 List of Functions 0017 6088 T 15 16 The default settin...

Page 282: ...095 Use it to set the transmission level ATT Raise the transmission level if errors occur frequently at time of communication because of the condition of the line It means close to 8 Any of the following error codes may be indicated at time of transmission because of the line condition 100 101 102 104 201 280 281 282 283 284 750 752 754 755 757 759 760 762 764 765 767 769 770 772 774 775 777 779 7...

Page 283: ...des may be indicated because of the condition of the line 0005 0018 The line condition identification time is between when the dial signal is transmitted and when the line condition is cut for the transmitting party while it is between when the DIS signal is transmitted and when the line is cut for the receiving party 15 5 6 011 T 30 T1 timer for reception 0017 6105 Set the T1 timer for the receiv...

Page 284: ...he Counter Check screen which appears in response to a press on the Counter key When 0 is selected count type will not be indicated No 56 Use it to indicate the type of software counter 1 of the control panel The type of soft counter 1 cannot be changed No 57 Use it to change the type of soft counter 2 of the control panel to suit the needs of the user No 58 Use it to change the type of soft count...

Page 285: ...1 203 Copy L 1 204 Copy S 1 205 CopyA Total1 1 1 206 CopyA Total2 2 1 207 CopyA L 1 208 CopyA S 1 209 Local copy Total1 1 1 210 Local copy Total2 2 1 211 Local copy L 1 212 Local copy S 1 221 Copy Bk1 1 1 222 Copy Bk2 2 1 227 Copy Bk L 1 228 Copy Bk S 1 237 Copy Bk L 2 sided 1 238 Copy Bk S 2 sided 1 249 CopyA Bk1 1 1 250 CopyA Bk2 2 1 255 CopyA Bk L 1 256 CopyA Bk S 1 265 CopyA Bk L 2 sided 1 266...

Page 286: ...2 2 2 1 1 1 414 Copy Print 1 1 1 1 1 1 1 421 Copy Print Bk L 1 1 1 422 Copy Print Bk S 1 1 1 701 Recieved print Total1 702 Recieved print Total2 703 Recieved print L 704 Recieved print S 709 Recieved print Bk1 710 Recieved print Bk2 715 Recieved print Bk L 716 Recieved print Bk S 725 Recieved print Bk L 2 sided 1 726 Recieved print Bk S 2 sided 1 801 Report print Total1 802 Report print Total2 803...

Page 287: ...FileS hare DB BOX scan Total scan 501 Scan Total1 1 1 505 Bk scan Total1 1 1 506 Bk scan Total2 2 1 507 Bk scan L 1 508 Bk scan S 1 509 C scanTotal 1 1 1 510 C scanTotal 2 2 1 511 C scan L 1 512 C scan S 1 915 Transmission scan total2 C 1 916 Transmission scan total2 Bk 1 917 Transmission scan total3 C 1 918 Transmission scanTotal3 Bk 1 921 Transmission scanTotal5 C 1 922 Transmission scanTotal5 B...

Page 288: ...nt scanning on ADF 220 170 270 one unit 0 1mm 043 Horizontal scan end position correction copy scanning on ADF 24 0 200 one unit 0 1mm 044 Horizontal scan end position correction superfine scanning on ADF 36 0 200 one unit 0 1mm 045 Horizontal scan end position correction fine scanning on ADF 47 0 200 one unit 0 1mm 046 Horizontal scan end position correction standard scanning on ADF 47 0 200 one ...

Page 289: ...an start position adjustment when scanning on a document fed from ADF 0017 6125 Adjust the position at which horizontal scanning of a document fed from the ADF starts The larger the adjustment value the narrower the top margin of the image becomes 15 6 11 043 Horizontal scan end position correction copy scanning on ADF 0017 6126 Adjust the position at which horizontal scanning of a document being ...

Page 290: ...RR 0 LTR_R 1 FOOLSCAP 2 OFFICIO 3 E_OFFICIO 4 G_LTR_R 5 A_LTR_R 15 6 20 196 Shading Target Value Red 0017 6135 This is market related measures taken to improve shadow images generated by a thick original such as a book or a folded or wrinkled original When taking the measures assign the same values for R G and B After changing the values be sure to turn off the power and turn it on again 15 6 21 1...

Page 291: ...disable placement of priority on recording in sub scanning direction T 15 21 Image B4 or shorter and that cannot be printed by division and on A4 recording paper Bit Function 1 0 0 not used 1 not used 2 not used 3 not used 4 not used 5 not used 6 not used 7 priority on recording in sub scanning direction place do not place place if B4 recording paper and A4 recording paper are set and an A4 extra ...

Page 292: ...y 15 7 1 2 5 Detailed Discussions of Bit 3 0017 6148 Select whether to enable or disable post rotation reduction mode Selecting Enable will reduce the noise caused by the polygon motor by stopping the motor immediately after post rotation 15 7 1 2 6 Detailed Discussions of Bit 4 0017 6149 Select whether to enable or disable flicker reduction mode Select Enable and enter a count to modify fusing te...

Page 293: ...xt is recorded Selecting Set may split text data when a small paper size such as A5 is selected In this case a page may be split in the middle of a character string 15 7 1 4 SSSW SW18 15 7 1 4 1 List of Functions 0017 8533 T 15 24 15 7 1 4 2 Detailed Discussions of Bit 0 0017 8534 If there is no progress after shifting the target figure of the temperature adjustment using Temperature Adjustment UP...

Page 294: ...stment manual feed tray 50 0 to 100 one unit 0 1 mm 32 Top registration adjustment cassette 50 0 to 100 one unit 0 1 mm 33 Top registration adjustment duplex unit 50 0 to 200 one unit 0 1 mm 34 Left end registration adjustment manual feed tray 100 0 to 200 one unit 0 1 mm 35 Left end registration adjustment cassette 1 100 0 to 200 one unit 0 1 mm 36 Left end registration adjustment cassette 2 100 ...

Page 295: ...anual feed tray 0017 8644 If there is a registration loop noise and abrasion while feeding the paper from the manual feed tray registration loop noise and abrasion could be reduced by adjusting the volume of the registration loop By making the value larger loop volume will become bigger 15 7 2 19 059 Adjustment of the registration loop volume Cassette 0017 8645 If there is a registration loop nois...

Page 296: ...per Compatibility 0017 6174 With a special paper compatibility kit cassette size adjuster installed set the cassette paper size lever to paper size groups U1 to U3 to set the paper sizes listed below 15 8 Network Parameter Settings NETWORK 15 8 1 Confirmation of contents of CA certificate 0017 6175 Selecting the service mode NETWORK CERTIFICATE CA CERTIFICATE enables confirmation of the contents o...

Page 297: ...er certificate and the device serial number for example ABC01234 which the license is going to be installed is necessary Device serial number will indicate on Serial Number when pressing the counter confirmation key on the main machine 2 Copy the license key of 24 digit figures which is indicated on the WEB browser to the designated column on license access number certificate Reconfirm that there ...

Page 298: ... license To inactive the license operation through the service mode has to be made and to prove the function is inactive issue of the function inactive certificate key is necessary This operation is valid to any of the each optional function and at the point of issuing the function inactive certificate key the function will be inactive and could not be used New license key to install to the transm...

Page 299: ...ch sheet of large sized paper larger than A4 LTR T 15 28 Item Description E RDS SWITCH e RDS OFF ON setting 0 OFF 1 ON When used ON the counter information and error information are sent to UGW Default 0 OFF RGW ADDRESS URL of UGWDefault URL of actual UGWCharacter string length 129 bytes including NULL one byte codes only RGW PORT Port No of UGW Default 443Setting range 1 to 65535 COM TEST Executi...

Page 300: ...vice life DRBL 1 Unit supplies FX UNIT Fixing unit paper pass count 150 000 TR ROLL Transfer charger roller high voltage ON count 150 000 DV UNT C Developing unit rotation count 150 000 M PU RL Manual feed tray pickup roller paper pass count 150 000 M SP PD Manual feed tray separation pad paper pass count 150 000 Item Explanation SERVICE DATA LIST Service mode service soft switch output SSSW MENU ...

Page 301: ...rding to original size 3 RX number of total pages reception 4 Total number of pages transmitted and received for each modem speed 5 Total number of pages transmitted received in connection with different modem speeds Standard Fine Super Fine Ultra Fine 6 Total number of pages transmitted and received for each coding method 7 Total number of pages transmitted and received in each mode 8 Total numbe...

Page 302: ...been received 7 bit 1 through bit 96 of DIS DCS or DTC that has been transmitted 8 RX procedural signal received TX procedural signal transmitted 15 14 4 Counter List 0017 6188 Explanation Maintenance supplies counter output For more detailed information about the maintenance supplies counter output execute service mode Display counter information Counters Indication sample 280 1 7 3 0 0 280 numbe...

Page 303: ... jam occurrence 3 Jam time 4 Jam recovery time 5 Location 3 Host machine 4 ADF 5 Finisher 6 Occurrence category 0 Host machine 1 ADF 2 Finisher JAM ERR LOG REPORT 07 12 2005 13 07 FAX 001 1 2 3 4 5 6 7 8 9 10 1 2 3 4 5 6 7 8 JAM 01 04 12 12 17 20 03 4 1 0012 000026 1 A4 20 04 12 12 17 20 03 4 1 0012 000026 1 A4 ERR 01 04 12 12 17 15 36 3 0010 0000 000691 20 04 12 12 17 15 36 3 0010 0000 000691 ...

Page 304: ... Delivery reversal sensor stationary jam 000e ADF cover open error 000f User ADF open error 0010 Pickup NG Finisher 0130 Inlet sensor delivery delay jam 0231 Inlet sensor delivery stationary jam 0033 Bundle delivery jam 0035 Stapler jam 1036 Power on jam 1137 Door open jam 8 Total counter display 9 Pickup stage position 0 Manual feed tray 1 Cassette 1 2 Cassette 2 3 Cassette 3 4 Cassette 4 10 Pape...

Page 305: ... _ _ _ _ _ _ _ _ _ _ _ _ _ _ _ _ _ _ _ _ _ _ _ _ _ _ _ _ _ _ _ _ _ _ _ _ _ _ _ _ _ _ _ _ _ _ _ _ _ _ _ _ _ _ _ _ _ _ _ _ _ _ _ _ _ _ _ _ _ _ _ _ _ _ _ _ _ _ _ _ _ _ _ _ _ _ _ _ _ _ _ _ _ _ _ _ _ _ _ _ _ _ _ _ _ _ _ _ _ _ _ _ _ _ _ _ _ _ _ _ _ _ _ _ _ _ _ _ _ _ _ _ _ _ _ _ _ _ _ _ _ _ _ _ _ _ _ _ _ _ _ _ _ _ _ _ _ _ _ _ _ _ _ _ _ _ _ _ _ _ _ _ _ _ _ _ _ _ _ _ _ _ _ _ _ _ _ _ _ _ _ _ _ _ _ _ _ _ _ _...

Page 306: ...48 054 213 214 215 WRITE ADJ PRM 031 032 033 034 035 036 037 038 039 OPTYION ROM USB MEMORY DELIVERY FULL SENSOR 1 DELIVERY FULL SENSOR 2 USB SERIAL No MAC ADDRESS BACKUP BATTERY LUGIA NUMBER OF LOGS ACTIVITY PRINTJOB ACCOUNT COPY PDL PRINT RX PRINT REPORT JAM SERVICE CALL ENVIROMENT _ _ _ _ _ _ _ _ _ _ _ _ _ _ _ _ _ _ _ _ _ _ _ _ _ _ _ _ _ _ _ _ _ _ _ _ _ _ _ _ _ _ _ _ _ _ _ _ _ _ _ _ _ _ _ _ _ _...

Page 307: ... Number The larger the number of a enviroment log data the more recently it has occurred 3 Date Data acquisition day 4 Time Data acquisition time 5 Temperature deg 6 Humidity 7 Fixing roller temperature 1 deg 8 Fixing roller temperature 2 deg FACTORY 1 2 3 FACTORY 1 2 3 031 50 026 032 50 031 033 50 032 034 100 033 035 100 034 036 100 041 037 100 042 038 100 043 039 100 044 045 046 047 048 054 213 ...

Page 308: ...ears the maintenance counter parts counter and mode specific counters Initializes the counter numerator in the system dump list TYPE Initializes user data and service data to suit specified destination settings SOFT CNT Not used HST ACTIVITY Initializes the activity report ACCOUNT Clears print histories JAM Clears the jam history ERR Clear the error error code history ALARM Clears the alarm histor...

Page 309: ...R CLEAN Used to clean the delivery roller or ADF pickup roller by idling them 15 19 2 Test Mode Menu List LCD Type 0017 6194 Test mode menu list To invoke test mode follow these steps 1 Enter service mode Press the operation panel user mode key 2 key 8 key and user mode key in this order 2 Press the operation panel arrow keys to show TEST MODE 3 Press the OK key To exit test mode press the user mo...

Page 310: ...EST TC9600bps 7 G3 SIGNAL TX TEST 12000bps 8 G3 SIGNAL TX TEST 14400bps 5 DTMF TEST 0 9 DTMF transmission test 0 G3 SIGNAL TX TEST 300bps 1 G3 SIGNAL TX TEST 2400bps 2 G3 SIGNAL TX TEST 4800bps 3 G3 SIGNAL TX TEST 7200bps 4 G3 SIGNAL TX TEST 9600bps 5 G3 SIGNAL TX TEST TC7200bps 6 G3 SIGNAL TX TEST TC9600bps 7 G3 SIGNAL TX TEST 12000bps 8 G3 SIGNAL TX TEST 14400bps 9 G3 SIGNAL TX TEST TC9600bps G3...

Page 311: ... OP3 0000 PATH 0000 1 SENSOR LATCH 0 2 0 CAS 0 REG 0 DEL 0 MULTI 0 1 TONER 0 FULL 0 2ND DEL 0000 2 OP1 0000 OP2 0000 OP3 0000 PATH 0000 2 SWITCH CHECK 0 1 0 CAS 0000 LOCK 0000 1 OP1 0000 OP2 0000 OP3 0000 3 DS ON DES of HPS ON BCVS of 4 REF xxx ANT xxx ANT REF xxx 5 BSCT on BDAC A3 BDSS3 0 of of of of 6 NCR Sts NCR xxxxx DPT MGN OK RDY 0101 7 LAST of EXIT of REG of CVR of 8 WID1 on WID2 on LEN1 on...

Page 312: ...p key F 15 17 15 19 6 Modem Test 4 MODEM TEST 0017 6199 MODEM test 4 MODEM TEST These tests test modem and NCU transmission and reception The modem tests check whether signals are sent correctly from the modem by comparing the sound of the signals from the speaker with the sounds from a normal modem End this test by pressing the Stop key Relay Test Press 1 or 2 on the keypad on the Modem test menu...

Page 313: ...MEMO The frequency and the output level of individual frequencies are in keeping with the output level set in service mode G3 Signal Transmission Test A press on 4 on the keypad from the MODEM test menu selects the G3 signal transmission test In this test the following G3 signals from the modem are trans mitted using the telephone line terminal and the speaker To select a different transmission sp...

Page 314: ...nd the speaker by pressing the start key The Baud rate can be changed with the keypad and the Speed can be changed with the left right arrow key 15 19 7 Function Test 6 FUNCTION TEST 0017 6203 Function test 6 FUNCTION TEST Press the numeric keypad key 6 on the test mode menu to select the function test Press numeric keypad keys 1 and 3 to 9 during the function test to enter the menus listed below ...

Page 315: ...ns Press numeric keypad key 3 on the FUNCTION TEST menu to select the sensor test The touch panel LCD indications change as the associated sensors turn on and off Keypad Item Explanation 1 G3 signal transmission test Transmits 4800 bps G3 signals to a telephone line and speaker 2 Not used 3 Sensor test Sensor actuation test 4 ADF test ADF operation test 5 Book test Host machine operation test 6 Sp...

Page 316: ...te 2 retry sensor SR6 0 Document presence 1 Document absenc Cassette 2 paper sensor SR5 0 Document presence 1 Document absence OP2 0 0 Cassette 3 retry sensor SR6 0 Document presence 1 Document absence Cassette 3 paper sensor SR5 0 Document presence 1 Document absence OP3 0 0 Cassette 4 retry sensor SR6 0 Document presence 1 Document absence Cassette 4 paper sensor SR5 0 Document presence 1 Docume...

Page 317: ...y 6 4 Can status OK Normal scan ERR Scan error NG Nonstandard error No indication No card 5 Equipment status IN Initialization in progress RDY Ready 6 Card reader version indication Four digit number REF xxx ANT xxx ANT LEF xxx REF Toner reference voltage A D value ANT Toner antenna voltage A D value ANT LEF Differential voltage A D value LAST of EXIT of REG of CVR of LAST Last document detection ...

Page 318: ...D display changes from OFF to ON indicating the received frequency The touch panel LCD displays the status of CML CNG and FED detection from left to right with ON OFF indications Numeric keypad key 2 turns on the CML relay to detect CNG Test menu 3 Press numeric keypad key 3 on the LINE DETECT menu to select test menu 3 When the CNG signal is detected on the telephone line connection terminal the ...

Page 319: ...Chapter 16 Upgrading ...

Page 320: ......

Page 321: ...6 2 16 2 2 Connection 16 4 16 3 Downloading System Software 16 5 16 3 1 Downloading System 16 5 16 3 1 1 Downloading Procedure Touch panel type 16 5 16 3 2 Downloading RUI and Language 16 10 16 3 2 1 Downloading Procedure 16 10 16 3 3 Downloading BOOT 16 10 16 3 3 1 Downloading Procedure 16 10 16 3 4 Other Upgrade Methods 16 10 16 3 4 1 Downloading the PCL Software Touch panel type 16 10 16 3 4 2 ...

Page 322: ......

Page 323: ...ol firmware Inserting the 32MB ROM PCB in the extended slot in the image processor PCB allows the main controller to operate under the control of the firmware stored in the 32MB ROM PCB Pay attention to the following points when updagrading 1 When updagrading Boot make sure to update Boot first 2 When updagrading the following software make sure to update all to the same version System Language PC...

Page 324: ...R2025i iR2030 iR2030i Unit name Main controller System Boot program Boot 16MB ROM PCB PCL_op for the standard model 32MB ROM PCB PCL_Common for the model equipped with the PCL printer kit W1 CA certificate distributed only as necessary Preparation Have the following ready PC in which SSTv3 21 or later is installed Download a CA certificate of version of SSTv3 31 or higher System CD System Software...

Page 325: ...Chapter 16 16 3 4 Click the Register Firmware button F 16 2 5 Select the drive in which the system CD is inserted and then click the SEARCH button F 16 3 ...

Page 326: ... then click the REGISTER button This machine allows two or more system software programs to be register at the same time However it does not allow two or more them to be downloaded at the same time If two or more software programs need to be upgraded download them one by one F 16 4 7 When the system software program registration result appears click the OK button F 16 5 ...

Page 327: ...is machine to the PC using the USB cable 1 F 16 6 16 3 Downloading System Software 16 3 1 Downloading System 16 3 1 1 Downloading Procedure Touch panel type 0017 6015 1 Turn on the power switch of the PC and start SST 2 When the power switch is turned on the Found New hardware Wizard appears Click Cancel F 16 7 3 Select MFP in Target Selection and then select iR2018i in Model List F 16 8 1 ...

Page 328: ...6 9 5 Turn on the power switch of the host machine 6 Press the following keys on the control panel to enter the service mode 2 Key 8 Key 7 Using or select DOWNLOAD 8 Press the OK key on the control panel to place the host machine in the downloading wait mode No indicated on LCD 9 Press the OK button on the SST screen displayed on the display of the PC F 16 10 ...

Page 329: ...ing screen appears Click the OK button F 16 11 11 Click System Software Download on the Selecting a Job screen MEMO This machine does not use the Upload the Backup Data and Download the Backup Data functions not displayed on the Selecting a Job screen F 16 12 ...

Page 330: ...e system software to download from the list Check that the selected version is displayed in Selected Version and then click the START button F 16 13 13 When downloading starts the progress of downloading is displayed by the progress bar F 16 14 ...

Page 331: ...ayed F 16 15 Never turn off the power switch of the machine while the data is being written to the flash ROM If it becomes impossible to start this machine after turning its power switch off the image processor PCB must be replaced 15 When writing of the data to the Flash ROM is complete its result is displayed Click the OK button F 16 16 ...

Page 332: ...Chapter 16 16 10 16 When the Selecting a Job screen appears click Return to Main Menu F 16 17 17 Click the OK button to return to the menu screen of SST F 16 18 ...

Page 333: ... button and turn OFF ON the main power switch F 16 19 16 3 2 Downloading RUI and Language 16 3 2 1 Downloading Procedure 0017 6016 To download the language software use the steps given for the system software 16 3 3 Downloading BOOT 16 3 3 1 Downloading Procedure 0017 6017 To download the boot software use the steps given for the system software ...

Page 334: ...download it The default CA certificate is maintained within the system software and can be activated by executing Service Mode CLAER CA KEY and turning the power OFF ON so there is no need to download it again If you have updated your system software make sure to perform the following procedure to activate the CA certificate in the updated system software Procedure Execute Service Mode CLAER CA KE...

Page 335: ...6 22 4 Double click the CA KEY folder in Model List to confirm the version of the CA certificate Select USB in Interface and then click the START button F 16 23 5 Turn on the power switch of the host machine 6 Press the following keys on the control panel to enter the service mode 2 Key 8 Key ...

Page 336: ...n the control panel to place the host machine in the downloading wait mode No indicated on LCD 9 Press the OK button on the SST screen displayed on the display of the PC F 16 24 10 When connection is complete the following screen appears Click the OK button F 16 25 ...

Page 337: ...A_KET Download on the Selecting a Job screen F 16 26 12 Select the version of the system software to download from the list Check that the selected version is displayed in Selected Version and then click the START button F 16 27 ...

Page 338: ...turn off the power switch of the machine while the data is being written to the flash ROM If it becomes impossible to start this machine after turning its power switch off the image processor PCB must be replaced 14 When writing of the data to the Flash ROM is complete its result is displayed Click the OK button F 16 29 ...

Page 339: ...k Return to Main Menu F 16 30 16 Click the OK button to return to the menu screen of SST F 16 31 17 In Service Mode open NETWORK CERTIFICATE CA CERTIFICATE and check if the information recorded there is the same as the CA certificate you downloaded ...

Page 340: ......

Page 341: ...Chapter 17 Service Tools ...

Page 342: ......

Page 343: ...Contents Contents 17 1 Service Tools 17 1 17 1 1 Special Tools 17 1 17 1 2 Oils and Solvents 17 1 ...

Page 344: ......

Page 345: ...an addition when making an electrical check Tester extension pin L shipped FY9 3039 A As an addition when making an electrical check NA 3 Test Chart FY9 9196 A For checking and adjusting images Name Uses Composition Remarks Alcohol cleaning e g glass plastic rubber external covers fluoride family hydrocarbon alcohol surface activating agent water Do not bring near fire Procure locally IPA isopropy...

Page 346: ...Chapter 17 17 2 Lubricant EM 50L gear special oil special solid lubricating agent lithium soap HY9 0007 Name Uses Composition Remarks ...

Page 347: ...Oct 11 2007 ...

Page 348: ......

Reviews: