background image

How to change print settings

Select file and print

1

2

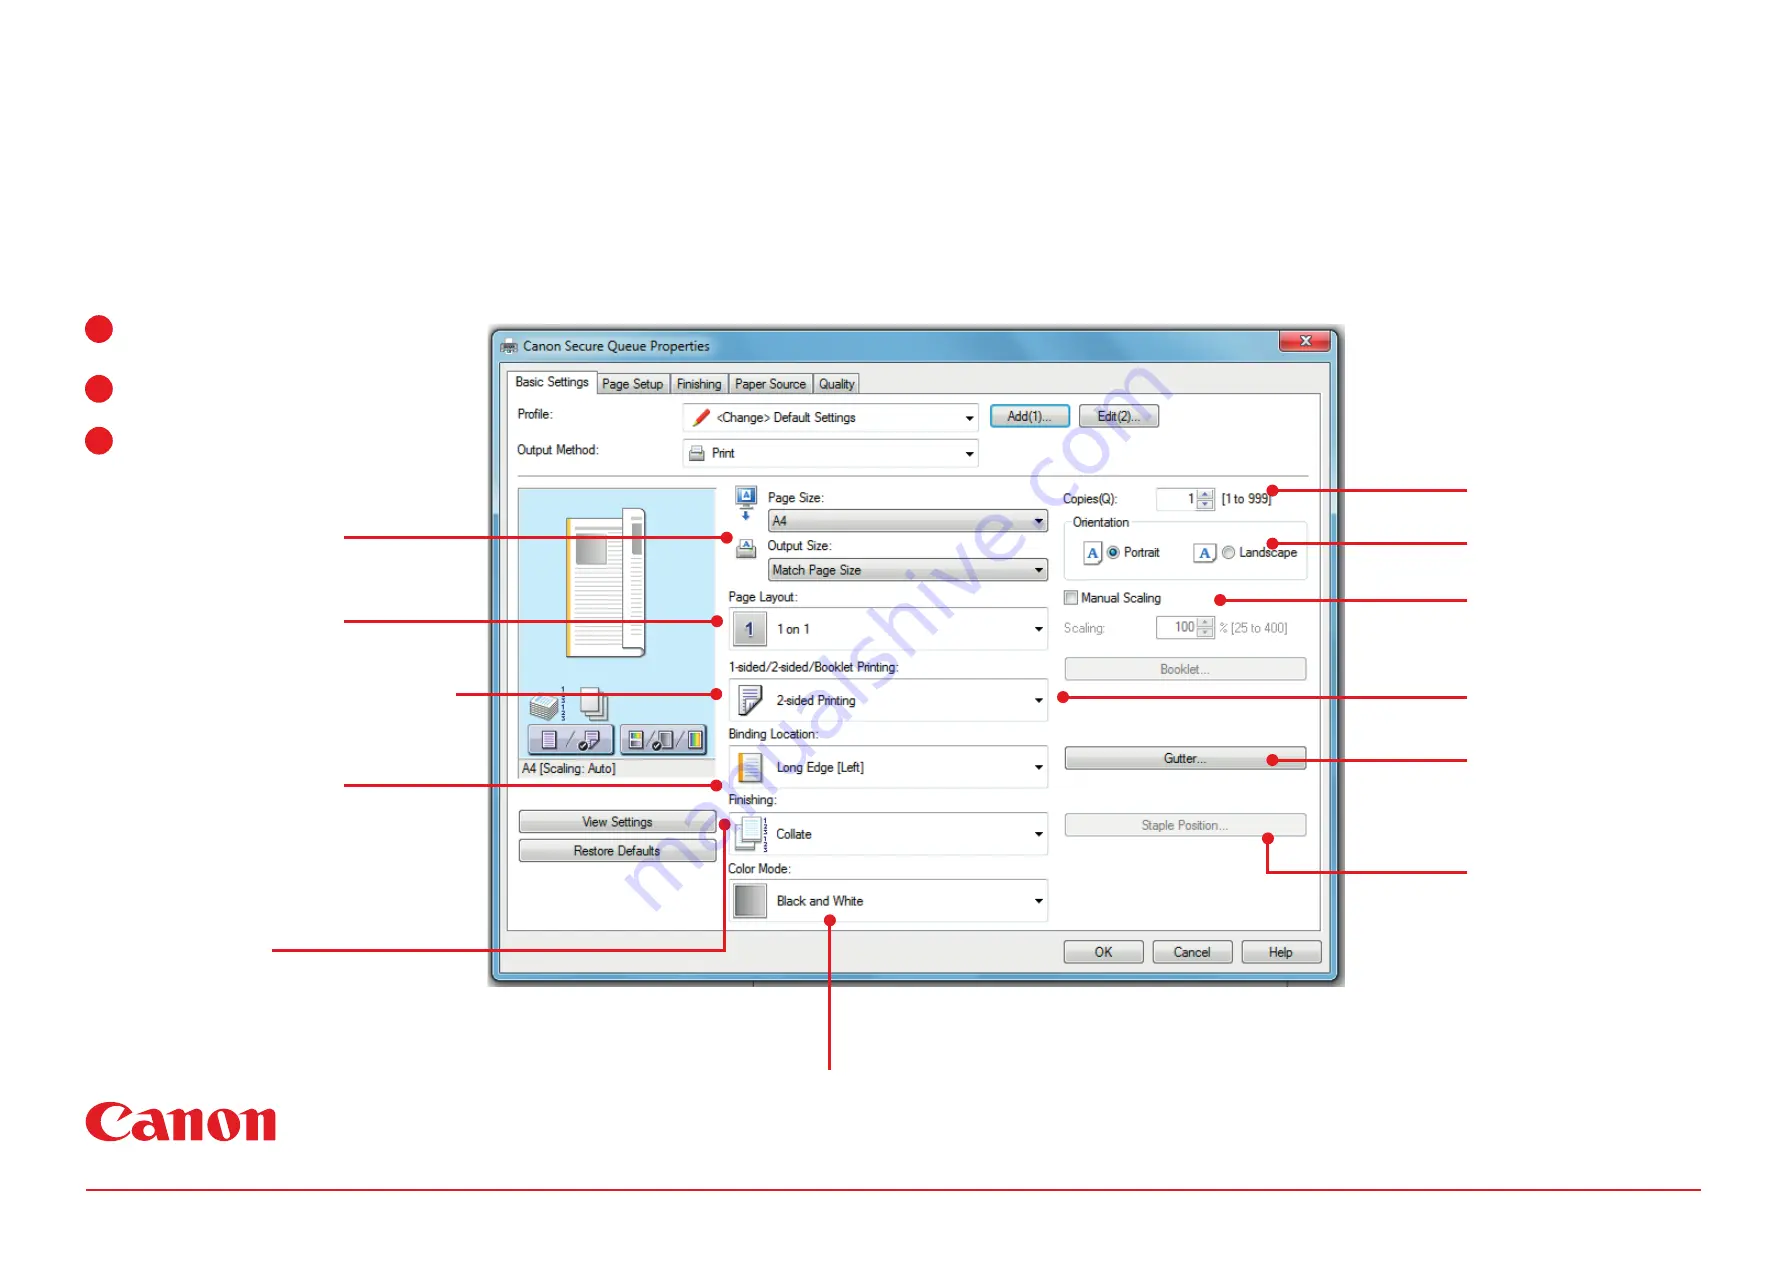
Choose the secure print queue


Copies


Select number of copies 

required. 

Orientation


Choose landscape or portrait.

Manual Scaling


Allows you to reduce or 

enlarge in 1% increments 

(25% - 400%).

Booklet


Choose to print your 

document as a booklet.

Gutter


Create a gutter on the 

document to allow for 

binding.

Staple Postion


Activate staple under the 

finishing menu and then 

select staple position to 

change the staple location on 

your document.

Follow steps 1 and 2 at your PC to send a document to print. If you require to change from the default settings, go to step 3 before submitting to print.

3

Select properties

Choose from the print settings 

outlined below.


Output size


Allows you to reduce or enlarge  

your print document.

Page Layout


Allows you to display more than 

one page on a sheet. 

1-sided/2 sided/Booklet Printing


Allows you to print single sided, 

double sided or print your 

document as a booklet.

Binding Location


Select from long edge or short 

edge to change the way your 

document is displayed when 

printed double sided e.g. 

Calendar style or booklet style.

Finishing


Select collate to print your document as sets 

(abc) (abc) or select group to print your 

document as sheets (aaa) (bbb).

Staple


Apply a staple to your document.

Colour Mode 

Select to print your document in 

full colour, auto colour or black 

and white.

Summary of Contents for iR ADV C55 i Series

Page 1: ...A How To Guide for your printer iR ADV C55XXi ...

Page 2: ...number panel to the right of the touch screen Then press ID or Login The home screen will appear for you to choose the function you require Note To retrieve your PIN Code you must first add the new Secure Print queue and send a test page or print job The system will then automatically email you a PIN code to your inbox 2 3 ...

Page 3: ...e default settings go to step 3 before submitting to print 3 Select properties Choose from the print settings outlined below Output size Allows you to reduce or enlarge your print document Page Layout Allows you to display more than one page on a sheet 1 sided 2 sided Booklet Printing Allows you to print single sided double sided or print your document as a booklet Binding Location Select from lon...

Page 4: ... or choose the Select All button to print all the jobs in your queue 1 2 Now select from Print Delete Will print your job s and delete them from the print queue Delete Will delete any jobs selected from the queue Upon login select the Secure Print button 3 Logout Select logout upon releasing your jobs The device will auto logout after 2 minutes ...

Page 5: ...r document unless a specific document size is selected File Format Allows you to change the file format of your scanned document e g JPEG TIFF you can also apply compression details 2 Sided Original Allows you to specify your document is double sided Different Size Originals Will ensure the page sizes are acknowledges and will keep the original page sizes when scanning Options Further scan options...

Page 6: ...our document choose from pre set options or enter a percentage 4 5 Select Paper Press this key to choose the paper source to print from if auto is selected the device will select the most appropriate 6 Original Type This will copy a mixture of original types Press the down arrow and select Photo if you are making copies of photographs or select Text if you are making copies of typed text 7 Options...

Page 7: ... LTR is displayed you can overide this by selecting one of the trays displayed to the right e g A4 Press OK to continue printing 2 If you do not want to overide the paper onto a paper tray as displayed you can select the cancel button at the bottom of the screen and press Yes on the prompt This will cancel your print job 3 Note Please check the page setip of your document within the application yo...

Page 8: ...er job queue status you wish to cancel Ensure you are logged in 1 2 3 Select the Status Monitor Cancel button 4 Log out Should the device error mid way through a print job it is advisable to cancel the job to ensure the prints are not released when the error is rectified Select Stop and press Yes to confirm deletion 5 6 ...

Page 9: ...edges when opening Press Remove the Toner Cartridge to unlock the internal cover 3 On the touch screen a video will display the next steps and can be paused if required Remove the new toner from its box and with the white part of the toner facing up shake to toner up and down approximately 10 times Install the new cartridge with the flat surface of the toner cartridge facing down slide the toner i...

Page 10: ...aste Toner appears on the device touch screen either follow the instructions on the touch screen panel or follow the steps highlighted below Hold the left edge of the cover when opening 3 Pull out the waste toner half way hold the handle on the top and pull it out all the way 1 Locate the waste toner unit to the left of drawer 1 5 Insert the new waste toner unit then close the cover ...

Reviews: