


09
Easy Operation Guide
Copy
10
Basic Copying Functions
Easy Operation Guide
Co
py
Pr
ef
ac
e
O
th
er
Pr
in
t
Sc
an
Se
nd
/F
ax
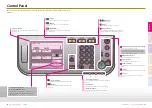
This section describes the operation procedures for the Copy functions you can access from the top screen of
the Copy function.
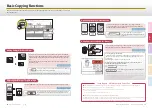
Basic Copying Functions
You can make an enlarged or reduced copy from the original of a standard
paper size, such as A4 original to A3 or to A5 original. The optimal copy ratio
is automatically set by selecting the desired paper size from the paper size
keys.
You can also set the copy ratio from 25% to 400% in 1% increments on the
Copy Ratio screen.
Press [Copy Ratio]
→
select or set the desired ratio
→
press [Done] as
indicated on the touch panel display.
You can automatically set the copy ratio by pressing [Auto] on the Copy Ratio screen.
Making Enlarged/Reduced Copies
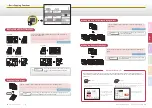
You can optimize the copy density level for the original, automatically or manually.
Press [Light] to make the density lighter or press [Dark] to darken to
the desired level. Press [A] (Auto) to automatically set the density
level.
You can use the stack bypass as a temporary paper source for the size of
the paper that is not loaded in any paper drawers.
Using Paper Not Loaded in the Drawers
Adjusting the Density of Copied Images
You can set the machine to optimize the copy output quality by
selecting the type of your original. If your original contains both text
and photo images, select [Text/Photo].
Press the original type drop-down list box
→
select the original type from [Text], [Text/Photo],
or [Photo].
Optimizing the Copy Output Quality
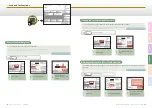
Stack Bypass
—
A Multi-purpose Paper Tray
To specify the paper size and type:
Load the paper in the stack bypass as illustrated
→
select the paper size
→
press
[Next]
→
select the paper type
→
press [OK]
→
[Done] as indicated on the touch
panel display.
*
The stack bypass is now chosen as the paper source.
To manually select the stack bypass as the paper source after the paper is
loaded and its size and type are specified:
Press [Paper Select].
Select the key for the stack bypass as shown left
→
press
[Done].
**
* Disable the Stack Bypass Standard Settings if the screens for specifying the paper size
and type are not displayed even when you load paper in the stack bypass. See Chapter 3,
“Configuring the Machine’s Basic Settings,” in the Reference Guide.
** The specified paper size and type are displayed on the key.
The stack bypass is a versatile paper source that enables you to print on special sizes and types of paper.
You can use it as a temporary paper source, as described above.
You can use special sizes and types of paper that are not available in the paper drawers:
– Non-standard size paper
– Special types of paper such as thicker paper or labels
You can specify the default paper size/type for the stack bypass.
Specifying the paper size and type is required when you use the stack bypass. To skip this procedure, you can set and store the default
paper size and type by specifying Stack Bypass Standard Settings from the Additional Functions menu.
For more information, see Chapter 3, “Configuring the Machine’s Basic Settings,” in the Reference Guide.
●
▶
▶
●
Chapter 2
❖
Copying Guide
Chapter 2
❖
Copying Guide
Chapter 2
❖
Copying Guide
Chapter 2
❖
Copying Guide
TEXT
TEXT/
PHOTO
PHOTO
3
2
4
1
1
4
2
3