


35
Easy Operation Guide
Send/Fax
36
Send and Fax Functions
Easy Operation Guide
Co
py
Pr
ef
ac
e
O
th
er
Pr
in
t
Sc
an
Se
nd
/F
ax
1
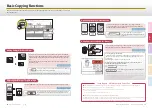
Press [Delayed Send].
2
Enter the time to send the
document using –
(numeric keys)
→
press [OK].
3
Press [Done].
1
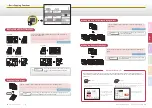
Press [Stamp].
2
Press [Done].
Press [Send Settings].
You can specify the time for sending the document. This function is useful, for example, when you want to send a
document at a future time when you may not be near the machine.
Specifying the Time to Start Sending
Press [Send Settings].
You can set the machine to affix a stamp on the front side of scanned originals to indicate they have been scanned.
† The Stamp mode is available only when the optional Stamp Unit-B1 is attached
to the feeder (optional for the imageRUNNER 2545/2535/2530/2525/2520).
Affixing Stamps on Scanned Originals
1
1
>>
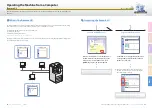
Send and Fax Functions
This section describes the operation procedures for the
Send and Fax functions you can access from the [Send
Settings] key on the top screen of the Send and Fax
functions.
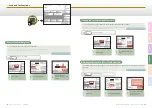
First, register the e-mail address you want to use as the reply-to
address.
Press [Send Settings].
You can specify the reply-to address for your e-mails/I-faxes.
Adding the Reply Destination to Sent Documents
1
1
Press [
▼
].
2
Press [Reply-to].
3
Select the reply-to address
→
press [OK]
→
[Done].
Chapter 2
❖
Sending and Facsimile Guide
Chapter 2
❖
Sending and Facsimile Guide
Chapter 3
❖
Sending and Facsimile Guide
1