


41
Easy Operation Guide
Other
42
Customizing the Machine Settings
Easy Operation Guide
Co
py
Pr
ef
ac
e
O
th
er
Pr
in
t
Sc
an
Se
nd
/F
ax
1
2
3
5
7
1
3
2
9
1
1
9
4
6
8
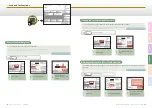
Customizing the Machine Settings
The Additional Functions screen is displayed by pressing (Additional Functions) on the machine’s control
panel. From this screen, you can change and customize the machine’s various settings. When these settings
are changed or specified, they are saved as default settings and remain in effect until they are changed again.
From the Additional Functions screen, you can customize the machine settings to suit your needs.
Examples of Useful Settings
If you frequently use the Copy function,
for example, you can set the Copy screen
to be displayed first.
Displaying the screen for the
function you frequently use
Saving electricity or toner
There are two settings for saving electricity and toner.
Press [Energy Consumption in
Sleep Mode] and make the
desired settings.
Press [Toner Save Mode] and
make the desired settings.
Press [Initial Function] and make
the desired settings.
Chapter 3 in the
Reference Guide
Chapter 3 in the
Reference Guide
Chapter 3 in the
Reference Guide
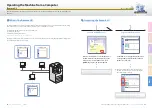
Press [Auto Sleep Time] and make
the desired settings.
You can adjust the time for the
machine to enter the Sleep mode.
Setting the time for the
machine to enter the Sleep
mode
First make the copy settings as you
prefer. Press [Standard Settings]
and make the desired settings.
Various settings for the Copy function
can be stored and recalled as a
setting combination.
Storing and recalling the
copy settings you prefer
When you dial a fax number, the
machine prompts you to enter the
fax number again, which will prevent
dialing mistakes.
Preventing misdialing when
sending a fax
Press [Restrict the Send Function]
→
[Confirm Entered Fax Numbers]
and make the desired settings.
Chapter 3 in the
Reference Guide
Chapter 4 in the
Copying Guide
Chapter 4 in the
System Settings Guide
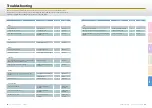
1
[Common Settings]
Enables you to specify the settings that are fundamental to
the machine operations.
▶
Chapter 3 in the Reference Guide
2
[Copy Settings]
Enables you to specify the settings for the Copy function.
▶
Chapter 4 in the Copying Guide
3
[Timer Settings]
Enables you to specify the timer-related settings for the
machine, such as the time for the machine to enter the Sleep
mode.
▶
Chapter 3 in the Reference Guide
4
[Communications Settings]
Enables you to specify the settings for the Send and Fax
functions.
▶
Chapter 7 in the Sending and Facsimile Guide
5
[Adjustment/Cleaning]
Enables you to adjust and optimize the machine settings for
better results when printing on special paper or under other
conditions. Also enables you to perform automatic machine
cleaning.
▶
Chapter 5 and 6 in the Reference Guide
6
[Printer Settings]
Enables you to specify the settings for the Print function.
▶
Chapter 4 in the Printer Guide
7
[Report Settings]
Enables you to print various reports such as the User’s Data
List.
▶
Chapter 2 in the Reference Guide
▶
Chapter 8 in the Sending and Facsimile Guide
8
[Address Book Settings]
Enables you to register, edit, or delete destinations.
▶
Chapter 4 in the Sending and Facsimile Guide
9
[System Settings]*
Enables you to specify the machine’s system settings such as
the network- or security-related settings. Mainly used by the
administrator.
* To make changes to the System Settings, log in to the machine
as the System Manager.
▶
System Settings Guide
(Chapters to refer to depend on the setting items.)
To save electricity:
To save toner: