


21
Easy Operation Guide
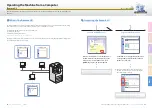
Printing from a USB Memory Media Device (Media Print)
Easy Operation Guide
22
Co
py
Pr
ef
ac
e
O
th
er
Pr
in
t
Sc
an
Se
nd
/F
ax
1
2
3
4
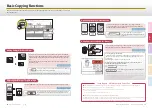
Prepare
Display the Memory Media Print
Screen
Select the file to print
Start Printing
Insert the USB memory media device containing
the file you want to print into the USB port on
the left or right side of the machine.
*
Press
(SCAN/PRINT) to display the
Scan/Print screen
→
press [Memory Media
Print].
Select the USB memory media device
containing the file you want to print
→
press
[Down] to display the files in the media device.
Select the files you want to print
→
press
[Start Print].
To select the file in a folder, select the folder
→
press [Down]
to display the files
→
select the file.
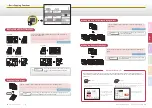
To cancel printing, press
(Stop). You can also cancel the
current print job by pressing [Cancel] on the screen
indicating the print processing status.
*
When printing is complete, remove the USB memory media
device from the USB port.
▶
▶
▶
Printing from a USB Memory Media Device
(Media Print)
This section describes the basic operation procedure for printing JPEG or TIFF files stored in the USB memory
media device directly connected to the machine.
When a screen indicating the USB memory media device has
been inserted appears, press [Done] and proceed to the next
step.
If the machine is in the Sleep mode, press
(Power).
Enter your ID and password or insert the control card if the
screen prompts you to do so. For more information on
logging in to the machine, see “How to Log in to the
Machine,” on p. 07.
▶
▶
▶
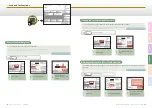
Print Setting Options
1
Press to specify the print quantity.
2
Press to select the paper source.
3
Press to specify the optional settings for printing JPEG files.
4
Press to print the list of the JPEG files stored in the USB memory media device.
1
3
2
4
PDF on User Manual CD-ROM
* The USB ports on the right side of the machine are optional
(USB Application 3-Port Interface Kit-A1).
The left side USB port is not available when the above option is
attached.
* The canceling procedure differs depending on the job status.
For more information, see Chapter 3, “Managing Print Jobs,” in the
Printer Guide.
† Some USB memory media devices are not compatible with the
machine. For more information, see Chapter 2, “Printing from
USB Memory Media (Media Print),” in the Printer Guide.
†
The Media Print function is available only when it is enabled by the System Settings of the machine.
See Chapter 7, “Other System Settings,” in the System Settings Guide.
Printer Guide
Printer Guide
Please read this guide before operating this product.
After you finish reading this guide, store it in a safe place for future reference.
ENG
Printer Guide
Printer Guide
Printer Guide
Please read this guide before operating this product.
After you finish reading this guide, store it in a safe place for future reference.
ENG