


31
Easy Operation Guide
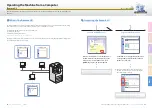
Send/Fax
32
Send and Fax Functions
Easy Operation Guide
Co
py
Pr
ef
ac
e
O
th
er
Pr
in
t
Sc
an
Se
nd
/F
ax
>>
Send and Fax Functions
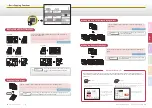
1
1
Press [Option].
2
Press [Document Size].
3
Select the document size
that is larger than the
original size
→
press [Done]
→
[OK].
1
Press [Option].
2
Press the [Resolution] drop-
down list box
→
select the
desired resolution
→
press
[OK].
Press [Scan Settings].
When the edges of the scanned image are missing, change the Document Size setting to a size that is larger than the
actual original size.
Specifying the Scanning Area to Cover the Original Size
Press [Scan Settings].
You can scan fine text in documents more clearly by setting a higher resolution.
Note, however, that the file size increases as you increase the resolution.
Scanning Fine Text and Images Clearly
1
1
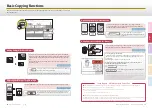
This section describes the operation procedures for the
Send and Fax functions you can access from the [Scan
Settings] key on the top screen of the Send and Fax
functions.
1
Press [Option].
2
Press the original type drop-
down list box
→
select [Photo]
or [Text/Photo]
→
press [OK].
Press [Scan Settings].
You can improve the image quality of scanned images by selecting the original type setting that best suits your
originals. When originals containing photos are not scanned clearly, select [Photo] or [Text/Photo] from the original
type drop-down list box to obtain better results.
Scanning Documents Containing Photos Clearly
1
Chapter 3
❖
Sending and Facsimile Guide
Chapter 3
❖
Sending and Facsimile Guide
Chapter 3
❖
Sending and Facsimile Guide