


6
6
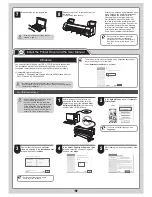
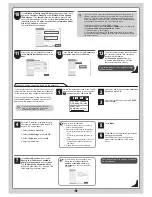
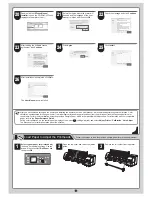
In the
Printer Selection
window, select
The printer is connected directly to a
computer
and click
Next
.
7
In the
Printer Installation
dialog box,
select
Install with USB Connection
, and
click
Next
.
8
When the following dialog box is
displayed, make sure the printer is on and
use the USB cable to connect the printer
to the computer.
MEMO
• If a warning message is displayed, click
Retry
to try again.
• Be careful not to insert the USB cable
into the Ethernet port.
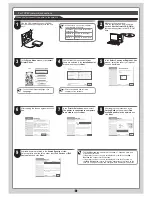
9
After reviewing the installation results in
the
Complete Installation
window, click
Next
.
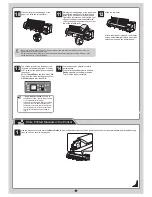
10
In the
Finish
window, select
Restart my
computer now
and click
Restart
.
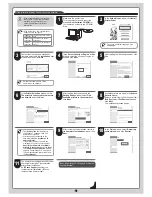
11
The printer driver settings take effect after
the computer restarts. This completes
printer driver installation.
An
iPFxxxx Support
desktop icon
is created after installation. (iPFxxxx
represents the printer model.)
Next, install the
User Manual
.
12
When the
Install User Manual
dialog
box is displayed, insert the provided
User
Manuals CD-ROM
in the CD-ROM drive
and click
Next
.
13
Click
Next
.
14
After reading the software license
agreement, select
I accept the terms of
the license agreement
, and then click
Next
.
15
Click
Install
.
The installation process begins.
16
After installation is completed, click
Finish
.
The
User Manual
is now installed.
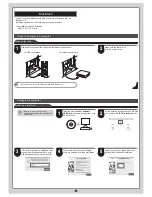
MEMO
After you have finished setting up the printer and installing the printer driver and User Manual, we recommend performing color calibration. Color
calibration compensates for changes in color from individual variation among printheads or from the printing environment, ensuring better color
consistency. Perform color calibration using the provided Sample Paper, which is compatible with this process. For information on other compatible
paper, refer to the
Paper Reference Guide
.
During color calibration, on the control panel's display screen, open
(settings/adj. tab) and select
Adjust Printer
-
Calibration
-
Auto Adjust
.
The process of color calibration takes about ten minutes.
Install the User Manual