


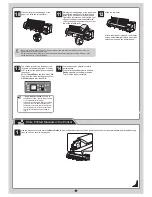

15
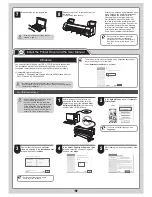
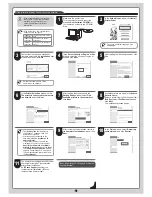
Store Printed Manuals in the Pocket
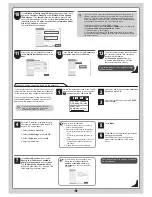
10
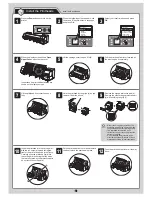
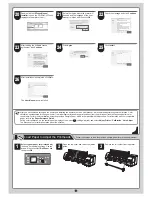
While holding the leading edge of the
paper roll, raise the release lever.
11
Holding the leading edge of the paper with
both hands, gently pull it to the ejection
guide (a) as you ensure that the left and
right sides remain even and that the right
edge of the paper remains parallel with
the orange paper alignment line (b). Next,
lower the release lever.
b
a
12
Close the top cover.
After a roll of paper is loaded, the display
screen automatically display a paper type
selection menu and the printer beeps.
• Be sure to perform steps 10 and 11. If paper cannot feed straight or becomes curled, it may rub
against the print head or be jammed.
• Do not pull paper in an attempt to force it to align with the paper alignment line (b). Doing so may
cause the paper to not feed straight.
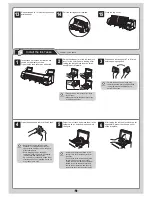
13
The screen for selecting the paper type
is shown on the display screen. Press
▲
or
▼
to select the type of paper loaded in
the printer.
Select
Coated Paper
and then press
OK
.
Then from the menu that appears, select
HW Coated
and then press
OK
.
MEMO
• If
Paper loaded crooked.
appears on
the display screen, refer to steps 10 and
11 to reload the roll of paper.
If the error occurs again after you reload
the paper, remove the roll holder from
the printer and check to make sure that
the roll of paper is in close contact with
the roll holder flange as described in
step 5.
14
Printhead position adjustment starts
automatically.
When printhead adjustment is finished,
Ready
appears on the display screen.
Printer setup is now complete.
1
Use the manual pocket to store the
Basic Guide
(which includes descriptions of basic printer operations, routine maintenance, and troubleshooting
tips), so you can refer to it as needed.
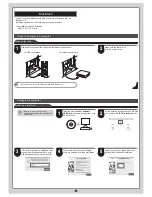
1
Printe
r O
perati
ons
Basic Guide
Pri
nter Operati
ons
1
This
Ba
sic G
uide
includ
es three book
lets
.
Larg
e-F
orm
at Prin
ters
2
Trouble
sho
otin
g
3
Prin
ter Relo
cation
Printe
r Driv
er Ins
tallati
on
Rea
d thi
s m
anual
fi rst.
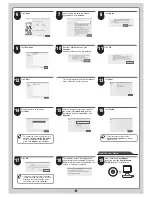
Safety
Precau
tions .....
................
..........
.........
2
Types o
f manu
als
.......
.............
......
........
...........
5
Docu
men
tatio
n C
onven
tions .......
......
.............
..6
Par
ts ...............
...........
..................
......
...............
8
Atta
chin
g th
e R
oll H
olde
r to Ro
lls .......
......
......1
2
Loadi
ng R
olls i
n the
Prin
ter .......
......
.............
..14
Rem
oving
the
Roll fr
om t
he P
rinte
r .......
.........
16
Loadi
ng S
hee
ts in the
er .......
.............
.....
18
Rem
oving
She
ets
.......
......
.......
......
........
.........
20
Con
sum
ables
..............
.............
...........
............
21
Rep
lacing
Ink T
anks
.......
......
.............
.............
22
Rep
lacing
the M
ainte
nan
ce C
artri
dge
..........
..26
Rep
lacing
the P
rinthea
d ..........
...........
............
30
Men
u M
ap..........
.............
...........
.............
........
35
Troubl
eshoo
ting
.......
......
..........................
......
...2
If Ro
ll Pa
per J
ams
......
.........
...........
........
........
18
If a
She
et Ja
ms........
...........
.............
...............
21
If P
aper
is So
iled
..........
.............
......
.............
..23
If Printing
is F
aint
.............
.......
......
........
.......
...2
5
If Vertical L
ines
are W
arped
or C
olor
s are
Misalign
ed .......
......
.............
..........
..............
26
If B
andi
ng O
ccur
s .............
.............
.................
28
If Li
ne Len
gth D
oes N
ot M
atch
.....
.............
.....
30
Error M
essa
ges
...............
................
.............
..32
Pre
pari
ng to
Transfe
r the
er .......
......
.......
..2
Rein
stalli
ng the
Pri
nter
..........
...........
.........
.......
6
Instal
ling the
Pri
nter Driv
er (W
indows
) .............
9
Insta
lling the
Printer D
rive
r (M
ac O
S X
) .........
11
Con
ven
ient Prin
ter D
river
Fea
ture
s ....
......
......1
3