

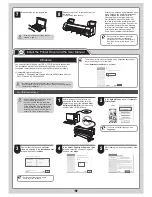


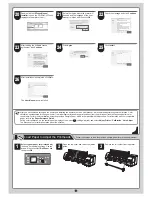


12
6
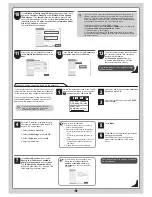
Click
Next
.
7
After reading the software license
agreement, click
Continue
.
8
Click
Agree
.
9
Click
Continue
.
10
Exit other applications and click
Continue
.
Items selected in step 4 are installed.
11
Click
OK
.
12
Click
Quit
.
This completes printer driver installation.
Next, select the printer to set up.
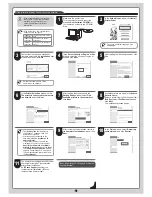
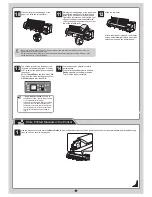
13
Click
Next
.
14
Select the printer to setup and
click
Next
.
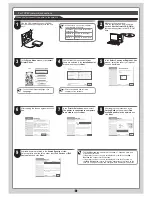
MEMO
• To register the printer by entering its IP
address, click
Registering IP Address
.
Enter the IP address of the desired
printer in
IP Address
and click
Next
.
15
After entering your preferred name for
the printer in
Printer Name
and the
installation location in
Location
, click
Register
.
16
Click
Finish
.
MEMO
• To register another printer, click
Continue Registration
, and repeat
steps 14 to 16.
17
Click
OK
.
MEMO
• If the same model of printer is already
registered on the computer, a screen is
displayed for printer selection. Select
the desired printer and click
Next
.
18
The following screen is displayed and
paper information is updated. When the
paper information has been updated, the
screen is no longer displayed.
19
Next, install the
User Manual
.
Insert the provided
User Manuals
CD-ROM
in the CD-ROM drive.
Install the User Manual