background image

11

Parts

When the printer is in Sleep mode, you can press any button except the  

Power  

  button to bring the printer online 

again.

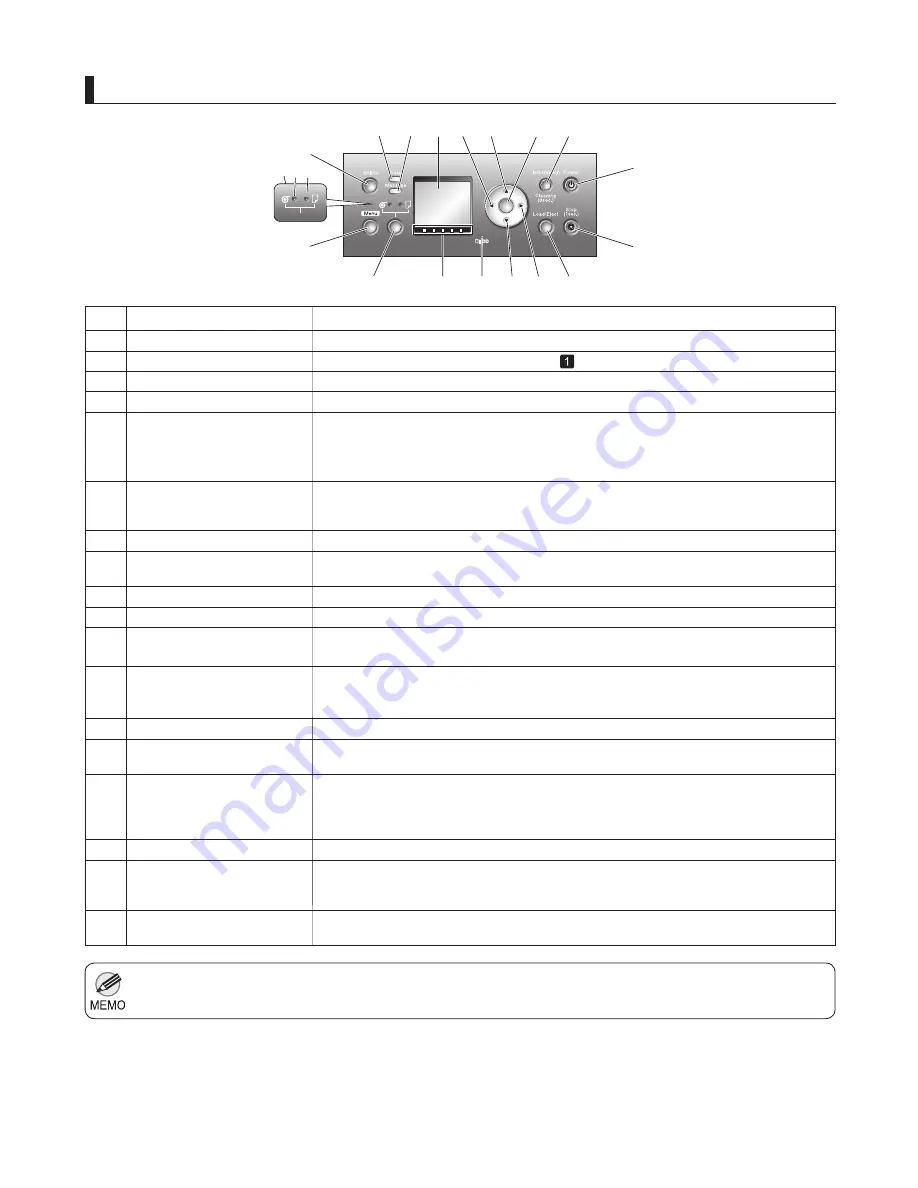
Control Panel

1.  

Roll Media lamp  

  (Green)


Cut Sheet lamp  

  (Green)

2.

Menu mode: Press this button to display the menu one level higher.

Hold down for at least a second to cancel print jobs in progress or end the ink drying 
period.

By pressing this button, you can check instructions on loading and removing paper. 
Instructions for loading paper are shown on the  

Display Screen  

  if pressed when no 

paper is loaded, and instructions for removing paper are shown if paper is loaded.

Turns the printer on and off.

Displays printer submenus. Press this button to display information about ink, paper, and 
so on.

In Menu mode, press this button to confirm or execute the selected item or setting. Also 
press this button if the  

Display Screen  

  indicates to press the  

OK  

  button.

Menu mode: Press this button to display the menu one level lower.

Offline mode: Press this button to feed the roll manually in the direction of ejection, as 
needed.

Offline: Press this button to rewind rolls manually.

Lit when the printer is accessing the hard disk.

These labels indicate the  Ink Tank


  colors. The labels correspond to the ink levels on the 


Display Screen  

 .

Shows the printer menu, as well as the printer status and messages.

Switches the paper source. Each time you press this button, the paper source switches 
between the roll and the sheet, and the corresponding lamp on the  

Paper Source 

Section  

  is lit.

After you press the  

Feeder Selection  

  button, the lamp for your chosen paper source is 

lit.

Switches the printer online and offline.
Displays the main menu of the printer. (

, Menu Map)

Indicates the status of print jobs or the printer firmware.
Lit or flashes when messages are displayed.

Menu mode: Press this button to display the previous menu item or setting value.

Menu mode: Press this button to display the next menu item or setting value.

You can also hold down this button for three seconds to clean the  Printhead


  ( 

Head 

Cleaning A  

 ).

Operation


Stop  

  Button


Load/Eject  

  Button


Power  

  Button


Information  

  Button


OK  

  Button


  Button


  Button


  Button


  Button


HDD lamp  

  (Green)


Color Label  


Display Screen  


Feeder Selection  

  Button


Paper Source Section  


Message lamp  

  (Orange)


Online  

  Button (Green)


Data lamp  

  (Green)


Menu  

  Button

Name

j

l

m

n

o

p
q

k

i

h

g

f

e

d

a

c

b

r

OK

o

k

p

r

n

l

j

m

q

a

b

f

g

h

i

e

1 2

c

d

Summary of Contents for imagePROGRAF iPF815

Page 1: ...g Rolls in the Printer 14 Removing the Roll from the Printer 18 Loading Sheets in the Printer 22 Removing Sheets 24 Consumables 25 Replacing Ink Tanks 26 Replacing the Maintenance Cartridge 32 Replaci...

Page 2: ...any power source shared by other electrical devices This could cause a fire or electrical shock Never knot the power cable or wrap it around itself This could cause a fire or electrical shock Periodi...

Page 3: ...weights of main printer units are as follows Moving the printer requires at least six people one person on each side of the unit Be careful to avoid back strain and other injuries iPF815 iPF825 Approx...

Page 4: ...e from the outlet and then call for service If you continue to use the printer this could cause a fire or electrical shock Connect the interface cable correctly To avoid damage before connection make...

Page 5: ...electronic manuals are accessible from imagePROGRAF Support Information Besides the electronic manuals you can also access the imagePROGRAF website from imagePROGRAF Support Information User Manual Th...

Page 6: ...Text conventions and illustrations Button names and user interface elements Key and button names on the control panel and user interface elements in software such as menus and buttons are indicated a...

Page 7: ...llation If this equipment does cause harmful interference to radio or television reception which can be determined by turning the equipment off and on the user is encouraged to try to correct the inte...

Page 8: ...this cover to replace an Ink Tank Use this panel to operate the printer and check the printer status Releases the Paper Retainer Lift this lever toward the front of the printer when loading paper Sli...

Page 9: ...ts printed documents from winding around the Roll Holder or being drawn into the Paper Feed Slot Load the roll on this holder When loading a roll insert the edge of the roll paper here Secure rolls on...

Page 10: ...paper with this line when loading it Moves the Printhead The carriage serves a key role in printing The Carriage slides along this shaft The Printhead moves across the platen to print Vacuum holes on...

Page 11: ...anually Lit when the printer is accessing the hard disk These labels indicate the Ink Tank colors The labels correspond to the ink levels on the Display Screen Shows the printer menu as well as the pr...

Page 12: ...ing a roll may cause injury 1 2 When printing on rolls attach the Roll Holder to the roll Rolls have a two or three inch paper core Use the correct attachment for the paper core The printer comes equi...

Page 13: ...a of the Roll Holder Insert the attachments for the roll paper core on the Holder Stopper Insert the Holder Stopper from the left in the Roll Holder as shown Holding it at the position shown b push it...

Page 14: ...er to instructions on the Display Screen as you load the paper Checking Instructions During Printer Operations User Manual Attaching the Roll Holder to Rolls 1 3 2 Confirm that a roll is selected as t...

Page 15: ...oll so that there is no gap between the right edge of the paper and the Roll Holder 4 5 6 7 Using both hands pull out the roll evenly on both ends and insert it in the Paper Feed Slot a Advance the ro...

Page 16: ...g the Roll Unit may affect the printing quality If a sheet is loaded in the printer The sheet may be ejected and rarely it may be bent 1 3 2 Load a roll in the Roll 2 Lower position iPF825 only Confir...

Page 17: ...the roll evenly on both ends and insert it in the Paper Feed Slot a Advance the roll until the buzzer sounds In a crouching position push the Roll Unit into the printer Position the Wheeled Output Sta...

Page 18: ...he barcode is printed You will be unable to keep track of the amount of roll paper left If you need to cut a printed roll select Paper Cutting in the printer menu and cut the roll at the desired posit...

Page 19: ...he Roll Holder from Rolls User Manual To load new paper in the printer at this point see the following procedure Loading Rolls in the Printer 5 6 7 Using both hands rotate the Roll Holder in the direc...

Page 20: ...n iPF825 only Press the Load Eject button Press or to select Remove Roll and then press the OK button Press or to select Roll 2 Lower and then press the OK button After confirming that the Online lamp...

Page 21: ...21 Removing the Roll from the Printer To load new paper in the printer at this point see the following procedure Loading Rolls in the Printer 7 In a crouching position push the Roll Unit in...

Page 22: ...of paper against the Platen well In this case use your hand to load the paper Sheets are held in place by suction through holes on the Platen Although the suction may produce a noise when paper is lo...

Page 23: ...fter the paper is advanced the printer automatically goes online and starts printing If no print job has been received from the computer beforehand the printer automatically shows a menu for selection...

Page 24: ...ting print job processing or ink drying 1 2 3 4 Press the Load Eject button Press the OK button to eject the paper As you hold the sheet lift the Release Lever and remove the sheet Lower the Release L...

Page 25: ...Cartridge The Maintenance Cartridge is provided with a Shaft Cleaner 330 ml 11 2 fl oz MBK Ink Tank PFI 303MBK BK Ink Tank PFI 303BK C Ink Tank PFI 303C M Ink Tank PFI 303M Y Ink Tank PFI 303Y 700 ml...

Page 26: ...ng ink tanks Make sure the printer is ready for ink tank replacement Ink Tank replacement is possible in the following cases You can replace ink tanks if the Display Screen indicates the printer is On...

Page 27: ...ank replacement Press the Menu button to display MAIN MENU Press or to select Rep Ink Tank and then press the button Press or to select Yes and then press the OK button A message on the Display Screen...

Page 28: ...s not return to the original position 3 2 Hold the Ink Tank by the grips a or handle b and remove it Press the OK button 700 ml tanks 330 ml tanks Lift the stopper a of the Ink Tank Lock Lever for the...

Page 29: ...fect printing quality Do not remove and agitate ink tanks that have already been installed in the printer Ink may leak out 1 2 Before opening the pouch tilt the Ink Tank to the left and right gently s...

Page 30: ...ever matches the color of the Ink Tank and check the orientation of the Ink Tank before reloading it 3 4 Press the OK button and insert the Ink Tank into the holder with the ink holes facing down as s...

Page 31: ...31 Replacing Ink Tanks If the Ink Lamp is not lit reload the tank 5 6 Make sure the Ink Lamp is lit Close the Ink Tank Cover The printer will go online or offline M...

Page 32: ...idge MC 09 Take the following precautions when handling the Maintenance Cartridge Precautions when handling the maintenance cartridge Make sure the printer is ready for maintenance cartridge replaceme...

Page 33: ...Menu button to display MAIN MENU Press or to select Maintenance and then press the button Press or to select Repl maint cart and then press the button Press or to select Yes and then press the OK but...

Page 34: ...plastic bag packaging material and Shaft Cleaner a and then take out the Maintenance Cartridge b Keep the used Maintenance Cartridge level as you put it in the plastic bag Expel excess air from the p...

Page 35: ...ever toward the front will draw out ink which consumes ink 8 3 1 2 Press the OK button The printer now initializes the Maintenance Cartridge Next replace the Shaft Cleaner Hold the Shaft Cleaner on th...

Page 36: ...he small box before putting it in the larger box with the used Maintenance Cartridge for disposal 4 5 After removing the cap of the new Shaft Cleaner hold it by the bottom of the grips a and attach it...

Page 37: ...ecome dirty during Printhead replacement Use the gloves provided with the new Printhead for replacement 1 2 When to replace the printhead Replace the Printhead in the following situations If the print...

Page 38: ...then press the button Press or to select Yes and then press the OK button Ink is now filled After about two minutes a message is shown on the Display Screen instructing you to open the Top Cover Repla...

Page 39: ...se a damp cloth that you have wrung out completely to wipe it clean Move the Carriage out of the way manually if Carriage is concealing the ventilation duct and then clean the duct Pull the Printhead...

Page 40: ...g the caps Never touch the ink supply section d This may cause printing problems The Printhead contains ink to protect the nozzles We recommend removing Safety Cap 2 b as you hold it over the Printhea...

Page 41: ...rped or Colors are Misaligned Never remove an Ink Tank while the system is filling with ink 9 10 11 12 With the nozzles facing down and the metal contacts toward the back insert the Printhead into the...

Page 42: ...matic Automatic Automatic Fixed Eject Manual Lowest Low Standard Standard Standard Standard High Strongest Strong Weak Weakest Highest Band Joint Print Length Off Off 30 sec 1 sec 3 sec 5 sec 7 sec 9...

Page 43: ...r CAD 2 Color CAD 3 Color CAD 4 Color CAD 5 Monochrome Paper Manager Paper Source Automatic Roll Paper Roll 1 Upper Line Pen Manager Enable merge Pen Setup Select Palette Margin 3mm Standard 5mm Conse...

Page 44: ...rnet 2 On Off Half Duplex Full Duplex Not Use Use NDSPServer BinderyPServer RPrinter On No Yes Off Auto Detect Comm Mode Spanning Tree Frame Type Ethernet Type MAC Address Print Service NetWare On Off...

Page 45: ...yyyy mm dd hh mm Contrast Adj Reset PaprSetngs Status Print Paper Details Print Job Log Menu Map System Info Error Log Nozzle Check Test Print Information Head Cleaning Fine Band Adj Information Head...

Page 46: ...acement 26 Ink tanks 25 26 m Maintenance Cartridge 8 9 25 32 Maintenance Cartridge Cover 8 9 Maintenance cartridge replacement 32 Menu map menu structure 42 p Paper Alignment Line 10 22 Paper Feed Slo...

Page 47: ......

Page 48: ...Canon Plaza Lake Success NY 11042 U S A Canon Europe Ltd 3 The Square Stockley Park Uxbridge Middlesex UB11 1ET United Kingdom Canon China Co Ltd 15F Jinbao Building No 89 Jinbao Street Dongcheng Dis...

Reviews: