28
Part I: Fast Track to Super Snaps
We explain all the important menu options elsewhere in the book; for now,
just familiarize yourself with the process of navigating menus and selecting
options. After pressing the Menu button to display the menus, use these
techniques:
✓
To select a different menu:
Press the right or left cross keys or rotate
the Main dial to cycle through the available menus.
✓
To select and adjust a function on the current menu:
Press the up or
down cross key to highlight the feature you want to adjust. On the left
side of Figure 1-12, the Quality option is highlighted, for example. Next,
press the Set button. Settings available for the selected item then appear
either right next to the menu item or on a separate screen, as shown on
the right side of the figure. Either way, use the cross keys to highlight
your preferred setting and then press Set again to lock in your choice.
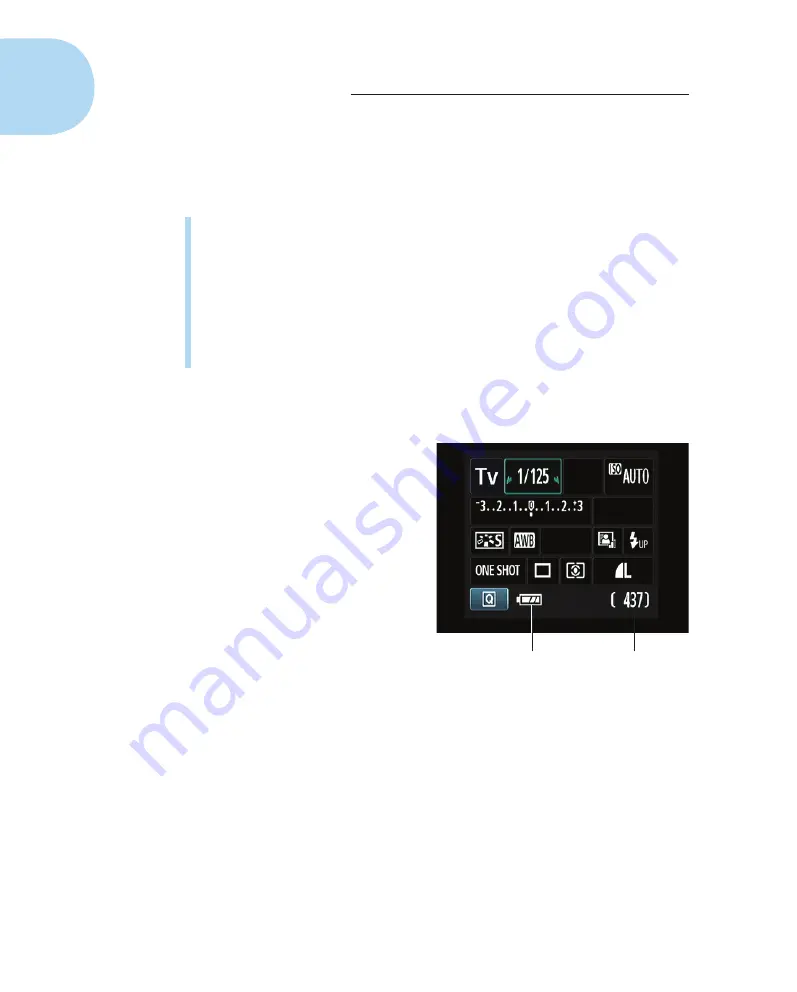
Using the Shooting Settings display
As shown in Figure 1-13, the Shooting
Settings screen displays the most
critical photography settings —
aperture, shutter speed, ISO, and the
like. Note that the display is relevant
only to regular still-photography
shooting, though. When you switch
to Live View mode or Movie mode,
you can choose to see some settings
superimposed over your image in the
monitor, but the process of adjusting
settings and customizing the dis-
play is different. (See Chapter 4 for
details.)
The types of data shown in the
Shooting Settings display depend
on the exposure mode you select.
The figure shows data that’s
included when you work in one of
the advanced modes, such as Tv (shutter-priority autoexposure). In the fully
automatic modes as well as in Creative Auto mode, you see far fewer settings
because you can control fewer settings in those modes. Figure 1-13 labels two
key points of data that are helpful in any mode, though: how many more pic-
tures can fit on your memory card at the current settings, and the status of
the battery. A “full” battery icon like the one in the figure shows that the bat-
tery is fully charged. When the icon appears empty, you better have a spare
battery (sold separately) handy if you want to keep shooting.
Battery status
Shots remaining
Figure 1-13:
The Shooting Settings display
gives you an easy way to monitor current
picture settings.
05_9781118094976-ch01.indd 28
05_9781118094976-ch01.indd 28
7/7/11 5:28 PM
7/7/11 5:28 PM


