background image

88

Before Use

Basic Guide

Advanced Guide

Camera Basics

Auto Mode /  

Hybrid Auto Mode

Other Shooting Modes

Tv, Av, and M Mode

Playback Mode

Wi-Fi Functions

Setting Menu

Accessories

Appendix

Index

P Mode

Configuring Custom Functions

 Still Images 

 Movies

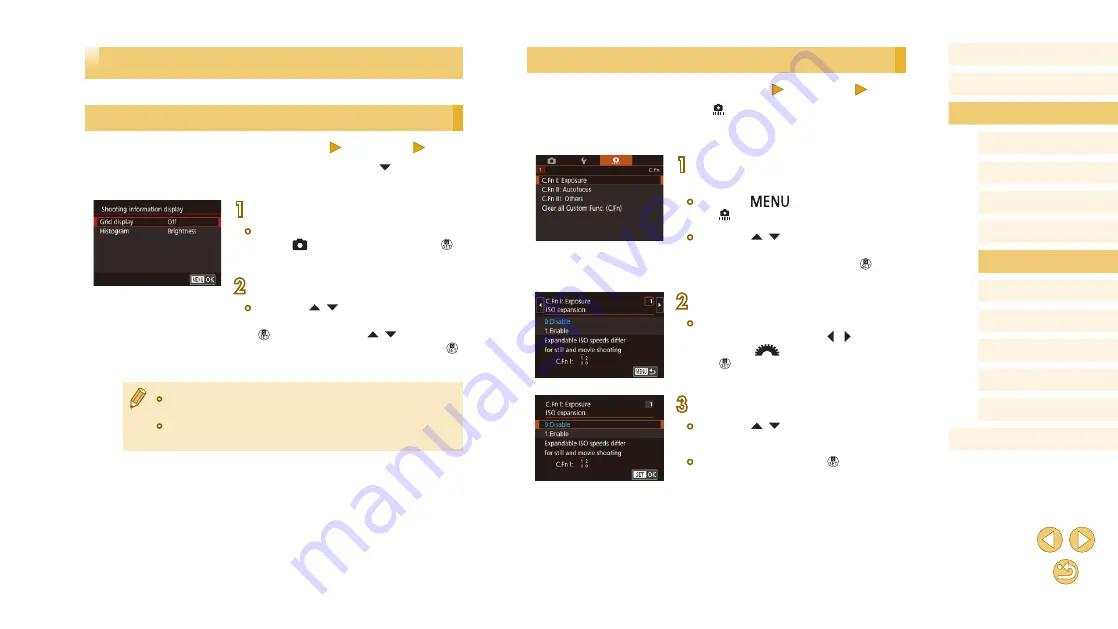
Configure custom functions on the [

1] tab of the menu (

=

 32) to 

customize how the camera works to suit your shooting preferences. You 

can also assign commonly used functions to specific buttons.

Choose the type of function to 

customize.


Press the [

] button and choose 

the [ 1] tab (

=

 32).


Press the [ ][ ] buttons to choose a 

type of function ([Exposure], [Autofocus], 

or [Others]), and then press the [ ] 

button.

Choose the function.


[Exposure] or [Others]: Choose the 

function (either press the [ ][ ] buttons 

or turn the [

] dial), and then press 

the [ ] button.

Choose an option.


Press the [ ][ ] buttons to choose an 

option.


When finished, press the [

] button to 

return to the previous screen.

Customizing Controls and Display

Customizing Display Information

 Still Images 

 Movies

Customize what screen is displayed when you press the [ ] button on the 

shooting screen.

Access the setting screen.


Choose [Shooting information display] 

on the [ 1] tab, and then press the [ ] 

button (

=

 32).

Configure the setting.


Press the [ ][ ] buttons to choose 

a display item, and then press the 

[ ] button. Press the [ ][ ] buttons to 

choose an option, and then press the [ ] 

button.


To make the grid pattern smaller, choose [Shooting information 
display] > [Grid display].


To switch from a brightness histogram to an RGB histogram, 
choose [Shooting information display] > [Histogram].

Summary of Contents for EOS M10

Page 1: ... D020 000 F101 A Make sure you read this guide including the Safety Precautions 14 section before using the camera Reading this guide will help you learn to use the camera properly Store this guide safely so that you can use it in the future Click the buttons in the lower right to access other pages Next page Previous page Page before you clicked a link To jump to the beginning of a chapter click ...

Page 2: ...cap Battery Pack LP E12 with terminal cover Battery Charger LC E12 LC E12E Neck Strap EM 200DB Interface Cable IFC 400PCU Printed matter is also included For details on the lens included in the lens kit check information on the camera package A memory card is not included Compatible Memory Cards The following memory cards sold separately can be used regardless of capacity SD memory cards 1 SDHC me...

Page 3: ...ed by the camera shall be for personal use Refrain from unauthorized recording that infringes on copyright law and note that even for personal use photography may contravene copyright or other legal rights at some performances or exhibitions or in some commercial settings The camera warranty is valid only in the area of purchase In case of camera problems while abroad return to the area of purchas...

Page 4: ...E lock Left button 13 Quick Set menu Set button 14 Flash Right button 15 Information Down button 1 Used with NFC features 113 2 Gestures may not be detected as easily if you apply a screen protector In this case increase the sensitivity of the touch screen panel 142 Part Names 1 Movie button 2 Front dial 3 EF M lens mount index 4 Contacts 5 Shutter button 6 Power button 7 Mode switch 8 Flash 9 Lam...

Page 5: ...tions xx Pages with related information in this example xx represents a page number Instructions in this guide apply to the camera under default settings For convenience all lenses and mount adapters are simply referred to as lenses and mount adapters whether they are included or sold separately The illustrations in this guide show the camera with the EF M 15 45mm f 3 5 6 3 IS STM lens attached as...

Page 6: ...the Date and Time 21 Display Language 21 Attaching a Lens 22 Detaching a Lens 22 Lens Instruction Manuals 23 Attaching EF and EF S Lenses 23 Detaching a Lens 24 Using a Tripod 24 Using Lens Image Stabilization 24 Trying the Camera Out 25 Shooting Scene Intelligent Auto 25 Viewing 26 Erasing Images 27 Advanced Guide Camera Basics 28 On Off 28 Power Saving Features Auto Power Down 29 Power Saving in...

Page 7: ...nging the Metering Method 64 Changing the ISO Speed 65 Adjusting ISO Auto Settings 65 Auto Correction of Brightness and Contrast Auto Lighting Optimizer 66 Shooting Bright Subjects Highlight Tone Priority 66 Image Colors 67 Adjusting White Balance 67 Custom White Balance 67 Scene Icons 39 On Screen Frames 40 Common Convenient Features 40 Using the Self Timer 40 Using the Self Timer to Avoid Camera...

Page 8: ... 95 Browsing and Filtering Images 95 Navigating through Images in an Index 95 Touch Screen Operations 96 Double Touch Magnification 96 Finding Images Matching Specified Conditions 96 Using the Front Dial to Jump between Images 97 Image Viewing Options 98 Manually Correcting White Balance 68 Customizing Colors Picture Style 69 Customizing Picture Styles 70 Saving Customized Picture Styles 71 Focusi...

Page 9: ...yer 125 Printing Images Wirelessly from a Connected Printer 126 Sending Images to Another Camera 128 Image Sending Options 129 Sending Multiple Images 129 Choosing Images Individually 129 Selecting a Range 129 Sending Rated Images 130 Notes on Sending Images 130 Choosing the Number of Recording Pixels Image Size 130 Adding Comments 131 Sending Images Automatically Image Sync 131 Magnifying Images ...

Page 10: ...154 Easy Print 154 Configuring Print Settings 155 Cropping Images before Printing 156 Choosing Paper Size and Layout before Printing 156 Available Layout Options 157 Initial Preparations 131 Preparing the Camera 131 Preparing the Computer 132 Sending Images 132 Viewing Images Sent via Image Sync on a Smartphone 133 Shooting Remotely 134 Editing or Erasing Wi Fi Settings 135 Editing Connection Info...

Page 11: ...8 Number of Shots per Memory Card 189 Recording Time per Memory Card 189 Approximate Built in Flash Range 190 Printing ID Photos 157 Printing Movie Scenes 157 Movie Printing Options 157 Adding Images to the Print List DPOF 158 Configuring Print Settings 158 Setting Up Printing for Individual Images 159 Setting Up Printing for a Range of Images 159 Setting Up Printing for All Images 159 Clearing Al...

Page 12: ...v Av and M Mode Playback Mode Wi Fi Functions Setting Menu Accessories Appendix Index P Mode Battery Pack LP E12 190 Battery Charger LC E12 LC E12E 190 Index 191 Wi Fi Wireless LAN Precautions 194 Radio Wave Interference Precautions 194 Security Precautions 194 Trademarks and Licensing 195 Disclaimer 196 ...

Page 13: ...the action Blur the action Tv Mode 83 Shoot yourself under optimal settings Self Portrait 51 Apply special effects 53 Shoot several shots at once Continuous 42 Without using the flash Flash Off 36 Include yourself in the shot Self Timer 40 View View images Playback Mode 91 Automatic playback Slideshow 99 On a TV 150 On a computer 152 Browse through images quickly 95 Erase images 102 Record View Mo...

Page 14: ...he rated capacity of the electrical outlet or wiring accessories Do not use if the plug is damaged or not fully inserted in the outlet Do not allow dust or metal objects such as pins or keys to contact the terminals or plug Do not cut damage alter or place heavy items on the power cord if your product uses one This could result in electrical shock or fire Safety Precautions Before using the produc...

Page 15: ...rd the battery pack batteries cover the terminals with tape or other insulators Contacting other metal materials may lead to fire or explosions Turn the camera off in places where camera use is prohibited The electromagnetic waves emitted by the camera may interfere with the operation of electronic instruments and other devices Exercise adequate caution when using the product in places where use o...

Page 16: ...ause leakage overheating or explosion resulting in product damage or fire If your product uses multiple batteries do not use batteries that have different levels of charge together and do not use old and new batteries together Do not insert the batteries with the and terminals reversed This may cause the product to malfunction Do not sit down with the camera in your pant pocket Doing so may cause ...

Page 17: ...follows Attaching the Strap Attach the included strap to the camera as shown On the other side of the camera attach the strap the same way Holding the Camera Place the strap around your neck When shooting keep your arms close to your body and hold the camera securely to prevent it from moving If you have raised the flash do not rest your fingers on it Basic Operations Basic information and instruc...

Page 18: ...they are not used Charge the battery pack on or immediately before the day of use As a visual reminder of the charge status attach the battery cover with visible on a charged battery pack and concealed on an uncharged one The charger can be used in areas with 100 240 V AC power 50 60 Hz For power outlets in a different format use a commercially available adapter for the plug Never use an electrica...

Page 19: ...hen you insert it Inserting memory cards facing the wrong way may damage the camera 3 Close the cover Close the cover in the direction shown until it clicks shut For guidelines on how many shots or hours of recording can be saved on one memory card see Number of Shots per Memory Card 189 Inserting the Battery Pack Insert the included battery pack 1 Open the cover Slide the cover 1 and open it 2 2 ...

Page 20: ...ttons You can also set the date and time by touching the desired item on the screen in step 2 and then touching followed by Similarly you can also set your home time zone by touching on the screen in step 3 followed by Removing the Memory Card Open the cover and push the memory card in until it clicks and then slowly release the memory card The memory card will pop up Setting the Date and Time Set...

Page 21: ...tep 3 and then touching it again Changing the Date and Time Adjust the date and time as follows 1 Access the menu screen Press the button 2 Choose Date Time Press the buttons or turn the dial to choose 2 tab Press the buttons to choose Date Time and then press the button 3 Change the date and time Follow step 2 in Setting the Date and Time 20 to adjust the settings Press the button to close the me...

Page 22: ...hown 3 Attach the lens cap to the lens after removal Minimizing Dust When changing lenses do it quickly in a place with minimal dust When storing the camera without a lens attached be sure to attach the body cap to the camera Remove dust on the body cap before attaching it Attaching a Lens The camera is compatible with EF M lenses If you use Mount Adapter EF EOS M you can also use EF and EF S lens...

Page 23: ...ns in the direction shown until it clicks into place To mount an EF S lens align the white squares on the lens and adapter and then turn the lens in the direction shown until it clicks into place 4 Attach the adapter to the camera Align the mount indexes the white dots on the adapter and camera and then turn the lens in the direction shown until it clicks into place Since the image sensor size is ...

Page 24: ...ses with built in image stabilization are named with IS Slide the image stabilization switch on the lens to ON When holding or carrying a camera with a lens that is heavier than the camera support the lens Adapters may extend the minimum focusing distance or affect the maximum magnification or shooting range of the lens If the front part focusing ring of the lens rotates during autofocusing do not...

Page 25: ...s displayed on the screen for about two seconds Even while the shot is displayed you can take another shot by pressing the shutter button again Trying the Camera Out Still Images Movies Follow these instructions to turn the camera on shoot still images or movies and then view them Shooting Scene Intelligent Auto For fully automatic selection of the optimal settings for specific scenes simply let t...

Page 26: ...mage display press the button Movies are identified by a icon To play movies go to step 3 Recording Movies 1 Start recording Press the movie button Recording begins and Rec is displayed with the elapsed time Black bars displayed on the top and bottom edges of the screen indicate image areas not recorded Frames displayed around any detected faces indicate that they are in focus Once recording begin...

Page 27: ...button The current image is now erased To cancel erasure press the buttons to choose Cancel and then press the button You can choose multiple images to erase at once 102 You can also erase the current image by touching Erase on the screen in step 2 3 Play movies Press the button press the buttons to choose and then press the button again Playback now begins and after the movie is finished is displ...

Page 28: ...attached to the camera and the power is off the aperture narrows to reduce the amount of light entering the camera and protect the internal components of the camera Accordingly the camera makes a small noise when turned on or off as the aperture is adjusted The sensor is cleaned when the camera is turned on or off which may also make a small noise Even when the camera is off is displayed as the se...

Page 29: ... shoots Subjects may be out of focus if you shoot without initially pressing the shutter button halfway Power Saving Features Auto Power Down As a way to conserve battery power the camera automatically deactivates the screen Display Off and then turns itself off after a specific period of inactivity Power Saving in Shooting Mode The screen is automatically deactivated after about one minute of ina...

Page 30: ...re composed However on screen image brightness may not match the brightness of your shots Note that any on screen image distortion or jerky subject motion will not affect recorded images For playback display options see Switching Display Modes 93 Adjusting the Screen Angle You can adjust the screen angle and orientation to suit the scene or how you are shooting The screen can be opened to about 18...

Page 31: ...gs Touch in the upper right of the screen to access the Quick Set menu Touch a menu item and then an option to complete the setting To return to the previous screen touch the menu item or touch the selected option again You can access the screen for options labeled with a icon by touching Using the Quick Set Menu Configure commonly used functions in the Quick Set menu Note that menu items and opti...

Page 32: ... setting changes you can restore the camera s default settings 145 Available menu items vary depending on the selected shooting or playback mode 174 181 Using the Menu Screen Configure a variety of camera functions through the menu screen as follows 1 Access the menu screen Press the button 2 Choose a tab Press the buttons or turn the dial to choose a tab Tabs represent functions 1 such as shootin...

Page 33: ...tal letters Available input modes vary depending on the function you are using Deleting Characters Touch to delete the previous character Touching and holding will delete five characters at a time Touch Screen Operations To choose tabs press the button to access the menu screen and then touch the desired function tab and page tab Touch an item to choose it and then touch it again Touch an option t...

Page 34: ...ecording reading transmitting images shooting long exposures 83 85 or connecting transmitting via Wi Fi When the indicator blinks green never turn the camera off open the memory card or battery cover or shake or jolt the camera which may corrupt images or damage the camera or memory card Confirming Input and Returning to the Previous Screen Press the button For some functions is not displayed and ...

Page 35: ...etermine the subject and shooting conditions Shooting Scene Intelligent Auto Still Images Movies 1 Turn the camera on Press the power button 2 Enter mode Set the mode switch to A scene icon is displayed in the upper left of the screen 39 Frames are displayed around faces and subjects that have been detected indicating that they are in focus 3 Compose the shot When using a zoom lens zoom by turning...

Page 36: ...perations will be recorded When you recompose shots the focus brightness and colors will be automatically adjusted 3 Finish recording To stop movie recording press the movie button again Recording will stop automatically when the memory card becomes full 4 Shoot Shooting Still Images 1 Focus Press the shutter button halfway The camera beeps twice after focusing and AF frames are displayed to indic...

Page 37: ...e movie files in the following cases even if they were recorded on the same day in mode The digest movie file size reaches approximately 4 GB or the total recording time reaches approximately 16 minutes and 40 seconds The digest movie is protected 99 Daylight saving time 20 video system 139 time zone 141 or copyright information 144 settings are changed A new folder is created 138 Recorded shutter...

Page 38: ...94 Still Images Movies If the camera makes no operating sounds it may have been turned on while holding down the button To activate sounds press the button choose Beep on the 3 tab and then press the buttons to choose On Still Images If the camera cannot focus on subjects when you press the shutter button halfway an orange AF frame is displayed with and no picture is taken if you press the shutter...

Page 39: ...ovie recording lens operating noises from auto focusing may also be recorded If you prefer not to record sound choose MENU 32 5 tab Sound recording Disable To keep the focus fixed during movie recording choose MENU 32 5 tab Movie Servo AF Disable Individual movies that exceed 4 GB are divided into multiple files To notify you about 30 sec before the movie reaches 4 GB the elapsed time on the recor...

Page 40: ...he subject or person s face detected as the main subject Frames follow moving subjects within a certain range as they are tracked to keep them in focus Frames turn green after you press the shutter button halfway and the camera focuses Frames turn blue in mode if subject motion is detected when you press the shutter button halfway Once subjects are in focus after focus and brightness are readjuste...

Page 41: ...conds is specified two seconds before the shot the lamp blinking and self timer sound will speed up The lamp will remain lit in case the flash fires Once you start the self timer the lamp will blink and the camera will play a self timer sound Two seconds before the shot the blinking and sound will speed up The lamp will remain lit in case the flash fires To cancel shooting after you have triggered...

Page 42: ...ntinuously Shooting by Touching the Screen Touch Shutter Still Images Movies With this option instead of pressing the shutter button you can simply touch the screen and release your finger to shoot The camera will focus on subjects and adjust image brightness automatically 1 Enable the touch shutter function Touch and change it to 2 Shoot Touch the subject on the screen to take the picture To canc...

Page 43: ...ing continuous shooting the focus exposure and colors are locked at the position level determined when you pressed the shutter button halfway Cannot be used with the self timer 40 Shooting may stop momentarily or continuous shooting may slow down depending on shooting conditions camera settings and the zoom position As more shots are taken shooting may slow down There may be a delay before you can...

Page 44: ... JPEG and RAW images captured together have the same image number For details on Digital Photo Professional and EOS Utility applications see Software 152 When deciding the number of pixels based on print size use the following table as a guide for images with a 3 2 aspect ratio A2 16 5 x 23 4 in A3 11 7 x 16 5 in A4 8 3 x 11 7 in 3 5 x 5 in 5 x 7 in Postcard For e mailing and similar purposes Capt...

Page 45: ...ices Native aspect ratio of the camera screen equivalent to 35mm film Used for printing images at 5 x 7 inch or postcard sizes Used for printing images at 3 5 x 5 inch or A series sizes Square aspect ratio Not available in mode You can also configure this setting by choosing MENU 32 1 tab Still Image Aspect Ratio Using the Menu Press the button choose Image quality on the 1 tab and then press the ...

Page 46: ... Movie rec size Changing Movie Image Quality Still Images Movies Adjust movie image quality image size and frame rate The frame rate indicates how many frames are recorded per second which is determined automatically based on the NTSC or PAL setting 139 For guidelines on the total recording time for movies at each level of image quality that will fit on a memory card see Recording Time per Memory ...

Page 47: ...splays images until you press the shutter button halfway Off No image display after shots By pressing the button while an image is displayed after shooting you can switch the display information Customizing Camera Operation Customize shooting functions on the tab of the menu screen as follows For instructions on menu functions see Using the Menu Screen 32 Deactivating the Red Eye Reduction Lamp St...

Page 48: ...ettings in these modes when viewing images shot in mode Customize shots in these ways Background Adjust background defocusing Choose higher values to make backgrounds sharper or lower values to make them blurrier Brightness Adjust image brightness Choose higher values to brighten images Contrast Adjust contrast Choose higher values to increase the contrast Saturation Adjust the vividness of colors...

Page 49: ...this profile selected you can press the button to view the previous settings and compare them to your new settings Press the button press the buttons to choose OK after the confirmation message and then press the button 1 Enter mode Follow step 1 in Shooting in Hybrid Auto Mode 37 and choose 2 Configure the settings Press the button press the buttons to choose an item and then adjust the setting e...

Page 50: ... Settings Follow step 1 in Shooting with Your Favorite Settings Creative Assist 49 to choose Press the button press the buttons to choose and then choose a profile to load either by pressing the buttons or turning the dial Press the button to apply the saved settings To return without applying settings choose and press the button Using Settings from Images Load settings from images captured in mod...

Page 51: ...ed depending on the shooting conditions Try taking some test shots first to make sure you obtain the desired results mode can also be accessed by following step 1 in Shooting in Hybrid Auto Mode 37 In flash mode is set to and cannot be changed In mode the time left before shooting is shown on the top of the screen when you activate the self timer by selecting or by selecting and setting the time t...

Page 52: ...uous shooting with other lenses the focus is determined initially when you press the shutter button halfway Shooting Evening Scenes without Using a Tripod Handheld Night Scene Still Images Movies Beautiful shots of evening scenes or portraits with evening scenery in the background without the need to hold the camera very still as with a tripod A single image is created by combining consecutive sho...

Page 53: ...Change the color tone Turn the dial to adjust the color tone 3 Shoot These color tones may not look suitable when applied to people In flash shots color tones are automatically set to the default setting Subjects appear larger in mode compared to other modes In and mode shots may look grainy because the ISO speed 65 is increased to suit the shooting conditions Because the camera will shoot continu...

Page 54: ...Three consecutive images are captured at different brightness levels each time you shoot and the camera combines image areas with optimal brightness to create a single image This mode can reduce the washed out highlights and loss of detail in shadows that tend to occur in high contrast shots 1 Choose Follow step 1 in Shooting in Hybrid Auto Mode 37 and choose 2 Shoot Hold the camera steady as you ...

Page 55: ...uto Mode 37 and choose 2 Choose an effect level Turn the dial to choose an effect level A preview is shown of how your shot will look with the effect applied 3 Shoot Shooting with a Fish Eye Lens Effect Fish Eye Effect Still Images Movies Shoot with the distorting effect of a fish eye lens 1 Choose Follow step 1 in Shooting in Hybrid Auto Mode 37 and choose 2 Choose an effect level Turn the dial t...

Page 56: ...rded 1 Choose Follow step 1 in Shooting in Hybrid Auto Mode 37 and choose A white frame is displayed indicating the image area that will not be blurred 2 Choose the area to keep in focus Press the button Touch to resize the frame and press the buttons to move it 3 For movies choose the movie playback speed Turn the dial to choose the speed 4 Return to the shooting screen and shoot Press the button...

Page 57: ...ard Cool Images have a cooler tone than with Standard Try taking some test shots first to make sure you obtain the desired results Playback Speed and Estimated Playback Time for One Minute Clips Speed Playback Time Approx 12 sec Approx 6 sec Approx 3 sec Try taking some test shots first to make sure you obtain the desired results To switch the orientation of the frame to vertical press the buttons...

Page 58: ... Turn the dial to choose an effect level A preview is shown of how your shot will look with the effect applied 3 Shoot Shooting with a Soft Focus Effect Still Images Movies This function allows you to shoot images as if a soft focus filter were attached to the camera You can adjust the effect level as desired 1 Choose Follow step 1 in Shooting in Hybrid Auto Mode 37 and choose 2 Choose an effect l...

Page 59: ...r shot will be recorded Shooting still images during movie recording may not be possible when the memory card s recording speed is slow or when there is not enough free internal memory Shutter sounds are recorded in movies If the camera cannot focus on subjects when you press the shutter button halfway an orange AF frame is displayed with and no picture is taken if you press the shutter button all...

Page 60: ... then press the button To restore the original setting repeat this process but choose Auto To deactivate focusing during recording when the shutter button is pressed halfway choose MENU 32 5 tab AF w shutter button during Disable During recording of or movies with an aspect ratio of 16 9 still images will have an aspect ratio of During recording of or movies with an aspect ratio of 4 3 still image...

Page 61: ... you can deactivate the wind filter Access the Sound recording screen as described in step 1 of Adjusting the Recording Volume 60 Choose Wind filter Attenuator and then press the button Choose Wind Filter and then choose Disable Using the Attenuator The attenuator can reduce audio distortion in noisy environments However in quiet environments it lowers the sound recording level Access the Sound re...

Page 62: ...tep 1 in Shooting in Hybrid Auto Mode 37 and choose 2 Customize the settings as desired 63 82 and then shoot Movies can be recorded in mode as well by pressing the movie button However some menu settings 31 32 may be automatically adjusted for movie recording P Mode More discerning shots in your preferred shooting style Instructions in this chapter apply when the mode switch set to and mode to Pro...

Page 63: ...een The INFO Quick Control screen provides convenient single screen access to a variety of shooting settings 1 Access the INFO Quick Control screen Press the button a few times to display the INFO Quick Control screen 2 Choose a setting to configure To view a description press the button and choose an item by pressing the buttons To adjust a setting turn the dial Touch to complete the setting The ...

Page 64: ...the subject or scene Metering is restricted to within the circular spot metering frame in the center of the screen Center Weighted Avg Determines the average brightness of light across the entire image area calculated by treating brightness in the central area as more important With the exposure is locked at the level determined when you press the shutter button halfway With or the exposure is not...

Page 65: ...e set a higher ISO speed for higher sensitivity or a lower value for lower sensitivity Touch choose the ISO speed either press the buttons or turn the dial and then press the button The option you configured is now displayed Although choosing a lower ISO speed may reduce image graininess there may be a greater risk of subject and camera shake in some shooting conditions Choosing a higher ISO speed...

Page 66: ...ghtness and Contrast Auto Lighting Optimizer Still Images Movies Correct brightness and contrast automatically to avoid images that are too dark or lack contrast Press the button choose in the menu and choose the desired option 31 This feature may increase noise under some shooting conditions When the effect of Auto Lighting Optimizer is too strong and images become too bright set it to Low or Dis...

Page 67: ...Select your image from step 1 and then press On the confirmation screen press the buttons to choose OK press the button and then press the button again Press the button to close the menu 4 Choose Follow the steps in Adjusting White Balance 67 to choose Image Colors Adjusting White Balance Still Images Movies By adjusting white balance WB you can make image colors look more natural for the scene yo...

Page 68: ...ching in step 1 Shots in step 1 that are too bright or dark may prevent you from setting the white balance correctly A message is displayed if you specify an image in step 3 that is not suitable for loading white data Choose Cancel to choose a different image Choose OK to use that image for loading white data but note that it may not produce a suitable white balance If Unselectable image is displa...

Page 69: ...s the button choose in the menu and choose the desired option 31 Auto The color tone will be adjusted automatically to suit the scene The colors will look vivid especially for blue skies greenery and sunsets in nature outdoor and sunset scenes Standard The image looks vivid sharp and crisp Suitable for most scenes Portrait For smooth skin tones The image looks softer Suited for close up portraits ...

Page 70: ...harpen them Contrast Adjust the contrast Choose lower values to decrease the contrast or higher values to increase it Saturation 1 Adjust the intensity of colors Choose lower values to make colors faded or higher values to make them deeper Color tone 1 Adjust skin color tone Choose lower values to produce redder hues or higher values to produce yellower hues Filter effect 2 Emphasize white clouds ...

Page 71: ...F The camera focuses using a single AF frame Effective for reliable focusing Frames turn green after you press the shutter button halfway and the camera focuses Saving Customized Picture Styles Save presets such as or that you have customized as new styles You can create several Picture Styles with different settings for parameters such as sharpness or contrast 1 Select a user defined style number...

Page 72: ...frame first aim the camera to bring the subject into an AF frame and then hold the shutter button halfway down Keep the shutter button halfway down as you recompose the shot and then press the shutter button all the way down Focus Lock To magnify the position of the AF frame follow steps 2 4 in Shooting in Manual Focus Mode 75 Note that Touch Shutter is not available at this time Tracking After yo...

Page 73: ...n Servo AF mode Note that continuous shooting is slower at this time Also note that focus may be lost if you zoom in or out during continuous shooting With other lenses the focus is locked after the second shot in continuous shooting even in Servo AF mode and continuous shooting is slower Depending on the lens used the distance to the subject and the subject s speed the camera may not be able to a...

Page 74: ... MF blinks on the screen To cancel focusing release the shutter button 4 Shoot Press the shutter button all the way down to shoot Cannot be used with Servo AF 73 Not available with lenses other than EF M lenses Changing the Focus Setting Still Images Movies You can change default camera operation of constantly focusing on subjects it is aimed at even when the shutter button is not pressed Instead ...

Page 75: ...on the screen in step 3 Shooting in Manual Focus Mode Still Images Movies When focusing is not possible in AF mode use manual focus To make focusing easier magnify the display 1 Choose EF M lenses Press the button choose 2 tab Focus mode MF 32 Other lenses Turn off the camera set the lens switch to MF and then turn the camera on again MF is displayed 2 Display the magnifying frame Touch in the low...

Page 76: ...etting screen cannot be accessed by pressing the button when the flash is lowered Move the switch to raise the flash then configure the setting If the flash fires vignetting may occur Vignetting or dark image areas may also occur if the flash fires depending on the lens Easily Identifying the Focus Area MF Peaking Still Images Movies Edges of subjects in focus are displayed in color to make manual...

Page 77: ...button You can also access the Flash Control screen 32 by pressing the button and touching When there is a risk of overexposure the camera automatically adjusts the shutter speed or ISO speed for flash shots to reduce washed out highlights and shoot at optimal exposure Thus shutter speeds and ISO speeds displayed when you press the shutter button halfway may not match the settings in flash shots Y...

Page 78: ...valuative flash metering which enables standard flash exposure can be changed to average flash metering across the metering area as when using an externally metered flash Press the button and choose Flash Control on the 3 tab Choose E TTL II meter and then Average Shooting with the FE Lock Still Images Movies Just as with the AE lock 64 you can lock the exposure for flash shots 1 Raise the flash a...

Page 79: ...amera shake using built in image stabilization performed by the lens Off Deactivates image stabilization If image stabilization cannot prevent camera shake mount the camera on a tripod or take other measures to hold it still In this case set IS Mode to Off IS Mode is not displayed for lenses other than EF M lenses Use the image stabilization switch on the lens instead 24 Lenses with built in image...

Page 80: ...n data on the 2 tab and then choose an item 32 2 Confirm that correction data is available Make sure Correction data available is displayed under the lens name 3 Apply correction Choose an item and press the button to apply the setting 31 Recording Movies with Subjects at the Same Size Shown before Shooting Still Images Movies Normally once movie recording begins the image display area changes and...

Page 81: ...already taken When using a non Canon lens setting the corrections to Disable is recommended even if Correction data available is displayed To correct RAW images use Digital Photo Professional 152 Noise may occur around the edges of images shot under some conditions if you set Peripheral illumin to Enable The camera cannot be used to check the effect of correcting chromatic aberration in RAW images...

Page 82: ...here may be a delay before you can shoot again as the camera reduces noise in images Images shot at speeds of ISO 1600 or higher may be grainier with this option set to ON than at OFF or AUTO Unexpected results may occur if images are quite misaligned from camera shake for example Mount the camera on a tripod or take other measures to keep it still if possible If you shoot a moving subject the sub...

Page 83: ...ore you can shoot again when Long exp noise reduction is set to ON or AUTO and the shutter speed is 1 second or slower because images are processed to remove noise We recommend deactivating image stabilization when shooting at slow shutter speeds on a tripod 79 Maximum shutter speed with the flash is 1 200 second If you specify a faster speed the camera will automatically reset the speed to 1 200 ...

Page 84: ...values vary by lens 1 Enter mode Follow step 1 in Shooting in Hybrid Auto Mode 37 and choose 2 Set the aperture value Turn the dial to set the aperture value Orange display of the shutter speed when you press the shutter button halfway indicates that the standard exposure has not been obtained Adjust the aperture value until the shutter speed is displayed in white or use safety shift 88 Maximum sh...

Page 85: ...ure the setting Press the button choose adjustment of shutter speed 1 or aperture value 2 and when is displayed turn the dial to set a value Touch and either touch drag the bar or touch to set the ISO speed 3 When the ISO speed is fixed an exposure level mark 5 based on your specified values is shown on the exposure level indicator for comparison to the standard exposure level 4 The exposure level...

Page 86: ...brightness changes when you press the shutter button halfway after setting the ISO speed to AUTO If standard exposure cannot be obtained with your specified shutter speed and aperture value the ISO speed is displayed in orange After you set the shutter speed and aperture value the exposure level may change if you adjust the zoom or recompose the shot When the ISO speed is fixed screen brightness m...

Page 87: ...pecified shutter speed and aperture value the ISO speed is displayed in orange You can also adjust the setting items on the bottom of the screen by touching an item to select it and then either touching dragging the bar or touching Recording Movies at Specific Shutter Speeds and Aperture Values Still Images Movies Set your preferred shutter speed aperture value exposure and ISO speed For details o...

Page 88: ...xposure or Others Choose the function either press the buttons or turn the dial and then press the button 3 Choose an option Press the buttons to choose an option When finished press the button to return to the previous screen Customizing Controls and Display Customizing Display Information Still Images Movies Customize what screen is displayed when you press the button on the shooting screen 1 Ac...

Page 89: ...ses that support this feature Type of Function Function Description Exposure ISO expansion Set to 1 Enable for the option of setting the ISO speed to H H corresponds to ISO 25600 or in mode ISO 12800 Safety shift Set to 1 Enable for automatic adjustment of the shutter speed and aperture value to bring the exposure level closer to standard exposure if standard exposure would not be available otherw...

Page 90: ...hen press the button Press the buttons to choose the function When finished press the button to return to the previous screen Shutter button Set to AE AF no AE lock to enable focusing by pressing the button Note that this disables the normal button function of locking AE Also note that with Touch Shutter the camera will not adjust the focus before shooting button Movie button Press the button to a...

Page 91: ...ress the button Press and hold the buttons to browse through images quickly To access this screen Scroll Display mode press and hold the buttons for at least one second In this mode press the buttons to browse through images To return to single image display press the button To browse images grouped by shooting date press the buttons in Scroll Display mode Playback Mode Have fun reviewing your sho...

Page 92: ...just the volume during movie playback quickly drag up or down across the screen Movies are identified by a icon To play movies go to step 3 3 Play movies To start playback press the button press the buttons to choose and then press the button again 4 Adjust the volume Press the buttons to adjust the volume To adjust the volume when the volume indicator 1 is no longer displayed press the buttons 5 ...

Page 93: ...ng screen Choose Playback information display on the 4 tab and then press the button 2 Choose information to display Press the buttons to choose information to display and then press the button to add a mark To return to the menu screen press the button An example of display with the options selected in step 2 is shown at left for reference To display mode setting details add a mark to Info displa...

Page 94: ...ouching on the screen in step 1 and touching on the screen in step 2 Overexposure Warning for Image Highlights Still Images Movies Information displays 2 6 93 can help you avoid washed out highlights which blink as a warning Brightness Histogram Still Images Movies Information displays 2 6 include a graph on the top called a brightness histogram which shows the distribution of brightness in images...

Page 95: ...x To view more images at once turn the dial again To view fewer images at once turn the dial clockwise Fewer images are shown each time you turn the dial 2 Choose an image Press the buttons to scroll through images and choose one An orange frame is displayed around the selected image Press the button to view the selected image in single image display To deactivate the 3D display effect shown if yo...

Page 96: ...on choose in the menu and then press the button Press the buttons to choose a condition When is selected you can view only images matching this condition by pressing the buttons To perform an action for all of these images together press the button and go to step 3 2 Choose the second condition When you have selected or as the first condition choose the second by pressing the buttons Touch Screen ...

Page 97: ...have these ratings Similarly the conditions or are displayed only when some images have these ratings Use to jump between images with any rating 3 View the filtered images Images matching your conditions are displayed in yellow frames To view only these images press the buttons To cancel filtered display press the button choose in the menu and then press the button When the camera has found no cor...

Page 98: ...ll Images Movies 1 Magnify an image Turn the dial clockwise to zoom in and magnify images You can magnify images up to about 10x by continuing to turn the dial The approximate position of the displayed area 1 is shown for reference To zoom out turn the dial counterclockwise and to restore single image display press the button 2 Move the display position and switch images as needed To move the disp...

Page 99: ...y first cancel protection Viewing Slideshows Still Images Movies Automatically play back images from a memory card as follows Press the button and then choose Slideshow on the 1 tab 32 Press the buttons to choose Start and then press the button The slideshow will start after Loading image is displayed for a few seconds Press the button to stop the slideshow The camera s power saving functions 29 a...

Page 100: ...en by touching You can also protect images by touching OK on the screen in step 3 Selecting a Range 1 Choose Select Range Following step 2 in Using the Menu 100 choose Select Range and press the button 2 Choose a starting image Press the button Using the Menu 1 Access the setting screen Press the button and choose Protect on the 1 tab 32 2 Choose a selection method Choose an option as desired 32 T...

Page 101: ... choose Unprotect All Images in step 1 of Protecting All Images at Once and then complete step 2 Press the buttons to choose an image and then press the button 3 Choose an ending image Press the button to choose Last image and then press the button Press the buttons to choose an image and then press the button Images before the first image cannot be selected as the last image 4 Protect the images ...

Page 102: ... the button To return to the menu screen press the button Erasing Images Still Images Movies You can choose and erase unneeded images one by one Be careful when erasing images because they cannot be recovered However protected images 99 cannot be erased 1 Choose an image to erase Press the buttons to choose an image 2 Erase the image Press the button After Erase is displayed press the buttons to c...

Page 103: ...ages Following step 2 in Choosing a Selection Method 102 choose Select All Images and press the button 2 Erase the images Press the buttons to choose OK and then press the button Choosing Images Individually 1 Choose Select Following step 2 in Choosing a Selection Method 102 choose Select and press the button 2 Choose an image Once you choose an image following step 2 in Choosing Images Individual...

Page 104: ...ollow these steps to deactivate automatic image rotation which rotates images based on the current camera orientation Press the button choose Auto Rotate on the 3 tab and then choose Off 32 Images cannot be rotated 104 when you set Auto Rotate to Off Additionally images already rotated will be displayed in the original orientation Rotating Images Still Images Movies Change the orientation of image...

Page 105: ...e screen in step 2 Rating Images Rating Still Images Movies Organize images by rating them on a scale of 1 5 or By viewing only images with a specified rating you can restrict the following operations to all images with that rating Viewing 91 Viewing Slideshows 99 Protecting Images 99 Erasing Images 102 Adding Images to the Print List DPOF 158 Adding Images to a Photobook 160 Press the button choo...

Page 106: ... 2 Choose an image Press the buttons to choose an image and then press the button 3 Choose an image size Press the buttons to choose the size and then press the button Editing Still Images Image editing 106 108 is only available when the memory card has sufficient free space When is shown on the screen you can touch instead of pressing the button if you prefer When is shown on the screen you can t...

Page 107: ...ou can resize move and adjust the aspect ratio of the cropping frame Operations in step 2 are also possible by pressing the button choosing 2 tab Cropping pressing the button choosing an image and pressing the button again Operations are also possible by touching and on the top of the screen in step 2 4 Save as a new image and review Follow step 2 in Resizing Images 106 Press the button and then f...

Page 108: ...dragging across the screen Correcting Red Eye Still Images Movies Automatically corrects images affected by red eye You can save the corrected image as a separate file 1 Choose Red Eye Correction Press the button and then choose Red Eye Correction on the 2 tab 32 2 Choose an image Press the buttons to choose an image Applying Filter Effects Apply effects equivalent to shooting in and modes to imag...

Page 109: ... cut while in the portion after the nearest mark on the right will be cut 3 Review the edited movie Press the buttons to choose and then press the button The edited movie is now played 3 Correct the image Press the button Red eye detected by the camera is now corrected and frames are displayed around corrected image areas Enlarge or reduce images as needed Follow the steps in Magnifying Images 98 ...

Page 110: ...mat when you choose Overwrite To edit the movie again repeat step 2 To cancel editing press the button press the buttons to choose OK and then press the button 4 Save the edited movie Press the buttons to choose and then press the button Press the buttons to choose New File and then press the button Choose Save w o Comp and then press the button The movie is now saved as a new file To overwrite th...

Page 111: ...ect the clip to erase Follow steps 1 2 in Viewing Short Movies Created When Shooting Still Images Digest Movies 94 to play a movie created in mode and then press the button to access the movie control panel Press the buttons to choose or and then press the button 2 Choose Press the buttons to choose and then press the button The selected clip is played back repeatedly 3 Confirm erasure Press the b...

Page 112: ...e collectively referred to as smartphones Web Services Add your account information to the camera for CANON iMAGE GATEWAY online photography service or other Web services to send camera images to the services Unsent images on the camera can also be sent to a computer or Web service via CANON iMAGE GATEWAY Media Player View images on DLNA compatible TVs or other devices Digital Living Network Allia...

Page 113: ...or image selection Connecting via NFC When Camera Is Off or in Shooting Mode 1 Install Camera Connect Activate NFC on the smartphone and touch the devices N Marks together to start Google Play on the smartphone automatically Once the Camera Connect download page is displayed download and install the app Importing Images to a Smartphone Import images to a smartphone as follows Connect via NFC 113 S...

Page 114: ...e viewed from the connected smartphone when you choose All images in step 3 To restrict camera images that can be viewed from the smartphone choose a different option in step 3 136 Once you have registered a smartphone you can change privacy settings for it on the camera 136 Connections require that a memory card be in the camera You can also change the camera nickname on the screen in step 2 137 ...

Page 115: ...en is displayed press the buttons to choose OK and then press the button Connecting via NFC When Camera Is in Playback Mode Press the button to turn the camera on Touch the N Mark on the smartphone with Camera Connect installed 113 against the camera s N Mark Press the buttons to choose an image to send and then press the button is displayed To cancel selection press the button again is no longer ...

Page 116: ...Wi Fi Settings Password Off but we recommend setting it to On for better security One smartphone can be registered to the button To assign a different one first clear the current one in MENU 32 4 tab Mobile Device Connect Button 3 Choose Press the buttons to choose and then press the button The camera SSID and password are displayed 4 Connect the smartphone to the network In the smartphone s Wi Fi...

Page 117: ...ra Connect Start Camera Connect on the smartphone 7 Select the camera to connect to On the camera selection screen displayed on the smartphone choose the camera to begin pairing Adding a Smartphone Using the Wi Fi Menu These steps show how to use the camera as an access point but you can also use an existing access point 118 1 Install Camera Connect For Android smartphones find Camera Connect in G...

Page 118: ...r through the Wi Fi menu you can also use an existing access point Also refer to the access point user manual Confirming Access Point Compatibility Confirm that the Wi Fi router or base station conforms to the Wi Fi standards in Wi Fi Wireless LAN 188 Connection methods vary depending on whether the access point supports Wi Fi Protected Setup WPS 119 or not 120 For non WPS access points check the ...

Page 119: ... during wireless transmission Check which security setting is used WPA2 PSK AES WPA2 PSK TKIP WPA PSK AES WPA PSK TKIP WEP open system authentication or no security Password encryption key network key The key used when encrypting data during wireless transmission Also called the encryption key or network key Key index transmit key The key set when WEP is used for network authentication data encryp...

Page 120: ...xt and then press the button 4 Choose Auto Press the buttons to choose Auto and then press the button 5 Import images Follow steps 6 9 in Adding a Smartphone Using the Wi Fi Menu 117 to choose the smartphone adjust the privacy setting and import the images 6 Establish the connection On the access point hold down the WPS connection button for a few seconds On the camera press the button to go to th...

Page 121: ...vides user guides for downloading Registering CANON iMAGE GATEWAY After linking the camera and CANON iMAGE GATEWAY add CANON iMAGE GATEWAY as a destination Web service on the camera To determine the access point password check on the access point itself or refer to the user manual Up to 16 access points will be displayed If no access points are detected even after you choose Refresh in step 2 to u...

Page 122: ...creen displayed until you are finished with step 7 1 Log in to CANON iMAGE GATEWAY and access the camera link settings page From a computer or smartphone access http www canon com cig to visit CANON iMAGE GATEWAY Once the login screen is displayed enter your user name and password to log in If you do not have a CANON iMAGE GATEWAY account follow the instructions to complete member registration fre...

Page 123: ...settings screen 2 Configure the Web service you want to use Follow the instructions displayed on the smartphone or computer to set up the Web service 7 Enter the authentication code On the smartphone or computer enter the authentication code displayed on the camera and go to the next step A six digit confirmation number is displayed 8 Check the confirmation number and complete the setup process Ch...

Page 124: ...lso send multiple images at once resize images and add comments before sending 129 3 Choose In Playback mode press the button choose in the menu and press the button to access the Wi Fi menu Press the buttons to choose and then press the button The Web service settings are now updated If any configured settings change follow these steps again to update the camera settings Uploading Images to Web S...

Page 125: ...ia player s user manual When finished press the button on the camera to end the connection If the screen is dimmed press any button Once the second screen in step 3 is displayed press the button Viewing Images Using a Media Player View images on the camera s memory card on a TV or other device This feature requires a DLNA compatible TV set or other media player such as a game system or smartphone ...

Page 126: ...password are displayed Connections require that a memory card with saved images be in the camera Once you have connected to devices via the Wi Fi menu recent destinations will be listed first when you access the Wi Fi menu You can easily connect again by pressing the buttons to choose the device and then pressing the button To add a new device display the device selection screen by pressing the bu...

Page 127: ...he setting If you prefer not to display recent target devices choose MENU 32 4 tab Wi Fi Settings Target History Off When using another access point see Using Another Access Point 118 4 Connect the printer to the network In the printer s Wi Fi setting menu choose the SSID network name displayed on the camera to establish a connection 5 Choose the printer Press the buttons to choose the printer nam...

Page 128: ... selection screen by pressing the buttons and then configure the setting If you prefer not to display recent target devices choose MENU 32 4 tab Wi Fi Settings Target History Off You can also send multiple images at once and change the image size before sending 129 Sending Images to Another Camera Connect two cameras via Wi Fi and send images between them as follows Only Canon brand cameras equipp...

Page 129: ...ing Multiple Images 129 choose Select Range and press the button 2 Choose images Follow steps 2 3 in Selecting a Range 103 to specify images To include movies press the buttons to choose Incl Movies and then press the button to mark the option as selected Press the buttons to choose OK and then press the button Image Sending Options You can choose multiple images to send at once and change the ima...

Page 130: ...age Size On the image transfer screen choose by pressing the buttons and then press the button On the screen displayed choose the recording pixel setting image size by pressing the buttons and then press the button To send images at original size select No as the resizing option Choosing will resize images that are larger than the selected size before sending Movies cannot be resized 3 Send the im...

Page 131: ...described in Registering CANON iMAGE GATEWAY 121 To include a Web service as the destination log in to CANON iMAGE GATEWAY 123 select your camera model access the Web service settings screen and choose the destination Web service in Image Sync settings For details refer to CANON iMAGE GATEWAY Help 2 Choose the type of images to send only when sending movies with images Press the button and choose ...

Page 132: ...mages are sent When the images have been sent successfully to the CANON iMAGE GATEWAY server is displayed on the screen 2 Save the images to the computer Images are automatically saved to the computer when you turn it on Sent images are labeled with a icon Press the buttons to choose Image Sync and then choose Stills Movies 32 3 Assign to the button only when sending images by pressing the button ...

Page 133: ...e destination is a computer on the same network as the camera because images are sent via the access point instead of CANON iMAGE GATEWAY Note that images stored on the computer are sent to CANON iMAGE GATEWAY so the computer must be connected to the Internet Viewing Images Sent via Image Sync on a Smartphone By installing the Canon Online Photo Album Canon OPA app you can use your smartphone to v...

Page 134: ...ges from the camera Shooting Remotely As you check a shooting screen on your smartphone you can use it to shoot remotely Privacy settings must be configured in advance to allow viewing of all images from the smartphone 114 136 1 Secure the camera Keep the camera still by mounting it on a tripod or taking other measures 2 Connect the camera and smartphone 113 115 In the privacy settings choose All ...

Page 135: ...played on the camera Following step 4 in Editing Connection Information 135 choose Change Device Nickname and press the button Select the input field and press the button Use the keyboard displayed to enter a new nickname 33 Editing or Erasing Wi Fi Settings Edit or erase Wi Fi settings as follows Editing Connection Information 1 Access the Wi Fi menu and choose a device to edit Press the button t...

Page 136: ...Erasing Connection Information Erase connection information information about devices that you have connected to as follows Following step 4 in Editing Connection Information 135 choose Erase Connection Info and press the button After Erase is displayed press the buttons to choose OK and then press the button The connection information will be erased Specifying Images Viewable from Smartphones Spe...

Page 137: ...Press the buttons to choose OK and then press the button The Wi Fi settings are now reset To reset other settings aside from Wi Fi to defaults choose Clear all camera settings on the 4 tab 145 Changing the Camera Nickname Change the camera nickname displayed on connected devices as desired 1 Choose Wi Fi Settings Press the button and choose Wi Fi Settings on the 4 tab 32 2 Choose Change Device Nic...

Page 138: ...to store shots taken that day Choose Create Folder on the 1 tab and then choose Daily Images will now be saved in folders created on the shooting date File Numbering Your shots are automatically numbered in sequential order 0001 9999 and saved in folders that store up to 2 000 images each You can change how the camera assigns file numbers Choose File Numbering on the 1 tab and then choose an optio...

Page 139: ...ly Changing the Video System Set the video system of any television used for display This setting determines the image quality frame rate available for movies Choose Video system on the 1 tab and then choose an option Regardless of the option selected in this setting shots may be numbered consecutively after the last number of existing images on newly inserted memory cards To start saving shots fr...

Page 140: ...original brightness press and hold the button again for at least one second or restart the camera Using Eco Mode This function allows you to conserve battery power in Shooting mode When the camera is not in use the screen quickly darkens to reduce battery consumption 1 Configure the setting Choose Eco Mode on the 2 tab and then choose On is now shown on the shooting screen 167 The screen darkens w...

Page 141: ... the self timer Choose Beep on the 3 tab and then choose Off World Clock To ensure that your shots will have the correct local date and time when you travel abroad simply register the destination in advance and switch to that time zone This convenient feature eliminates the need to change the Date Time setting manually Before using the world clock be sure to set the date and time and your home tim...

Page 142: ...e dust whenever you turn the camera on or off or when the camera shuts off in Power Saving mode You can disable automatic cleaning or activate cleaning as needed Disabling Auto Cleaning 1 Access the setting screen Turn the camera on in Shooting mode choose Sensor cleaning on the 3 tab and press the button Press the buttons to choose Auto cleaning and then press the button Hiding Hints and Tips Gui...

Page 143: ...n the sensor with care Use a blower without a brush attached A brush can scratch the sensor Do not insert the blower tip inside the camera beyond the lens mount It can damage the shutter curtains Never use canned air or gas to clean the sensor The blowing force can damage the sensor or the spray gas can freeze on the sensor If a smudge that cannot be removed with a blower remains having the sensor...

Page 144: ...Information to Record in Images 144 and choose Delete Copyright Info Press the buttons to choose OK and then press the button The copyright info already recorded in images will not be deleted Checking Certification Logos Some logos for certification requirements met by the camera can be viewed on the screen Other certification logos are printed in this guide on the camera packaging or on the camer...

Page 145: ...djusting Other Settings The following settings can also be adjusted Wi Fi Settings 4 tab 112 Mobile Device Connect Button 4 tab 115 firmware ver 4 tab used for firmware updates During firmware updates the touch screen panel will be disabled to prevent accidental operations Restoring Default Camera Settings If you accidentally change a setting you can restore default camera settings 1 Access the Cl...

Page 146: ...ine Canon accessories Canon shall not be liable for any damage to this product and or accidents such as fire etc caused by the malfunction of non genuine Canon accessories e g a leakage and or explosion of a battery pack Please note that this warranty does not apply to repairs arising out of the malfunction of non genuine Canon accessories although you may request such repairs on a chargeable basi...

Page 147: ... IFC 400PCU TV Video System Computer PictBridge Compatible Printers Card Reader SD SDHC SDXC Memory Card Connect Station CS100 EF Lenses EF S Lenses EF M Lenses Mount Adapter EF EOS M AC Adapter Kit ACK E12 Included Accessories Battery Charger LC E12 LC E12E Battery Pack LP E12 with terminal cover Body Jacket EH28 CJ Neck Strap EM E2 Neck Strap EM 200DB HDMI Cable HTC 100 Grip GR E3 Face Jacket EH...

Page 148: ...lable adapter for the plug Never use an electrical transformer designed for traveling which may damage the battery pack Other Accessories Body Jacket EH28 CJ Protects the camera from dust and scratches Face Jacket EH28 FJ Attach to the camera to give it a new look Optional Accessories The following camera accessories are sold separately Note that availability varies by area and some accessories ma...

Page 149: ...ore Grip GR E3 Enables you to hold the camera more securely When using the grip tighten the screw to attach the grip firmly to the camera Neck Strap EM E2 A soft and comfortable neck strap Interface Cable IFC 400PCU For connecting the camera to a computer or printer IFC 200U and IFC 500U are also compatible HDMI Cable HTC 100 For connecting the camera to an HDMI input of a high definition TV Print...

Page 150: ...a television When the camera and TV are connected you can also shoot while previewing shots on the larger screen of the TV To shoot follow the same steps as when using the camera screen However MF Point Zoom 75 and MF Peaking 76 are not available Using Optional Accessories Playback on a TV Still Images Movies Connecting the camera to an HDTV with the HDMI Cable HTC 100 sold separately enables you ...

Page 151: ...eparately eliminates the need to monitor the remaining battery level 1 Make sure the camera is off 2 Insert the coupler Follow step 1 in Inserting the Battery Pack 19 to open the cover Holding the coupler with the terminals 1 facing as shown insert the coupler just as you would a battery pack following step 2 in Inserting the Battery Pack 19 Follow step 3 in Inserting the Battery Pack 19 to close ...

Page 152: ...SP1 Mac OS X 10 10 Mac OS X 10 9 Check the Canon website for the latest system requirements including supported OS versions Using the Software The software available for download from the Canon website is introduced below with instructions for installation and saving images to a computer Software After installing the software you can do the following things on your computer EOS Utility Import imag...

Page 153: ... the computer user manual 2 Turn on the camera and display EOS Utility Press the button to turn the camera on Windows Double click the EOS Utility icon on the desktop Mac OS Click the EOS Utility icon in the Dock From now on EOS Utility will start up automatically when you connect the camera to the computer and turn on the camera Installing the Software 1 Download the software With a computer conn...

Page 154: ...urn the printer on 3 Save the images to the computer Click Download images to computer Start automatic download Once images are saved to the Pictures folder on the computer in separate folders named by date Digital Photo Professional starts up automatically and displays the imported images After images are saved close EOS Utility press the power button to turn the camera off and unplug the cable U...

Page 155: ...and file number added Off Default Matches current printer settings Off On Uses information from the time of shooting to print under optimal settings Red Eye 1 Corrects red eye No of Copies Choose the number of copies to print Cropping Specify a desired image area to print 156 Paper Settings Specify the paper size layout and other details 156 4 Turn the camera on Press the button to turn the camera...

Page 156: ...press the button When choosing N up press the button On the next screen press the buttons to choose the number of images per sheet and then press the button 5 Print the image Cropping Images before Printing Still Images Movies By cropping images before printing you can print a desired image area instead of the entire image 1 Choose Cropping After following step 1 in Configuring Print Settings 155 ...

Page 157: ...a single sheet of paper You can also print the folder number file number and elapsed time for the frame by setting Caption to On Available Layout Options Default Matches current printer settings Bordered Prints with blank space around the image Borderless Borderless edge to edge printing N up Choose how many images to print per sheet ID Photo Prints images for identification purposes Only availabl...

Page 158: ...me Canon brand PictBridge compatible printers sold separately The date is printed in a format matching setting details in MENU 32 2 tab Date Time 20 To cancel printing in progress press the button choose OK and then press the button again After displaying a scene to print as described in steps 2 5 of Viewing 91 you can also access the screen in step 1 here by pressing the buttons to choose in the ...

Page 159: ...ndividual Images 159 choose Clear All Selections and press the button Press the buttons to choose OK and then press the button Setting Up Printing for Individual Images Still Images Movies 1 Choose Select Images Qty Press the button choose Print settings on the 2 tab and then press the button Press the buttons to choose Select Images Qty and then press the button 32 2 Choose an image Press the but...

Page 160: ... procedure in Choosing a Selection Method 160 choose Clear All Selections and press the button Press the buttons to choose OK and then press the button Adding Images to a Photobook Still Images Movies Photobooks can be set up on the camera by choosing up to 998 images on a memory card and importing them into the software on your computer where they are stored in their own folder This is convenient...

Page 161: ...uns out of power quickly Battery performance decreases at low temperatures Try warming the battery pack a little by putting it in your pocket for example ensuring that the terminals do not touch any metal objects Dirty battery terminals reduce battery performance Try cleaning the terminals with a cotton swab and reinserting the battery pack a few times If these measures do not help and the battery...

Page 162: ...ut level 77 86 White spots appear in flash shots This is caused by light from the flash reflecting off dust or airborne particles Shots look grainy Lower the ISO speed 65 High ISO speeds in some shooting modes may cause grainy images 52 Shooting Cannot shoot The camera cannot shoot unless subjects are in focus Wait until the frame turns green as you press the shutter button halfway and allow the c...

Page 163: ...1 if the sound in the movie is faint No sound is played for movies shot in mode 56 because audio is not recorded in this mode Shots are affected by linear noise or moiré Some subjects make shots more susceptible to linear noise or moiré This is more likely to happen under the following conditions Subjects have fine horizontal stripes or checkered patterns The sun lights or other sources of bright ...

Page 164: ...point and make sure there are no objects between the devices Want to erase Wi Fi connection information before disposing of the camera or giving it to someone else Reset the Wi Fi settings 137 Computer Cannot transfer images to a computer When attempting to transfer images to the computer via a cable try reducing the transfer speed as follows Press the button to enter Playback mode Hold the button...

Page 165: ... supported folder number 999 for storing images on the card has been reached and the highest supported image number 9999 for images in folders has been reached On the 1 tab of the menu 32 change File Numbering to Auto Reset 138 or format the memory card 139 Lens Error There is a communication problem between the camera and lens Clean the lens contacts and mount the lens correctly on the camera Fre...

Page 166: ...nsufficient space on server Delete unnecessary images uploaded to CANON iMAGE GATEWAY to create space Save the images sent via Image Sync 131 to your computer Check network settings Check to make sure your computer can connect to the Internet with the current network settings A camera error was detected error number If this error message is displayed immediately after a shot the image may not have...

Page 167: ... speed 83 31 Aperture value 84 32 Exposure compensation 63 33 Highlight tone priority 66 34 ISO speed 65 35 Audio recording mode 60 36 Attenuator 61 37 Wind filter 61 38 Time zone 141 39 Eco mode 140 40 Movie AE lock 60 41 Movie Servo AF 60 Battery Level An on screen icon or message indicates the battery charge level Display Details Sufficient charge Slightly depleted but sufficient Blinking red N...

Page 168: ...images are labeled with Info Display 3 Shows the lens name focal length and an RGB histogram Note that long lens names may not be fully displayed Information on the top of the screen is the same as for Info Display 2 Info Display 4 Shows Picture Style information Information on the top of the screen is the same as for Info Display 2 During Playback Info Display 1 1 Current image Total images 2 Bat...

Page 169: ...atic aberration correction Information on the top of the screen is the same as for Info Display 2 Summary of Movie Control Panel The following operations are available on the movie control panel accessed as described in Viewing 91 Shown when the camera is connected to a PictBridge compatible printer 154 Play Slow Motion Press the buttons to adjust the playback speed No sound is played Skip Backwar...

Page 170: ...O O O O O O 100 6400 O O O O O 12800 O O O O Flash 76 Auto O O O O O O O O O O O O O O On O O O O O O O O O O O O O O O O O Slow Synchro 2 O O 2 O 2 Off O O O O O O O O O O O O O O O O O O O O O O O O Flash Exposure Compensation 77 O O O O 1 1 Flash Output Level 86 O O O Aperture Value 84 O O O Shutter Speed 83 O O O Program Shift 64 O AE Lock 60 64 FE Lock 78 O O O O 3 3 AE Lock during recording ...

Page 171: ... O O Magnified Display 75 O O O O O O O O O O Touch Shutter 42 O O O O O O O O O O O O O O O 4 O O O O O Still Image Shooting When Recording Movies 59 5 O O O O O O O O O O O O O O O O O O O O O O O Change Display 30 63 Info display 1 No info display O O O O O O O O O O O O O O O O O O O O O O O O Info display 2 INFO Quick Control screen O O O O O O 4 Only available for shooting Subject designatio...

Page 172: ... O O O O O O O O O O O O O O O O O O O O O 2 O O O O O O O O O O O 3 O O O O O When Set to PAL O O O O O O 2 O O O O O O O O O O O O O O O O O O O O O O 2 O O O O O O O O O O O 3 O O O O O Drive Mode 42 O O O O O O O O O O O O O O O O O O O O O O O O O O O O O O O O O O O O Self Timer 40 O O O O O O O O O O O O O O O O O O O O O O O O Self Timer Settings O O O O O O O O O O O O O O O O O O O O O O...

Page 173: ... O O O O O O Auto Lighting Optimizer 66 O O O O O O O O O O O O O O O O O O O O O O O O O O O O O O O O O O O O Metering mode 64 O O O O O O O O O O O O O O O O O O O O O O O O O O O O Still Image Aspect Ratio 45 O O O O O O 3 O O O O O O O O O O O O O O O O O O 3 O O O O O O O O O O O O O O O 4 4 O O O O O 3 O O O O O O O O O O O O O 3 Functions can be configured on the 1 tab 4 Set automatically ...

Page 174: ...till Image Aspect Ratio 45 See Quick Set Menu 172 Shooting information display 88 O O O O O O O O O O O O O O O O O O O O O O O O Reverse Disp 30 On O O O O O O O O O O O O O O O O O O O O O O O O Off O O O O O O O O O O O O O O O O O O O O O O O Image review 47 1 Off 2 sec 4 sec 8 sec Hold O O O O O O O O O O O O O O O O O O O O O O O O Touch Shutter 42 Touch Shutter Enable O O O O O O O O O O O ...

Page 175: ... O O O O O O O O O O O O O O O O MF AF MF O O O O O O O O O O O O O O O O O O O O MF Peaking Settings 76 O O O O O O O O O O O O O O O O O O O O IS Settings 79 IS Mode 2 Off O O O O O O O O O O O O O O O O O O O O O O Continuous O O O O O O O O O O O O O O O O O O O O O O O O Dynamic IS 3 1 O O O O O O O O O O O O O O O O O O O O O O O 2 O O O O O O O O O O O O O O O O O O O O O O O Lens aberratio...

Page 176: ...k Set Menu 172 Metering mode 64 See Quick Set Menu 172 Flash Control Flash firing 76 See Functions Available in Each Shooting Mode 170 E TTL II meter 78 Evaluative Average O O O O Red eye reduc 47 On Off O O O O O O O O O O O O O O O O O O O Built in flash settings Flash Mode 86 E TTL II O O O O O O O O O O O O O O O O O O O Manual flash O O O Shutter Sync 78 1st curtain O O O O O O O O O O O O O ...

Page 177: ... Quick Set Menu 172 Long exp noise reduction 82 Disable O O O O O O O O O O O O O O O O O O O O O O O O Auto Enable O O O O High ISO speed NR 81 Standard O O O O O O O O O O O O O O O O O O O O O O O O Disable Low High Multi Shot Noise Reduction O O O O Digest Type 37 Include Stills No Stills O AF auto switch 40 Enable O Disable O O O O O O O O O O O O O O O O O O O O O O O O Keep setting 48 Disab...

Page 178: ...Manual O O O O O O Disable O O O O O O O O O O O O O O O O O O O O O O O O Rec level O O O O O O Wind filter Attenuator Wind Filter Auto O O O O O O O O O O O O O O O O O O O O O O O Disable O O O O O O O Attenuator Disable O O O O O O O O O O O O O O O O O O O O O O O O Enable O O O O O O Movie Servo AF 59 Enable O O O O O O O O O O O O O O O O O O O O O O O Disable O O O O O O O O O O O O O O O ...

Page 179: ... O O O O O O O O O O O O O O O O O O O O O O O O 1 Enable O O C Fn II Autofocus 88 AF assist beam LED firing 0 Enable O O O O O O O O O O O O O O O O O O O O O O 1 Disable O O O O O O O O C Fn III Others 88 Custom Controls Shutter AE lock O O O O O O button O O O O Release shutter w o lens 0 Disable O O O O O O O O O O O O O O O O O O O O O O O O 1 Enable O O O O O O Retract lens on power off 0 En...

Page 180: ...nnect Button 115 Certification Logo Display 144 Copyright Info 144 Clear all camera settings 145 firmware ver 145 Only available in these modes and INFO Quick Control The INFO Quick Control screen 63 is not available in these modes and Shooting Mode Function Shooting mode O O Shutter speed O O O Aperture value O O O ISO speed O O O O O Exposure comp O O O O O O Flash exposure compensation O O O O ...

Page 181: ...ked Digest Movie 94 Print 154 Resize 106 Cropping 107 Creative filters 108 Apply settings 50 Wi Fi function 112 In shooting modes other than Apply settings to Playback Tab Tab Item Reference Page 1 Protect 99 Rotate 104 Erase 102 Rating 105 Slideshow 99 List Play Digest Movies 94 Image Search 96 2 Creative filters 108 Resize 106 Cropping 107 Red Eye Correction 108 Print settings 155 Photobook Set ...

Page 182: ...y soft cloth such as an eyeglass cloth Do not rub hard or apply force Never use cleaners containing organic solvents to clean the camera or screen Use a blower brush to remove dust from the lens If cleaning is difficult contact a Canon Customer Support Help Desk To prevent condensation from forming on the camera after sudden temperature changes when the camera is transferred from cold to warm envi...

Page 183: ... 1536 S3 Small 3 Approx 350 000 pixels 720 x 480 RAW Approx 17 9 megapixels 5184 x 3456 Folder setting Monthly and daily can be selected File No Continuous Auto Reset Specifications Type Type Digital single lens non reflex AF AE camera Recording media SD memory card SDHC memory card SDXC memory card UHS I compatible Image sensor size Approx 22 3 x 14 9 mm APS C Size Compatible lenses Canon EF M EF...

Page 184: ... 3 stops in 1 3 stop increments AE lock Auto Manual Image Processing during Shooting Picture Style Auto Standard Portrait Landscape Neutral Faithful Monochrome User Def 1 3 White balance Auto Preset Daylight Shade Cloudy Tungsten light White fluorescent light Flash Custom white balance correction feature available Noise reduction Applicable to long exposures and high ISO speed shots Automatic imag...

Page 185: ...80x720 59 94 fps 50 00 fps 115 4 MB min 640x480 29 97 fps 25 00 fps 22 4 MB min Shutter Type Electronically controlled focal plane shutter Shutter speed 1 4000 sec to 30 sec total shutter speed range available range varies by shooting mode X sync at 1 200 sec Flash Units Built in flash Retracting manual pop up flash Guide No approx 5 ISO 100 m Supports angle of view equivalent to focal length of a...

Page 186: ...r One Shot AF MF and MF in AF MF mode MF peaking supported Servo AF Can be paused and resumed Brightness metering range EV 1 20 at room temperature ISO 100 Metering mode Evaluative metering Exposure control Movie auto exposure mode miniature effect movie mode still image mode Shutter speed of 1 30 to 1 4000 sec with aperture and ISO speed set automatically Movie manual exposure mode Shutter speed ...

Page 187: ...play formats Single image display single image info display basic info shooting info histogram lens info Picture Style noise reduction correction data image index 6 12 42 110 image rotate possible Zoom magnification Approx 1 5x to 10x Highlight alert Overexposed highlights blink Image browsing methods Single image jump by 10 or 100 images filter images by shooting date by people by movies by still...

Page 188: ...mission method DS SS modulation IEEE 802 11b OFDM modulation IEEE 802 11g n Transmission range Approx 15 m 49 ft When connected to a smartphone or tablet With no obstructions between transmitting and receiving antennas and there is no radio interference Transmission frequency central frequency Frequency 2412 2462 MHz Channels 1 11 ch Connection method Infrastructure mode Camera access point mode A...

Page 189: ...mory cards recording may stop before this time has elapsed Faster memory cards are required when shooting stills during movie recording Number of Shots per Memory Card Using a 16 GB memory card Image Quality File Size Approx MB Number of Shots Approx Maximum Burst Approx 6 8 2208 1000 4 4 3397 1000 5 8 2612 1000 3 6 4152 1000 3 0 5061 1000 2 0 7592 1000 1 8 8377 1000 0 3 48592 1000 22 7 666 7 RAW ...

Page 190: ...mera specifications or appearance are subject to change without notice If a problem occurs with a non Canon lens attached to the camera consult the respective lens manufacturer Approximate Built in Flash Range approx m ft ISO Speed With an EF M15 45mm f 3 5 6 3 IS STM Lens Wide angle 15 mm Telephoto 45 mm 100 0 5 1 4 1 6 4 6 0 5 0 9 1 6 3 0 200 0 5 2 0 1 6 6 6 0 5 1 3 1 6 4 3 400 0 5 2 9 1 6 9 5 0...

Page 191: ... Assist shooting mode 48 Cropping 107 156 Custom Functions 88 Custom WB 67 Custom white balance 67 D Date time Changing 21 Date time battery 21 Settings 20 World clock 141 DC coupler 151 Deactivating flash 77 Defaults Reset all Direct printing 187 Display language 21 Display period 47 DLNA 112 DPOF 158 E Eco mode 140 Editing Cropping 107 Red eye correction 108 Resizing images 106 Editing or erasin...

Page 192: ...ending images 121 Sending images to another camera 128 Sending images to a smartphone 113 Sending images to Web services 124 Sensor cleaning 142 Servo AF 73 Sharpness 70 Shooting Shooting information 167 Single image display 26 Slideshow 99 Slow synchro 77 Soft focus shooting mode 58 Household power 151 Hybrid Auto shooting mode 37 I Icons 167 168 Image dust prevention 142 Image quality Compressio...

Page 193: ...ing mode 52 Strap 17 T Terminal 150 151 154 Tone priority 66 Toning effect 70 Touch AF 72 Touch Shutter 42 Toy camera effect shooting mode 57 Traveling with the camera 141 Tripod socket 4 Troubleshooting 161 TV display 150 Tv shooting mode 83 V Viewing 26 Image search 96 Index display 95 Jump display 97 Magnified image 98 Single image display 26 Slideshow 99 TV display 150 W Water painting effect ...

Page 194: ...ges or loss of earnings resulting from a degradation or disappearance of content When transferring this product to another person disposing of it or sending it for repair be sure to note the wireless LAN settings and reset the product to its default settings erase settings if necessary Canon will not make compensation for damages resulting from loss or theft of the product Canon accepts no respons...

Page 195: ...is product searches for Wi Fi networks in the vicinity and displays the results on the screen Networks you are not authorized to use unknown networks may also be displayed However attempting to connect to or using such networks could be regarded as unauthorized access Be sure to use only networks you are authorized to use and do not attempt to connect to other unknown networks If security settings...

Page 196: ...sclaimer Unauthorized reproduction of this guide is prohibited All measurements based on Canon testing standards Information subject to change without notice as are product specifications and appearance Illustrations and screenshots in this guide may differ slightly from the actual equipment The above items notwithstanding Canon cannot be held liable for any loss arising from the use of this produ...

Reviews: