background image

Installing Digital Photo Professional

1-3

1

In

st

alli

ng t

he 

S

o

ft

ware

5

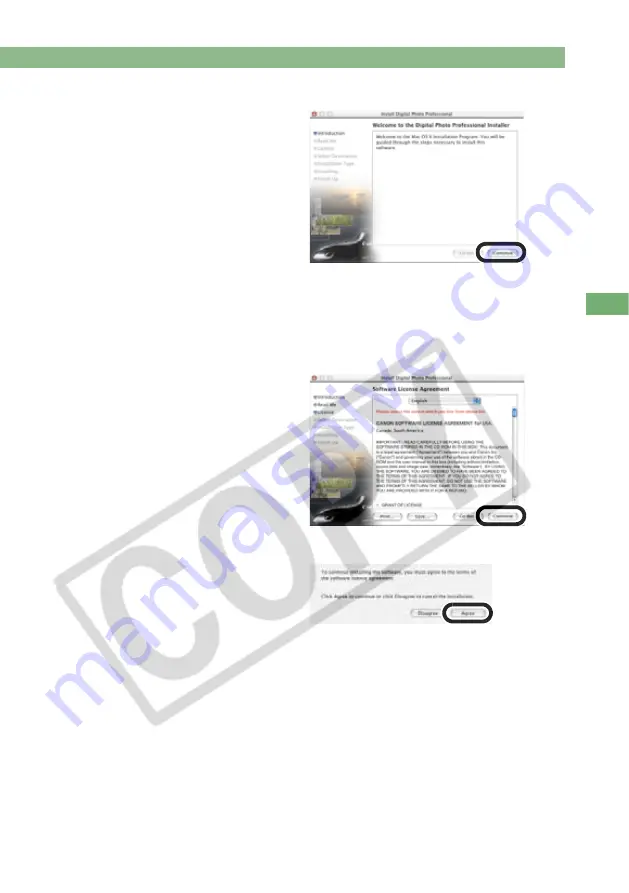
Click the [Continue] button.

The [Read Me] dialog box 

appears.

6

Click the [Continue] button.

The [Software License Agreement] dialog box appears.

7

Check the details of the Software License Agreement and click 
the [Continue] button.

8

Click the [Agree] button.

The [Select a Destination] dialog 
box appears.

Summary of Contents for EOS Digital Photo Professional

Page 1: ...Macintosh E INSTRUCTION MANUAL ...

Page 2: ... the functions of the edit image window and how to display images and perform detailed edits on them 5 Reference 5 1 Provides troubleshooting the instructions on uninstalling Digital Photo Professional and shortcut key list to allow you to use Digital Photo Professional easily Shortcut Key List 5 4 Index 5 7 Trademark Acknowledgments Canon and EOS are trademarks of Canon Inc Adobe and Photoshop ar...

Page 3: ...d computer Marks additional information that you will find helpful Please read the safety precautions carefully before using this product Ensure that you use the product correctly according to the procedures described in these instructions The following safety precautions are intended to instruct you in the safe and correct operation of the product and its accessories to prevent injuries or damage...

Page 4: ...ystem Supports color space of sRGB Adobe RGB and Wide Gamut RGB Effectively converting and saving multiple RAW images in a single operation batch processing Includes a comparison mode that allows you to adjust an image while comparing an edited image with the original in the same window Editing multiple images while comparing each of them Saving and applying recipe data the edit data from multiple...

Page 5: ...EG TIFF images White balance Click white balance function RAW Brightness RAW Click white balance function Brightness Example 1 Displaying Thumbnail Images and Performing Basic Edits in the Main Window Start up Digital Photo Professional 2 2 Display an image in the main window 2 6 Perform the basic edits on the image 2 15 2 18 Convert and save images in a single operation 2 32 ...

Page 6: ... Color Tone curve Color Start up Digital Photo Professional 2 2 Select an image in the main window 2 7 Display the image in the edit window 3 2 Edit the image 3 7 3 12 Compare the edited image with the original 3 6 Convert and save the image 2 30 Transfer the image to Photoshop 2 35 Example 2 Performing Detailed Edits on a Single Image in the Edit Window ...

Page 7: ... SelectingOne ImagefromMultiple ImagesandPerforming Detailed Edits on the Imageinthe Edit ImageWindow Start up Digital Photo Professional 2 2 Select images in the main window 2 7 Display the images in the edit image window 4 2 Edit the image 2 15 2 18 3 7 3 12 Compare the edited image with the original 3 6 Convert and save images in a single operation 2 32 Transfer the image to Photoshop 2 35 ...

Page 8: ...he above OS preinstalled CPU 400 MHz G3 or better 1 GHz G4 or better recommended RAM Minimum 256 MB 1 GB or more recommended Hard disk space At installation 20 MB or more During operation 256 MB or more Display Resolution 1024 768 or more Colors Thousands or more Image Format File Extension RAW images shot on an EOS 1Ds or EOS 1D camera TIF RAW images shot on an EOS 1D Mark II camera CR2 DCF 1 0 o...

Page 9: ...1 Installing the Software This chapter describes how to install Digital Photo Professional in your computer Installing Digital Photo Professional 1 2 ...

Page 10: ...nal as you follow the installation procedure 1 Start up your Macintosh Quit any programs that are running 2Insert the CD Digital Photo Professional Disk The CD icon appears on the desktop 3 Double click the CD icon The Installer panel appears 4Double click the English folder the install icon The Welcome to the Digital Photo Professional Installer dialog box appears ...

Page 11: ...he Continue button The Read Me dialog box appears 6Click the Continue button The Software License Agreement dialog box appears 7 Check the details of the Software License Agreement and click the Continue button 8Click the Agree button The Select a Destination dialog box appears ...

Page 12: ... click the Continue button Clicking the Choose button allows you to select a folder in which the software will be installed The Easy Install dialog box appears 10Click the Install button The installation begins 11 Click the Close button The install dialog box closes to end the installation 12Remove the CD ...

Page 13: ...ting Images 2 13 Hiding the Show the Folder Tree Area 2 14 Hiding the Toolbar 2 14 Editing Images 2 15 Rotating Images 2 15 Click White Balance Function 2 16 Adjusting the Brightness 2 17 Editing RAW Images 2 18 Adjusting the White Balance 2 19 Adjusting the Brightness 2 24 Specifying Color Space 2 25 Using Edits Recipe Data 2 26 Saving the Recipes 2 26 Loading and Pasting Recipes 2 26 Copying Rec...

Page 14: ... menus Image display area Show the folder tree area 2 6 2 8 The above window shows all the information at once In actual use only the information needed is displayed To quit Digital Photo Professional select Digital Photo Professional menu Quit Digital Photo Professional Displays the coordinates of the cursor position and the RGB values 8 bit conversion of an image while operating the click white ...

Page 15: ...o Professional menu Hides Digital Photo Professional This function is not supported Displays the version information of Digital Photo Professional Shows all the applications that are hidden Hides any application other than Digital Photo Professional Edit menu 2 7 2 7 2 8 2 8 2 26 2 26 2 27 2 26 2 27 Closes the main window 2 34 2 32 2 34 Copies images to the clipboard Pastes images on the clipboard...

Page 16: ...u View menu Minimizes the Digital Photo Professional window Displays the Digital Photo Professional window on the top of other windows Adjustment menu 2 15 2 15 2 19 2 24 2 17 2 25 2 28 2 28 4 2 2 14 2 14 2 11 2 11 2 11 2 11 2 13 2 8 2 9 Displays the path of the folder that contains the displayed images Tools menu 2 35 2 35 ...

Page 17: ...Brightness adjust button 2 17 Brightness RAW button 2 24 White balance button 2 19 Click button 2 16 Check mark Clicking the Check button shows the check mark Brightness adjustment value 2 24 This value is displayed for images for which the brightness RAW was adjusted White balance 2 20 The icon for the specified white balance is displayed with RAW images only Recording format The RAW symbol is di...

Page 18: ...mages to your computer using other software supplied with the camera or a third party card reader See Supported Image Formats 8 for image formats that you can display Images that cannot be displayed appear as Images that were shot with the camera held vertically with Auto rotate setting to ON are automatically displayed vertically You can display images saved on a memory card using a third party c...

Page 19: ...ld down the key and click the images To select sequential images click the first image and then hold down the shift key and click the last image Click the Select all button Alternatively you can select images by selecting the Edit menu Select all Clicking the Clear all button deselects all the images Alternatively you can deselect images by selecting the Edit menu Clear all Selecting All Images ...

Page 20: ...rked photos only you can select only the images for which the check mark 2 5 is specified 1 Click a folder on the Show the folder tree area 2Select Bookmark menu Add The folder is registered with the Bookmark menu The registered folder can be selected from the Bookmark menu Selecting Images According to Conditions Registering Frequent Use Folders with the Menu ...

Page 21: ... folder To change the folder name select the folder in the bookmark folder display area change the displayed folder name and then click the Change button To delete the folder select the folder in the bookmark folder display area then click the Delete button 3 Click the Close button Organizing Frequent Use Folders The folder name that is selected in the bookmark folder display area is displayed The...

Page 22: ...s are moved to the Trash 2Select Finder menu on the desktop Empty Trash The images are deleted Images that you deleted in step 2 cannot be restored Check carefully before deleting images When multiple images are selected all the selected images will be deleted Take particular care when you have just finished a task involving the selection of multiple images ...

Page 23: ...s The available image sizes are Large thumbnail Medium thumbnail and Small thumbnail Various information 2 5 is displayed in the display area You can display the brightness histogram and the shooting information for images Select View menu Large thumbnail Medium thumbnail or Small thumbnail Select View menu Thumbnail with information Selecting the Thumbnail Size Image with Information Display ...

Page 24: ...indow appears See Chapter 3 Performing Detailed Edits in the Edit Window for the information on the edit window Select multiple images and then click the Edit image window button The main window switches to the edit image window See Chapter 4 Performing Detailed Edits in the Edit Image Window for the information on the edit image window Displaying the Edit Window Displaying the Edit Image Window ...

Page 25: ...ges are sorted according to the selected condition as shown below File name Sorted in alphanumeric order 0 to 9 a to z RAW priority Displays in the following order RAW images CR2 TIF RGB images JPG TIF If multiple files have the same file extension they are sorted in order of File name Check mark Displays the image with a check mark sorted in order of File name the image without a check mark sorte...

Page 26: ...ou can hide the Show the folder tree area by selecting View menu Folders Performing the same operation again shows the Show the folder tree area Select View menu Toolbar Performing the same operation again shows the toolbar Hiding the Show the Folder Tree Area Hiding the Toolbar ...

Page 27: ... 2 29 Before quiting Digital Photo Professional you must save the edited images 2 29 See Supported Image Formats 8 for the images that are supported by Digital Photo Professional When multiple images are selected the edits are applied to all the selected images The editing data can be saved in a separate file 2 26 The edited images can be transferred to Adobe Photoshop 2 35 Click the Rotate left o...

Page 28: ...k on another point over the image the white balance is adjusted again If you finish this operation click the Click button The coordinates of the cursor position and the RGB values 8 bit conversion of an image are displayed in the lower left of the main window 2 2 The image is adjusted based on the value of 1 1 pixels from the clicked point You can also adjust the white balance by clicking an achro...

Page 29: ... the Brightness adjust button The Brightness adjustment dialog box appears Alternatively you can display this dialog box by selecting Adjustment menu Brightness adjustment 2Adjust an image while viewing it 3 Click the Close button Adjusting the Brightness Drag the slider left or right to adjust the brightness Restores the image to its original condition Enter a value to adjust the brightness ...

Page 30: ...lso revert edited images to the last saved settings or shoot settings 2 28 3 Convert and save the image 2 30 2 32 Before quiting Digital Photo Professional you must save the edited images 2 30 2 32 See Supported Image Formats 8 for the types of RAW images that are supported by Digital Photo Professional When multiple images are selected the edits are applied to all the selected images The editing ...

Page 31: ... color temperature settings color wheel and click white balance function 1 Click the White balance button The White balance adjustment dialog box appears Alternatively you can display this dialog box by selecting Adjustment menu White balance 2Adjust the white balance by making each setting 2 20 to 2 24 3 Click the Close button Adjusting the White Balance ...

Page 32: ...7000 Daylight For sunny daylight outdoors Approx 5200 Shade For shaded areas outdoors Approx 7000 Cloudy For cloudy or hazy days and during sunset Approx 6000 Tungsten light For tungsten light bulb light Approx 3200 Fluorescent light For fluorescent light Approx 4000 Flash When flash is used Approx 6000 Color temp You can manually set color temperature for 2800 to 10000K in 100K increments 2 21 Ap...

Page 33: ...ndow Specifying the Color Temperature You can specify the color temperature in the range of 2800 to 10000K in 100K increments to adjust the white balance 1 Select Color temp 2Adjust an image while viewing it Drag the slider left or right to adjust the color temperature The adjusted value appears ...

Page 34: ...ange of 0 to 359 in 1 stop increments and the saturation in the range of 0 to 255 in 1 stop increments 1 Click the Tune button The color wheel appears 2Adjust an image while viewing it Drag to adjust an image Enter a value in a range of 0 to 359 or click the buttons to specify the hues Enter a value in a range of 0 to 255 or click the buttons to specify the saturation ...

Page 35: ... changes to 2Click a point in a neutral part of the image If you click on another point over the image the white balance is adjusted again If you finish this operation click the Click RAW button The coordinates of the cursor position and the RGB values 8 bit conversion of an image are displayed in the lower left of the main window 2 2 The image is adjusted based on the value of 1 1 pixels from the...

Page 36: ...tton The registered personal white balance is applied to the image You cannot use the personal white balance if you have not registered it 1 Click the Brightness RAW button The Brightness adjustment dialog box appears Alternatively you can display this dialog box by selecting Adjustment menu Brightness adjustment RAW 2Adjust an image while viewing it 3 Click the Close button Adjusting the Brightne...

Page 37: ...added to the ICC profile that is embedded in TIFF images that have been converted from RAW images and saved 2 30 2 32 A color space is the reproducible color range the characteristics of color gamut Digital Photo Professional supports the color space of sRGB Adobe RGB and Wide Gamut RGB sRGB Widely used for the standard color space of monitors digital cameras and scanners Adobe RGB A wider color s...

Page 38: ...file If you wish to save the image to which the edits were applied see Saving Edited Images 2 29 Image rotations 2 15 are not included in recipe data 1 Select an image and then select Edit menu Read recipe from file The Open dialog box appears 2Select a recipe and click the Open button 3 Select an image to which the recipe will be applied and then select Edit menu Paste recipe to selected photo Ed...

Page 39: ... to the image Image rotations 2 15 are not included in recipe data Editing data that can be performed on RAW images only 2 18 to 2 25 3 12 to 3 18 cannot be applied to JPEG and TIFF images If you try to apply editing data that can be applied to all image formats JPEG TIFF or RAW images 2 15 to 2 17 3 7 to 3 11 together with editing data that can be applied only to RAW images 2 18 to 2 25 3 12 to 3...

Page 40: ...Last Saved Settings Reverting to Shoot Settings Select an image and then select Adjustment menu Revert to last saved settings If you select multiple images all the edited images that you selected are reverted to the last saved settings Select an image and then select Adjustment menu Revert to shoot settings If you select multiple images all the edited images that you selected are reverted to the s...

Page 41: ... image and overwrite the existing image You can apply edits to images and save the new images with another name Select an image and then select File menu Add recipe and save 1 Select an image and then select File menu Add recipe and save as The Save as dialog box appears 2Select the destination folder enter the file name and then click the Save button Saving without Renaming Saving and Renaming ...

Page 42: ... menu Convert and save The Convert and save dialog box appears Converting and Saving RAW Images while Renaming Them Enter a file name for saving images Saves images Restores the settings to their original ones and closes the Convert and save dialog box Displays the contents of the drive or folder Specify the drive or folder to which the image will be saved ...

Page 43: ...minimize the color differences between devices Specify the sharpness in 5 levels 1 to 5 when JPEG is selected from the list box Higher values give higher levels of edge sharpening Specify the image quality compression ratio in 10 levels 1 to 10 when JPEG is selected from the list box Higher values give higher quality of the JPEG image Select JPEG Exif TIFF 8bit or Exif TIFF 16bit for the image for...

Page 44: ...isplay this window by selecting File menu Batch save 4Specify the settings and click the Execute button The process dialog box appears allowing images to be saved in a single operation When processing is complete the images are saved in the specified folder and the Terminate button appears on the process dialog box Converting and Saving Images in a Single Operation Batch processing Displays the fi...

Page 45: ...erefore during batch saving you can perform other operations in the main edit and edit image windows Select JPEG Exif TIFF 8bit or Exif TIFF 16bit for the image format used when the image is saved Specify the folder in which the format converted images will be saved The name of the destination folder is displayed next to the Browse button Specify the sharpness in 5 levels when JPEG is selected fro...

Page 46: ...ing begins Selecting File menu Page setting allows you to specify paper sizes Select an image and then select File menu Print with Easy PhotoPrint Easy PhotoPrint starts up Follow the instructions displayed on the Easy PhotoPrint window to print images To print images with Easy PhotoPrint you need Easy PhotoPrint 2 1 or later and a Canon BJ printer that supports Easy PhotoPrint 2 1 or later If ima...

Page 47: ... version of Photoshop for transferring images is 7 0 You cannot transfer images to Photoshop Elements One image can be transferred at a time You cannot transfer multiple images at a time When RAW images are transferred they are automatically converted to the TIFF images and the ICC profile is attached to each of them The specified preferences 2 39 or individually specified color space 2 25 are add...

Page 48: ... displayed and saved at maximum speed because no additional processing is applied Allows you to select whether the edited image is saved automatically or the confirmation dialog box is displayed when you quit Digital Photo Professional or change images displayed in the main window to the ones in another folder Allows you to select whether the folder that was open the last time is displayed or the ...

Page 49: ... position in each window Split single image and show Allows you to specify the grid spacing in a range of 8 to 256 pixels used when the grid is displayed on the edit window or the edit image window Removing the check mark hides the Click button and the Brightness adjust button from the main window If you select this checkbox the image that has been displayed on the edit window is selected on the m...

Page 50: ...rve while pressing the control key 3 10 Allows you to select whether the histogram for the original image is displayed or the histogram for the edited image is displayed in the RGB image adjustment tab sheet on the tool palette Allows you to select whether points on the tone curve are connected with a straight line or a curve Allows you to select whether the tone curve is expressed in RGB or Brigh...

Page 51: ...s and saved 2 30 2 32 A color space is the reproducible color range the characteristics of color gamut Digital Photo Professional supports the color space of sRGB Adobe RGB and Wide Gamut RGB sRGB Widely used for the standard color space of monitors digital cameras and scanners Adobe RGB A wider color space than sRGB Mainly used for printing for business purposes Wide Gamut RGB A wider color space...

Page 52: ...3 2 Selecting the Image Display Mode 3 5 Selecting the Display Size 3 5 Displaying the Grid 3 5 Displaying the Edited Image and the Original at the Same Time 3 6 Editing Images 3 7 Adjusting the Image Tone 3 8 Adjusting the Hue and Saturation 3 11 Editing RAW Images 3 12 Adjusting the Brightness 3 13 Adjusting the White Balance 3 13 Adjusting the Dynamic Range 3 16 Adjusting the Color 3 18 ...

Page 53: ...age Alternatively you can display this window by selecting File menu Open in Edit window For some images it may take some time to change to the high resolution image You can select whether the tool palette is displayed as another window or displayed within the same window 2 38 Menu bar Displays the Digital Photo Professional File Edit View Adjustment Tools and Window menus Path display Displays th...

Page 54: ...2 27 Digital Photo Professional menu 3 2 2 34 2 36 Hides Digital Photo Professional This function is not supported Displays the version information of Digital Photo Professional Shows all the applications that are hidden Hides any application other than Digital Photo Professional 2 2 File menu Edit menu 2 26 2 26 2 27 ...

Page 55: ...splays the Digital Photo Professional window on the top of other windows Displays the path of the folder that contains the displayed images Shows hides the tool palette Displays the path of the displayed images 2 35 RGB image adjustment tab sheet 3 7 RAW image adjustment tab sheet 3 12 The above tool palette shows all the information at once In actual use only the information needed is displayed ...

Page 56: ...0 view actual size and 200 view You can display a grid that allows you to check the horizontal or vertical level of the image Select View menu Fit to window 50 view 100 view or 200 view When you display an image in a larger size you can change the display position by dragging the image Select View menu Grid Performing the same operation again hides the grid You can specify the grid spacing 2 37 Se...

Page 57: ...he Display Position You can also tile images vertically Select View menu Before after comparison The images are displayed as shown on the right 2 37 Select View menu Change up down left right Performing the same operation again tiles images horizontally Displaying the Edited Image and the Original at the Same Time ...

Page 58: ...b sheet appears 3 Edit the image 3 8 to 3 11 Alternatively you can apply edits to other images by copying and pasting the edit data to the other images 2 27 You can also revert edited images to the last saved settings or shoot settings 2 28 4Compare the edited image with the original 3 6 5 Save the image 2 29 or transfer it to Photoshop 2 35 Before quiting Digital Photo Professional you must save ...

Page 59: ...de RGB which adjusts the input and output for the entire image in a single operation as well as the R G and B settings that adjust each color individually You can switch between the different channels as you make your adjustments The horizontal axis shows the brightness and color saturation for the unadjusted input image with the left hand end indicating shadow darker areas of the image and the ri...

Page 60: ...ter a value to specify the minimum output Enter a value in the range of 0 to 247 in 1 stop increments to adjust the shadow point When you move the cursor to the left edge of the graph the cursor changes to Drag the slider right to adjust the shadow point When you move the cursor to the right edge of the graph the cursor changes to Drag the slider left to adjust the highlight point Enter a value in...

Page 61: ...curve while pressing the control key You can change tone curve interpolation methods or tone curve modes 2 38 1 Click the Click button When you move the cursor over the image the cursor changes to 2Click a point in a neutral part of the image If you click on another point over the image the white balance is adjusted again If you finish this operation click the Click button The image is adjusted ba...

Page 62: ...tep increments and the saturation in the range of 0 to 200 in 1 step increments Adjust an image while viewing it Adjust an image while viewing it Enter a value to adjust the brightness and contrast Drag the slider left or right to adjust the brightness and contrast Adjusting the Hue and Saturation Restores the image to its original condition Enter a value to adjust the hue and saturation Drag the ...

Page 63: ...ages 3 13 to 3 18 Alternatively you can apply edits to other images by copying and pasting the edit data to the other images 2 27 You can also revert edited images to the last saved settings or shoot settings 2 28 4Compare the edited image with the original 3 6 5 Convert and save the image 2 30 2 32 or transfer it to Photoshop 2 35 Before quiting Digital Photo Professional you must save the edited...

Page 64: ...ttings color wheel and click white balance Selecting the White Balance You can select white balance from the list box 2 20 Specifying the Color Temperature You can specify the color temperature in the range of 2800 to 10000K in 100K increments to adjust the white balance 2 21 Adjust an image while viewing it Adjusting the Brightness Drag the slider left or right to adjust the brightness Enter a va...

Page 65: ...r the image the cursor changes to 2Click a point in a neutral part of the image If you click on another point over the image the white balance is adjusted again If you finish this operation click the Click button The image is adjusted based on the average value of the range of 5 5 pixels from the clicked point You can also adjust the white balance by clicking an achromatic color neutral gray part ...

Page 66: ...e range of 0 to 255 in 1 stop increments 2 22 Registering Adjusted White Balance Personal White Balance You can register up to three adjusted white balance data as personal white balance settings Personal White Balance You can apply the registered personal white balance to images 2 24 1 Adjust the white balance 3 13 to 3 15 2Click the Register button The Register personal white balance dialog box ...

Page 67: ... while viewing it The minimum number of steps between the shadow point and the highlight point is 8 Adjusting the Dynamic Range When you move the cursor to the left edge of the graph the cursor changes to Drag the slider right to adjust the shadow point When you move the cursor to the right edge of the graph the cursor changes to Drag the slider left to adjust the highlight point Enter a value in ...

Page 68: ...ettings or Linear Shoot settings Selects the tone curve used when shots were taken Linear Selects the linear tone curve You can select linear processing when you wish to transfer the image to your own retouching software such as Photoshop and adjust the image in the software 1 Select Custom The slider appears 2Adjust an image while viewing it The slider has 5 levels Drag the slider left or right t...

Page 69: ...s colors so that the images that are taken in an ambient light of approx 5200K can be colorimetrically faithful to the subject s color tones Adjusting the Color Restores the image to its original condition Applies the color used when shots were taken to the image Applies faithful color reproduction to images The Hue and Saturation sliders appear Use the next step to adjust the hue and saturation i...

Page 70: ... how to display images and perform detailed edits on them The functions of the edit image window are the same as those of the main window chapter 2 and of the edit window chapter 3 For detailed instructions on operating these functions refer to the page described with each function Displaying the Edit Image Window 4 2 ...

Page 71: ... these functions refer to the page described with each function 1 Select multiple images in the main window 2 7 2Click the Edit image window button The main window switches to the edit image window A low resolution image is displayed first and then it changes to a high resolution image Alternatively you can display this window by selecting View menu Edit in Edit image window 3 Click the images in ...

Page 72: ...Menu bar Displays the Digital Photo Professional File Edit View Adjustment Tools and Window menus Tool palette Thumbnail image display area 4 2 The above window shows all the information at once In actual use only the information needed is displayed To exit the edit image window click the Main window button Image display area When you display an image in a larger size you can change the display po...

Page 73: ...he images from the thumbnail image display area 2 30 2 32 2 36 Digital Photo Professional menu Hides Digital Photo Professional This function is not supported Displays the version information of Digital Photo Professional Shows all the applications that are hidden Hides any application other than Digital Photo Professional 2 2 File menu Edit menu 2 13 2 34 2 34 2 34 ...

Page 74: ...hoto Professional window Displays the Digital Photo Professional window on the top of other windows Displays the path of the displayed images Shows hides the tool palette Shows hides the thumbnail image display area Displays the thumbnail image display area either vertically or horizontally Select the next image Select the first image Select the last image 2 25 2 28 2 28 2 15 2 15 Sets a check mar...

Page 75: ...ge Rotate left button 2 15 Batch save button 2 32 50 view button Scales down the image 50 Tool button Shows hides the tool palette Thumbnails button Shows hides the thumbnail image display area Rotate right button 2 15 Next photo button Select the next image 200 view button Scales up the image 200 RGB image adjustment tab sheet 3 7 RAW image adjustment tab sheet 3 12 The above tool bar and tool pa...

Page 76: ... troubleshooting the instructions on uninstalling Digital Photo Professional and shortcut key list to allow you to use Digital Photo Professional easily Troubleshooting 5 2 Uninstalling the Software 5 3 Shortcut Key List 5 4 Index 5 7 ...

Page 77: ...tem requirements 8 is installed in the computer if other applications are running with Digital Photo Professional the memory RAM may not be sufficient Is the preferences file for Digital Photo Professional corrupted The preferences file for Digital Photo Professional may be damaged Quit any applications that are running delete the preferences file for Digital Photo Professional from the Preference...

Page 78: ...rticularly likely to result in computer malfunctions When you have moved the folders to be deleted to the Trash select Finder menu Empty Trash to empty the Trash You cannot reinstall Digital Photo Professional until you have emptied the Trash 1 Display the folder containing the Digital Photo Professional folder 2Move the Digital Photo Professional folder to the Trash 3 Select Finder menu Empty Tra...

Page 79: ...W photos only option A Open Window N Select check marked photos only Y Close Window W Edit in Edit image window Add recipe and save S Large thumbnail 1 Add recipe and save as shift S Medium thumbnail 2 Convert and save D Small thumbnail 3 Batch save B Thumbnail with information 0 Page setting shift P Rotate left L Print P Rotate right R Print with Easy PhotoPrint E Add check mark option M Delete R...

Page 80: ...P Hide Digital Photo Professional H Info I Hide Others option H Fit to window 0 Quit Digital Photo Professional Q 50 view 1 Close Window W 100 view 2 Add recipe and save S 200 view 3 Add recipe and save as shift S Rotate left L Convert and save D Rotate right R Page setting shift P Minimize M ...

Page 81: ...on H Return to main window Quit Digital Photo Professional Q Fit to window 0 Close Window W 50 view 1 Add recipe and save S 100 view 2 Add recipe and save as shift S 200 view 3 Convert and save D Rotate left L Batch save B Rotate right R Page setting shift P Add check mark option M Print P Remove check mark shift M Print with Easy PhotoPrint E Minimize M ...

Page 82: ...s 2 15 3 7 Editing RAW Images 2 18 3 12 Exiting Digital Photo Professional 2 2 Exiting the Edit Image Window 4 3 Exiting the Edit Window 3 2 I Image with Information Display 2 11 Information Displayed with Images 2 5 Installing the Software 1 2 L Loading and Pasting Recipes 2 26 M Main Features and Structure 4 Main Window 2 2 O Operation Flow 5 P Personal White Balance 2 24 3 15 Printing Images 2 ...

Page 83: ...s 2 36 Starting up Digital Photo Professional 2 2 Supported Image Formats 8 System Requirements 8 T Tool Palette RAW image adjustment tab sheet 3 4 4 6 RGB image adjustment tab sheet 3 4 4 6 Transferring Images to Photoshop 2 35 Troubleshooting 5 2 U Uninstalling the Software 5 3 ...

Page 84: ...San Donato Milanese MI Italy CANON Schweiz AG Geschäftsbereich Wiederverkauf Industriestrasse 12 CH 8305 Dietlikon Switzerland CANON GmbH Oberlaaerstrasse 233 4th floor 1100 Wien Austria CANON España S A C Joaquín Costa 41 28002 Madrid Spain SEQUE Soc Nac de Equip Lda Praça da Alegria 58 2º 1269 149 Lisboa Portugal CENTRAL CANON LATIN AMERICA INC SOUTH AMERICA 703 Waterford Way Suite 400 Miami FL ...

Reviews: