background image

111

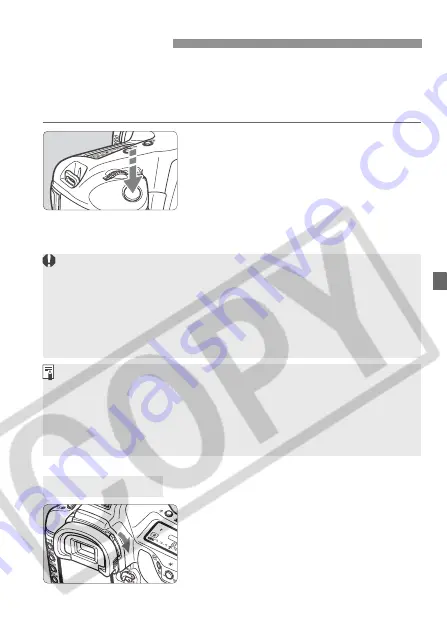
Mirror lockup is enabled with C.Fn-12. (p.165) The mirror can be swung 
up separately from when the exposure is made. This prevents mirror 
vibrations which may blur the image during close-ups or when a super 
telephoto lens is used. Set Custom Functions with 

3

 <

n

>.

1

Press the shutter button 
completely. 

X

The mirror will lock in the up position. 

2

Again press the shutter button 
completely. 

X

The picture is taken and the mirror 
goes back down. 

If you take a picture without looking 
through the viewfinder, stray light may 
enter the eyepiece and affect the 
exposure. To prevent this, turn the 
eyepiece shutter lever as shown by the 
arrow to shutter the eyepiece. 

Mirror Lockup

Eyepiece Shutter


In very bright light such as at the beach or ski area on a sunny day, take 
the picture promptly after mirror lockup. 


During mirror lockup, do not point the camera lens at the sun. The sun’s 
heat can scorch and damage the shutter curtains. 


Bulb exposures cannot be used with the self-timer. During the self-timer 
countdown, if you let go of the shutter button, there will be a shutter-
release sound. This is not the shutter release (no picture is taken). 


During mirror lockup, the drive mode will be single shooting (

u

) to 

override the current drive mode (single or continuous). 


The mirror locks up, and after 30 seconds, it will go back down automatically. 
Pressing the shutter button completely again locks up the mirror again.


For mirror lockup shots, using Remote Switch RS-80N3 or Timer Remote 
Controller TC-80N3 (both optional) is recommended. 

Summary of Contents for EOS-1D Mark II Digial

Page 1: ...E INSTRUCTION MANUAL E INSTRUCTION MANUAL...

Page 2: ...ts Copyright laws in your country may prohibit the use of images of people and certain subjects for anything but private enjoyment Also be aware that certain public performances exhibitions etc may pr...

Page 3: ...II N Camera body Eyecup body cap and battery compart ment cap attached Built in lithium battery for date time Ni MH Pack NP E3 protective cover included Ni MH Charger NC E2 DC Coupler Kit DCK E1 Wide...

Page 4: ...Time Battery 47 Cleaning the CMOS sensor 48 Attaching the Neck Strap and Hand Strap 50 Image Settings 51 Setting the Image recording Quality 52 Setting the ISO Speed 55 Selecting a Picture Style 56 Cu...

Page 5: ...e Compensation 106 Auto Exposure Bracketing 107 AE Lock 109 Bulb Exposures 110 LCD Panel Illumination 110 Mirror Lockup 111 Eyepiece Shutter 111 Flash Photography 112 Image Playback 115 Reviewing Imag...

Page 6: ...ate o Adjust the color tone p 68 69 WB correction WB bracketing Take black and white or sepia photos p 57 Monochrome Focusing Change the AF point p 82 S Selecting the AF point Photograph a still subje...

Page 7: ...Set mirror lockup p 111 Mirror lockup Create a new folder to save images p 71 Creating a folder Image backup on another card p 73 Dual image recording Save RAW and JPEG images separately p 74 RAW JPEG...

Page 8: ...the electrical contacts with tape to prevent contact with other metallic objects or batteries This is to prevent fire or an explosion If excessive heat smoke or fumes are emitted during battery pack...

Page 9: ...d use a dry cloth to clean off the dust around the power outlet If the surrounding is dusty humid or oily the dust on the power outlet may become moist and short circuit the outlet to cause a fire Pre...

Page 10: ...not touch the camera s electrical contacts with your fingers This is to prevent the contacts from corroding Corroded contacts can cause camera misoperation If the camera is suddenly brought in from th...

Page 11: ...avoid places prone to having static electricity Otherwise the images recorded on the memory card might be lost Do not leave memory cards in direct sunlight or near a heat source Doing so can warp the...

Page 12: ...and insert a fully charged battery 2 Attach the lens p 29 Align the red dot 3 Set the lens focus mode switch to AF p 29 4 Insert a memory card p 30 Insert a CF card into the left slot and or insert a...

Page 13: ...nt over the subject and press the shutter button halfway to autofocus 8 Take the picture p 34 Press the shutter button fully to take the picture 9 View the image p 116 The image will de displayed for...

Page 14: ...p Vertical grip Main Dial p 37 35 Vertical grip shutter button p 37 34 Depth of field preview button p 103 Lens release button p 29 Lens mount index p 29 Mirror p 111 Hand strap mount Body number Trip...

Page 15: ...5 Strap mount p 50 D PC terminal p 114 F Remote control terminal N3 type Battery release handle p 25 26 Battery p 22 Battery release button p 26 P a Assist White balance correction button p 84 68 5 Qu...

Page 16: ...p 126 Direct printing terminal C DIGITAL terminal M Menu button p 38 X Select button p 38 Rear LCD Panel p 18 G Clear button p 42 N Image size selection button p 52 White balance bracketing button p 6...

Page 17: ...icon z xbn mPersonal Function icon yFlash exposure compensation hAEB Exposure compensation amount AEB range Flash exposure compensation amount Drive modes u Single shooting p Low speed continuous shoo...

Page 18: ...n icon SD card selection icon White balance bracketing level RAW image recording card slot indicator Folder Number SD card indicator CF card indicator File No Color temperature Personal white balance...

Page 19: ...oint selection mode SEL FE lock Busy buSY Aperture AF point selection mode AF HP Memory card No 1 2 yExposure compensation Flash exposure compensation uWhite balance correction ISO speed Area AF ellip...

Page 20: ...u 9 or 8 indicates that the relevant function remains active for 6 sec or 16 sec respectively after you let go of the button This manual uses the following alert symbols The Caution symbol indicates a...

Page 21: ...21 Getting Started This chapter explains a few preparatory steps and basic operations with the EOS 1D Mark II N...

Page 22: ...tment cap and store it 3 Recharge the battery X When you connect the battery the recharging will start automatically and the red CHARGE lamp will light It takes about 120 minutes to fully recharge a c...

Page 23: ...charging automatically The battery waiting to be charged will have the CHARGE lamp blinking slowly every other second And when two batteries are to be discharged the battery waiting to be discharged w...

Page 24: ...arging An abnormally high battery temperature was detected so the charging was terminated Consult your dealer or nearest Canon Service Center REFRESH lamp does not light If the battery cannot be disch...

Page 25: ...hen the 4 switch is set to 1 p 33 the battery level will be indicated at one of four levels z Battery level OK x Battery level is low b Battery will be exhausted soon n Battery must be recharged Insta...

Page 26: ...e button and take out the battery Temperature Shots remaining At 20 C 68 F Approx 1200 At 0 C 32 F Approx 800 Removing the Battery The actual number of shots may be fewer than indicated above dependin...

Page 27: ...s shown by the arrow 2 Connect the DC plug Connect the AC Adapter s DC plug to the DC terminal 3 Connect the power cord Connect the AC plug to the power outlet then connect the power cord to the AC ad...

Page 28: ...tch is set to 1 do not disconnect the DC plug or AC adapter s power cord from the power outlet Otherwise the camera may stop operating If the camera stops operating remove the DC Coupler from the came...

Page 29: ...e lens set the focus mode switch to f If it is set to g autofocus will not be possible 4 Remove the front lens cap While pressing the lens release button turn the lens as shown by the arrow Turn the l...

Page 30: ...p and turn the cover release handle as shown by the arrow 2 Insert the memory card into the camera The left slot is for the CF card and the right slot is for the SD card If the CF card is inserted in...

Page 31: ...e memory card in use will also be displayed 1 Open the cover Turn the 4 switch to 2 Make sure the access lamp is off and buSY is not displayed on the top LCD panel Then open the cover 2 Take out the m...

Page 32: ...e is processed and recorded onto the memory card lit or blinking access lamp When the memory card becomes full the Card Full warning will appear on the LCD panel and in the viewfinder Shooting will be...

Page 33: ...Basic Operation Power Switch To save battery power the camera turns off automatically after 1 minute of non operation p 45 To turn on the camera again just press the shutter button halfway If you tur...

Page 34: ...s the picture Shutter Button If you press the shutter button halfway and 9 elapse you must press it halfway again and wait a moment before pressing it completely to take a picture If you press the shu...

Page 35: ...etering mode drive mode etc 2 After pressing a button turn the 6 dial When you press a button its function remains selected for 6 seconds 9 During this time you can turn the 6 dial to set the desired...

Page 36: ...lso review and select images on the LCD monitor with this dial 2 After pressing a button turn the 5 dial When you press a button its function remains on for 6 seconds 9 During this time you can turn t...

Page 37: ...ton AE lock button Assist button and FE lock multi spot metering button Before using the vertical grip controls turn on the vertical grip on off switch When you are not using the vertical grip be sure...

Page 38: ...x Blue Playback menu Image playback related menu c b Yellow Set up menu Camera s basic settings n Orange Custom Functions and Personal Functions 5 Tab Menu items Menu settings Shooting menu Playback...

Page 39: ...n Hold down the M button and turn the 5 dial to select a tab then let go of the button 3 Select a menu item Hold down the X button and turn the 5 dial to select a menu item then let go of the button 4...

Page 40: ...f 1 User Def 2 User Def 3 Detail set 56 58 61 Review Off On On INFO 116 Review time 2 sec 4 sec 8 sec Hold 117 Noise reduction Off Auto On 78 110 ISO expansion Off On 55 Protect images Protect image 1...

Page 41: ...saved in memory card 174 Format Format and erase data in memory card 133 LCD Brightness 5 levels 119 Date Time Date time setting 46 Language 15 languages provided English German French Dutch Danish Fi...

Page 42: ...the Default Settings Shooting Settings Shooting mode d Program AE AF Mode One Shot AF Metering mode Evaluative metering Drive mode Single AF point selection Automatic Exposure compensation 0 Zero AEB...

Page 43: ...de a clear viewfinder image using Dioptric Adjustment Lens E 10 types optional is recommended p 183 To obtain sharp images hold the camera still to minimize camera shake Firmly grasp the camera grip w...

Page 44: ...uage screen will appear 2 Set the desired language Hold down the X button and turn the 5 dial to select the Language Then let go of the X button X The language will change 3 Setting the Language Engli...

Page 45: ...e power turns off you can turn on the camera again by pressing the shutter button or other button 1 Select Auto power off Select the c tab Hold down the X button and turn the 5 dial to select Auto pow...

Page 46: ...of the X button 3 Set the date display format Hold down the X button and turn the 5 dial to select one of the following display formats mm dd yy dd mm yy yy mm dd Then let go of the button 4 Press th...

Page 47: ...ry is on the ceiling of the battery compartment 2 Remove the back up battery cover Use a small Philips screwdriver As shown in the diagram loosen the screw to remove the cover Be careful not to lose t...

Page 48: ...ery make sure the battery level is sufficient 1 Install the DC Coupler or a battery and turn the 4 switch to 1 2 Select Sensor cleaning Select the b tab Hold down the X button and turn the 5 dial to s...

Page 49: ...tch to 2 Open the memory card slot cover Remove the battery The surface of the image sensor is extremely delicate Be very careful when cleaning the sensor Be sure not to turn off the camera while clea...

Page 50: ...Strap and Hand Strap Attaching the Neck Strap Attaching the Hand Strap optional 1 4 2 5 3 6 Attaching the Neck Strap After attaching the strap pull it at the buckle to take up the slack and to make su...

Page 51: ...51 Image Settings This chapter explains the settings for shooting digital images Image recording quality ISO speed white balance color space and Picture Style...

Page 52: ...Select the Image Size Image Size Guide Image Size Approx megapixels recorded Image Type Print Size 3 Large 3504 x 2336 8 2 JPEG A3 or larger 4 Medium1 3104 x 2072 6 4 A4 or larger 5 Medium2 2544 x 16...

Page 53: ...ge size number of possible shots and maximum burst during continuous shooting are based on Canon s testing criteria JPEG quality 8 Picture Style Standard ISO 100 etc The actual file size and number of...

Page 54: ...et the desired recording quality compression rate Hold down the X button and turn the 5 dial to select the desired JPEG quality compression rate Then let go of the button The larger the number the hig...

Page 55: ...crements 1 Hold down the E and Q buttons simultaneously X The current ISO speed will be displayed on the LCD panel 2 Turn the 6 dial While looking at the LCD panel or viewfinder turn the 6 dial until...

Page 56: ...5 dial to select the desired style Then let go of the button Standard The image looks vivid sharp and crisp Portrait For nice skin tones The image looks slightly sharp and crisp By changing the Color...

Page 57: ...ure Style The symbols on the upper right of the Picture Style selection screen refer to parameters such as Sharpness Contrast etc The numerals indicate the settings of parameters for each Picture Styl...

Page 58: ...n let go of the button 3 Select the parameter Hold down the X button and turn the 5 dial to select a parameter like Sharpness then let go of the button 4 Set the desired setting Hold down the X button...

Page 59: ...oning effect see page 60 3 Set the desired setting Hold down the X button and turn the 5 dial to set the desired setting then let go of the button Press the M button to save the setting The Picture St...

Page 60: ...card It can make the image look more impressive The following can be selected N None S Sepia B Blue P Purple G Green Filter Sample effects N None Normal black and white image with no filter effects Y...

Page 61: ...t User Def 1 2 3 Hold down the X button and turn the 5 dial to select User Def 1 2 3 then let go of the button 3 Select the base Picture Style Press the X button then let go of the button Hold down th...

Page 62: ...Style having any modified settings different from the default registered in the User Def 1 2 3 will be displayed in blue To shoot with the registered Picture Style follow step 2 for selecting User Def...

Page 63: ...ed for commercial printing and other industrial uses This setting is not recommended if you do not know about image processing Adobe RGB and Design rule for Camera File System 2 0 Exif 2 21 Since the...

Page 64: ...on the color temperature When the color temperature is high there is more blue And when the color temperature is low there is more red To the human eye a white object looks white regardless of the typ...

Page 65: ...ch to g then focus manually p 90 Set any white balance setting p 64 Shoot the white object so that a standard exposure is obtained If it is underexposed or overexposed a correct white balance setting...

Page 66: ...data will be imported 5 Select O Hold down the B button and turn the 5 dial to select O Then let go of the B button X The custom white balance will be set If an image was captured while the Picture St...

Page 67: ...f the button The color temperature can be set from 2800K to 10000K in 100K increments Setting the Color Temperature When setting the color temperature for an artificial light source set white balance...

Page 68: ...the u button 2 Hold down the B and turn the 6 or 5 dial The 6 dial adjusts blue B and amber A and the 5 dial adjusts magenta M and green G You can adjust both blue B amber A and magenta M green G To...

Page 69: ...utton and press the V button X The rear LCD panel will be as follows Hold down the V button You can let go of the B button 2 Hold down the V and turn the 6 or 5 dial Turn the 6 dial to set the blue B...

Page 70: ...amber correction is equivalent to 5 mireds of a color temperature conversion filter You can also set white balance correction and AEB shooting in addition to the white balance bracketing If you set AE...

Page 71: ...V button and turn the 5 dial to select n Hold down the X button and turn the 5 dial to select Create folder Then let go of the button X The Create folder screen will appear Hold down the X button and...

Page 72: ...er No 999 Creating Folders with a Personal Computer With the memory card open on the screen create a new folder named Dcim Open the Dcim folder and create as many folders as necessary to save and orga...

Page 73: ...he button The h and j icons indicate which card is to display the image for the image review immediately following image capture h will display the image saved in the CF card and j will display the im...

Page 74: ...W JPEG recording separate recording If RAW JPEG separate recording is set and the image size is not set to RAW JPEG it will be the same as Dual image recording When Dual image recording or RAW JPEG se...

Page 75: ...t go of the button 3 Enter four alphanumeric characters Hold down the r button and turn the 5 dial to move the cursor to the right of the character to be deleted Press the L button to delete the chara...

Page 76: ...let go of the button 2 Select the desired setting Hold down the X button and turn the 5 dial to select the desired setting Then let go of the button Each time you replace the memory card the file num...

Page 77: ...ges captured thereafter are saved in this new folder The file numbering method Auto reset or Continuous that was in effect before the manual reset will continue to take effect Continuous Manual Reset...

Page 78: ...Noise reduction is applied automatically on long exposures 1 sec or longer if noise typical to long exposures is detected This setting is effective in most cases On Noise reduction is applied automati...

Page 79: ...se has 45 AF points By selecting a suitable AF point you can shoot with autofocus while maintaining the desired subject framing You can also set the AF mode to suit the subject or obtain the desired e...

Page 80: ...ch achieves focus flashes briefly and the focus confirmation light o in the viewfinder lights at the same time The exposure is also set While you press the shutter button halfway the camera continues...

Page 81: ...ht o in the viewfinder will blink If this occurs in the One Shot AF mode the picture cannot be taken even if the shutter button is pressed fully Recompose the picture and try to focus again Or see Whe...

Page 82: ...AF point To select a horizontal AF point turn the 6 dial To select a vertical AF point turn the 5 dial If all the peripheral AF points light up automatic AF point selection will take effect When you...

Page 83: ...Manual selection limited to 9 AF points p 166 The center AF point and 8 peripheral AF points are selectable Selecting a horizontal AF point is the same as explained in steps 1 and 2 Selecting an AF p...

Page 84: ...the I button X The AF point will be registered During AF point registration and switching the LCD panel will display the following Registering and Switching the AF Point Registering an AF Point Automa...

Page 85: ...on to switch to the registered AF point p 168 3 Switch to the registered AF point only while pressing the P button p 168 When you release the P button the camera will return to the original AF point S...

Page 86: ...he selected AF point and AF point s achieving focus will light Expanding the activation area to 7 or 13 AF points automatically p 167 As shown below the AF point activation area expands automatically...

Page 87: ...following L series lenses whose maximum aperture is f 4 or larger the center AF point will be a cross type sensor with or without an Extender attached The remaining 44 AF points will only be horizonta...

Page 88: ...mm f 4 5L USM EF100 400mm f 4 5 5 6L IS USM With Extender EF2x or EF2x II EF300mm f 4L USM EF300mm f 4L IS USM EF400mm f 4 DO IS USM EF500mm f 4L IS USM EF600mm f 4L USM EF600mm f 4L IS USM EF70 200mm...

Page 89: ...ng near and far objects Example Animal in a cage etc e Repetitive patterns Example Skyscraper windows computer keyboards etc In such cases do one of the following 1 Focus an object at the same distanc...

Page 90: ...will flash and the focus confirmation light will light when focus is achieved During automatic AF point selection when the center AF point achieves focus it will flash and the focus confirmation light...

Page 91: ...card When the buffer memory becomes full shooting cannot continue until the buffer memory starts to empty to the memory card As the images are transferred you can continue shooting Press the shutter b...

Page 92: ...re the picture is taken Self timer Operation k 10 sec self timer l 2 sec self timer Do not stand in front of the camera when you press the shutter button to start the self timer Doing so will throw of...

Page 93: ...t the optimum metering mode drive mode and shooting mode d s f a to suit the particular subject Other easy to use features are also provided for diverse shooting First set the 4 switch to 1 If necessa...

Page 94: ...brightness background front and back lighting conditions and camera orientation horizontal or vertical the camera sets the proper exposure w Partial Metering Effective when the background is much bri...

Page 95: ...cene AF Point Linked Spot Metering To make AF point selection faster the selectable AF points can be limited to 11 C Fn 13 1 or 9 C Fn 13 3 The AF point manually selected among the 11 or 9 will be lin...

Page 96: ...ot metering point over the area where you want a relative exposure reading then press the I button X On the right of the viewfinder the relative exposure level will be displayed for the spot meter rea...

Page 97: ...ot meter reading will register The exposure setting obtained with multi spot meter readings will be canceled in the following cases 1 After taking the last spot meter reading 16 seconds elapse 2 You p...

Page 98: ...briefly and the focus confirmation light o in the viewfinder lights at the same time X The exposure setting will be displayed on the LCD panel and in the viewfinder 3 Check the display X The shutter...

Page 99: ...the AF points that achieve focus will light d stands for Program AE stands for Auto Exposure If the focus confirmation light o blinks the shutter will lock and a picture cannot be taken You can freel...

Page 100: ...ession of motion s stands for Time value 1 Select s on the LCD panel Hold down the W button and turn the 6 dial to select s Then let go of the button 2 Set the desired shutter speed Look at the top LC...

Page 101: ...r increase the ISO speed If the minimum aperture blinks it indicates overexposure Turn the 6 dial to set a faster shutter speed until the blinking stops Or decrease the ISO speed Shutter Speed Display...

Page 102: ...rger f number is used the foreground and background will be in focus The higher the f number the clearer the focus will be for both near and far subjects f stands for Aperture value 1 Select f on the...

Page 103: ...tes underexposure Turn the 6 dial to set a larger aperture smaller f number until the shutter speed stops blinking Or increase the ISO speed If the 8000 shutter speed blinks it indicates overexposure...

Page 104: ...utton and turn the 6 dial to select a Then let go of the button 2 Turn the 7 switch to 1 3 Turn the 6 dial to set the shutter speed and turn the 5 dial to set the aperture To set the aperture you can...

Page 105: ...105 a Manual Exposure 5 Set the exposure Check the exposure level and set the desired shutter speed and aperture value 6 Take the picture Exposure level indicator...

Page 106: ...exposure level indicator N is displayed on the LCD panel and the exposure compensation icon y and the exposure level indicator s are displayed in the viewfinder To cancel exposure compensation set th...

Page 107: ...6 The diagram on the left shows an AEB amount of 1 stop centering on the standard exposure level The AEB amount 1 0 the AEB range N and the h icon will be displayed 2 Take the picture X The viewfinde...

Page 108: ...ing is possible only within the settable shutter speed range 1 8000 30 sec aperture range and ISO speed range 100 1600 It is not possible with ISO 50 and 3200 even if the ISO speed extension is On If...

Page 109: ...he exposure then press the A button X The w icon will light in the viewfinder and the exposure setting will be locked AE lock Each time you press the A button it locks the current exposure setting 3 R...

Page 110: ...l to set the aperture 3 Take the picture Press the shutter button completely X The elapsed exposure time will be displayed on the LCD panel M sec N min O hour The U button on the upper right of the ca...

Page 111: ...irror Lockup Eyepiece Shutter In very bright light such as at the beach or ski area on a sunny day take the picture promptly after mirror lockup During mirror lockup do not point the camera lens at th...

Page 112: ...shutter speeds from 30 sec to 1 8000 sec FE Flash Exposure Lock Press the camera s I button to lock the flash exposure at the desired part of the subject This is the flash equivalent of AE lock Flash...

Page 113: ...ou can set the flash exposure manually With an EX series Speedlite having a manual flash mode follow the procedure below 1 Set the camera and Speedlite settings Set the camera s shooting mode to a or...

Page 114: ...ection The camera s PC terminal has no polarity so you can connect any sync cord regardless of its polarity Non Canon Flash Units If the camera is used with a flash unit with dedicated flash contacts...

Page 115: ...red with the camera You can even add a sound recording to an image For images taken with another camera The camera might not be able to properly display images captured with a different camera or edit...

Page 116: ...1 Select Review Select the z tab Hold down the X button and turn the 5 dial to select Review Then let go of the button 2 Select the desired setting Hold down the X button and turn the 5 dial to selec...

Page 117: ...the X button and turn the 5 dial to select Review time Then let go of the button 2 Select the desired setting Hold down the X button and turn the 5 dial to select the desired setting Then let go of th...

Page 118: ...ng Hold down the X button and turn the 5 dial to select On Then let go of the button 3 Take a vertical shot For the image review right after image capture the image will not be displayed vertically on...

Page 119: ...to select LCD Brightness Then let go of the button X The brightness adjustment screen will appear 2 Adjust the brightness While referring to the gray chart on the screen s left hold down the X button...

Page 120: ...ith the first image turn the dial clockwise Image Playback If you quit the image playback and return to image playback without doing any shooting the image playback will start with the image last disp...

Page 121: ...n the V button and turn the 5 dial X The image display format on the LCD monitor will change When the desired image display format appears let go of the button Changing the Image Display Format Shooti...

Page 122: ...the One Shot AF mode the AF point which achieved focus will be displayed If automatic AF point selection was used you may see multiple AF points which achieved focus If AI Servo AF was used the selec...

Page 123: ...istogram you can see the exposure level bias and the overall tone reproduction condition RGB Display This histogram is a graph showing the distribution of the image s brightness level of each primary...

Page 124: ...display press the V button In step 2 you can start the magnified view at the center of the image or at a AF point Set Enlarge display set Under the x tab set Enlarge display set Enlarge from image ce...

Page 125: ...ate the image X Each time you press and let go of the X button the image will rotate clockwise To stop rotating the image press the M button The menu will reappear 3 Rotating an Image With Enlarge fro...

Page 126: ...IN 3 Turn the camera s 4 switch to 1 4 Press the V button X The image will appear on the TV screen Nothing will be displayed on the camera s LCD monitor After you finish set the 4 switch to 2 turn th...

Page 127: ...image protection and sound recording p 129 if you press the button too long 2 sec sound recording will start instead and image protection will not be set To apply image protection press the H button a...

Page 128: ...images Then let go of the button 2 Select the desired protection setting Hold down the X button and turn the 5 dial to select the desired setting Then let go of the button X A confirmation dialog wil...

Page 129: ...e sound recording is 30 sec To end the sound recording let go of the button X Images having a sound recording will have the j icon displayed KSound Recording for an Image microphone Sound recording is...

Page 130: ...ages from being erased accidentally protect it 1 Display the image to be erased 2 Press the L button The Erase menu will appear at the bottom of the screen To exit the erase menu press the L button ag...

Page 131: ...ay 3 Press the L button The Erase menu will appear at the bottom of the screen 4 On the Erase menu select ALL X Hold down the L button and turn the 5 dial to select ALL Then let go of the button X The...

Page 132: ...on dialog will appear 2 Erase the images Hold down the X button and turn the 5 dial to select OK Then let go of the button X All unprotected images on the memory card will be erased After the images a...

Page 133: ...s the SD card Hold down the X button and turn the 5 dial to select the card Then let go of the button X A confirmation dialog will appear 3 Select OK If Card2 for the SD card is selected low level for...

Page 134: ...ut Low level Formatting The memory card s capacity displayed on the Format screen may be lower than the capacity indicated on the card Handling Card Err If Card Err is displayed on the LCD panel it in...

Page 135: ...Direct Compatible with Bubble Jet Direct only Compatible with PictBridge Compatible with PictBridge wPictBridge or ACP Direct SBubble Jet Direct wPictBridge Canon CP printer Canon PIXMA DS BJ printer...

Page 136: ...nter Refer to the table Printers and Cables below to select the proper cable to connect the camera to printer To connect to the printer refer to the printer s instruction manual Preparing to Print Pri...

Page 137: ...he image and the printer icon w A or S indicating a printer connection will be displayed The procedure will be different depending on the icon displayed See the applicable pages below SBubble Jet Dire...

Page 138: ...r See Error Messages on page 142 Before disconnecting the cable turn off the camera and printer Pull out the cable while holding the plug not the cord When connecting the camera to the printer do not...

Page 139: ...per Settings X The Paper Settings screen will appear wPrinting with PictBridge Printer connected icon Print setting screen Depending on the type of printer the date and file number imprinting trimming...

Page 140: ...Paper Type If you are using a Canon PIXMA DS BJ printer with Canon paper set the respective paper type as follows If you are using a non Canon printer refer to the printer s instruction manual Select...

Page 141: ...rimming see page 149 Borderless The print will have no white borders If your printer cannot print borderless prints the print will have borders Bordered The print will have a white border along the ed...

Page 142: ...not resume operate the printer to resume printing For details see the printer s instruction manual Error Messages If a problem occurs during printing an error message will appear on the camera s LCD...

Page 143: ...ill appear 3 Select Style X The Style screen will appear APrinting with CP Direct Printer connected icon Print setting screen Trimming frame Appears when you want to trim the image Sets the quantity t...

Page 144: ...ultiple 8 small images of the same picture will be printed on the paper Check the Borders and Date settings and set them if necessary When you are done press the 7 to return to the print setting scree...

Page 145: ...The image will also be cut off along all four edges If Date is On the date recorded for the image will appear on the print The date will appear on the lower right of the image If you select Stop while...

Page 146: ...appear 3 Select Style X The Style screen will appear SPrinting with Bubble Jet Direct Printer connected icon Print setting screen Trimming frame Appears when you want to trim the image Sets the quanti...

Page 147: ...n the printer Check the Borders and Date settings and set them if necessary When you are done press the M to return to the print setting screen 5 Set the number of copies Set as necessary Set a number...

Page 148: ...the lower right of the image If you select Stop during the printing the picture being printed will stop printing and the paper will be discharged If a problem occurs during printing an error message...

Page 149: ...The image area within the trimming frame will be printed The operation guide disappears while you trim the image It will reappear after 5 sec of idle time Changing the trimming frame size and moving...

Page 150: ...a might not be printed as you specified The smaller you make the trimming frame the grainier the picture will look If the picture will be too grainy the trimming frame will turn red When trimming the...

Page 151: ...print ordering instructions to the memory card It is for images taken with a digital camera and you can specify which photos and the quantity to print With a DPOF compatible digital camera you can do...

Page 152: ...cannot be set individually for each image The print settings are set in the same way as with menu settings 1 Select Print Order X The Print Order screen will appear 2 Select Set up X The Set up scree...

Page 153: ...r type With Index prints both the Date and File No cannot be set to On at the same time When printing with DPOF you must use the memory card whose Print Order specifications have been set It will not...

Page 154: ...print settings The print order will vary depending on the Print Type p 152 setting You can set the quantity for each image for standard type prints If you want to include the image in the index print...

Page 155: ...or each image Note that after following the Selecting Individual Images procedure if you do the Selecting All Images procedure the print order will change to All images 1 Select All X The All screen w...

Page 156: ...ll be saved to the memory card and the menu will reappear Note that RAW images cannot be selected for printing even when you set Mark all When using a PictBridge printer print no more than 400 images...

Page 157: ...tep 5 2 Select Print Order X The Print Order screen will appear 3 Select Print Print will be displayed only if the camera is connected to the printer and printing is possible X The print setting scree...

Page 158: ...size 42 images 10 x 14 8 cm size 63 images As for the number of index images with Bubble Jet Direct see the BJ printer s instruction manual If you stopped the printing and want to continue printing th...

Page 159: ...159 Customizing the Camera Custom Functions enable you to customize various camera features to suit your picture taking preferences...

Page 160: ...select the desired setting Then let go of the button 3 Exit the menu Press the M button X The Custom Personal Function menu will reappear X The respective Custom Function setting number will be displ...

Page 161: ...utofocus and press the shutter button halfway to attain AE lock 2 AF AF lock no AE lock In the AI Servo AF mode you can press the w button to stop the AF operation momentarily This prevents the AF fro...

Page 162: ...even while the lens is detached from the camera Convenient especially if you want to use a super telephoto lens with more than one EOS 1D Mark II N camera body 3 Tv 5 Av 6 w o lens You set the shutte...

Page 163: ...1 ISO Remain shots Displays the ISO speed at all times The number of remaining shots on the rear LCD panel is displayed with more digits 2 ISO File No Displays the ISO speed instead of the number of...

Page 164: ...ted 2 0 Auto cancellation Starts the bracketing sequence with the minus or bluish or magenta bias setting 3 0 No cancellation Repeats the bracketing sequence starting with the minus or bluish or magen...

Page 165: ...left extreme right top most and bottom most AF points During autofocusing you can press the S button to switch instantly to the automatic AF point selection mode You can also select the AF point inclu...

Page 166: ...C Fn 14 E TTL II 0 Evaluative Fully automatic flash photography for all conditions from low light to daylight fill flash 1 Average The flash exposure will be averaged over the Area AF ellipse Since a...

Page 167: ...omes unsuitable the shutter speed or aperture is shifted to obtain a suitable exposure automatically C Fn 17 AF point activation area 0 Single AF point 1 Expand TTL of 7 AF points The AF point activat...

Page 168: ...tantly switches to automatic AF point selection among 45 AF points from manual AF point selection only while you hold it down Convenient when you are no longer able to focus track a moving subject wit...

Page 169: ...AI SERVO 0 Disable 1 Enable Shooting is possible even while focus has not been achieved Even though the focus is not quite sharp at least you will have a picture C Fn 00 Focusing Screen 0 k Ec N R For...

Page 170: ...Fn 00 Hold down the X button and turn the 5 dial to select P Fn 00 Then let go of the button 3 Select Regist or Apply Hold down the X button and turn the 5 dial to select Regist or Apply Then let go...

Page 171: ...o increased exposure standard exposure and decreased exposure 10 Retains the shift amount for program shift 14 Disables focus detection search driving by the lens drive 15 Disables the AF assist beam...

Page 172: ...to select Personal Function number Then let go of the button 3 Clear or reset the setting Hold down the X and turn the 5 dial To cancel the setting select OFF To reset select ON Then let go of the X b...

Page 173: ...5 dial to select Save camera settings Then let go of the button 2 Save the camera settings Hold down the X button and turn the 5 dial to select OK Then let go of the X button X The camera settings wi...

Page 174: ...he X button and turn the 5 dial to select Loading camera settings Then let go of the button 3 Read the camera settings Hold down the X button and turn the 5 dial to select OK Then let go of the X butt...

Page 175: ...175 Reference This section will help you understand your camera better It covers information on camera features system accessories and other reference information...

Page 176: ...set the 4 switch to 2 right after shooting the access lamp will still light or blink for a few seconds while the image is recorded onto the memory card X When the camera finishes recording the image...

Page 177: ...exhausted X Recharge the battery p 22 You did not focus well The focus confirmation light in the viewfinder blinks X Press the shutter button halfway again and focus the subject If you still cannot f...

Page 178: ...d press the shutter button gently p 34 43 The data in the memory card is damaged X Format the memory card p 133 X Use the proper memory card p 3 The image is erase protected X Cancel the protection p...

Page 179: ...or Error Codes Error Code Countermeasures Err 01 Communications between the camera and lens is faulty Clean the lens contacts p 11 Err 02 There is a problem with the memory card Try any of the followi...

Page 180: ...ng Screen Focusing Screen Type Designation C Fn 00 Setting k New Laser matte Ec N Ec R 0 l Laser matte Ec series A B C CII CIII D H I L 1 p Super precision matte Ec S 2 C Fn 00 cannot be registered in...

Page 181: ...ns Ec A Standard microprism Ec H Laser matte with scale Ec B New split screen Ec I Laser matte with cross hair Ec CII All Laser matte Ec L Cross split screen Ec CIII Laser matte Ec N New Laser matte E...

Page 182: ...100 240 V AC Shoe mount Speedlites Flash photography with an EX series Speedlite is as easy as normal auto exposure shooting without flash All EX series Speedlites enable E TTL II autoflash high speed...

Page 183: ...elease count setting The timer can be set anywhere from 1 sec to 99 hours 59 min 59 sec in 1 sec increments The connection plug for the camera has a quick lock feature Wireless Controller LC 5 Wireles...

Page 184: ...Fog Eyepiece Ec Rubber Frame Ec E series Dioptric Adjustment Lenses Angle Finder C Wide Strap L5 Hand Strap E1 Focusing Screen Ec Ni MH Pack NP E3 Ni MH Charger NC E2 DC Coupler Kit DCK E1 CR2025 lith...

Page 185: ...WFT E1A Wireless LAN access point IEEE1394 port Wireless LAN adapter Ethernet port PC card slot USB port Canon EF lenses Timer Remote Controller TC 80N3 Remote Switch RS 80N3 Wireless Controller LC 5...

Page 186: ...simultaneous recording Provided File size 1 L Large Approx 3 2 MB 3504 x 2336 pixels 2 M1 Medium1 Approx 2 6 MB 3104 x 2072 pixels 3 M2 Medium2 Approx 1 9 MB 2544 x 1696 pixels 4 S Small Approx 1 1 M...

Page 187: ...ly and horizontally with respect to the effective pixels Magnification 0 72x 1 diopter with 50mm lens at infinity Eyepoint 20 mm Built in dioptric adjustment 3 0 1 0 diopter Focusing screen Interchang...

Page 188: ...Multi spot metering Max 8 spot metering entries 4 Center weighted averaged metering Metering range EV 0 20 at 20 C 68 F with EF50mm f 1 4 lens ISO 100 Exposure control Program AE shiftable shutter pri...

Page 189: ...x 22 shots LCD Monitor Type TFT color liquid crystal monitor Monitor size 2 5 inch Pixels Approx 230 000 Coverage 100 with respect to the effective pixels Brightness adjustment Five levels provided In...

Page 190: ...amera setting saving reading Possible Power Source Battery One Ni MH Pack NP E3 AC power can be supplied via the AC adapter and DC coupler Startup time Approx 0 2 sec Battery life At 20 C 68 F Approx...

Page 191: ...ions W x H x D 82 x 49 x 167 mm 3 2 x 1 9 x 6 6 in Weight 380 g 13 4 oz excluding power cord DC Coupler Kit DCK E1 DC Coupler Compatible camera EOS 1D series camera Rated input 13 V DC Rated output 13...

Page 192: ...cause harmful interference to radio communications However there is no guarantee that interference will not occur in a particular installation If this equipment does cause harmful interference to radi...

Page 193: ...l Functions 172 Color saturation 58 Color space 63 Color temperature 67 Color tone 58 Compression rate 54 Continuous numbering 77 Continuous shooting 91 Contrast 58 CP Direct 143 Custom Function group...

Page 194: ...3 ISO speed 55 ISO speed extension 55 J JPEG 52 54 JPEG Quality 54 L Landscape 56 Language 44 LCD monitor 11 42 LCD panel 11 17 18 LCD panel illumination 110 Lens 11 29 Low level formatting 134 M M Ma...

Page 195: ...92 Sensor cleaning 48 Set up menu 38 41 Sharpness 58 Shooting information 122 Shooting menu 38 40 Shooting mode 17 Shots remaining 26 53 Shutter button 34 Shutter curtain synchronization 167 Shutter...

Page 196: ...ese Milano Italy CANON Schweiz AG Gesch ftsbereich Wiederverkauf Industriestrasse 12 CH 8305 Dietlikon Switzerland CANON G m b H Oberlaaerstrasse 233 4th floor 1100 Wien Austria CANON Espa a S A C Joa...

Reviews: