background image

84

Using Menus

Use the menus to set the operation of the projector in detail.

Menu Configuration

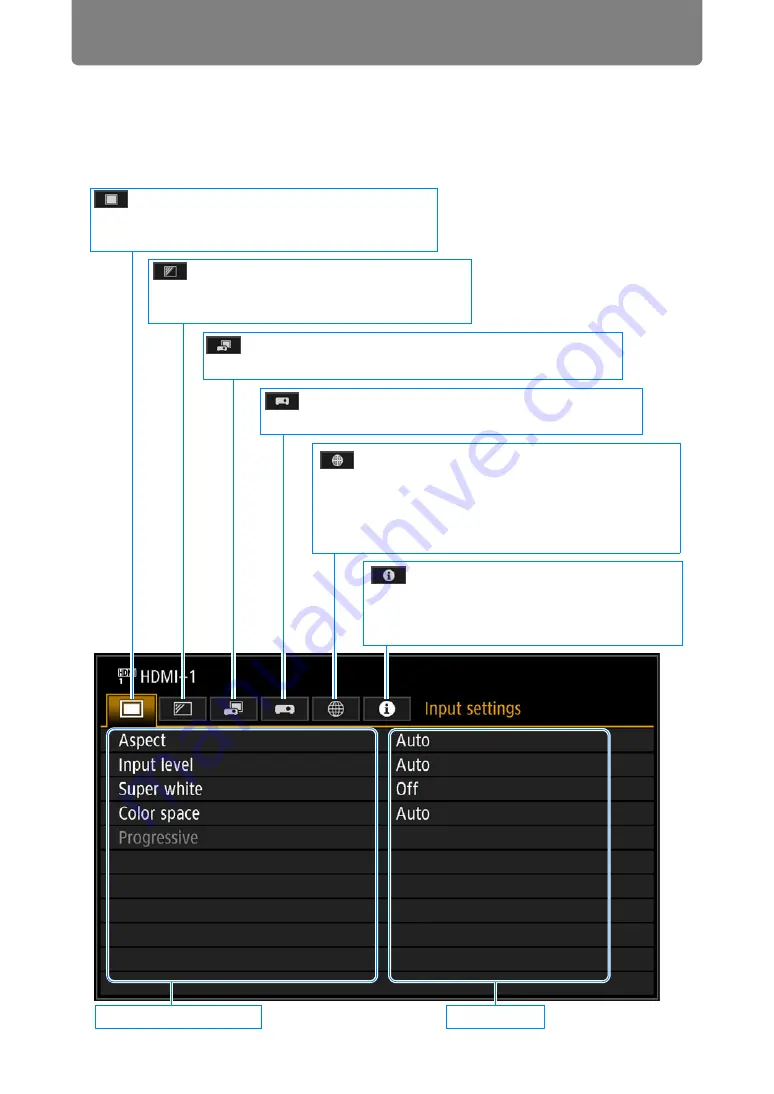
The menu screen is divided into 6 tabs as shown below.

Contents of menu

Menu items

[Information] tab (

P148

)

You can check information about the 
signal types of the images projected and 
other information.

[System settings] tab (

P108

)

You can set the operation of the projector.

[Image adjustment] tab (

P90

)

You can adjust the image quality and colors 
according to your preference.

[Network settings] tab (

P123

)

These settings are for when using the projector 
from a PC via a network.
For the network settings, refer to “Network 
settings” (

P122

).

[Install settings] tab (

P97

)

This setting is used when installing the projector.

[Input settings] tab (

P87

)

You can set the type of signal or the method of 
projection of the images input.

Summary of Contents for 4K500ST

Page 1: ...allation Procedure Connection Procedure Projection Procedure Convenient Features Advanced Guide Using Menus Menu Settings Advanced Projection Other Information Maintenance Product Specifications Troubleshooting ENG MULTIMEDIA PROJECTOR User s Manual ...

Page 2: ...ars when the projector is turned on for the first time You can select a language to be used by the projector for displaying menus and messages in the window Select the desired language with the pointer buttons and press the OK button You can change the language from the menu at a later time P116 If the language selection screen is out of focus adjust the focus P67 Remote control Projector An item ...

Page 3: ... 60 Step 2 Select an Input Signal 63 Step 3 Adjust the Image 65 Step 4 Select an Aspect Ratio Screen Aspect Matching the Screen 72 Step 5 Adjusting Keystone Distortion 73 Step 6 Select the Image Quality Image Mode 76 Step 7 Turn the Projector Off 79 Convenient Features 80 Advanced Guide 83 Using Menus 84 Menu Configuration 84 Basic Menu Operations 85 Menu Settings 87 Input settings 87 Image adjust...

Page 4: ...ple sources of input in 4K with two terminals for HDMI and four for DVI input A single HDMI terminal can be used for 3840 x 2160 30 Hz video signals P55 Peripheral Focus Adjustment Image focus can be adjusted on the edges of the screen enabling use in dome projection P102 P157 Edge Blending Blend the overlapping edges of images from multiple projectors to make the overall image more seamless P103 ...

Page 5: ...and try the solutions in the Troubleshooting section in the back of this manual If the problem still persists contact the Canon Customer Support Center CAUTION TO REDUCE THE RISK OF ELECTRIC SHOCK DO NOT REMOVE COVER OR BACK NO USER SERVICEABLE PARTS INSIDE EXCEPT LAMP REPLACEMENT REFER SERVICING TO QUALIFIED SERVICE PERSONNEL THIS SYMBOL INDICATES THAT DANGEROUS VOLTAGE CONSTITUTING A RISK OF ELE...

Page 6: ...istances must be maintained Do not cover the ventilation slots on the projector Heat build up can reduce the service life of your projector and can also be dangerous If the projector is unused for an extended time unplug the projector from the power outlet Do not project the same image for a long time An afterimage may remain on the LCD panels due to the characteristics of the panels of the projec...

Page 7: ...ojector on an unstable cart stand or table The projector may fall causing serious injury to a child or adult and serious damage to the projector Use only with a cart or stand recommended by the manufacturer or sold with the projector Wall or shelf mounting should be carried out in accordance with the manufacturer s directions and should use a mounting kit approved by the manufacturers An appliance...

Page 8: ... the wall outlet and refer servicing to qualified service personnel under the following conditions a When the power cord or plug is damaged or frayed b If liquid has been spilled into the projector c If the projector has been exposed to rain or water d If the projector does not operate normally after following the operating instructions Adjust only those controls that are covered in the operating ...

Page 9: ...to be disposed of with your household waste according to the WEEE Directive 2012 19 EU the Battery Directive 2006 66 EC and or national legislation implementing those Directives If a chemical symbol is printed beneath the symbol shown above in accordance with the Battery Directive this indicates that a heavy metal Hg Mercury Cd Cadmium Pb Lead is present in this battery or accumulator at a concent...

Page 10: ...ul interference to radio communications Operation of this equipment in a residential area is likely to cause harmful interference in which case the user will be required to correct the interference at his own expense The cable with a ferrite core provided with the projector must be used with this equipment in order to comply with Class A of the FCC Rules Use of a shielded cable is required to comp...

Page 11: ...y these symbols Safety Symbols in this Manual Denotes the risk of death or serious injury from improper handling if the information is not observed To ensure safe use always observe this information Denotes the risk of injury from improper handling if the information is not observed To ensure safe use always observe this information Denotes prohibited actions Denotes required actions or informatio...

Page 12: ... If the projector is knocked over or dropped and the cabinet is damaged Pay attention to the following points for handling the power cord Failure to do so may cause a fire electric shock or personal injury Do not place any objects on the power cord and do not allow it to become trapped under the projector Do not cover the power cord with a carpet Do not modify or excessively bend twist pull wind o...

Page 13: ...use a damaged power plug or an outlet that is loose When using an extension cord do not exceed the cord s rated capacity Periodically inspect the power plug and outlet and remove any dust or dirt from between the plug and the outlet Installation and Handling Precautions Pay attention to the following points regarding installation and handling of the projector Failure to do so may cause a fire elec...

Page 14: ... the lamp inside the projector is high it could ignite causing a fire As strong light beams are emitted while the projector is in use do not look directly into the projector lens Doing so could cause an eye injury Pay particular attention to prevent small children from doing so When setting the projector on a high surface for projection be sure the surface is flat and stable For ceiling mounting p...

Page 15: ...e of the lamp cover not directly under it If the lamp ruptures dust and gas containing mercury vapor may come out of the exhaust vents If this happens immediately open the windows and doors to provide ventilation to the room If you accidentally inhale gas from the lamp or get any pieces in your eyes or mouth consult a doctor immediately Precautions for the Batteries of the Remote Control Pay atten...

Page 16: ...unters or humidifiers Doing so may cause fire or electric shock Do not place any heavy objects on top of the projector or sit stand on it Pay particular attention to prevent small children from doing so The projector may be knocked over and this could result in damage or a personal injury Do not place the projector on an unstable or slanted surface Doing so may cause the projector to fall or be kn...

Page 17: ...ow Doing so may cause a malfunction For guidelines on operating temperatures see Product Specifications Do not place any objects on top of the projector that may change shape or color due to heat Projector settings must be adjusted when using the projector at high altitudes or in upward or downward projection Failure to adjust the settings may shorten the lamp life or damage the lamp For details c...

Page 18: ...temperature and humidity are as follows Prepare the projector as described below before carrying it Disconnect the cables connected to the projector Carrying the projector with the cables attached may cause an accident Retract the adjustable feet before moving the projector Leaving the feet extended may cause damage Do not carry or move the projector alone Have at least one assistant Do not strike...

Page 19: ...age to become blurred Wait until the condensation has evaporated for the image projected to return to normal At Altitudes above 2 300 m 7 545 8 Adjust the Settings Projector settings must be adjusted when using the projector at altitudes of 2 300 m 7 545 8 or higher Specifically refer to instructions for High altitude P102 in the Install settings menu If the air intake or exhaust vent is blocked h...

Page 20: ...on it is necessary to periodically clean the air intake and exhaust vents and the area around the air filter Dust that accumulates in intake or exhaust vents may impair ventilation raising the temperature inside and posing a risk of damage or fire Use a vacuum cleaner or similar means to remove dust from the intake vent and exhaust vent ...

Page 21: ... projection by yourself Always request installation by a qualified technician or the Canon Customer Support Center 1 No optional accessories are available for installing the projector in ways other than ceiling installation P37 P188 2 Failure to do so may damage the lamp Upward projection Inclination of the projector should be no more than 10 from the vertical axis 2 Downward projection Inclinatio...

Page 22: ...ronment Assign a private IP address Use behind a firewall Change passwords regularly About Trademarks Ethernet is a registered trademark of Xerox Corporation Microsoft Windows Windows Vista Windows 7 Windows 8 and Windows 8 1 are registered trademarks or trademarks of Microsoft Corporation in the United States and or other countries Mac Mac OS and Macintosh are trademarks of Apple Inc registered i...

Page 23: ...TIES PROVIDE THE PROGRAM AS IS WITHOUT WARRANTY OF ANY KIND EITHER EXPRESSED OR IMPLIED INCLUDING BUT NOT LIMITED TO THE IMPLIED WARRANTIES OF MERCHANTABILITY AND FITNESS FOR A PARTICULAR PURPOSE THE ENTIRE RISK AS TO THE QUALITY AND PERFORMANCE OF THE PROGRAM IS WITH YOU SHOULD THE PROGRAM PROVE DEFECTIVE YOU ASSUME THE COST OF ALL NECESSARY SERVICING REPAIR OR CORRECTION IN NO EVENT UNLESS REQUI...

Page 24: ...trol Batteries for the remote control AA size x2 part No RS RC05 Optional remote controls are also available RS RC04 However some buttons are not supported with this projector The RS RC05 can also be used as a wired remote P33 Power cord 1 8 m 5 9 For Continental Europe User s Manual CD ROM For the U S A and Canada Warranty Card Important Information Lens cap ...

Page 25: ...connector P59 Anti theft lock hole An anti theft wire cable not included can be connected Side control P26 Do not block the air intake Doing so may cause a malfunction Lamp cover P165 Exhaust vent Infrared remote receiver P33 Do not block the air exhaust Doing so may cause a malfunction Security bar A wire or cable can be attached to deter theft Do not block the air intake Doing so may cause a mal...

Page 26: ...ter the focus adjustment window the marginal focus adjustment window is also displayed for adjusting focus of image edges P157 depending on the Marginal focus setting P102 4 KEYSTONE button P73 Corrects keystone distortion 5 Pointer VOL buttons P85 Up down left or right in menu navigation or other operations Adjust the sound volume VOL button Decreases the volume VOL button Increases the volume 6 ...

Page 27: ...es under normal conditions when the power is on STAND BY red Lights up or flashes during standby or when the projector is shutting down WARNING red Lights up or flashes when an error occurs LAMP orange Lights up or flashes when a problem occurs with the lamp or lamp cover TEMP red Lights up or flashes when the internal temperature is high ...

Page 28: ... on Projecting In power management mode with the lamp off The time for replacing the lamp is near In standby mode The time for replacing the lamp is near During projection Internal temperature is high In standby mode Internal temperature is high During projection A lamp error has occurred A temperature error has occurred The lamp cover is open An air filter error has occurred flashes 3 times A fan...

Page 29: ...d pair Used to connect the projector to a network 5 USB port P119 Connects a USB flash drive Used for firmware updates 6 AUDIO IN terminal AUDIO IN P53 P54 Receives audio input Audio supplied to this terminal is played through the internal speaker when you select Audio in as the source audio terminal for the selected source video 7 AUDIO OUT terminal AUDIO OUT P53 P54 Outputs the audio to external...

Page 30: ... buttons Decrease the image size 6 FOCUS button P67 Adjusts focusing buttons Moves the focus position further away buttons Moves the focus position nearer By pressing the FOCUS button twice you can also adjust the focus at image edges P157 depending on the Marginal focus setting P102 7 TEST PATTERN button P107 Displays the test pattern 8 D ZOOM button Not used with this product 9 Ch button P113 Ch...

Page 31: ...one distortion The Keystone setting enables both horizontal vertical keystone correction by adjusting top bottom left right length and corner correction 18 VOL button Adjusts the sound volume button 3 button Increases the volume button 6 button Decreases the volume 19 MUTE button Mutes the sound 20 Numerical buttons P118 P124 P126 Enter password and TCP IP setting values 21 Fn button Not used with...

Page 32: ...e batteries that are included with the remote control Remove the batteries when they are flat or when the remote control will not be used for a long period of time When replacing the batteries replace both at the same time Also do not use two batteries of a different type at the same time Insert the batteries with the and terminals in the correct directions If any liquid from inside the batteries ...

Page 33: ... control may be inoperative if there is an obstacle between the remote control and the projector or the infrared remote receiver on the projector is exposed to direct sunlight or strong light of lighting equipment When you use 2 or more projectors at the same time you can change the channel settings to prevent the 2 remote controls from interfering with each other P113 Infrared operations cannot b...

Page 34: ...34 ...

Page 35: ...asic Guide Installation Procedure Connection Procedure Projection Procedure Convenient Features Advanced Guide Using Menus Menu Settings Advanced Projection Other Information Maintenance Product Specifications Troubleshooting Basic Guide ...

Page 36: ...oor use the lens shift function P51 P70 to adjust up down left right For information about the relationship between screen size and projection distance refer to page 50 To avoid keystone distortion install the projector so that it is at right angles to the screen The screen must not be exposed to direct sunlight or light from lighting equipment In a bright room it is recommended that lights be tur...

Page 37: ... feet facing down Ceiling Mounting or Rear Projection You can mount the projector on the ceiling ceiling mounting or place it behind the screen rear projection if you use a translucent screen Remove the caps on top of the projector before installing a ceiling attachment When mounting the projector on the ceiling it is more convenient to install the projector right side up with the adjustable feet ...

Page 38: ...tor Never use a damaged plug or loosen outlet Make sure to tighten screws for the ceiling attachment securely and never loosen or remove them Never look into a lens when adjusting the projection because a high intensity light is projected from the projector It may result in eye damage During projection never put an object in front of the projector s lens Make sure the followings when you install a...

Page 39: ... be separated from the Joint fitting before installation Ceiling mount bracket and Joint fitting Base bracket Joint fitting Template sheet for a ceiling mount hole 2 shts M6 screw 25 mm 1 0 4 pcs M4 screw 15 mm 0 6 10 pcs Anti fall wires 2 pcs Washer Toothed Lock Washer 1 pc Use the template sheet B for the projector M5 screw 12 mm 0 5 with washer 4 pcs Assembly Installation Manual this manual 1 ...

Page 40: ...stable between 55 cm 1 9 and 95 cm 3 1 in steps of 5 cm 0 2 Before mounting the Ceiling Attachment be sure to check the strength of the ceiling The ceiling should be strong enough to support the projector and Ceiling Attachment and optional extension pipe If the ceiling is not strong enough be sure to reinforce it The projector may fall and you may get injured Make sure to perform the installation...

Page 41: ...s used 22 9 cm 9 0 57 9 cm 22 8 to 77 9 cm 30 7 77 9 cm 30 7 to 117 9 cm 46 4 Height Side view Projection Distance Front view 236 mm 9 3 298 mm 11 7 534 mm 21 0 230 mm 9 1 263 mm 10 4 227 mm 8 9 Top view 113 mm 4 4 230 mm 9 1 235 mm 9 3 235 mm 9 3 113 mm 4 4 470 mm 18 5 279 mm 11 0 236 mm 9 3 100 mm 3 9 100 mm 3 9 100 mm 3 9 100 mm 3 9 100 mm 3 9 80 mm 3 1 80 mm 3 1 80 mm 3 1 80 mm 3 1 ...

Page 42: ...les through 2 Secure the Ceiling mount bracket to the ceiling Use four M13 screws to secure the Ceiling mount bracket to the ceiling with the arrow facing toward the screen Before securing the Ceiling mount bracket be sure to remove the template sheet B The M13 screws are not included in the supplied parts Prepare the M13 screws suitable for the ceiling structure Always use the included template s...

Page 43: ...erminal clamp with the attached M4 screw at A on the Base bracket Make sure to fasten and tighten the screw securely 5 Pull cables out of the cable hole in the ceiling As depicted in the diagram let cables pass through the hole on ceiling mount clamp If cables are too thick make a hole at a different position than the hole on the ceiling mount clamp and let them pass through the new hole 6 Attach ...

Page 44: ...on A of the Joint fitting and secure it temporarily using the four supplied M5 screws B Pull out the cables Be sure to secure screws B tightly after making the adjustment discussed in Adjust the Projection Angle P48 8 Connect cables Connect cables to the projector After completion of installation adjust the projection angle P48 A B B ...

Page 45: ...he extension pipe is stretched to its maximum length insert the screws in two adjacent screw holes Extended length when extension pipe is attached when lens shift is 0 1 Separate the Joint fitting from the Ceiling mount bracket temporarily Preparation on page 42 2 Make a hole in the ceiling Step 1 on page 42 3 Secure the Ceiling mount bracket to the ceiling Step 2 on page 42 4 Attach the Base brac...

Page 46: ...the four supplied M5 screws The open end of the pipe should face the open end of the Ceiling mount bracket as shown 7 Attach the Joint fitting to the bottom of the extension pipe Use the four M5 screws removed from the Ceiling mount bracket during preparation Direction to the screen Direction to the screen Direction to the screen ...

Page 47: ...ghtly after making the adjustment discussed in Adjust the Projection Angle P48 9 Put the cables in to the pipe and attach the covers Thread any cables that are too thick for the ceiling mount bracket hole through a separate hole you have opened 1 Pull the cables out of the cable hole in the ceiling 2 Put the cables inside the pipe 3 Close the inner cover of the pipe and then close outer cover of t...

Page 48: ...ction angle 1 First loosen four screws B and then loosen two wing screws C Move the projector vertically to adjust the vertical projection angle 2 When the projector is correctly positioned first tighten the wing screws C and next tighten the four screws B After completion of adjustment tighten the screws and check that every fitting is secured firmly Be sure to hold the projector from falling unt...

Page 49: ...tured In this case never attempt to replace the lamp by yourself Always request service from the Canon Customer Support Center With ceiling mounted projectors the lamp may fall out when you open the lamp cover or during replacement During replacement stand to the side of the lamp cover not directly under it If the lamp ruptures dust and gas containing mercury vapor may come out of the exhaust vent...

Page 50: ...4 307 120 9 180 70 9 3 1 10 2 4 1 13 5 160 359 141 3 190 74 8 351 138 2 205 80 7 3 6 11 8 4 7 15 4 180 404 159 1 213 83 9 394 155 1 231 90 9 4 0 13 1 5 3 17 4 200 449 176 8 237 93 3 438 172 4 257 101 2 4 5 14 7 5 8 19 0 220 494 194 5 261 102 8 482 189 8 282 111 0 4 9 16 1 6 4 21 0 240 539 212 2 284 111 8 526 207 1 308 121 3 5 4 17 7 7 0 23 0 260 584 229 9 308 121 3 570 224 4 334 131 5 5 9 19 4 7 6...

Page 51: ... ranges for the projector are as follows The lens can be shifted up or down and to the left or right Performance using lens shift is ensured within the recommended range described below However peripheral dimness or blurriness may occur in the corners outside the last 10 of the horizontal lens shift range and outside the last 15 of the vertical lens shift range In this case adjust lens shift to wi...

Page 52: ...3 260 200 78 7 57 22 4 185 72 4 58 22 8 280 216 85 0 61 24 0 199 78 3 63 24 8 300 231 90 9 66 26 0 213 83 9 67 26 4 350 269 105 9 77 30 3 249 98 0 79 31 1 400 308 121 3 88 34 7 284 111 8 90 35 4 450 347 136 6 99 39 0 320 126 0 101 39 8 500 385 151 6 110 43 3 355 139 8 112 44 1 550 424 166 9 121 47 6 391 153 9 124 48 8 600 462 181 9 132 52 0 427 168 1 135 53 1 A values are the approximate vertical ...

Page 53: ...nnecting multiple sources of input for 4K projection refer to Multi Input 4K Projection P55 Amplified speakers Mini jack RCA terminal Audio cable not included AUDIO OUT terminal DVI D terminal AUDIO IN terminal DVI D cable not included AUDIOoutput terminal Monitor output terminal DVI D terminal Computer HDMI terminal HDMI cable not included HDMI terminal Audio cable not included Audio cable not in...

Page 54: ...Procedure 54 Connecting AV Equipment Amplified speakers Mini jack RCA terminal Audio cable not included HDMI terminal AUDIO OUT terminal AV equipment HDMI cable not included HDMI terminal Audio cable not included ...

Page 55: ...clock Projecting resolutions with a dot clock higher than 165 MHz requires a dual link plug and cable The following resolutions are supported 1920 x 1200 single link vertical frequency 60 Hz 2560 x 1600 dual link vertical frequency 60 Hz 4096 x 2160 dual link vertical frequency 24 Hz However most current computers are limited to a maximum DVI D output resolution of 2560 x 1600 For HDMI 1 4 the fol...

Page 56: ...use up to four DVI cables and two HDMI cables Refer to the following figure You cannot project on two or four screens when the projector is connected to multiple computers or pieces of AV equipment Connect up to four dual link DVI D cables Connect workstations by using four dual link DVI cables Connect up to two HDMI cables Connect desktop computers by using two HDMI cables Connect up to one HDMI ...

Page 57: ...ype of image including resolution supplied to the terminals Use Normal for most signals For specific signals use Single 1x2 2x2 or 1x4 as needed For details check the table of supported signals P169 Normal setting Supports many typical images including Single 1x2 2x2 and 1x4 Single setting Supports many specialized signals from a single piece of connected equipment 1x2 setting Supports many specia...

Page 58: ...en this setting is set to Normal the EDID unique ID that conveys to computers the model name and setting values of connected display devices is a list that consists of video signals used with one or multiple projector terminals On the video output equipment you can specify video signals for use with a different number of terminals Multi input mode select window is displayed automatically if the in...

Page 59: ...ector and plug it in Be sure to connect the ground wire of the power cord to ground Be sure to connect the ground wire before connecting the power plug to the outlet Also when you disconnect the ground wire be sure to unplug the power plug from the outlet beforehand Fully insert the power cord plug into the socket After turning off the projector wait at least 5 minutes before turning it on again T...

Page 60: ...the projected image during the first few minutes until the image stabilizes A window appears when the projector is turned on for the first time You can select a language to be used by the projector for displaying menus and messages in the window Select the desired language with the pointer buttons and press the OK button P61 You can change the language from the menu at a later time P116 Remote con...

Page 61: ...P62 Press the INPUT button to select the input signal P63 When Notebook Computer Screen Does Not Appear Set your notebook computer to output signals to an external monitor For more details refer to Changing Notebook Computer Screen Output P62 Adjusting Image Set the display resolution of the computer to the highest resolution or the resolution closest to that setting P65 Use the ZOOM button on the...

Page 62: ... operation To turn on the external monitor output with most computers press the function key F1 to F12 which is marked with the external monitor icon while holding down the Fn key The function key you use and the method used to turn on the external monitor output vary depending on the model For details see the manual for your notebook computer With Windows 8 1 Windows 8 or Windows 7 you can turn o...

Page 63: ...jection 1 Press the INPUT button to display the window shown below The currently active input signal is marked with a green circle and enclosed by a orange border Names of input signals available for projection are displayed in white and unavailable signal names are grayed out 2 Press the buttons to select the input signal You can also switch from one DVI D input source to the next by pressing the...

Page 64: ...the DIGITAL or HDMI button In multi input mode the projector combines two or four sources of input for projection together As sources of input for projection at 4K or other resolutions choose from DVI 1x2 DVI 2x2 DVI 1x4 or HDMI 1x2 P55 Signals you supply for Multi Input mode must meet certain conditions If the signals do not meet these requirements a icon is displayed ...

Page 65: ...rsor toward the upper or lower right corner to access the menu 2 Click Settings and then click Control Panel 3 From Control Panel Home Appearance and Personalization select Adjust screen resolution 4 Click the Resolution tab and move the slider to select the resolution closest to the maximum output signal resolution of the projector 5 Click the OK button Windows 7 1 Open the Control Panel from the...

Page 66: ...mum output signal resolution of the projector from the Resolution list 3 Click the OK button Mac OS X 1 Open the Apple Menu and select System Preferences 2 In the System Preferences window click the Displays icon to display the Display window 3 Select the Display tab and select the resolution closest to the maximum output signal resolution of the projector from the Resolutions list 4 Close the Sys...

Page 67: ...e control or the LENS button on the projector to display the focus adjustment window 2 Press the pointer buttons to adjust the focus 3 When the focus is adjusted optimally press the OK button or the FOCUS button If the screen is curved you can adjust the focus of the image edges Refer to Marginal focus P102 and Adjusting Peripheral Focus P157 Remote control Projector To adjust the focus use the bu...

Page 68: ...l to adjust it with the zoom function P36 1 Press the ZOOM button on the remote control to display the zoom adjustment window Press the LENS button on the projector repeatedly to switch between windows for parameters adjusted by controlling the lens To access the zoom adjustment window press the LENS button twice or three times if you have set Marginal focus to On Remote control When Marginal focu...

Page 69: ...ons to adjust the image size 3 When the desired image size is selected press the OK button or the ZOOM button To enlarge the image use the button on the remote control or projector To reduce the image use the button on the remote control or projector Screen Remote control Projector ...

Page 70: ... lens up down left right P51 1 Press the SHIFT button on the remote control to display the lens shift adjustment window Press the LENS button on the projector repeatedly to switch between windows for parameters adjusted by controlling the lens To access the lens shift adjustment window press the LENS button three times or four times if you have set Marginal focus to On Remote control When Marginal...

Page 71: ...n after movement with the lens shift function is not returned when the power is turned off To return it to its original position perform reset During screen position adjustment press and hold the SHIFT button on the remote control or the LENS button on the projector to display the Lens shift reset window Two options are available 50 home position or 0 Use the pointer buttons to select an option an...

Page 72: ...n image is projected at the aspect ratio of the input signal Select this mode for normal image projection True size The image is projected with the original resolution of the input signal Screens of computers with a lower display resolution than the projector are displayed smaller but clearer than in other aspect ratios Selecting an Aspect Ratio Press the ASPECT button on the remote control and se...

Page 73: ...tone correction refer to Keystone P98 Horizontal Vertical Keystone Correction 1 Press the KEYSTONE button on the remote control or projector to display the horizontal vertical keystone adjustment window When Keystone is set to Horizontal vertical keystone Keystone correction may not be effective in some lens shift positions If keystone distortion is excessive and cannot be fully corrected straight...

Page 74: ...STONE button on the remote control or projector to display the corner adjustment window When Keystone is set to Corner adjustment To correct top distortion press the button To correct bottom distortion press the button To correct distortion on the right press the button Screen To correct distortion on the left press the button Remote control Projector Remote control Projector ...

Page 75: ...he corner 4 When you have finished correcting press the OK button Resetting the Keystone Adjustment Reset adjustment as follows First press the KEYSTONE button on the remote control twice to display the Keystone reset window Next select OK with the button and then press the OK button Your specified keystone adjustment is now reset Remote control Projector Remote control Projector ...

Page 76: ...ors Presentation 1 Bright 2 Images mainly consisting of text 3 Keeps the screen bright Dynamic 1 Bright 2 Media played with video software 3 Keeps the screen bright Video 1 Somewhat dark 2 Video from camcorders 3 Close to the color space of TVs Photo sRGB 1 Somewhat dark 2 Digital photos from sRGB compatible cameras 3 Conforms to the sRGB standard DICOM SIM 1 Adjust gamma to suit the surrounding b...

Page 77: ... to the DICOM Digital Imaging and Communications in Medicine standard Typically to project the image according to the DICOM standard it requires the grayscale tone correction using a luminance meter according to the environment In this projector there are 21 types of tone settings for various ambient lights You can correct the tone in a simplified manner by selecting the DICOM test pattern P168 It...

Page 78: ... TEST PATTERN button on the remote control until DICOM is displayed or select On from Test pattern in the Install settings menu 3 As you watch the test pattern adjust the items in the following menus Brightness Contrast Sharpness Gamma 4 Press the OK button after the setting Perform one of the followings to obtain an appropriate projection Darken the ambient light Reduce the image size Reduce the ...

Page 79: ...D BY indicator remains lit instead of flashing If you want to continue projecting without turning off the power press a button other than POWER or else wait until the confirmation message disappears The projector cannot be turned on while the lamp is cooling down After turning off the projector wait at least 5 minutes before turning it on again It may shorten the lamp life if you turn on the proje...

Page 80: ...that would be distracting or to pause playback of video or animation Press the FREEZE button to freeze the moving image The projector shows the following icon Press the FREEZE button again to return to the original display It is also cancelled when the input signal is terminated Projecting a Test Pattern from the Menu Even without any input signals the projector can project a test pattern Test pat...

Page 81: ...n power consumption in the image mode Power management mode P114 Automatically turns off the lamp or the power after a certain period if the projector is idle without an input signal Power management duration P114 Specify the period after which the lamp or the projector should go off automatically if left idle without an input signal when Power management mode is set to Lamp off or Standby Network...

Page 82: ...82 ...

Page 83: ...ic Guide Installation Procedure Connection Procedure Projection Procedure Convenient Features Advanced Guide Using Menus Menu Settings Advanced Projection Other Information Maintenance Product Specifications Troubleshooting Advanced Guide ...

Page 84: ...ystem settings tab P108 You can set the operation of the projector Image adjustment tab P90 You can adjust the image quality and colors according to your preference Network settings tab P123 These settings are for when using the projector from a PC via a network For the network settings refer to Network settings P122 Install settings tab P97 This setting is used when installing the projector Input...

Page 85: ... the buttons to select a tab If the tab position is not highlighted in orange press the buttons to move the current selection to the top 3 Press the buttons to select an item 4 Select contents How to select the contents varies depending on the item Remote control Projector Remote control Projector Remote control Projector ...

Page 86: ... OK button or button to display a list of the contents 3 Use the buttons to select the desired contents 4 When you have found the contents you desired press the OK button or 1 Select Contrast 2 Use the buttons to adjust the setting 1 Select Register network password A different screen is displayed 2 Use the buttons or number buttons on the remote control to enter the projector network password 1 S...

Page 87: ...re grayed out or hidden Menu Function Details Aspect Select an image aspect ratio P88 Input level Select the input level for HDMI signal P88 Super white Select super white mode compatibility for HDMI signals P88 Color space Select the color space for HDMI signal P89 Progressive Select progressive processing for still images in cinematic content or moving images in videos P89 ...

Page 88: ... 0 255 This setting is only available with RGB HDMI signals In Auto mode the signal level is selected automatically Some equipment may not support this If HDMI output can be set to Normal or Expanded we recommend Expanded The contrast of images will be improved and dark scenes will be rendered more realistically In this case set Input Level to Auto or Expanded For more detailed information refer t...

Page 89: ... input signal as a color difference signal Option Function Off Does not perform progressive processing Film auto Suitable for still images or typical moving images Performs progressive processing for video or cinematic content Video 1 Suitable for projecting video with high image quality and relatively slow movement Performs progressive processing optimized for HD video Video 2 Suitable for projec...

Page 90: ...y to suit the projected image P91 Create profile Save desired image quality settings as profiles P92 Baseline image mode Shows the image mode that is basis of the profile P92 Brightness Adjust image brightness P92 Contrast Adjust image contrast P92 Sharpness Adjust image sharpness P92 Gamma Correct loss of detail in shadows or highlights P92 Color adjustment Fine tune image colors P93 Advanced adj...

Page 91: ...s Close to the color space of TVs Photo sRGB Somewhat dark Digital photos from sRGB compatible cameras Conforms to the sRGB standard DICOM SIM Adjust gamma to suit the surrounding brightness Medical or other monochrome images Conforms to gamma values used for medical images Conforms to DICOM Standard Part 14 However the projector cannot be used in diagnosis or similar applications User 1 3 Up to 3...

Page 92: ...clearly The saved settings consist of the brightness contrast sharpness gamma color adjustment advanced adjustment and lamp mode Although only 3 user profiles are displayed separate profiles apply depending on whether DVI D or HDMI signals are supplied As a result it is possible to save up to 6 settings The image mode name which was the basis for the settings change is also saved in the user memor...

Page 93: ...ce of a purplish or greenish image Color temperature Adjusts the white color temperature R G B Gain Adjust the gain of each color R G B Offset Adjusts the color offset of each color In DICOM SIM image mode Color temperature is not adjusted with numeric values but set to one of the following five presets Preset 1 Adjust brightness relative to DICOM Standard Part 14 Preset 2 Adjust color tone relati...

Page 94: ...ctive on noise with an irregular frequency or amplitude Option Function Off Disables random noise reduction Weak Specify one of three levels of intensity of the random noise reduction Middle Strong MPEG noise reduction Reduce MPEG image noise Option Function Off Disables MPEG noise reduction Weak Specify one of three levels of intensity of the MPEG noise reduction Middle Strong Examples of Ambient...

Page 95: ...h Sky Green Enhances skin tones blue skies and greens so that these colors are more consistent with people s remembered impressions Option Function Off Disable correction Weak Specify the level of correction Middle Strong 6 axis color adjust Fine tune RGB red green blue and CMY cyan magenta yellow hues in images Submenu Function Off Disables 6 axis color adjustment Adjust Use the buttons to select...

Page 96: ...eduction or MPEG noise reduction is applied Option Function Full power Projects images at full brightness Power saver Reduces lamp brightness to save energy Option Function OK Resets the image adjustment settings Cancel Cancels resetting of the image adjustment settings Performing reset when Image mode is set to a profile from User 1 to User 3 will restore the settings originally saved for that us...

Page 97: ...98 Keystone Set the type of keystone correction P98 Professional settings Specify advanced installation settings P99 Lens Position Store information about the lens position including focus zoom and lens shift settings which can be used to restore the lens to these positions P106 Screen color Adjust projection colors to suit the screen color P106 Iris Reduce the difference in brightness among model...

Page 98: ...nstalled upside down on the ceiling The projected image is inverted in the vertical direction Rear Select this to project an image from behind the screen The projected image is inverted in the horizontal direction Rear Ceiling mounted Select when the projector is installed upside down on the ceiling and behind the screen The projected image is inverted in both vertical and horizontal directions To...

Page 99: ... or DVI 1x4 DVI input Single For use with one DVI input signal one connection DVI 1x2 For use with two DVI input signals DVI 2x2 For use with four DVI input signals projected in a 2x2 layout DVI 1x4 For use with four DVI input signals projected side by side HDMI input mode Normal For use with Single or HDMI 1x2 HDMI input Single For use with one HDMI input signal one connection HDMI 1x2 For use wi...

Page 100: ...crease values to amplify signals that have been attenuated by a long cable Signals may be too strong if noise occurs when using a short cable or when using an active cable signal corrector or repeater If so increase values to attenuate and correct the signals DVI 2 equalizer setting DVI 3 equalizer setting DVI 4 equalizer setting When a dual link cable is used any noise in the signal line may prev...

Page 101: ...point adjustment mode in screen corners and at the center Manual adjustment Precise adjustment based on 54 points in a 6 x 9 grid Reset Restore the original position before adjustment With advanced registration checkered or halftone image areas may be affected by uneven colors or image artifacts Registration and Advanced registration settings are retained even if you change the panel drive mode 5 ...

Page 102: ...most important Marginal focus In dome projection image focus can be adjusted on the edges of the screen and the remote control can be used to activate and deactivate this focus adjustment For detailed instructions refer to Adjusting Peripheral Focus P157 Option Function Off Disable remote focusing of image edges On Enable remote focusing of image edges To access the adjustment window press the LEN...

Page 103: ...tart marker End marker Blending area When adjusting the image projected from the right side Adjustment may not eliminate different colors or brightnesses in the blending area For best edge blending results use all projectors in the same image mode Optimal image mode Photo sRGB and make the following adjustments 1 Brightness contrast R G B gain R G B offset black level color blending color temperat...

Page 104: ...omentarily set edge blending to Off and check the display Although the starting marker is normally aligned with the image edge it can also be aligned toward the center of the image In this case the black blending area will lie outside of the starting marker Submenu Function Off Do not adjust colors of blended images Adjust Adjust unwanted colors or discrepancies between colors in the blending area...

Page 105: ... 0 Area A Black level cannot be adjusted Area B Adjust to a black level different from that of area D Area C Adjust to provide a smooth transition relative to the black levels of areas B and D Submenu Function Side Select the direction to adjust from Left Right Top Bottom A Width B Width C Width Adjust the widths of areas A C Submenu Function B D area base Adjust the black level brightness of B D ...

Page 106: ...relative to the saved position Specifying a somewhat smaller image size than the screen size image area enables you to switch among multiple lens positions without the image extending off the screen When precise positioning is needed use lens shift zoom and focus functions to fine tune the position Save position and Lens shift reset are not available when Positional lock is set to On P98 Load posi...

Page 107: ... by pressing the TEST PATTERN button on the remote control Submenu Function Open Disables aperture adjustment Close 1 3 Specify the aperture value in a range of 1 3 The Iris setting does not affect power consumption Option Function Off Disable test pattern display On Enable test pattern display While the test pattern menu is displayed you can use the buttons to switch patterns Additionally options...

Page 108: ...l communication setting values P114 Power management mode You can specify to turn off the lamp or projector automatically after a certain period if the projector and remote control are not used and there is no input signal P114 Power management duration Specify how long before the lamp is turned off or the projector enters standby depending on the Power management mode setting P114 Direct power on...

Page 109: ...tered user logos as follows You can specify the position after a logo has been registered Choose from upper left upper right center lower left or lower right No signal screen Customize the screen shown when no input signals are received Option Function Black The screen is all black Blue The screen is all blue User logo The user logo is projected Screen when blank Select the screen shown when proje...

Page 110: ...yed for 10 or 30 seconds Extended The menu is displayed for 3 minutes The following display times are also changed Only Center is available when edge blending is used Other display positions are grayed out and not available Item Normal Extended MENU screen 30 seconds 3 minutes Input P63 Keystone adjustment P73 Keystone reset P75 Focus P67 Zoom P68 Lens shift P70 Lens shift reset P71 Marginal focus...

Page 111: ...unction Off The air filter warning is not displayed On The air filter warning is displayed The guide screen is shown at the following cases No input signal is detected An invalid button is pressed in BLANK or FREEZE mode P31 When positional lock P98 is set to On and buttons locked by this feature are pressed When it is almost time to replace the lamp the projector s LAMP indicator will flash For d...

Page 112: ... when you operate the projector Option Function Off Disables the beep On Enables the beep Key repeat Key repeat enables projector or remote control buttons to be held down instead of pressing them repeatedly Option Function Off Key repeat is not enabled On Key repeat is enabled Key lock Lock the projector to prevent direct or remote control operation Option Function Off Disables the key lock Main ...

Page 113: ...m AUDIO IN for audio output HDMI 1 Only available when the input signal is set to HDMI 1 or HDMI 1x2 Audio signals from HDMI 1 are output HDMI 2 Only available when the input signal is set to HDMI 2 or HDMI 1x2 Audio signals from HDMI 2 are output To Unlock Key Lock Function Turn off the projector and unplug the power plug Hold down the OK button on the main unit and plug in the power cord as you ...

Page 114: ...n rate in bits per second Data bits Number of bits of data Parity Number of parity bits Option Function Disabled Disable power management mode Lamp off Only turns the lamp off Standby Turns the projector off and puts it in standby After the lamp is turned off projection resumes when the same input signal is restored the remote control or projector is operated the power is turned on After the proje...

Page 115: ...set Power management mode to an option other than Disabled When Disabled is selected Direct power on is not available After turning off the projector wait at least 5 minutes before turning it on again It may shorten the lamp life if you turn on the projector immediately after turning it off Option Function Off Motion blur reduction is not performed Weak Reduce motion blur for fast moving images No...

Page 116: ...gs Language Select the menu display language Language English Russian Czech German Dutch Danish French Finnish Arabic Italian Norwegian Chinese Simplified Spanish Turkish Chinese Traditional Portuguese Polish Korean Swedish Hungarian Japanese ...

Page 117: ... control and connect the power plug Make sure to keep holding down the MENU button until a beep sounds When the projector beeps the password is canceled The entered password is also reset Cancellation on the Remote Control To forcibly cancel the password from the remote control in standby state press the MENU button 3 times then press the POWER button You cannot set On unless you have completed Re...

Page 118: ...emperature Compensates for changes in gradation caused by a change in LCOS panel temperature Lamp counter You can reset the lamp counter that indicates the time for lamp replacement For details on lamp counter display see Replacing the Lamp P163 Submenu Function Off Returns to the factory default without performing Gamma restore Adjust Restore the original gamma and apply the result Restoring gamm...

Page 119: ...rive 2 Insert the USB flash drive in the USB port 3 Follow the instructions shown to complete the update process For details on replacing or cleaning the filter see P160 P163 This value is not reset even if Factory defaults is executed Firmware versions shown here are for illustration only and differ from actual versions In some cases it may not be possible to download updates For details contact ...

Page 120: ...ge Mode Standard Advanced adjustment Ambient light Off Random noise reduction Off MPEG noise reduction Off Dynamic gamma Mem color correct 6 axis color adjust Off Lamp mode Full power Install settings Submenu Default Value Positional lock Off Image flip H V None Keystone Horizontal vertical keystone Professional settings Panel drive mode 4096x2160 Multi input mode select Normal DVI optimizer DVI d...

Page 121: ... Value DVI 1x4 Audio in HDMI 1 HDMI 1 HDMI 2 HDMI 2 HDMI 1x2 HDMI 1 Power management mode Standby Power management duration 15 min Direct power on Off Motion blur reduction Off Other settings Password settings Off Adjust panel characteristics Gamma restore Off Adjust panel temperature Off Submenu Default Value Network settings lock Lock Network password setting On Network standby settings Low powe...

Page 122: ...o On to enable it P125 Referring to Checking Projector Information P148 check that the projector IP address does not overlap with other computers that are on the same LAN To set a projector IP address follow the instructions in Completing Computer Settings for a Network Connection P130 and use the web screen or use projector TCP IP settings P126 When you connect the computer to the network for the...

Page 123: ...hanges P124 Network password setting Specify whether network settings are password protected P124 Register network password Set a network password P124 Network standby settings Specify the extent of network functionality in standby mode P125 Network function Enable or disable network functions P125 Detailed settings Display and set network connection details P126 PJLink Enable or disable PJLink P1...

Page 124: ...mote control to enter the projector network password Option Function Unlock Cancels the lock and allows other network settings to be changed The password must be entered in order to cancel the lock Use the buttons or number buttons on the remote control to enter the four digit network password Lock Lock the settings Forcibly canceling the network lock Press these buttons in the following order to ...

Page 125: ...vailable even in standby mode including the web screen control over the network and PJLink Low power All network functions are available even in standby mode However the projector may be less responsive than usual when some functions are initially used Low power may delay access over the network for some functions For faster access select Normal Power consumption when Network function is On varies...

Page 126: ...tor DHCP TCP IP settings Change or specify the IP address subnet mask and gateway address used for connections Submenu Function Off Disables the DHCP function TCP IP settings must be configured manually On Enables the DHCP function Searches the DHCP server TCP IP settings cannot be configured IP address subnet mask and gateway address because the IP address is acquired from the DHCP server This me...

Page 127: ...Network settings lock P124 Network password setting P124 Register network password P124 Network standby settings P125 Network function P125 Detailed settings P126 PJLink P128 AMX Device Discovery P129 Crestron RoomView P129 Settings configured from the web screen Password P136 Network P137 Mail P138 Mail auth P139 SNMP P140 Projector info P141 PJLink P142 Menu Function ...

Page 128: ...is a unified standard for operation and control of projectors It allows centralized control of projectors and operation from a controller for all projectors regardless of manufacturer The objective is for JBMIA to improve convenience for users and expand the use of projectors through early systemization for network monitoring and control of projectors which will become the mainstream in the future...

Page 129: ...es check the useful life of lamps or turn the projectors on or off Specify whether to use Crestron RoomView Option Function Off Disables AMX Device Discovery On Enables AMX Device Discovery The projector will periodically send out AMX beacon packets over the network For details on AMX Device Discovery visit the AMX website http www amx com Option Function Off Disable Crestron RoomView On Enables C...

Page 130: ... 3 Click View network status and tasks In Icon View Click Network and Sharing Center 4 Click Change adapter settings 5 Right click Ethernet and then click Properties 6 In the This connection uses the following items list select Internet Protocol Version 4 TCP IPv4 and click the Properties button Make a note of the original network settings IP address subnet mask default gateway etc 7 Select Use th...

Page 131: ...hen the settings are completed click the OK button and then click the OK button on the Local Area Connection Properties window to close it Windows Vista 1 From the PC Start menu select Control Panel 2 Click on View network status and tasks 3 From the menu on the left side of the window click on Manage network connections 4 Right click Local Area Connection and open Properties 5 Select Internet Pro...

Page 132: ...192 168 254 254 Set an IP address which is different from this 5 Click Apply to close the network preference window Resetting the IP Address Setting of the Computer Follow the same procedure as for changing the IP address and reset the values to the original values based on the notes taken before the change Setting Up the Network Displaying the Network Configuration Screen 1 Turn on the computer a...

Page 133: ...ojector Power status The power status of the projector Lamp time full power Lamp operating time in Full power lamp mode Lamp time power saver Lamp operating time in Power saver lamp mode Lamp time converted Lamp operating time converted value Filter time Air filter operating time Alert Error message if an error has occurred Temperature abnormality Faulty lamp Faulty cooling fan Faulty power supply...

Page 134: ... OK The factory default user name is root and the password is system The settings screen is displayed Complete the network settings on this screen Network Setting 1 Select a function to set up from the settings screen menu To control the projector from the computer click Projector control P146 ...

Page 135: ... contents and if they are correct click Apply The settings are applied to the projector Selecting Network or Password in the menu will cause this message to be displayed Save completed Please change setting and reconnect If you select functions other than above Save completed is displayed Click Back to top to return to the top page of the web screen 1 2 ...

Page 136: ... Explanation Factory default setting User name When logging into the web screen enter the user name in 1 byte alphanumeric characters and symbols 4 15 characters root New password When logging into the web screen enter the password in 1 byte alphanumeric characters and symbols 4 15 characters system Confirm new password For confirmation enter the same password that you entered in New password syst...

Page 137: ...n or off If the function is on because the IP address is acquired from the server it is not possible to enter the following items IP address Subnet mask Default gateway OFF IP address Enter the IP address of the projector in 1 byte numbers 192 168 254 254 Subnet mask Enter the subnet mask in 1 byte numbers 255 255 255 0 Default gateway Enter the default gateway IP address in 1 byte numbers 0 0 0 0...

Page 138: ...r the sender address for error mails in 1 byte alphanumeric characters and symbols 1 63 characters Projector canon co jp SMTP server IP address Enter the SMTP server IP address in 1 byte numbers 0 0 0 0 SMTP server port number Enter the SMTP server port number in 1 byte numbers 1 65535 25 SNTP server IP address Enter the SNTP server IP address in 1 byte numbers 0 0 0 0 Time zone Select the time zo...

Page 139: ...Enter the user name to use for mail authentication in 1 byte alphanumeric characters and symbols 1 63 characters Blank Password Enter the password for mail authentication in 1 byte alphanumeric characters and symbols 1 63 characters Blank Confirm password For confirmation enter the same password as you entered in Password Blank POP3 server IP address Enter the POP3 server IP address in 1 byte numb...

Page 140: ...gs related to control of projectors which use SNMP Simple Network Management Protocol For the setting procedure refer to Network Setting P134 Item Explanation To The recipient address which was set from Mail in the settings screen P138 is displayed Cc The CC address which was set from Mail in the settings screen P138 is displayed From The sender address which was set from Mail in the settings scre...

Page 141: ...tings in this screen cannot be changed OFF Receive community Enter the community name which will receive projector information in 1 byte alphanumeric characters and symbols 1 15 characters Blank Password Enter the community settings password in 1 byte alphanumeric characters and symbols 8 15 characters It can be set only when the SNMP version is V3 Blank Confirm password For confirmation enter the...

Page 142: ...ler visit the Crestron website http www crestron com Item Explanation Factory default setting PJLink Turn the PJLink function on or off If OFF is selected the PJLink function will be turned off and the other settings in this screen cannot be changed ON PJLink authentication Select whether to turn the PJLink authentication function on or off If OFF is selected it is not possible to change the follo...

Page 143: ...match Invalid SMTP The SMTP server IP address has not been set System failed to connect SMTP server Failed to connect to the SMTP server when sending a test mail System failed to connect POP3 server Failed to connect to the POP3 server attempting to send a test mail System doesn t support this auth type An authentication type was set which is not supported by the server System failed to authentica...

Page 144: ...44 Resetting Network Settings to the Default Settings 1 Perform steps 1 3 on Displaying the Network Configuration Screen P132 to display the settings screen 2 Click Initialize 3 A confirmation window appears Click OK ...

Page 145: ...r dealer Errors related to the lamp Error name Faulty lamp Text The lamp has burnt out Replace the lamp with a new one If the same warning occurs again the lamp drive circuit may be defective Contact your dealer Errors related to the fan Error name Faulty cooling fan Text The cooling fan or another component may be defective Contact your dealer Errors related to the air filter Error name Faulty ai...

Page 146: ...can be controlled from this screen The factory default IP address is 192 168 254 254 If DHCP settings are used ask the network administrator for the projector IP address It is possible to check the IP address from the projector menu Item Explanation Projector name The name of the connected projector is displayed P141 Comment Shows notes such as where the projector is installed P141 Refresh Refresh...

Page 147: ...147 Menu Settings Advanced Guide Menu Settings 5 When the operations are finished click Back to top to return the initial web screen ...

Page 148: ...played Firmware Current firmware version Serial no Serial number unique to this projector IP address IP address used when connected to a network E mail sender address Sender e mail address used for sending error mails P138 E mail recipient address Displays Already set or Not set to show whether a recipient e mail address has been set for receiving error mails P138 Projector name Name which identif...

Page 149: ...cify the start position 4 Adjust Width Move the end marker to the inner edge of the overlapping area or press a number button on the remote control to specify the width of the area to correct The area between the starting and ending markers is called the blending area Values indicated for this blending area are adjusted to match manually entered blending area values Shading is applied to this area...

Page 150: ... all projectors Black Level Adjustment In overlapping projection dark colors are projected with less intensity than other colors in the overlapping area You can make this overlapping area less distracting by adjusting the black level of non overlapping image areas Here the non overlapping image area from the end marker toward the center of the image is called area D Normally three areas are identi...

Page 151: ...a may be more noticeable than that of surrounding areas By adjusting the black level of area B you can make the transition smoother To compensate adjust each area as follows When the projected image has multiple blending areas on the top bottom and each side the width of areas A B and C must be adjusted to suit these blending areas In this example instructions are given for adjusting area B 1 In t...

Page 152: ...djust the black level of area B as needed To reduce distracting colors and colors that are out of alignment in areas where the images overlap perform Color blending adjustment targeting the main tone in the envisaged projected image Results of adjusting the black level of area B are applied to all sides Blending can be fine tuned by adjusting Adjustment type Black level Red Green and Blue If you p...

Page 153: ...5 Point Adjustment 5 point adjustment enables basic correction of color misalignment across the screen by moving adjustment points in each corner and the center 1 In the Install settings menu select Professional settings RGB alignment Advanced registration Adjust 5 point adjustment Adjust The projector enters 5 point adjustment mode and a point selection window is displayed Adjust zoom and lens sh...

Page 154: ... 4 Use the buttons to align the adjustment points 5 Press the OK button to return to the window for color selection mode 6 Repeat this process to align the remaining colors and adjustment points Select Chart to toggle between display of the point selection window and source signal Accessing the 5 point adjustment window during test pattern projection will show the test pattern instead of your supp...

Page 155: ...ojector enters manual adjustment mode and a point selection window is displayed 2 Use the buttons to select the point for correction and then press the OK button The projector enters color selection mode Any manual adjustment values set before switching to 5 point adjustment are cleared Two sizes of point selection windows are used depending on Panel drive mode With advanced registration checkered...

Page 156: ...ustment 1 In the Install settings menu select Professional settings RGB alignment Advanced registration Adjust Reset A confirmation message for resetting is displayed 2 Select OK to reset the adjustment The following tasks are executed Values set in 5 point adjustment are cleared 5 point adjustment is deactivated Values set in manual adjustment are cleared Select Chart to toggle between display of...

Page 157: ...Edges into Focus To adjust peripheral focus press the FOCUS button on the remote control or the LENS button on the projector 1 Press the FOCUS button on the remote control twice to display the marginal focus adjustment window Pressing the LENS button on the projector repeatedly switches between windows for lens related parameters Press the LENS button twice to display the marginal focus adjustment...

Page 158: ...stall settings menu select Professional settings Marginal focus Reset to reset the adjustment The following tasks are executed Values set in marginal focus adjustment are cleared Marginal focus is set to Off Setting Marginal focus to Off will not reset the setting value for peripheral focus Press the buttons to move the peripheral focus farther away Press the buttons to move the peripheral focus n...

Page 159: ...c Guide Installation Procedure Connection Procedure Projection Procedure Convenient Features Advanced Guide Using Menus Menu Settings Advanced Projection Other Information Maintenance Product Specifications Troubleshooting Other Information ...

Page 160: ...may be damaged since it will block the air flow into the projector and raise the internal temperature of the projector The following screen is displayed when turning on the projector if the air filter needs to be cleaned Clean the air filter if it is displayed Before cleaning the projector always turn it off unplug it after the cooling fan stops and wait at least one hour Otherwise you may get bur...

Page 161: ...lter Follow the procedure below when replacing the air filter 1 Turn off the projector power and remove the power plug Do not rinse the air filter in water This may damage the air filter and projector If the air filter cleaning screen is displayed when turning on the projector after cleaning the air filter select Yes and press the OK button The air filter counter is reset and the message is no lon...

Page 162: ...ance 162 2 Pull out the filter cover tab on bottom while lifting up 3 Open the filter cover and remove it 4 Remove the air filter 5 Holding the new air filter by the tab insert the air filter in the projector ...

Page 163: ...screen is displayed When you press the POWER button Push POWER button again to turn off power message appears After this screen has been displayed for 10 seconds and disappeared all buttons become operable This message will not be displayed again if you select No in response to the message Do you want to display this message again Handle the air filter carefully If damaged the air filter will not ...

Page 164: ...been displayed Replace the lamp with a new one as soon as possible Lamps should be replaced about every 3 000 hours Note that there is no guarantee about how long lamps will last Useful life of lamps varies widely from lamp to lamp and depending on the environment of use Some lamps may fail or rupture soon after they are first used Dispose of used lamps in accordance with local regulations Precaut...

Page 165: ...es a risk of burns Be sure to use the specified lamp Contact the Canon Customer Support Center for further information This can also be purchased from the Canon website Do not touch the inner glass surface when you replace the lamp Doing so may cause deterioration to the projector s performance Handle lamps with care Impact or abrasion may cause lamps to rupture while they are in use If a lamp rup...

Page 166: ...mp cover to prevent it from falling off 4 Loosen the 3 screws on the inside of the lamp unit and then slowly pull out the lamp unit in the direction of the arrow Even when the screws are loosened they will remain attached to the lamp unit 5 Insert the new lamp unit all the way in and secure it with the 3 screws 6 Close the lamp cover and tighten the screw ...

Page 167: ...ing up the menu and select System settings Other settings Lamp counter 8 Select Reset Yes to reset the lamp counter We recommend cleaning or replacing the air filter part no RS FL03 when you replace the lamp To order air filters contact the Canon Customer Support Center ...

Page 168: ...layed you can use the buttons to switch patterns Also if there is an option pattern available you can use the buttons to switch pattern The following test patterns can be displayed Use to switch patterns Use to switch option patterns Raster 100 White red green blue Raster 50 White red green blue Color bars 1 2 3 4 5 6 7 8 9 10 11 12 13 Stairstep H Stairstep V Cross Hatch Border Focus Multi Checker...

Page 169: ...9 59 901 88 750 Normal Single 48 32 80 3 6 17 55 935 59 887 106 500 Normal Single 80 152 232 3 6 25 1280x1024 63 981 60 020 108 000 Normal Single 48 112 248 1 3 38 1920x1080 I 28 125 50 000 74 250 Normal Single 528 44 148 4 5 10 30 5 31 250 50 000 72 000 32 168 184 45 5 10 114 5 33 750 60 000 74 250 Normal Single 88 44 148 4 5 10 30 5 1920x1080 27 000 24 000 74 250 Normal Single 638 44 148 4 5 36 ...

Page 170: ...al 1x2 88 44 148 4 5 10 30 5 3840x1080 1920x1080 67 500 60 000 148 500 Normal 1x2 88 44 148 4 5 36 2560x1600 1280x1600 98 611 59 910 142 000 1x2 48 32 80 3 10 33 3840x2160 1920x2160 52 512 23 956 132 750 104 200 304 3 10 19 52 404 23 983 109 000 48 32 80 3 10 12 54 000 24 000 148 500 1x2 5 638 44 148 8 10 72 112 500 50 000 297 000 1x2 528 44 148 8 10 72 133 293 59 988 277 250 48 32 80 3 10 49 135 ...

Page 171: ...108 000 Normal Single 48 112 248 1 3 38 1920x1080 27 000 24 000 74 250 Normal Single 638 44 148 4 5 36 67 500 60 000 148 500 Normal Single 88 44 148 4 5 36 2048x1080 66 576 59 924 147 000 48 32 80 3 10 18 67 500 60 000 148 500 Normal Single 44 44 64 4 5 36 2560x1080 66 636 59 978 181 250 48 32 80 3 10 18 66 000 60 000 198 000 Single 248 44 148 4 5 11 1920x1200 74 038 59 950 154 000 Normal Single 4...

Page 172: ...48 32 80 3 5 23 67 158 59 963 173 000 Normal 2x2 128 200 328 3 5 32 67 500 60 000 148 500 Normal 2x2 88 44 148 4 5 36 4096x2160 2048x1080 66 576 59 924 147 000 2x2 48 32 80 3 10 18 67 160 59 964 183 750 128 216 344 3 10 27 67 500 60 000 148 500 Normal 2x2 44 44 64 4 5 36 4096x2304 2048x1152 70 992 59 909 156 750 Normal 4 2x2 4 48 32 80 3 5 25 71 584 59 903 197 000 Normal 4 2x2 4 136 216 352 3 5 35...

Page 173: ...8 652 8 32 40 48 8 6 135 000 60 000 148 500 Normal 1x4 44 22 74 8 10 72 4096x2160 1024x2160 134 055 59 926 188 750 80 112 192 3 10 64 133 235 59 962 157 750 1x4 5 48 32 80 3 10 49 133 320 60 000 147 185 8 32 40 48 8 6 135 000 60 000 148 500 Normal 1x4 22 22 32 8 10 72 4096x2304 1024x2304 142 103 59 959 168 250 1x4 4 48 32 80 3 10 53 143 111 59 979 201 500 80 112 192 3 10 69 142 199 60 000 156 988 ...

Page 174: ...0 4096 x 2400 x 3 panels 29 491 200 Projection lens Zoom ratio Focal length F value 1 3x 17 2 22 3 mm f2 6 Zooming Focus adjustment Motorized Motorized Lens shift V 60 motorized H 10 motorized Light source power consumption 250 NSHA 400 W 300 W Lamp mode Full power Power saver Image size projection distance 40 to 600 0 9 m to 17 7 m 3 0 to 58 1 Number of colors 16 770 000 colors full color Brightn...

Page 175: ...0 4096 x 2304 4 3840 x 2400 4 4096 x 2400 4 Input terminal DVI D terminal Digital PC 29 pin DVI connector HDMI terminal Digital PC Digital video LAN terminal Network connection RJ 45 10BASE T 100BASE TX 1000BASE T USB port USB Type A CONTROL terminal RS 232C D sub 9 pin REMOTE terminal Wired remote control 3 5ø stereo mini jack AUDIO IN terminal Audio signal 3 5ø stereo mini jack AUDIO OUT termina...

Page 176: ...CD panel Using the projector continuously for an extended period of time may accelerate the deterioration of optical parts Product specifications and appearance are subject to change without notice Remote Control External View Model number RS RC05 Power supply DC 3 0V using two AA size batteries Operating range Approx 8 m 26 2 25 horizontal and vertical to infrared remote receiver Dimensions 51 mm...

Page 177: ...L Pin assignment Communication format Communication mode RS 232C asynchronous half duplex communication Communication speed 19200bps Character length 8 bits Stop bits 2 bits Parity None Flow control None Pin No Signal 1 OPEN 2 RxD 3 TxD 4 OPEN 5 GND 6 OPEN 7 Internal pull up 8 OPEN 9 OPEN ...

Page 178: ...CR 49h 4Eh 50h 55h 54h 3Dh 44h 2Dh 52h 47h 42h 32h 58h 32h 0Dh DVI 1x4 INPUT D RGB1X4 CR 49h 4Eh 50h 55h 54h 3Dh 44h 2Dh 52h 47h 42h 31h 58h 34h 0Dh Input source acquisition GET INPUT CR 47h 45h 54h 3Dh 49h 4Eh 50h 55h 54h 0Dh Image Mode Standard IMAGE STANDARD CR 49h 4Dh 41h 47h 45h 3Dh 53h 54h 41h 4Eh 44h 41h 52h 44h 0Dh Presentation IMAGE PRESENTATION CR 49h 4Dh 41h 47h 45h 3Dh 50h 52h 45h 53h ...

Page 179: ... AUTO CR 41h 53h 50h 45h 43h 54h 3Dh 41h 55h 54h 4Fh 0Dh True size ASPECT TRUE CR 41h 53h 50h 45h 43h 54h 3Dh 54h 52h 55h 45h 0Dh Aspect value acquisition GET ASPECT CR 47h 45h 54h 3Dh 41h 53h 50h 45h 43h 54h 0Dh Lamp mode Full power LAMP FULL CR 4Ch 41h 4Dh 50h 3Dh 46h 55h 4Ch 4Ch 0Dh Power saver LAMP ECO CR 4Ch 41h 4Dh 50h 3Dh 45h 43h 4Fh 0Dh Lamp mode value acquisition GET LAMP CR 47h 45h 54h 3...

Page 180: ...rojector Contact the Canon Customer Support Center WARNING and LAMP are lit Faulty lamp The lamp does not illuminate If the lamp does not illuminate replace it If the same warning occurs again there may be a malfunction in the lamp drive circuit Contact the Canon Customer Support Center WARNING only flashes 3 times repeatedly Filter error The air filter is not installed Check whether or not the ai...

Page 181: ...u press the POWER button You cannot turn the projector on immediately after plugging it in P60 The lamp cover is open Unplug the projector from the power outlet then install the lamp cover correctly and turn on the projector again The safety device is activated because the air intake or the exhaust vent is blocked and the internal temperature of the projector has increased When the safety device i...

Page 182: ...e BLANK function has been selected Press the BLANK button on the remote control P80 No image is projected due to a problem with the computer Turn first the projector and then the computer off and then back on again The external monitor output is not set on the notebook computer correctly Turn on the external monitor output on the notebook computer To turn on the external monitor output press the L...

Page 183: ...us Adjust the focus P67 The distance to the screen is too short Check whether the distance to the screen is appropriate P50 The projector is not placed straight in front of the screen Check whether the projector is placed obliquely to the screen A slight error in the projection angle can be corrected through the keystone adjustment function P73 The projector has been moved to a place where the tem...

Page 184: ... and exhaust vents are not blocked and turn on the projector P25 P60 The air filter is dirty Check whether the air filter is clogged with dust If the air filter is clogged clean or replace the air filter P160 P161 The lamp has ruptured or there is a lamp malfunction If the lamp has ruptured follow the instructions in Precautions when replacing lamps that stop working P15 The operating temperature ...

Page 185: ...tween the infrared remote receiver of the main unit of the projector and the remote control or point the remote control in an obstacle free path You are operating the remote control in an unsuitable operating environment Check whether the infrared remote receiver of the main unit of the projector is exposed to direct sunlight or strong light of lighting apparatus P33 The channel setting of the rem...

Page 186: ...ower on 115 Display resolution Preparing the computer 65 Dynamic gamma 95 E Edge blending 4 103 149 Effect of ambient light 94 F FREEZE 80 G Gamma 92 H HDMI terminal 29 53 54 I IMAGE 77 Image adjustment 84 90 Image mode Image quality 76 Information 84 148 INPUT 63 Input signal select 63 Input terminal 29 Connecting to AV equipment 54 K Key lock 112 KEYSTONE 73 Keystone 73 L Lamp mode 96 Lamp repla...

Page 187: ... at Once Edge Blending 149 Projector on 109 R Rear projection 37 98 Remote control 30 31 32 113 Reset 75 96 120 S Screen color 106 Selecting a language 61 116 Setting display status 87 Sharpness 92 Side control 26 Signal type 169 Super white 88 System settings 84 108 T Test pattern 168 True size Aspect 72 Turning on external monitor output preparing the notebook computer 62 U USB Port 29 W WARNING...

Page 188: ...n Part No RS CL08 Ceiling mount pipe 600 1000 mm 23 6 39 4 in Part No RS CL09 Air filter Part No RS FL03 Lamp assembly with replacement air filter Part No RS LP10F Remote control Part No RS RC05 Remote control Part No RS RC04 Use the above materials to hang the projector from the ceiling ...

Page 189: ...NON U S A INC One Canon Park Melville New York 11747 U S A For all inquires concerning this product call toll free in the U S 1 800 OK CANON CANON EUROPE LTD 3 The Square Stockley Park Uxbridge Middlesex UB11 1ET United Kingdom CANON EUROPA N V Bovenkerkerweg 59 1185 XB Amstelveen The Netherlands ...

Reviews: