


148
W
WH
HA
AT
T T
TO
O D
DO
O IIN
N T
TH
HE
E F
FO
OL
LL
LO
OW
WIIN
NG
G
C
CIIR
RC
CU
UM
MS
ST
TA
AN
NC
CE
ES
S
L
Lo
osstt R
RF
F D
D..E
E..S
S..S
S.. K
Ke
eyyss
The RF D. E. S. S key is required to
start the vehicle.
If the key is lost during a ride, the en-
gine will continue without cut or misfire
and a the message "CHECK KEY" will
be displayed. You will be able to stop
the engine but you will need the spare
key to restart the vehicle.
See your dealer to buy a new key and
have it programmed.
F
Flla
att T
Tiirre
e
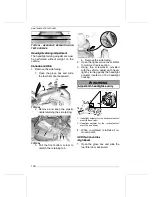
If a tire has a m
ma
ajjo
orr puncture or cut in
the tread and is completely deflated,
have the vehicle transported to the
nearest Can-Am On-Road dealer. Re-
fer to
Transporting the Vehicle
in this
section for transporting instructions.
If a tire has a m
miin
no
orr nail or stone
puncture and is not completely de-
flated, the tire can be temporarily re-
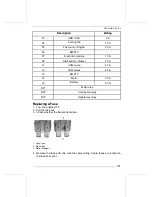
paired. To temporarily repair a tire, a
self-inflating tire sealer or tire plug re-
pair kit can be used. Follow the manu-
facturer's instructions that come with
the tire sealer or repair kit and have
the tire repaired or replaced by an au-
thorized Can-Am On-Road dealer a
ass
sso
oo
on
n a
ass p
po
ossssiib
blle
e.
When a tire is temporarily repaired,
ride slowly and carefully, and fre-
quently check tire pressure until it is
replaced or permanently repaired.
D
De
ea
ad
d B
Ba
atttte
erryy
If the battery is dead or too low to
crank the engine, it can be jump
started.
W
WA
AR
RN
NIIN
NG
G
C
Co
on
nn
ne
ecctt tth
he
e jju
um
mp
pe
err cca
ab
blle
ess a
ass
ssp
pe
ecciiffiie
ed
d iin
n tth
he
e jju
um
mp
p sstta
arrtt
p
prro
occe
ed
du
urre
e..
B
Ba
atttte
erriie
ess cca
an
n e
em
miitt e
exxp
pllo
ossiivve
e g
ga
ass
tth
ha
att cca
an
n iig
gn
niitte
e iiff jju
um
mp
pe
err cca
ab
blle
ess
a
arre
e n
no
ott p
prro
op
pe
errllyy cco
on
nn
ne
ecctte
ed
d..
N
NO
OT
TIIC
CE
E
D
Do
o n
no
ott d
diisscco
on
nn
ne
ecctt tth
he
e d
diisscch
ha
arrg
ge
ed
d
b
ba
atttte
erryy..
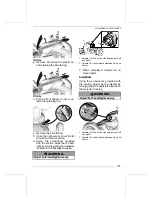
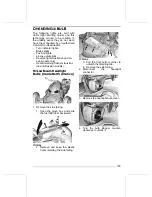
1. Park the booster vehicle closed to
the front of your vehicle.
2. Remove the front service cover.
Refer to
Service Covers
section.
3. Remove the positive terminal cov-
er and clean corrosion from battery
posts before connecting the jump-
er cables.
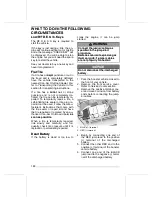
1. BLACK (-) terminal
2. RED (+) terminal
4. Begin by connecting one end of
the RED jump lead to the positive
(+) terminal of the discharged
battery.
5. Connect the other RED end to the
positive (+) terminal of the booster
vehicle battery.
6. Connect one end of the BLACK
jump lead to the negative (-) termi-
nal of the discharged battery.
Summary of Contents for RYKER 2023 Series
Page 10: ...8 This page is intentionally blank TABLE OF CONTENTS...
Page 11: ...9 G GE EN NE ER RA AL L I IN NF FO OR RM MA AT TI IO ON N...
Page 14: ...12 This page is intentionally blank GENERAL INFORMATION...
Page 15: ...13 G GE EN NE ER RA AL L P PR RE EC CA AU UT TI IO ON NS S...
Page 20: ...18 This page is intentionally blank ACCESSORIES AND MODIFICATIONS...
Page 21: ...19 V VE EH HI IC CL LE E I IN NF FO OR RM MA AT TI IO ON N...
Page 101: ...99 P PR RE E R RI ID DE E I IN NS SP PE EC CT TI IO ON N...
Page 104: ...102 This page is intentionally blank PRE RIDE CHECKLIST...
Page 105: ...103 M MA AI IN NT TE EN NA AN NC CE E...
Page 145: ...143 R RO OA AD D S SI ID DE E R RE EP PA AI IR RS S...
Page 160: ...158 This page is intentionally blank TRANSPORTING THE VEHICLE...
Page 161: ...159 T TE EC CH HN NI IC CA AL L I IN NF FO OR RM MA AT TI IO ON N...
Page 163: ...161 VEHICLE IDENTIFICATION...
Page 168: ...166 This page is intentionally blank EAC DECLARATION OF CONFORMITY...
Page 169: ...167 T TE EC CH HN NI IC CA AL L S SP PE EC CI IF FI IC CA AT TI IO ON NS S...
Page 179: ...177 W WA AR RR RA AN NT TY Y...
Page 201: ...199 C CU US ST TO OM ME ER R I IN NF FO OR RM MA AT TI IO ON N...
Page 206: ...204 CHANGE OF ADDRESS AND OWNERSHIP...
Page 207: ...205 This page is intentionally blank CHANGE OF ADDRESS AND OWNERSHIP...
Page 208: ...206 CHANGE OF ADDRESS AND OWNERSHIP...
Page 209: ...207 This page is intentionally blank CHANGE OF ADDRESS AND OWNERSHIP...
Page 210: ...208 NOTE CHANGE OF ADDRESS AND OWNERSHIP...
Page 211: ...209 NOTE CHANGE OF ADDRESS AND OWNERSHIP...
Page 212: ...210 NOTE CHANGE OF ADDRESS AND OWNERSHIP...
Page 213: ...211 NOTE CHANGE OF ADDRESS AND OWNERSHIP...
Page 214: ...212 NOTE CHANGE OF ADDRESS AND OWNERSHIP...
Page 215: ...213 NOTE CHANGE OF ADDRESS AND OWNERSHIP...
Page 216: ...214 NOTE CHANGE OF ADDRESS AND OWNERSHIP...
Page 217: ...215 NOTE CHANGE OF ADDRESS AND OWNERSHIP...
Page 218: ...216 NOTE CHANGE OF ADDRESS AND OWNERSHIP...
Page 219: ...217 NOTE CHANGE OF ADDRESS AND OWNERSHIP...
Page 220: ...218 Model No CHANGE OF ADDRESS AND OWNERSHIP...
Page 221: ......


