


133
completely sealed; there is no need to
add water to adjust the electrolyte
level.
W
WA
AR
RN
NIIN
NG
G
D
Do
o n
no
ott u
usse
e cco
on
nvve
en
nttiio
on
na
all lle
ea
ad
d--a
acciid
d
ttyyp
pe
e b
ba
atttte
erriie
ess.. A
Acciid
d m
ma
ayy lle
ea
akk o
ou
utt
tth
hrro
ou
ug
gh
h tth
he
e b
ba
atttte
erryy vve
en
ntt o
off a
a cco
on
n--
vve
en
nttiio
on
na
all lle
ea
ad
d--a
acciid
d ttyyp
pe
e b
ba
atttte
erryy..
A
Acciid
d m
ma
ayy a
allsso
o lle
ea
akk iiff tth
he
e b
ba
atttte
erryy
cca
asse
e iiss ccrra
acckke
ed
d o
orr d
da
am
ma
ag
ge
ed
d,,
w
wh
hiicch
h cca
an
n cca
au
usse
e sse
evve
erre
e b
bu
urrn
nss..
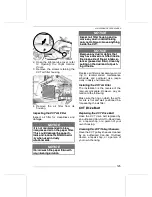
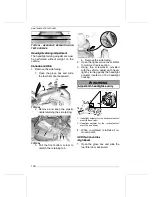
The battery may need to be charged if
the vehicle has not been ridden for at
least one month.
The battery can be charged while it is
installed on the vehicle.
A standard battery charger can be
used. The recommended charge rate
is 2A. If the battery is dead, it can be
jump started with a car battery (see
Roadside Repairs
section).
N
NO
OT
TIIC
CE
E
F
Fo
ollllo
ow
w tth
he
e iin
nssttrru
uccttiio
on
nss p
prro
ovviid
de
ed
d
w
wiitth
h yyo
ou
urr b
ba
atttte
erryy cch
ha
arrg
ge
err.. IIm
mp
prro
op
p--
e
err cch
ha
arrg
giin
ng
g m
ma
ayy d
da
am
ma
ag
ge
e tth
he
e
b
ba
atttte
erryy..
For home charging, a “trickle” charger
can be used to slow charge the bat-
tery. This type of charger can be left
connected for a long period of time
without damaging the battery. Always
follow the charging time as recom-
mended in the charger instructions.
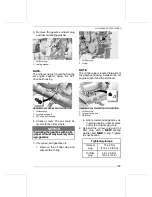
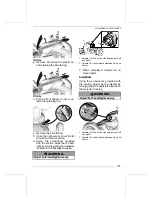
To charge the battery, proceed as
follows:
1. Remove the front service cover.
2. Remove the rubber insulator from
the positive battery terminal.
3. First connect the RED (+) cable to
the corresponding terminal.
4. Connect the BLACK (-) cable to
the corresponding terminal.
N
NO
OT
TIIC
CE
E
A
Allw
wa
ayyss cco
on
nn
ne
ecctt tth
he
e R
RE
ED
D ((+
+)) cca
ab
blle
e
ffiirrsstt tto
o a
avvo
oiid
d d
da
am
ma
ag
giin
ng
g tth
he
e e
elle
eccttrrii--
cca
all ssyysstte
em
m o
off tth
he
e vve
eh
hiicclle
e..
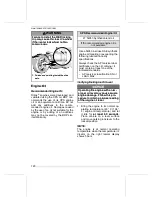
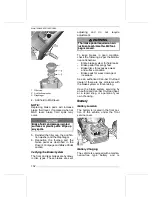
1. BLACK (-) terminal
2. RED (+) terminal
5. Start the battery charger. Charging
time will depend on the charging
rate.
When the battery is charged:
1. Disconnect the battery charger.
2. Reconnect the battery cables by
reversing the unplug procedure.
3. Slide back the rubber insulator
over the positive battery terminal.
4. Install the front service cover.
O
On
n B
Bo
oa
arrd
d D
Diia
ag
gn
no
ossttiicc ((O
OB
BD
D))
C
Co
on
nn
ne
ecctto
orr L
Lo
occa
attiio
on
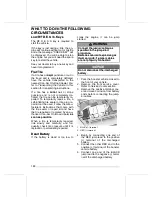
n
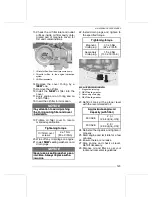
The on board diagnostic connector is
located in the front portion of the ve-
hicle, under the front service cover.
Refer to the OBD manufacturer in-
structions for connection and diagnos-
tic procedures.
MAINTENANCE PROCEDURES
Summary of Contents for RYKER 2023 Series
Page 10: ...8 This page is intentionally blank TABLE OF CONTENTS...
Page 11: ...9 G GE EN NE ER RA AL L I IN NF FO OR RM MA AT TI IO ON N...
Page 14: ...12 This page is intentionally blank GENERAL INFORMATION...
Page 15: ...13 G GE EN NE ER RA AL L P PR RE EC CA AU UT TI IO ON NS S...
Page 20: ...18 This page is intentionally blank ACCESSORIES AND MODIFICATIONS...
Page 21: ...19 V VE EH HI IC CL LE E I IN NF FO OR RM MA AT TI IO ON N...
Page 101: ...99 P PR RE E R RI ID DE E I IN NS SP PE EC CT TI IO ON N...
Page 104: ...102 This page is intentionally blank PRE RIDE CHECKLIST...
Page 105: ...103 M MA AI IN NT TE EN NA AN NC CE E...
Page 145: ...143 R RO OA AD D S SI ID DE E R RE EP PA AI IR RS S...
Page 160: ...158 This page is intentionally blank TRANSPORTING THE VEHICLE...
Page 161: ...159 T TE EC CH HN NI IC CA AL L I IN NF FO OR RM MA AT TI IO ON N...
Page 163: ...161 VEHICLE IDENTIFICATION...
Page 168: ...166 This page is intentionally blank EAC DECLARATION OF CONFORMITY...
Page 169: ...167 T TE EC CH HN NI IC CA AL L S SP PE EC CI IF FI IC CA AT TI IO ON NS S...
Page 179: ...177 W WA AR RR RA AN NT TY Y...
Page 201: ...199 C CU US ST TO OM ME ER R I IN NF FO OR RM MA AT TI IO ON N...
Page 206: ...204 CHANGE OF ADDRESS AND OWNERSHIP...
Page 207: ...205 This page is intentionally blank CHANGE OF ADDRESS AND OWNERSHIP...
Page 208: ...206 CHANGE OF ADDRESS AND OWNERSHIP...
Page 209: ...207 This page is intentionally blank CHANGE OF ADDRESS AND OWNERSHIP...
Page 210: ...208 NOTE CHANGE OF ADDRESS AND OWNERSHIP...
Page 211: ...209 NOTE CHANGE OF ADDRESS AND OWNERSHIP...
Page 212: ...210 NOTE CHANGE OF ADDRESS AND OWNERSHIP...
Page 213: ...211 NOTE CHANGE OF ADDRESS AND OWNERSHIP...
Page 214: ...212 NOTE CHANGE OF ADDRESS AND OWNERSHIP...
Page 215: ...213 NOTE CHANGE OF ADDRESS AND OWNERSHIP...
Page 216: ...214 NOTE CHANGE OF ADDRESS AND OWNERSHIP...
Page 217: ...215 NOTE CHANGE OF ADDRESS AND OWNERSHIP...
Page 218: ...216 NOTE CHANGE OF ADDRESS AND OWNERSHIP...
Page 219: ...217 NOTE CHANGE OF ADDRESS AND OWNERSHIP...
Page 220: ...218 Model No CHANGE OF ADDRESS AND OWNERSHIP...
Page 221: ......


