4
Operating Instructions
www.chpower.com
Operating The Nailer
(Continued)
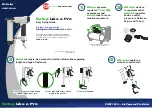
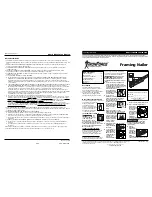
RECOMMENDED HOOKUP
The illustration below shows the
recommended hookup for the nailer.
1. The air compressor
must be able to
maintain a minimum
of 60 psi when the
nailer is being used. An inadequate
air supply can cause a loss of power
and inconsistent driving.
2. An oiler can be
used to provide oil
circulation through
the nailer. A filter can
be used to remove liquid and solid
impurities which can rust or “gum
up” internal parts of the nailer.
3. Always use air supply hoses with
a minimum working pressure
rating equal to or greater than the
pressure from the power source if a
regulator fails, or 150 psi, whichever
is greater. Use 3/8 inch air hose for
runs up to 50 feet. Use 1/2 inch air
hoses for 50 foot run or longer. For
better performance, install a 3/8 inch
quick plug (1/4 inch NPT threads)
with an inside diameter of .315 inch
(8mm) on the nailer and a 3/8 inch
quick coupler on the air hose.
4. Use a pressure regulator on the
compressor, with an operating
pressure of 0 - 125 psi. A pressure
regulator is required to control the
operating pressure of the nailer
between 60 and 100 psi.
OPERATIONAL MODE
Always know the
operational mode of
the tool before using. Failure to know
the operational mode could result in
death or serious personal injury.
SINGLE SEQUENTIAL MODE
This mode requires
the trigger to be
pulled each time a
fastener is driven.
The tool can be actuated by depressing
the Work Contact Element (WCE)
against the work surface followed by
pulling the trigger.
The trigger must be released to reset
the tool before another fastener can be
driven.
OPERATING A SINGLE SEQUENTIAL
TRIP TOOL
Check the operation
of the Work Contact
Element (WCE) trip mechanism before
each use. The WCE must move freely
without binding through its entire
travel distance. The WCE spring must
return the WCE to its fully extended
position after being depressed. Do
not operate the tool if the WCE trip
mechanism is not operating properly.
Personal injury may occur.
1. Disconnect the air
supply from the tool.
2. Remove all fasteners
from the magazine
(see Loading/
Unloading).
3. Make sure the trigger
and work contact
element (WCE) move
freely up and down
without sticking or binding.
4. Reconnect air
supply to the
tool.
5. Depress the Work
Contact Element
(WCE) against the
work surface without
pulling the trigger. The tool
MUST
NOT OPERATE
. Do not use the tool
if it operates without pulling the
trigger. Personal injury may result.
6. Remove the tool from
the work surface.
The Work Contact
Element (WCE) must
return to its original down position.
The tool
MUST NOT OPERATE
.
Do not use the tool if it operates
while lifted from the work surface.
Personal injury may result.
7. Pull the trigger
and depress the
work contact
element (WCE)
against the work surface. The tool
MUST NOT OPERATE
.
Recommended Hookup
Quick Plug
Quick
Coupler
Air Hose
Quick Plug
(Optional)
Quick
Coupler
(Optional)
Regulator
Lubricator
Filter
60 psi
Min.
100 psi
Max.
Movement
150 psi or greater
3/8 inch I.D.