ENGLISH
Page
27
- Manual code:
FA00464-EN
ver
.
1
03/2017 © C
AME S.p.a. - The data and information shown in this manual ar
e t
o be consider
ed as subject t
o change at any time and without the need for any advance warning.
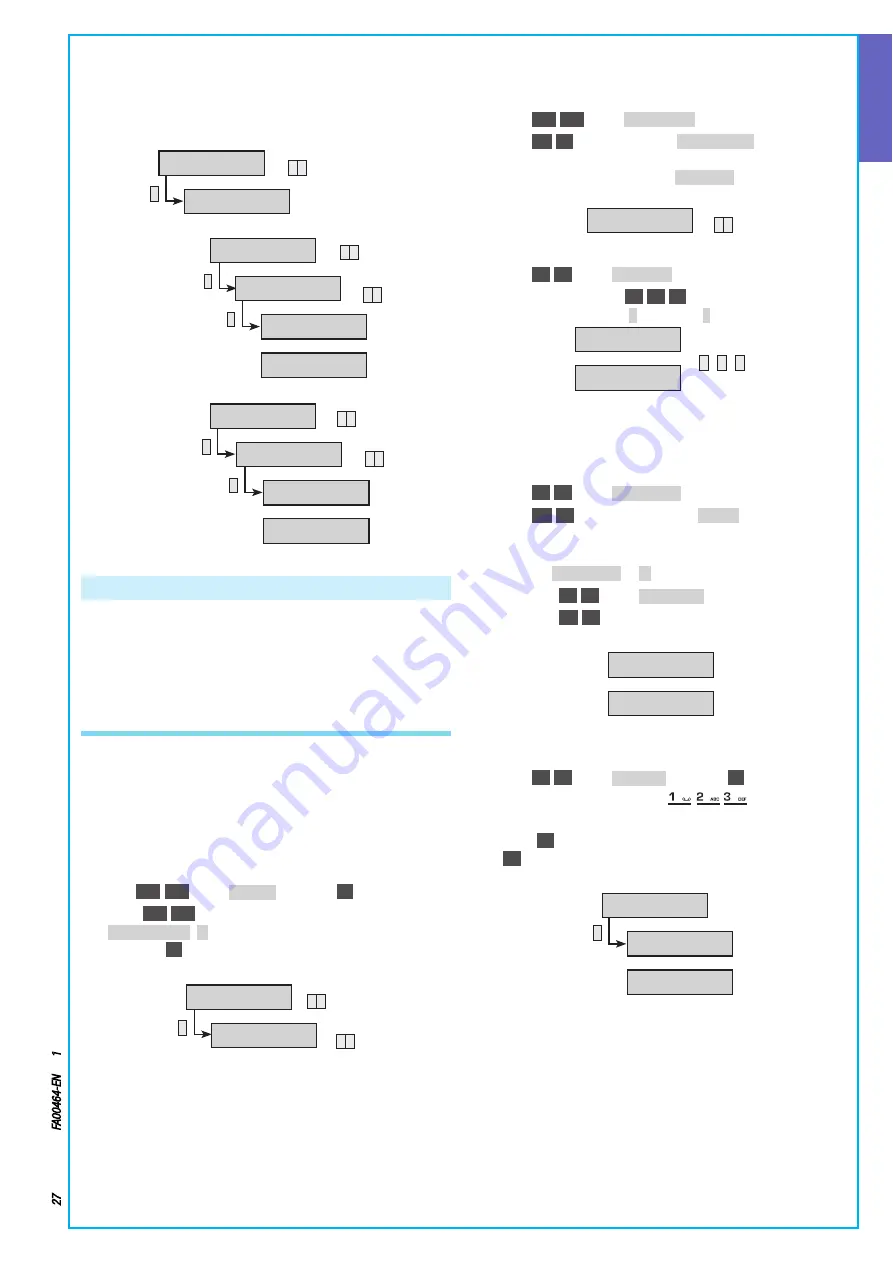
Example:
If you want to create a system with two areas:
•
Area 1 = LIVING AREA
•
Area 2 = BEDROOM AREA
You must:
*
*
*
*
*
MODIFY
SYSTEM
▼
▲
MANAGED AREAS
##-
MODIFY AREA 01
AREA 01
▼
▲
DESCRIPTION 01
AREA 01
▼
▲
AREA 01
*=OK #=ESC
LIVING AREA
*=OK #=ESC
MODIFY AREA 02
AREA 02
▼
▲
DESCRIPTION 02
AREA 02
▼
▲
AREA 02
*=OK #=ESC
BEDROOM AREA
*=OK #=ESC
Programming Scenarios
Scenarios are groups of operations set by the Installer which allow
the User, via the control unit, keypad, reader or telephone, to:
•
turn areas on/off
•
activate / deactivate outputs
Some scenarios are pre-set at the factory
CREATING SCENARIOS
Up to 16 customised scenarios can be created and then associated
individually or all together with one or more control devices as-
signed an address in the Control unit (keypads, readers and remote
controls)
STEP 1: Selecting scenario
1 Go into the Technical Menu
2 With
(▲)
/
(▼)
select
SCENARIOS
and press
(*)
3 With
(▲)
/
(▼)
select the scenario to create / modify
MODIFY SCENAR. XX
(
XX
indicates the index number of the scenario)
and press
(*)
*
SCENARIOS 03
MODIFY SCEN.XX
SCENARIO XX
▼
▲
▼
▲
STEP 2: Operation on areas (not available in EASY mode)
Defines the operation to be carried out on the areas (switch on / off)
1 Staying in the Scenario Menu
2 With
(▲)
/
(▼)
select
AREA OPERATION
3 With
(+)
/
(‒)
set the parameter
to EXACT ON+OFF
We will use the
classic scenario; it lets you set the on/off status of the control
unit "exactly" as described by
ASSOC. AREAS
The areas selected
will switch on and those deselected will switch off
AREA OPERATION XX
EXACT ON+OFF
+ -
STEP 3: Associated areas
1 With
(
▲
)
/
(
▼
)
select
ASSOC. AREAS
2 Press the number key
(1)
/
(2)
/
(3)
relating to the address of the
area to be associated (
#
= enabled,
-
= disabled)
ASSOC. AREAS XX
---
ASSOC. AREAS XX
###
1 2 3
STEP 4: Operation on outputs (not available in EASY mode)
Defines the operation to be carried out on an output (ON/OFF) when
the scenario is launched
1 Staying in the Technical Menu
2 With
(
▲
)
/
(
▼
)
select
OUTPUT OPERAT.
3 With
(
+
)
/
(
‒
)
set the parameter to
DISABLED
Normally the sce-
narios concern only the areas, if you need to activate an output
do the following:
a Set
OUTPUT OPERAT.
to
ON
b With
(
▲
)
/
(
▼
)
select
ASSOC. OUTPUT
c With
(
+
)
/
(
‒
)
set the output to be activated
OUTPUT OPERAT. XX
DISABLED
ASSOC. OUTPUT XX
NO
STEP 5: Scenario description
1 Staying in the Scenario Menu
2 With
(
▲
)
/
(
▼
)
select
DESCRIPTION
and press
(*)
3 With the alphanumeric keys
you can edit the
text
4 Press
(#)
to confirm and go back to the previous menus Press
(#)
to cancel the change
*
DESCRIPTION XX
SCENARIO XX
SCENARIO XX
+=OK #=ESC
GOING OUT
+=OK #=ESC


