3
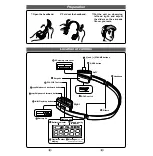
Controls and Connectors
IMPORTANT:
The 8100 will only
accept a 5VDC power
supply providing up to
700mA of current.
Connecting a power supply
of larger than 5VDC or
700mA will damage
your unit and void
your warranty.
16. Hold switch
Sliding this switch to the ON
(down) position will disable all button
functionality. If a button is pressed while
the Hold switch is engaged a HOLD
message (depicted by a Lock icon),
will appear momentarily in the display,
and no action will be taken. If the Hold
switch is engaged while attempting to
power on the unit, the Califone logo will
display, followed by the HOLD
message, and the unit will power off.
15. A-B Loop button
The A-B Loop button is used to play a
selected section of a track repeatedly.
Pressing the A-B Loop button once will
mark the start point of the section. An
“A-“ will appear in the display. Pressing
the A-B Loop button a second time will
mark the end of the selection. “A-B”
will appear in the display, and the
selected section will begin looping.
To cancel loop playback, press
the OK button
(5)
.
NOTE:
If you have selected a start
point for a loop but have not selected
an end point before the end of the
current track, the loop function
will reset and the “A-“ will
no longer be displayed.
14. Record button
Pressing the record button
immediately places the 8100 into
record mode, using the built-in
microphone
(2)
. Pressing the
Record button again during recording
pauses the recording until the Record
button is pressed again. To complete a
recording, press the OK button
(5)
.
13. Volume Up
Pressing this button raises the
playback volume level up to a
maximum safe listening level of 85dB
with the included 8100-HP headphone.
(The 8100 arrives from Califone with
the Sentinel Technology™ feature
“enabled”, but can be disabled for
specific situations from the “Settings”
Menu /Max Volume Limit.) The Volume
Up button is active during playback
even if the playback screen
is not displayed.
12. Previous Track
Pressing this button during playback
selects the previous track in the current
track list, and begins playing that track
from the beginning. If the currently
selected track is the first, the
last track is selected.
11. DC In jack
Connect an external
power supply to this jack
(not supplied).
10. Play/Pause
Pressing the Play/Pause button
begins playback of the currently
selected track. Pressing the
Play/Pause button during playback
pauses playback until the Play/Pause
button is pressed again.
1. Headphone outputs
Connect one or two 3.5mm headphone
connectors to one or both of these
outputs. Volume level to both outputs is
controlled by the Volume Up
(13)
and
Volume Down
(9)
buttons.
2. Microphone
Use this built-in microphone to record
student podcasts, vocal responses or
other audio sources. This feature can be
useful for tracking language learning
and student assessments.
3. Display
The LCD screen displays the menu
functions and operational messages.
During playback, the screen displays
the current track status, including
track number, total tracks, track time,
current position and playback status,
as well as volume level, battery charge
status and the current playback
source (internal memory
or external memory card).
4. Menu button
Pressing the Menu button displays the
Main Menu. For specific information on
Menu functions please refer to the
Menu Screen section of this user guide.
5. OK button
In playback mode, pressing the
OK button will stop playback. In
Menu mode, the OK button is
used to confirm a Menu selection.
6. Next Track
Pressing this button during playback
selects the next track in the current
track list, and begins playing that track
from the beginning. If the currently
selected track is the last, the
first track is selected.
7. USB Connector
Connect the included USB cable to
the mini-USB port on the unit,
connecting the other end to your host
computer. In addition to transferring
tracks to and from your computer,
the 8100’s internal battery will
charge via the USB connection
(fully recharged in 5 hours).
8. SD/MMC Card Slot
This slot will accommodate
an SD or MMC memory card
of up to 2GB. Cards larger
than 2GB are not supported.
9. Volume Down
Pressing this button lowers
the playback volume level. This
button is active during playback
even if the playback screen
is not displayed.
At the top of the Main Screen
you will note several icons which indicate
current settings on the 8100.
8100 Main Screen


