background image

12

Filter Maintenance

Portable Spas

Filtration starts on electronically controlled spas as soon as the pumps are primed and water flow is steady.  As the flow
of water goes through the filter, dirt and debris is removed and accumulated in the filter cartridge.  As the filter cartridge
accumulates minerals, dirt and debris, water flow is lessened and jet performance is reduced. This can cause your spa to
not to run or heat properly.  

Clean Your Filter Regularly and Replace as Needed.

Filter Cleaning

Your new Cal Spa has been designed for quick and easy filter maintenance.  The filter cartridge should be cleaned once
a week.

1.  Turn the power off at the breaker.
2.  Remove the filter(s) cover  (If equipped).
3.  Remove the filter(s) basket (Align flat areas on filter basket and canister).
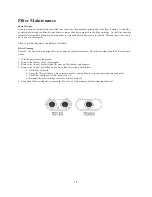
4.  Remove the filter(s) by Pulling up and Out, clean filter with a garden hose.

a.  Hold filter vertically.
b.  Spray the filter cartridges with a pressure nozzle, starting from the top and spraying down each pleat.
c.  Turn filter cartridge over and repeat step 4.b.
d.  Reinstall the filter cartridge in reverse order of removal.

5.  Deep clean filter cartridge(s) every month. Use only a Cal Spas approved filter-cleaning chemical. 

Summary of Contents for 1100 Electronic Series

Page 1: ...without written consent is strictly prohibited This Owner s Manual is for spas manufactured after January 1 2004 Due to continuous improvement program all models operation and or specifications are subject to change without prior notice LTR17000174 ...

Page 2: ... Series 7000 Electronic Series 9000 Electronic Series Duplication without written consent is strictly prohibited This Owner s Manual is for spas manufactured after January 1 2004 Due to continuous improvement program all models operation and or specifications are subject to change without prior notice LTR17000171 ...

Page 3: ...n and Olympian Spas 14 General Operation Instructions 15 Pure Water System 17 Adjustable Therapy System 18 Fitness Series Instructions 19 Fitness Exercise Program 20 Pneumatic Operation 21 1100 Electronic Operation 23 2300 Electronic Operation 26 5000 Electronic Operation 29 7000 9000 Electronic Operation 33 Champion Spa Operation 37 Olympian Spa Operation 38 Splash Stereo Information 39 Cal Enter...

Page 4: ... not in use See instructions enclosed with your cover DANGER RISK OF INJURY The suction fittings in this spa are sized to match the specific water flow created by the pump Should the need arise to replace the suction fittings or the pump be sure that the flow rates are compatible DANGER RISK OF INJURY Never operate spa if the suction fittings or filter baskets are broken or missing DANGER RISK OF ...

Page 5: ...with a medical history of heart disease low or high blood pressure circulatory system problems or diabetes should consult a physician prior to spa usage f Persons using medications should consult a physician before using a spa since some medication may induce drowsiness while other medication may affect heart rate blood pressure and circulation HYPERTHERMIA Hyperthermia occurs when the internal te...

Page 6: ...o usage 6 The optional turbo feature should be used sparingly When operating the turbo water temperature drops quite rapidly and can also dissipate chemicals NOTE Allowing the water temperature to lower more than 10 degrees below desired usage temperature and reheating prior to usage will cause the heater to operate longer than it normally would maintaining the desired temperature Your spas option...

Page 7: ... will default to 100 F and filter for two 2 hours twice a day 9 Pneumatic spas in Freeze Protection Mode will operate and heat to the manual setting the temperature where the thermostat is set See Pneumatic Operating instructions on page 21 for more information 10 Install filter cartridge into filter canister 11 The spa is now ready for use General Start up Information Inground and Ported Spas 1 O...

Page 8: ...floater NOTE Do not place bromine tablets in skimmer basket Weekly 1 Test spa water with test strips for the following items twice a week a Bromine Acceptable Range without a Cal Zone Ozonator is between Three 3 to Five 5 b Bromine Acceptable Range with a Cal Zone Ozonator is between One 1 to Three 3 c Chlorine Acceptable Range without a Cal Zone Ozonator is between Three 3 to Five 5 d Chlorine Ac...

Page 9: ...ts 3 Balconies must be constructed to current state and local codes Spa load requirements are 150 lbs per square foot Planning for Delivery of Your In ground Spa 1 Selecting the right site for the installation of your in ground spa and equipment is very important These sites should be city and state approved also considering the ease of access landscaping and architectural styling For complete Ins...

Page 10: ...rd and plug kit CKIT110 8 GFCI plug should be tested prior to every use To test the GFCI plug version please follow these easy instructions NOTE Spa should be already plugged in and operational 9 Press the button marked Test on the GFCI The GFCI will trip and the spa will stop operating 10 Press the button marked Reset on the GFCI The GFCI will reset and the spa will turn back on in about 5 second...

Page 11: ... and a green wire for your ground NOTE 6 AWG wire acceptable on wire run up to 100 Wire run over 100 must increase wire to 4 AWG 3 Please note that this is the only acceptable electrical wiring procedure Spas wired in any other way will void your warranty and may result in serious injury Before each use of your spa you should check the GFCI During this test the spa should be operational 1 Press th...

Page 12: ...10 ...

Page 13: ...n 7 Once the water is at the correct level turn on the power at the GFCI breaker NOTE Ensure110 Volt spas are connected to the proper electrical outlet 8 The spa will perform a diagnostic check for 30 seconds Once complete the spa will automatically operate at filter speed and continue heating until the spa water temperature reaches 100 F This is every electronically controlled spas default temper...

Page 14: ...ically operate at filter speed and continue heating until the spa water temperature reaches 100 F This is every electronically controlled spas default temperature 8 For information on adjusting the temperature setting see the applicable Controls Operation sections of this manual on pages 21 through 36 9 The spa is now ready for use For operation instructions see the applicable Control Operation se...

Page 15: ...ng Your new Cal Spa has been designed for quick and easy filter maintenance The filter cartridge should be cleaned once a week 1 Turn the power off at the breaker 2 Remove the filter s cover If equipped 3 Remove the filter s basket Align flat areas on filter basket and canister 4 Remove the filter s by Pulling up and Out clean filter with a garden hose a Hold filter vertically b Spray the filter c...

Page 16: ...on the pump basket s 5 Remove the lint traps inside and spray clean with a pressure nozzle attached to a garden hose 6 Remove lock nut from top of filter external canister 7 Remove filter cartridge Pull up and Out a Hold filter vertically b Spray filter cartridge with a pressure nozzle starting from the top and spraying down each pleat c Turn the filter cartridge over and repeat Step 7b d Re insta...

Page 17: ...trolled on spas with the optional Turbo System Spas equipped with a Cal Zone Quest 2000 Ozonator and Pure Water System will generally make a small amount of suction noise If this noise is bothersome simply close the air venturi located to the left of the control panel However if you leave this air venturi closed the Pure Water System will not be able to function properly Please see page 16 for ope...

Page 18: ...e mixing chamber When operating the lens will display a purple black light This light and energy is creating ozone in front of your eyes NOTE Due to the nature of the ozone light it is difficult to see the light in daylight This lens should be checked at night or in a shaded condition Ozone Servicing Your new Cal Zone Quest 2000 Ozonator has been engineered to be service friendly In the event that...

Page 19: ...Fitting Adjustable Therapy System Optional Spas equipped with this system allow you complete control of the therapy seat and or lounger This unique system offers convenient operation with its seat side controls seven different massage modes a soothing demo mode and all at a touch of a button Operating the System Pump On Off This button allows the user to turn on and off the Adjustable Therapy Seat...

Page 20: ...e more time a green LED will blink and the pump will run on H1 speed mode as part of a 15 minute cool down period After that the pump will stop automatically and the green LED light on the panel will continue to blink for a period of 1 minute then shutoff automatically Pulse Mode System Pulse mode system will shut off for two hours unless reset by the following procedure During this time the pump ...

Page 21: ...bars 2 exercise band cords 2 exercise bands and grips and an exercise belt This equipment attaches quickly and easily to the exercise anchors located on the spa walls IMPORTANT Always consult your physician before starting any exercise activity or program The fitness series spas feature rubber exercise bands When stretched these bands create a hi tension condition Improper use or failure to connec...

Page 22: ...oward your body bringing hands together squeezing and flexing chest muscles then slowly returning to the starting position 3 Standing Chest Press Using the exercise grips place your palms down with your elbows bent at 90 Press forward bringing your hands together squeezing and flexing your chest muscles then slowly return to the start position 4 Standing Shoulder Press Using the exercise grips pla...

Page 23: ...will only be maintained during the time that you have set on the time clock See the Time Clock Operation section below for setting instructions Temperature Adjustment Rotate the thermostat knob clockwise from OFF to HOT to set desired water temperature Range of water temperature will be from OFF to 104 F in the HOT position Time Clock Operation Filtration of the spa water is accomplished any time ...

Page 24: ...rol box and the spa will restart itself Jet Controls Depress the Jet button s to activate the high speed pump s Depress the Jet button again to turn off the high speed pump s Light Depress the Light button to turn on the spa light Depress the Light button again to turn off the spa light Turbo Optional Depress the Turbo button to turn on the spas Turbo System Depress the Turbo button again to turn ...

Page 25: ... will automatically activate Whenever the water temperature drops more than one degree below the set temperature the heating system will automatically activate and continue to operate until the spa has regained the temperature loss Jet Light Controls Depress the Jets pad once to activate the spa light Depress the pad a second time to activate the spa light and the low speed pump Depress the pad a ...

Page 26: ... the Jets pad to exit the filter program NOTE The filtration cycle settings of 6 8 and 0 could cause the water temperature to exceed the set temperature This condition is called thermal creep When water is moved through the plumbing it can generate heat and actually heat the spa water without ever engaging the heating system 120 240 Conversion The 1100 series spa is a convertible system The conver...

Page 27: ...pper Overheat The spa has shut down Either the spa has reached a temperature of 112 F or the High limit sensor has detected overheating in the heater manifold DO NOT ENTER THE SPA WATER Remove the spa cover and let the water cool At 110 F the spa should automatically reset If the spa does not automatically reset press any pad on the topside control panel If the spa still won t reset turn off the p...

Page 28: ...spa is powered up it will automatically start in Standard Heating Mode This is displayed by STANDARD on the left side of the topside control panel In this mode the heating system will automatically activate whenever the water temperature drops more than one degree below the set temperature In the Economy Heating Mode the heating system will only activate during filtration times Filtration times ar...

Page 29: ...third time to turn off the high speed Light Depress the Light pad to turn on the light and again to turn the light off Optional Lighting All optional lighting such as the Control Panel Light and Cabinet Perimeter Lighting is controlled by the Light pad and will turn on and off with the spa light Turbo Optional Depress the Option pad once to activate the Turbo system Depress the Option pad again to...

Page 30: ... day To set filtration time turn off the power to the spa at the time of day you would like to start filtration The first cycle will start after the spa is powered up The second filter cycle will begin twelve hours later Filter cycle duration is preset for 2 hours F2 To change duration of filtration time depress either the Up or Down pad then press either the Jets 1 or Jets 2 pad Depress the Temp ...

Page 31: ...never the water temperature drops more than one degree below the set temperature In the Economy Heating Mode the heating system will only activate during filtration times See Setting Filtration Cycles page 31 To switch from the Standard Heating Mode to the Economy Heating Mode simply depress the Temp pad followed by the Light pad Depress the same sequence to switch back to the Standard Heating Mod...

Page 32: ...he circulation pump Depress the jets pad again to activate the circulation pump and the high speed pump 1 Depress the jets pad a third time and the circulation pump high speed pump 1 and high speed pump 2 will be on Depress the Jets pad a fourth time and only the high speed pump 2 will be activated Depress the jets pad a final time to turn off the high speed on pump 2 Lights Depress the Light pad ...

Page 33: ... will begin twelve hours later The filtration cycle duration is preset to 2 hours F2 To change the duration of the filtration time depress the Temp pad then press the Jets pad Depress the Temp button again to choose from 2 4 6 8 and 12 hours twice a day FC Filtration Continuous After selecting the desired filtration cycle duration depress the Jets pad to exit the filtration program The circulating...

Page 34: ...If it s dirty clean it See page 14 for cleaning instructions If the problem per sist call your local authorized service center Sensor Spa has shut down The Hi limit Temperature sen sor has malfunctioned Call your local authorized service center Economy Heating Mode When flashing alternately with the water temperature your spa is in the Economy Heating Mode This message does not indicate the need f...

Page 35: ...hen press Mode Prog to confirm selection Economy mode heats the spa to set temperature only during filter cycles The ECON icon will display until mode is changed Pressing Jets 1 while in Economy mode puts the spa in Standard in Economy mode which operates the same as Standard Mode then reverts to Economy Mode automatically after 1 hour During this time a press of the Mode Prog button will revert t...

Page 36: ...to the next setting or to exit after the last setting The default filter cycles are as follows The first filter cycle is automatically activated at 8 00 AM and operates the pump until 10 00 AM The filter 1 indicator icon will light when filter 1 is running The second filter cycle is automatically activated at 8 00 PM and operates the pump until 10 00 PM The filter 2 indicator icon will light when ...

Page 37: ...allow water to cool At 107 F the spa should automatically reset If spa does not reset shut off the power to the spa and call your dealer or service organization No action required The pumps and the blower will automatically activate regardless of spa status If the problem persists contact your dealer or service organization May appear temporarily in an overheat situation and disappear when the hea...

Page 38: ...move clean and reinstall filter per manufacturer s instructions Every 30 days Test reset GFCI per manufacturer s instructions Drain and refill spa per manufacturer s instructions Every 90 days Drain and refill spa per manufacturer s instructions Every 180 days Clean and condition spa cover Every 365 days Install New Bio Clean Filter WARNING SHOCK HAZARD NO USER SERVICEABLE PARTS DO NOT ATTEMPT SER...

Page 39: ...im or relax in one spa This spa is controlled by the 2300 electronic control system which gives you complete control of this unique spa Please see the 2300 operating instructions to properly control the various functions of this spa Owner s Manual Champion Spa Information SWIM AREA 2 SWIM JETS ...

Page 40: ...eparate control systems which gives you the ability to have cooler temperatures for swimming and warmer temperatures for relaxing in the spa The swim area operates through an outdoor version of the 2300 equipment While the spa is operated with the 5000 equipment Please see these operating instructions to properly control the various functions of this incredible spa Olympian Spa Information Owner s...

Page 41: ...ays close the CD protection door Always close the Stereo cabinet door Remember water damage is not covered by the warranty Entertainment Systems Spas equipped with the TV DVD systems use this Splash stereo to broadcast the TV or DVD audio signals Set Up 1 Program preset station 1 to 88 7FM to receive the audio signal that the TV and DVD systems are transmitting on 2 Set Base to 3 As described in t...

Page 42: ...ise the TV monitor and optional pop up speakers 2 Press the CEC button again to lower the TV monitor and optional pop up speakers Important Manual and Automatic TV S are shipped with two large plastic tie straps to prevent shipping damage These straps must be removed prior to operation Strap Removal 1 Remove the rear cabinet panel with Behind TV Monitor 2 Locate the two white plastic tie straps 3 ...

Page 43: ...VIDEO is displayed on the screen of the TV monitor This will allow the TV Monitor to accept the signal from the DVD player 6 When an antenna cable or satellite system is connected to the coaxial cable on the right front side of the spa you will be able to receive live TV signals by pressing the SELECT button until the COMPOSITE TV icon appears on the TV monitor Allow a few second for the TV tuner ...

Page 44: ... a clear plastic bag inside the equipment area of your spa Operation 1 Press the POWER button on the DVD unit or remote control to turn the system on A Welcome DVD Video banner will be displayed across the screen 2 Press POWER on the Stereo Cd player 3 Move the DVD selector switch Located next to the DVD player to the ON position This will allow the Audio signal to be received by the Stereo CD pla...

Page 45: ...he A V button on the DVD Remote Control to switch the Video from OUT to IN 4 Press the Channel Up or Down buttons on the TV remote control to select TV Channel Switching Back to DVD Operation 1 Press the SELECT button on the TV Remote Control to switch Video to COMPOSITE VIDEO 2 Press the A V button on the DVD Remote Control to switch the Video from IN to OUT 3 Press the PLAY on the DVD remote Con...

Page 46: ...ive clothing and eyewear when handling chemicals Spa users that notice skin irritation must immediately suspend spa usage and consult their physician Pregnant women should consult their physician prior to using a spa for both chemical and temperature recom mendations Chemical Storage Chemicals must be stored completely out of the reach of children in an area that is well vented cool and dry Failur...

Page 47: ... a sanitizing chemical Chlorine Bromine etc immediately turn off power to the spa and proceed to drain spa water into a safe locally approved area Carefully rinse pillows jets and spa surface with regular tap water Avoid spray ing water directly into the equipment area Refill spa to proper water level turn power back on and then set the filtration time to F6 This will allow water to completely cir...

Page 48: ...ool Most people think of spas as nothing more than a small pool In fact nothing could be further from the truth If anything spas are more like an overgrown bathtub An average pool contains 30 000 gallons of water and operates at approximately 70 F 20 C An average spa only contains 350 gallons of water and operates at 100 F 38 C Since spas have more than 100 times less water than a swimming pool th...

Page 49: ...ntaminates are very difficult to see and can get lodged deep into the filter fibers causing water flow issues You will need to have an extra filter cartridge on hand for the deep cleaning process It is necessary to always have one filter either cleaning or drying and the other installed in the spa This process will double the filter cartridges overall life and performance Filter Cleaning 1 Place t...

Page 50: ...ally would have cleared up with a little Oxidizer Shock and fil tration time 4 Remember swimming pool chemicals are completely different than spa chemicals Entering a spa with wet clothes from a swimming pool can cause a possible chemical reaction to either the spa user and or the spa water Always rinse thoroughly when transferring between a swimming pool and a spa 5 Clean the spas filter s regula...

Page 51: ...F 1 Increases water evaporation 2 Increases chemical dissipation 3 Increases amount of spa user waste 4 Accumulation of minerals and salts 5 Increases Total Dissolved Solids TDS As you can imagine there is an inverse effect with cooler water temperatures Does this mean that you should not operate your spa at higher water temperatures No We just want you to be aware that your chemical usage will in...

Page 52: ... of circulation with the spa cover half off prior to testing 7 Always add chemicals when the pump s are on high speed 8 Always premix pH Alkalinity Down chemicals in half a bucket of water prior to introducing them to the spa 9 Never attempt to adjust pH or Total Alkalinity in large increments Adjustments are made easier and will stay set longer if you make them in small increments Do Not Use Vine...

Page 53: ... than larger adjustments Then you may start adjusting the pH back up by using pH Alkalinity Up in small amounts at a time Q My pH is high and the Total Alkalinity is low What do I do A Add small amounts of pH Alkalinity UP to bring up the alkalinity level first Be sure to allow plenty of circulation and standing time for the waters chemical levels to change This may take anywhere from one 1 to thr...

Page 54: ...ctive minerals in the newly added spa water in a state of Solution The term solution means that miner als in the water are being held in a suspended state keeping them from bonding to anything in the spa and causing damage Mineral con trol is a critical part of maintaining spa components performance and longevity In addition to fill up protection from minerals the Clear Water Plan also recommends ...

Page 55: ...Note Adding water clarifier in this case will only further delay the spas ability to clear up 2 Never enter the spa with sunscreen or lotion on your skin Oil is very difficult to remove from the spa water and can cause a reaction with some of the chemicals that you may add to your spa In addition soap and shampoo residues that are normally left on your body after a shower only increase foamy and c...

Page 56: ...ften in a bucket of clean water Use of Cal Spas Multi Purpose Cleaner Cal Spas Multi Purpose Cleaner should not be spayed directly into the spa water Incorrect product usage may cause water clarity issues Fast Sheen Spa finish protecting wax Cal Spas Fast Sheen is an essential part of maintaining your spas finish Through normal use the spas finish can accumulate dirt oil and calcium causing a roug...

Page 57: ...gh speed This is your base bromine level as the tablets will take awhile to dissolve enough to manage 500 gallons of water 2 Add 2 oz of Oxidizer Shock into the spa with all of the jets on high speed and the spa cover at least half off for 30 min This will remove any organic materials that may have been left in the plumbing lines after its last draining 3 Start by placing 3 to 4 bromine tablets in...

Page 58: ...r freeing up your sanitizer to attack more bacteria and other user waste This act greatly improves your sanitizers performance level and reduces spa odor Oxidizer Shock Shock All shock is not created equal The most common shock you will find in pool and home improvement stores is Chlorinating Shock This will destroy your spas Jets Pillows Pump Seals and worse The only shock that you should put in ...

Page 59: ...ing and implementing the Bromine or Chlorine Clear Water Plans Cal Spas Clear Water Plan Bromine Bromine users This plan and its chemical dosages are intended for Cal Spas Chemicals only Most chemical manufactures use different chemical for mulas and strengths Only Cal Spas chemicals are specially formulated to provide proper chemical balance at lower dosages Compare labels and dosages and see for...

Page 60: ...heck the expiration date prior to use 2 Add two tablespoons Granular Chlorine Chlorine dissipation will vary with water temperature 3 Adjust Total Alkalinity then pH if needed See pH and Alkalinity sections for more information 4 Add 2 oz of Stain and Scale Defense 5 Pull the dirty filter from the spa and place into Liquid Filter Cleaner solution 6 Place your extra cleaned fully dried filter cartr...

Page 61: ...are every bit as important to your spa as Bromine or Chlorine are Q My skin is becoming irritated after spa use Why A You are not using your Cal Spas Oxidizer Shock enough and or your sanitizer level is too high Because the spa and its chemicals will strip some of your bodies oils away We recommend that you use a moisturizer after spa use If you still have skin irritation after these steps see you...

Page 62: ...i um scale and mineral deposits Liquid Hardness Increaser CHE07000250 Increases water hardness to reduce corrosion Helps reduce foaming Spa Brite CHE07000580 CHE07000590 Clears up cloudy water in spas and hot tubs Effective at all spa and hot tub temperatures Foam Gone CHE07000800 CHE07000810 Breaks up existing foam in spa water Effective at all spa and hot tub temperatures pH Alkalinity Up CHE070...

Page 63: ...ls Majestic Fiesta and Special spas which have a 1 year equipment warranty This warranty excludes models which coverage is specified in the Designer Ultimate Series Spas warranty i e Champion Olympian and Ported Fiber Optic Light Source C A I warranties the fiber optic light source for a period of one year from the original date of purchase Light bulbs and L E D lights are specifically excluded fr...

Page 64: ...gh levels of chlorine bromine calcium pH and other excessive chemical levels Damage caused by direct sun light Spas should always be covered when not in use Damage caused as a result of failure to follow operating instructions as defined in this owner s manual Damage caused by Incorrect electrical installation electrical brown outs voltage spikes or operation of spa out of voltage range by more th...

Page 65: ...low any remaining water out of the jets and plumbing lines Use a soft towel to remove any remaining water in the spa filter canister and equipment area Cover your spa with a good spa cover and all weather tarp to ensure rain or snow can not enter the spa If your have a Gas Heater you will need to follow the winterizing instructions for your particular heater in the owner s manual This manual will ...

Page 66: ...MOVE PILLOWS USE A FLAT SCREWDRIVER PLACE THE FLAT SCREWDRIVER INTO THE PILLOW PEGS AND TAKE OUT PILLOW AS SHOWN INCORRECT WAY DO NOT PULL OUT PILLOW WITH THE HANDS How To Remove A Pillow Owner s Manual Page 64 Revised 01 01 04 ...

Page 67: ...OW TO REMOVE PILLOW cont Remove pillow by grabbing from these points of the pillow Remove pillow by grabbing from these points of the pillow Owner s Manual How To Remove A Pillow Revised 01 01 04 Page 65 ...

Page 68: ...nic Duplication without written consent is strictly prohibited This Owner s Manual is for spas manufactured after January 1 2004 Due to continuous improvement program all models operation and or specifications are subject to change without prior notice LTR17000174 ...

Page 69: ...Information 9 Starting Up Your Portable Spa 11 Filter Maintenance Portable Spas 12 General Operation Instructions 13 1500 Electronic Spa Control Operation 15 1500 Self Diagnostics 17 Clear Water Chemical Maintenance Plan 19 Frequently Asked Chemical Questions 33 2003 Victory Spa Series Warranty Information 35 Winterizing and Draining Your Cal Spa 37 Replacement Parts Reference Card 38 1 ...

Page 70: ... locked when not in use See instructions enclosed with your cover DANGER RISK OF INJURY The suction fittings in this spa are sized to match the specific water flow created by the pump Should the need arise to replace the suction fittings or the pump be sure that the flow rates are compatible DANGER RISK OF INJURY Never operate spa if the suction fittings or filter baskets are broken or missing DAN...

Page 71: ...ersons suffering from obesity or with a medical history of heart disease low or high blood pressure circulatory system problems or diabetes should consult a physician prior to spa usage f Persons using medications should consult a physician before using a spa since some medication may induce drowsiness while other medication may affect heart rate blood pressure and circulation HYPERTHERMIA Hyperth...

Page 72: ... usage temperature 4 The air venturi handles should be used sparingly When open water temperature drops quite rapidly and can also dissipate chemicals Note Allowing the water temperature to lower more than 10 degrees below desired usage temperature and reheating prior to usage will cause the heater to operate longer than it normally would maintaining the desired temperature The filter needs to be ...

Page 73: ...f the air relief valve tighten valve until closed Do not over tighten 5 Once water level is correct turn on the spa s power at the GFCI breaker 220 Volt Spas 110 Volt spas must be connected to the proper 20 Amp electrical service 6 The spa will perform a diagnostic check and power up in 30 seconds 7 All electronically controlled spas will default to 100 F and filter for two 2 hours twice a day 8 T...

Page 74: ...ctions on the container Do not use chlorinating shock 4 Add 2 oz Stain Scale Defense or 3 oz of Iron Out as directed on the container 5 Add pH Up if needed Always follow directions on the container 6 Add Alkalinity Up if needed Always follow directions on the container 7 Add pH Down if needed Always follow directions on the container BI Weekly 1 Follow the weekly instructions and the following 2 C...

Page 75: ...closing improperly b If the location of your spa is going to be near a sprinkler system make sure you adjust the sprinkler heads away from the spa and or Gazebo As water continually sprayed on the spa cabinet or in the equipment area may cause wood or electrical component damage Requirements for Decking Gates and Balconies a All decking must be able to support 150 pounds per square foot b Surround...

Page 76: ...e or a GFCI cord and plug kit CKIT110 8 GFCI plug should be tested prior to every use To test the GFCI plug version please follow these easy instructions Note Spa should be already plugged in and operational 1 Press the button marked Test on the GFCI The GFCI will trip and the spa will stop operating 2 Press the button marked Reset on the GFCI The GFCI will reset and the spa will turn back on in a...

Page 77: ...r your neutral and a green wire for your ground Note 6 AWG wire acceptable on wire run up to 100 Wire run over 100 must increase wire to 4 AWG 3 Please note that this is the only acceptable electrical wiring procedure Spas wired in any other way will void your warranty and may result in serious injury Before each use of your spa you should check the GFCI During this test the spa should be operatio...

Page 78: ...10 ...

Page 79: ...en valve until closed Do not over tighten 7 Once the water is at the correct level turn on the power at the GFCI breaker Note Ensure110 Volt spas are connected to the proper electrical outlet 8 The spa will perform a diagnostic check for 30 seconds Once complete the spa will automatically operate at filter speed and continue heating until the spa water temperature reaches 100 F This is every elect...

Page 80: ...ng Your new Cal Spa has been designed for quick and easy filter maintenance The filter cartridge should be cleaned once a week 1 Turn the power off at the breaker 2 Remove the filter s cover If equipped 3 Remove the filter s basket Align flat areas on filter basket and canister 4 Remove the filter s by Pulling up and Out clean filter with a garden hose a Hold filter vertically b Spray the filter c...

Page 81: ...tating the air venturi handle to the left Counter clockwise to increase the amount of airflow through the jets To decrease the amount of airflow through the jets simply rotate the handle to the right Clockwise Air Venturies Adjustable Jets Almost all of the jets in your spa are adjustable Rotating the face of an adjustable jet to the left Counter clockwise will decrease the amount of water flow th...

Page 82: ...tion Your Cal Zone Quest 1000 Ozonator will automatically operate during the filter cycles and any other time the spa is running on low speed The Ozone Indicator light on Quest 1000 ozonator itself will glow purple letting you know that the system is operational Note Due to the nature of the ozone light it is difficult to see the light in daylight This lens should be checked at night or in a shade...

Page 83: ...s regained the temperature loss Jet Light Controls One Pump Systems Depress the Jets pad once to activate the spa light Depress the pad a second time to activate the spa light and the low speed pump Depress the pad a third time to activate the spa light and the high speed pump Depress the pad a fourth time to run the high speed pump with the spa light off Depress the pad a fifth time to turn off t...

Page 84: ...stem to run two five hour fil ter cycle 120 240 Conversion The 1500 series spa is a convertible system The conversion from 120 Volts to 240 Volts must be performed by a licensed bonded electrician See 120 to 240 volt conversion instructions located on the inside cover of the control box Note Only spas equipped with 1 5 BHP pumps may be converted to 120 Volt Spas with 2 0BHP pumps or larger can onl...

Page 85: ...WG Copper Overheat The spa has shut down Either the spa has reached a temperature of 112 F or the High limit sensor has detected overheating in the heater manifold DO NOT ENTER THE SPA WATER Remove the spa cover and let the water cool At 110 F the spa should automatically reset If the spa does not automatically reset press any pad on the topside control panel If the spa still won t reset turn off ...

Page 86: ...ive clothing and eyewear when handling chemicals Spa users that notice skin irritation must immediately suspend spa usage and consult their physician Pregnant women should consult their physician prior to using a spa for both chemical and temperature recom mendations Chemical Storage Chemicals must be stored completely out of the reach of children in an area that is well vented cool and dry Failur...

Page 87: ... a sanitizing chemical Chlorine Bromine etc immediately turn off power to the spa and proceed to drain spa water into a safe locally approved area Carefully rinse pillows jets and spa surface with regular tap water Avoid spray ing water directly into the equipment area Refill spa to proper water level turn power back on and then set the filtration time to F6 This will allow water to completely cir...

Page 88: ...ool Most people think of spas as nothing more than a small pool In fact nothing could be further from the truth If anything spas are more like an overgrown bathtub An average pool contains 30 000 gallons of water and operates at approximately 70 F 20 C An average spa only contains 350 gallons of water and operates at 100 F 38 C Since spas have more than 100 times less water than a swimming pool th...

Page 89: ...ntaminates are very difficult to see and can get lodged deep into the filter fibers causing water flow issues You will need to have an extra filter cartridge on hand for the deep cleaning process It is necessary to always have one filter either cleaning or drying and the other installed in the spa This process will double the filter cartridges overall life and performance Filter Cleaning 1 Place t...

Page 90: ...ally would have cleared up with a little Oxidizer Shock and fil tration time 4 Remember swimming pool chemicals are completely different than spa chemicals Entering a spa with wet clothes from a swimming pool can cause a possible chemical reaction to either the spa user and or the spa water Always rinse thoroughly when transferring between a swimming pool and a spa 5 Clean the spas filter s regula...

Page 91: ...F 1 Increases water evaporation 2 Increases chemical dissipation 3 Increases amount of spa user waste 4 Accumulation of minerals and salts 5 Increases Total Dissolved Solids TDS As you can imagine there is an inverse effect with cooler water temperatures Does this mean that you should not operate your spa at higher water temperatures No We just want you to be aware that your chemical usage will in...

Page 92: ... of circulation with the spa cover half off prior to testing 7 Always add chemicals when the pump s are on high speed 8 Always premix pH Alkalinity Down chemicals in half a bucket of water prior to introducing them to the spa 9 Never attempt to adjust pH or Total Alkalinity in large increments Adjustments are made easier and will stay set longer if you make them in small increments Do Not Use Vine...

Page 93: ... than larger adjustments Then you may start adjusting the pH back up by using pH Alkalinity Up in small amounts at a time Q My pH is high and the Total Alkalinity is low What do I do A Add small amounts of pH Alkalinity UP to bring up the alkalinity level first Be sure to allow plenty of circulation and standing time for the waters chemical levels to change This may take anywhere from one 1 to thr...

Page 94: ...ctive minerals in the newly added spa water in a state of Solution The term solution means that miner als in the water are being held in a suspended state keeping them from bonding to anything in the spa and causing damage Mineral con trol is a critical part of maintaining spa components performance and longevity In addition to fill up protection from minerals the Clear Water Plan also recommends ...

Page 95: ...Note Adding water clarifier in this case will only further delay the spas ability to clear up 2 Never enter the spa with sunscreen or lotion on your skin Oil is very difficult to remove from the spa water and can cause a reaction with some of the chemicals that you may add to your spa In addition soap and shampoo residues that are normally left on your body after a shower only increase foamy and c...

Page 96: ...ften in a bucket of clean water Use of Cal Spas Multi Purpose Cleaner Cal Spas Multi Purpose Cleaner should not be spayed directly into the spa water Incorrect product usage may cause water clarity issues Fast Sheen Spa finish protecting wax Cal Spas Fast Sheen is an essential part of maintaining your spas finish Through normal use the spas finish can accumulate dirt oil and calcium causing a roug...

Page 97: ...gh speed This is your base bromine level as the tablets will take awhile to dissolve enough to manage 500 gallons of water 2 Add 2 oz of Oxidizer Shock into the spa with all of the jets on high speed and the spa cover at least half off for 30 min This will remove any organic materials that may have been left in the plumbing lines after its last draining 3 Start by placing 3 to 4 bromine tablets in...

Page 98: ...r freeing up your sanitizer to attack more bacteria and other user waste This act greatly improves your sanitizers performance level and reduces spa odor Oxidizer Shock Shock All shock is not created equal The most common shock you will find in pool and home improvement stores is Chlorinating Shock This will destroy your spas Jets Pillows Pump Seals and worse The only shock that you should put in ...

Page 99: ...ing and implementing the Bromine or Chlorine Clear Water Plans Cal Spas Clear Water Plan Bromine Bromine users This plan and its chemical dosages are intended for Cal Spas Chemicals only Most chemical manufactures use different chemical for mulas and strengths Only Cal Spas chemicals are specially formulated to provide proper chemical balance at lower dosages Compare labels and dosages and see for...

Page 100: ...heck the expiration date prior to use 2 Add two tablespoons Granular Chlorine Chlorine dissipation will vary with water temperature 3 Adjust Total Alkalinity then pH if needed See pH and Alkalinity sections for more information 4 Add 2 oz of Stain and Scale Defense 5 Pull the dirty filter from the spa and place into Liquid Filter Cleaner solution 6 Place your extra cleaned fully dried filter cartr...

Page 101: ...are every bit as important to your spa as Bromine or Chlorine are Q My skin is becoming irritated after spa use Why A You are not using your Cal Spas Oxidizer Shock enough and or your sanitizer level is too high Because the spa and its chemicals will strip some of your bodies oils away We recommend that you use a moisturizer after spa use If you still have skin irritation after these steps see you...

Page 102: ...i um scale and mineral deposits Liquid Hardness Increaser CHE07000250 Increases water hardness to reduce corrosion Helps reduce foaming Spa Brite CHE07000580 CHE07000590 Clears up cloudy water in spas and hot tubs Effective at all spa and hot tub temperatures Foam Gone CHE07000800 CHE07000810 Breaks up existing foam in spa water Effective at all spa and hot tub temperatures pH Alkalinity Up CHE070...

Page 103: ... repairs by non C A I authorized representatives incorrect electrical installation acts of God including but not limited to acts of nature and surrounding environments and any other cases beyond the control of C A I Please refer to the owner s manuals for examples of exclusions and of common acts invalidating this guarantee Disclaimers This Limited Warranty provided herein is made with the express...

Page 104: ...Spas should always be covered when not in use Damage caused as a result of failure to follow operating instructions as defined in this owner s manual Damage caused by Incorrect electrical installation electrical brown outs voltage spikes or operation of spa out of voltage range by more than or 10 Spas improperly installed inground or placed on non approved surfaces See page 5 in this Owner s manua...

Page 105: ... blow any remaining water out of the jets and plumbing lines Use a soft towel to remove any remaining water in the spa filter canister and equipment area Cover your spa with a good spa cover and all weather tarp to ensure rain or snow can not enter the spa If your have a Gas Heater you will need to follow the winterizing instructions for your particular heater in the owner s manual This manual wil...

Page 106: ...icro Jet Insert PLU21702403 3 Maxi Jet Insert PLU21702404 4 Storm Jet Insert PLU21702411 5 Air Venturi PLU21700375 6 On Off Drain Valve PLU21400350 7 Ozone Check Valve OZO18300031 8 50 Sq Ft Filter Cartridge FIL11100190 9 Floating Weir Skimmer Assy FIL11700138 10 Temperature Sensor Housing ELE09900240 EQUIPMENT 1 1 5 BHP 120 Volt Pump Complete V 100 200 PUM22000390 2 2 0 BHP 240 Volt Pump Complete...

Page 107: ...ONTROL Duplication without written consent is strictly prohibited This Owner s Manual is for spas manufactured after January 1 2004 Due to continuous improvement programs all models operation and or specifications are subject to change without prior notice LTR17000175 5 00 ...

Page 108: ...tarting Your Portable Spa 13 Filter Maintenance 14 Operating Instructions 15 5000 Electric Operation 18 Multi Colored Spa Light Operation 21 Cal Spas Clear Water Plan 22 Filters and Filtration 25 Cleaning and Maintenance 26 Water and Your Spa 29 Frequently Asked Questions 36 Warranty 37 Cal Spas Chemicals 39 Warranty Breakdown 40 Parts List 41 Owner s Manual Page 1 ...

Page 109: ...sible fingers pointing down Bend your elbows and try to touch your thumbs to your shoulders Keep your elbows close to your body You do not have to touch your shoulders Then relax your elbows and straighten your arms down at your sides Wrist Bend Bend both of your wrists upward and then downward You can also exercise one wrist at a time by placing your free hand thumb out under the exercising wrist...

Page 110: ...ternative a spa may be installed within 5 feet of metal surfaces if each metal surface is permanently bonded by a minimum No 8 AWG solid copper conductor to the outside of the spas control box DANGER RISK OF ELECTRIC SHOCK Do not permit any electrical appliances such as lights telephones radios televisions and etc within 5 feet 1 5 meters of the spa Never attempt to operate any electrical device f...

Page 111: ...yperthermia may include failure to perceive heat failure to recognize the need to exit unawareness of impending hazard damage to pregnant women physical inability to exit the spa and unconsciousness Following these instructions will make your first spa session a pleasurable one SAVE THIS INFORMATION CONTACT INFORMATION For customer service please contact your authorized dealer immediately If you n...

Page 112: ...ake sure the spa is covered and securely fastened 2 Set the spas operating temperature within 5 of the desired usage temperature and raise the temperature one or two hours prior to usage NOTE This method is only for spa usage under two hours a week 3 If the spa usage exceeds two hours a week the set temperature should remain at the desired usage temperature 4 The air venturi handles should be used...

Page 113: ...t you will need to consider when determining where to place your new spa Safety First Do not place your spa within 10 3m of overhead power lines Make sure the spa is positioned so that access to the equipment compartment and all side panels will not be blocked Be certain that your installation will meet all city and local safety codes and requirements How Will You Use Your Spa How you intend to us...

Page 114: ...ust be permanently connected hard wired to the power supply 120V spas may use a G F C I cord plugged into a dedicated grounded outlet Supplying power to a spa which is not in accordance with these instructions will void both the independent testing agency listing and the manufacturer s warranty 2 The power supplied to the spa must be on a dedicated circuit with no other appliances or lights sharin...

Page 115: ...e slab If you are installing the spa indoors pay close attention to the flooring beneath it Choose flooring that won t be spoiled or stained If you are installing your spa on an elevated wood deck or other structure it is highly recommended that you consult a structural engineer or contractor to ensure the structure will support the weight of 150 Lbs sq ft It is strongly recommended that a qualifi...

Page 116: ...CI cord and plug kit CKIT110 P N ELE09700086 8 GFCI plug should be tested prior to every use To test the GFCI plug version please follow these easy instructions NOTE Spa should already be plugged in and operational A Press the button marked Test on the GFCI The GFCI will trip and the spa will stop operating B Press the button marked Reset on the GFCI The GFCI will reset and the spa will turn back ...

Page 117: ...e be aware that this is the only acceptable electrical wiring procedure Spas wired in any other way will void your warranty and may result in serious injury NOTE Do not install GFCI breakers in main electrical panel The further away a GFCI is installed from the spa the higher the risk of false tripping or resetting of the GFCI breaker NOTE C A I can only recommend the use of square cover Siemens G...

Page 118: ...10 ...

Page 119: ... position 3 Remove the filter basket and cartridge from skimmer filter canister 4 Place a garden hose in the skimmer filter canister and continue filling your spa with regular tap water up to the water level halfway up the skimmer area 5 Open the air relief valve located on the front of the pump housing 6 After the air bubbles stop coming out of the air relief valve hand tighten the valve until it...

Page 120: ... for quick and easy filter maintenance The filter cartridge should be cleaned once a week 1 Turn the power off at the breaker 2 Remove the filter s cover if applicable 3 Remove the filter s basket align the flat areas on the filter basket and the canister 4 Remove the filter s by pulling up and out 5 Clean the filter with a garden hose A Hold the filter vertically B Spray the filter cartridges wit...

Page 121: ...ting the face of an adjustable jet to the left counter clockwise will decrease the amount of water flow through the jet Rotating the face of an adjustable jet to the right clockwise will increase the amount of water flow through the jet NOTE Neck jets will be reversed when adjusting pressure Owner s Manual Operating Instructions Figure 5 Adjustable Jets Storm ZX Jet 7 Face Storm JX Jet 5 1 2 Face ...

Page 122: ...forms of operating signals On the topside control panel there is a yellow light labeled OZONE INDICATOR This light indicates that the Ozonator is receiving power from the control box The second operating signal is the most important Located on the front side towards the bottom is the ozone mixing chamber When operating the lens will display a purple black light NOTE Due to the nature of the ozone ...

Page 123: ... a mixture of air with the jet pressure This is accomplished by simply rotating the air venturi knob to the left counter clock wise to increase the amount of airflow through the jets To decrease the amount of airflow through the jets sim ply rotate the handle to the right clockwise Owner s Manual Operating Instructions Figure 7 Air Venturies ...

Page 124: ... actual water temperature then depressing the temp pad again will allow you to change the direction of the temperature adjustment Standard and Economy Modes Your new spa is equipped with a Standard and Economy heating feature that gives you complete control of the heating system When the spa is powered up it will automatically start in the Standard Heating Mode In this mode the heating system will...

Page 125: ...nd 3 will be activated Depress the Jets button again to turn pumps 2 and 3 off Lights Depress the Light button to turn the spa light on and off NOTE J 505 J 506 J 507 and J 508 have different lighting instructions see page 21 Turbo Optional Depress the Options button once to activate the Turbo system Depress the Options button again to turn off the Turbo system Setting the Temperature Lock Figure ...

Page 126: ... duration of the filtration time depress the Temp pad then press the Jets pad Figure 11 Depress the Temp button again to choose from 2 4 6 8 and 12 hours twice a day FC Filtration Continuous After selecting the desired filtration cycle duration depress the Jets pad to exit the filtration program The circulating pump and ozone generator optional will run during filtration cycles NOTE The filtration...

Page 127: ...in 1 to 2 seconds of each button depression to advance to the next color NOTE If the user waits any longer than the allotted 1 to 2 second time frame the next depression will turn the spa light off 3 To turn the spa light off when not in use depress the Light button Using the Random Light Feature 1 Turn the spa light on by depressing the Light button on the top side control panel 2 Cycle through t...

Page 128: ...ive clothing and eyewear when handling chemicals Spa users that notice skin irritation must immediately suspend spa usage and consult their physician Pregnant women should consult their physician prior to using a spa for both chemical and temperature recom mendations Chemical Storage Chemicals must be stored completely out of the reach of children in an area that is well vented cool and dry Failur...

Page 129: ... a sanitizing chemical Chlorine Bromine etc immediately turn off power to the spa and proceed to drain spa water into a safe locally approved area Carefully rinse pillows jets and spa surface with regular tap water Avoid spray ing water directly into the equipment area Refill spa to proper water level turn power back on and then set the filtration time to F6 This will allow water to completely cir...

Page 130: ...ool Most people think of spas as nothing more than a small pool In fact nothing could be further from the truth If anything spas are more like an overgrown bathtub An average pool contains 30 000 gallons of water and operates at approximately 70 F 20 C An average spa only contains 350 gallons of water and operates at 100 F 38 C Since spas have more than 100 times less water than a swimming pool th...

Page 131: ...ntaminates are very difficult to see and can get lodged deep into the filter fibers causing water flow issues You will need to have an extra filter cartridge on hand for the deep cleaning process It is necessary to always have one filter either cleaning or drying and the other installed in the spa This process will double the filter cartridges overall life and performance Filter Cleaning 1 Place t...

Page 132: ...ally would have cleared up with a little Oxidizer Shock and fil tration time 4 Remember swimming pool chemicals are completely different than spa chemicals Entering a spa with wet clothes from a swimming pool can cause a possible chemical reaction to either the spa user and or the spa water Always rinse thoroughly when transferring between a swimming pool and a spa 5 Clean the spas filter s regula...

Page 133: ...F 1 Increases water evaporation 2 Increases chemical dissipation 3 Increases amount of spa user waste 4 Accumulation of minerals and salts 5 Increases Total Dissolved Solids TDS As you can imagine there is an inverse effect with cooler water temperatures Does this mean that you should not operate your spa at higher water temperatures No We just want you to be aware that your chemical usage will in...

Page 134: ... of circulation with the spa cover half off prior to testing 7 Always add chemicals when the pump s are on high speed 8 Always premix pH Alkalinity Down chemicals in half a bucket of water prior to introducing them to the spa 9 Never attempt to adjust pH or Total Alkalinity in large increments Adjustments are made easier and will stay set longer if you make them in small increments Do Not Use Vine...

Page 135: ... than larger adjustments Then you may start adjusting the pH back up by using pH Alkalinity Up in small amounts at a time Q My pH is high and the Total Alkalinity is low What do I do A Add small amounts of pH Alkalinity UP to bring up the alkalinity level first Be sure to allow plenty of circulation and standing time for the waters chemical levels to change This may take anywhere from one 1 to thr...

Page 136: ...ctive minerals in the newly added spa water in a state of Solution The term solution means that miner als in the water are being held in a suspended state keeping them from bonding to anything in the spa and causing damage Mineral con trol is a critical part of maintaining spa components performance and longevity In addition to fill up protection from minerals the Clear Water Plan also recommends ...

Page 137: ...Note Adding water clarifier in this case will only further delay the spas ability to clear up 2 Never enter the spa with sunscreen or lotion on your skin Oil is very difficult to remove from the spa water and can cause a reaction with some of the chemicals that you may add to your spa In addition soap and shampoo residues that are normally left on your body after a shower only increase foamy and c...

Page 138: ...ften in a bucket of clean water Use of Cal Spas Multi Purpose Cleaner Cal Spas Multi Purpose Cleaner should not be spayed directly into the spa water Incorrect product usage may cause water clarity issues Fast Sheen Spa finish protecting wax Cal Spas Fast Sheen is an essential part of maintaining your spas finish Through normal use the spas finish can accumulate dirt oil and calcium causing a roug...

Page 139: ...gh speed This is your base bromine level as the tablets will take awhile to dissolve enough to manage 500 gallons of water 2 Add 2 oz of Oxidizer Shock into the spa with all of the jets on high speed and the spa cover at least half off for 30 min This will remove any organic materials that may have been left in the plumbing lines after its last draining 3 Start by placing 3 to 4 bromine tablets in...

Page 140: ...r freeing up your sanitizer to attack more bacteria and other user waste This act greatly improves your sanitizers performance level and reduces spa odor Oxidizer Shock Shock All shock is not created equal The most common shock you will find in pool and home improvement stores is Chlorinating Shock This will destroy your spas Jets Pillows Pump Seals and worse The only shock that you should put in ...

Page 141: ...ing and implementing the Bromine or Chlorine Clear Water Plans Cal Spas Clear Water Plan Bromine Bromine users This plan and its chemical dosages are intended for Cal Spas Chemicals only Most chemical manufactures use different chemical for mulas and strengths Only Cal Spas chemicals are specially formulated to provide proper chemical balance at lower dosages Compare labels and dosages and see for...

Page 142: ...heck the expiration date prior to use 2 Add two tablespoons Granular Chlorine Chlorine dissipation will vary with water temperature 3 Adjust Total Alkalinity then pH if needed See pH and Alkalinity sections for more information 4 Add 2 oz of Stain and Scale Defense 5 Pull the dirty filter from the spa and place into Liquid Filter Cleaner solution 6 Place your extra cleaned fully dried filter cartr...

Page 143: ...are every bit as important to your spa as Bromine or Chlorine are Q My skin is becoming irritated after spa use Why A You are not using your Cal Spas Oxidizer Shock enough and or your sanitizer level is too high Because the spa and its chemicals will strip some of your bodies oils away We recommend that you use a moisturizer after spa use If you still have skin irritation after these steps see you...

Page 144: ...i um scale and mineral deposits Liquid Hardness Increaser CHE07000250 Increases water hardness to reduce corrosion Helps reduce foaming Spa Brite CHE07000580 CHE07000590 Clears up cloudy water in spas and hot tubs Effective at all spa and hot tub temperatures Foam Gone CHE07000800 CHE07000810 Breaks up existing foam in spa water Effective at all spa and hot tub temperatures pH Alkalinity Up CHE070...

Page 145: ...nsfer or relocation Warranty Exclusions Limitations This guarantee is void if the spa has been subject to negligence alteration misuse abuse repairs by non C A I authorized personnel incorrect electri cal installation acts of God and any other cases beyond the control of C A I Please refer to the Owner s Manual for examples of exclusions and of common acts invalidating this guarantee Disclaimers T...

Page 146: ... Comp Ball Valve PLU21102002 Gate Valve 2 X Spigot PLU21100250 OZONE Cal Zone Quest 2000 w Grey Plug OZO18000200 Cal Zone Quest 2000 Replacement Cartridge OZO18100020 Ozone Check Valve 3 8 Bx3 8 B OZO18102390 HEATERS XL Heater 5 5 w Teflon Switch Assembly 2003 HEA14100401 Heater Union Black 2 Split HEA14700070 Heater Union w Out O ring White 2 HEA14700080 Heater Gasket 2 O ring w Rib HEA14700030 S...

Page 147: ... Lock Faceplate Cal HAR13000011 Lip Guard Genesis Chrome 7 16 HAR13000060 CABINETS Door Panel Red Jet Wood Cabinet 26 x43 1 2 WOO27513193 Door Panel Red Jet Wood Cabinet 28 x43 1 2 WOO27513131 Door Panel Red Jet Wood Cabinet 34 x43 1 2 WOO27513012 Front Access Red Jet Wood Cabinet 26 x8 1 2 WOO27513195 Front Access Red Jet Wood Cabinet 28 x8 WOO27513134 Front Access Red Jet Wood Cabinet 34 x12 WOO...

Page 148: ...ey Jet Wood Cabinet 34 x16 3 4 WOO27513029 Round Corner Grey Jet Wood Cabinet 26 x12 WOO27513198 Round Corner Grey Jet Wood Cabinet 28 x12 WOO27513129 Round Corner Grey Jet Wood Cabinet 34 x12 WOO27513019 Side Panel Grey Jet Wood Cabinet 26 x50 1 4 WOO27513199 Side Panel Grey Jet Wood Cabinet 26 x60 1 4 WOO27513139 Side Panel Grey Jet Wood Cabinet 28 x59 1 2 WOO27513133 Side Panel Grey Jet Wood Ca...

Page 149: ...C A I Customer Service Department 1462 East Ninth Street Pomona CA 91766 Toll Free 1 800 CAL SPAS Fax 1 909 629 3890 www calspas com ...

Page 150: ...ROL Duplication without written consent is strictly prohibited This Owner s Manual is for spas manufactured after January 1 2004 Due to continuous improvement programs all models operation and or specifications are subject to change without prior notice LTR17000177 www calspas com 5 00 ...

Page 151: ... 12 Filter Maintenance 13 Operating Instructions 14 5000 7000 and 9000 Electrical Operation 17 Cal Spa Flow Diverter 22 Cal Spas Clear Water Plan 23 Filters and Filtration 26 Cleaning and Maintenance 27 Water and Your Spa 30 Frequently Asked Questions 37 Warranty 38 Appendix 40 Cal Spas Entertainment System 41 Cal Spas Chemicals 48 Warranty Breakdown 49 Parts List 50 Owner s Manual Page 1 ...

Page 152: ...sible fingers pointing down Bend your elbows and try to touch your thumbs to your shoulders Keep your elbows close to your body You do not have to touch your shoulders Then relax your elbows and straighten your arms down at your sides Wrist Bend Bend both of your wrists upward and then downward You can also exercise one wrist at a time by placing your free hand thumb out under the exercising wrist...

Page 153: ...ternative a spa may be installed within 5 feet of metal surfaces if each metal surface is permanently bonded by a minimum No 8 AWG solid copper conductor to the outside of the spas control box DANGER RISK OF ELECTRIC SHOCK Do not permit any electrical appliances such as lights telephones radios televisions and etc within 5 feet 1 5 meters of the spa Never attempt to operate any electrical device f...

Page 154: ...yperthermia may include failure to perceive heat failure to recognize the need to exit unawareness of impending hazard damage to pregnant women physical inability to exit the spa and unconsciousness Following these instructions will make your first spa session a pleasurable one SAVE THIS INFORMATION CONTACT INFORMATION For customer service please contact your authorized dealer immediately If you n...

Page 155: ...ke sure the spa is covered and securely fastened 2 Set the spas operating temperature within 5 of the desired usage temperature and raise the temperature one or two hours prior to usage NOTE This method is only for spa usage under two hours a week 3 If the spa usage exceeds two hours a week the set temperature should remain at the desired usage temperature 4 The air venturi handles should be used ...

Page 156: ...t you will need to consider when determining where to place your new spa Safety First Do not place your spa within 10 3m of overhead power lines Make sure the spa is positioned so that access to the equipment compartment and all side panels will not be blocked Be certain that your installation will meet all city and local safety codes and requirements How Will You Use Your Spa How you intend to us...

Page 157: ...t be permanently connected hard wired to the power supply 120V spas may use a G F C I cord plugged into a dedicated grounded outlet Supplying power to a spa which is not in accordance with these instructions will void both the independent testing agency listing and the manufacturer s warranty 2 The power supplied to the spa must be on a dedicated circuit with no other appliances or lights sharing ...

Page 158: ...e slab If you are installing the spa indoors pay close attention to the flooring beneath it Choose flooring that won t be spoiled or stained If you are installing your spa on an elevated wood deck or other structure it is highly recommended that you consult a structural engineer or contractor to ensure the structure will support the weight of 150 Lbs sq ft It is strongly recommended that a qualifi...

Page 159: ...CI cord and plug kit CKIT110 P N ELE09700086 8 GFCI plug should be tested prior to every use To test the GFCI plug version please follow these easy instructions NOTE Spa should already be plugged in and operational A Press the button marked Test on the GFCI The GFCI will trip and the spa will stop operating B Press the button marked Reset on the GFCI The GFCI will reset and the spa will turn back ...

Page 160: ...ase be aware that this is the only acceptable electrical wiring procedure Spas wired in any other way will void your warranty and may result in serious injury NOTE Do not install GFCI breaker in main electrical panel The further away a GFCI is installed from the spa the higher the risk of false tripping or resetting of the GFCI breaker NOTE C A I can only recommend the use of square cover Siemens ...

Page 161: ...Owner s Manual Page 11 Electrical Installation Owner s Manual Figure 3 GFCI Hook Up ...

Page 162: ... position 3 Remove the filter basket and cartridge from skimmer filter canister 4 Place a garden hose in the skimmer filter canister and continue filling your spa with regular tap water up to the water level halfway up the skimmer area 5 Open the air relief valve located on the front of the pump housing 6 After the air bubbles stop coming out of the air relief valve hand tighten the valve until it...

Page 163: ...quick and easy filter maintenance The filter cartridge should be cleaned once a week 1 Turn the power off at the breaker 2 Remove the filter s cover if applicable 3 Remove the filter s basket align the flat areas on the filter basket and the canister 4 Remove the filter s by pulling up and out 5 Clean the filter with a garden hose A Hold the filter vertically B Spray the filter cartridges with a p...

Page 164: ...stable jet to the left counter clockwise will decrease the amount of water flow through the jet Rotating the face of an adjustable jet to the right clockwise will increase the amount of water flow through the jet NOTE Neck jets will be reversed when adjusting pressure Owner s Manual Operating Instructions Figure 5 Adjustable Jets Storm ZX Jet 7 Face Storm JX Jet 5 1 2 Face Micro Swirl Jet 3 Face M...

Page 165: ... of operating signals On the topside control panel there is a yellow light labeled OZONE INDICATOR This light indicates that the Ozonator is receiving power from the control box The second operating signal is the most important Located on the front side towards the bottom is the ozone mixing chamber When operating the lens will display a purple black light NOTE Due to the nature of the ozone light...

Page 166: ...ixture of air with the jet pressure This is accomplished by simply rotating the air venturi knob to the left counter clock wise to increase the amount of airflow through the jets To decrease the amount of airflow through the jets simply rotate the handle to the right clockwise Owner s Manual Operating Instructions Figure 7 Air Venturies ...

Page 167: ... F until you change the set temperature as listed in the Temperature Adjustment section 5000 7000 and 9000 Electronic Operation Owner s Manual Figure 8 5000 Electronic System LED Temp Indicator Cursor Up Cursor Down Time Mode Prog Light Display Temperature Display Pump Display Pump Display Jets1 Clock Not available with the 7000 Heat Ozone Option Invert Jets 2 Light Safety Suction Figure 9 7000 an...

Page 168: ...mperature lock Locking the Panel 7000 and 9000 only Press Time Jets 1 and Cursor within 3 seconds of each other The panel will display PANEL LOCK All buttons are frozen except the Time button To unlock the panel repeat this step Time 9000 only When time hasn t been set a Time icon flashes To set time press Time then ModeProg then use the Cursor buttons to adjust the hours Repeat this step to set t...

Page 169: ...vated by pressing Jets 1 while in Economy Mode and operates the same as standard mode for one hour time a press of the ModeProg button will revert to Economy Mode immediately Sleep Mode Heats the spa to within 20 F of set temperature and only during filter cycles Safety Suction System 5000 7000 and 9000 The spas are equipped with a state of the art Safety Suction System This will automatically shu...

Page 170: ... available options Three options are available r reset to full after filling chemical reservoir n disable the chemical from being dispensed y enable dispensing of that chemical Press Jets1 while the value is flashing to accept the currently displayed setting Press Light to exit and retain the original setting Press Light to exit at any time The menu will be exited automatically if there is 30 seco...

Page 171: ...ut down The high limit sensor or water temperature sensor is not working Call your dealer or service organization Sf Vacuum Switch Spa is shut down The LED will show SF as soon as the vacuum switch closes All functions will turn off and the system will be disabled until a panel button is pressed LED LED indicator light There are LED indicator lights on the topside panel corresponding to heat safet...

Page 172: ...nds Immediately following this start up process the valve s will move to the center position at which time the center LED will light Figure 10 Cal Spas Flow Diverter Every press will move the valve s one stop The LED that is lit will move up clockwise to the next available position Button Functions Every press will move the valve s one stop The LED that is lit will move down counter clockwise to t...

Page 173: ...ive clothing and eyewear when handling chemicals Spa users that notice skin irritation must immediately suspend spa usage and consult their physician Pregnant women should consult their physician prior to using a spa for both chemical and temperature recom mendations Chemical Storage Chemicals must be stored completely out of the reach of children in an area that is well vented cool and dry Failur...

Page 174: ... a sanitizing chemical Chlorine Bromine etc immediately turn off power to the spa and proceed to drain spa water into a safe locally approved area Carefully rinse pillows jets and spa surface with regular tap water Avoid spray ing water directly into the equipment area Refill spa to proper water level turn power back on and then set the filtration time to F6 This will allow water to completely cir...

Page 175: ...ool Most people think of spas as nothing more than a small pool In fact nothing could be further from the truth If anything spas are more like an overgrown bathtub An average pool contains 30 000 gallons of water and operates at approximately 70 F 20 C An average spa only contains 350 gallons of water and operates at 100 F 38 C Since spas have more than 100 times less water than a swimming pool th...

Page 176: ...ntaminates are very difficult to see and can get lodged deep into the filter fibers causing water flow issues You will need to have an extra filter cartridge on hand for the deep cleaning process It is necessary to always have one filter either cleaning or drying and the other installed in the spa This process will double the filter cartridges overall life and performance Filter Cleaning 1 Place t...

Page 177: ...ally would have cleared up with a little Oxidizer Shock and fil tration time 4 Remember swimming pool chemicals are completely different than spa chemicals Entering a spa with wet clothes from a swimming pool can cause a possible chemical reaction to either the spa user and or the spa water Always rinse thoroughly when transferring between a swimming pool and a spa 5 Clean the spas filter s regula...

Page 178: ...F 1 Increases water evaporation 2 Increases chemical dissipation 3 Increases amount of spa user waste 4 Accumulation of minerals and salts 5 Increases Total Dissolved Solids TDS As you can imagine there is an inverse effect with cooler water temperatures Does this mean that you should not operate your spa at higher water temperatures No We just want you to be aware that your chemical usage will in...

Page 179: ... of circulation with the spa cover half off prior to testing 7 Always add chemicals when the pump s are on high speed 8 Always premix pH Alkalinity Down chemicals in half a bucket of water prior to introducing them to the spa 9 Never attempt to adjust pH or Total Alkalinity in large increments Adjustments are made easier and will stay set longer if you make them in small increments Do Not Use Vine...

Page 180: ... than larger adjustments Then you may start adjusting the pH back up by using pH Alkalinity Up in small amounts at a time Q My pH is high and the Total Alkalinity is low What do I do A Add small amounts of pH Alkalinity UP to bring up the alkalinity level first Be sure to allow plenty of circulation and standing time for the waters chemical levels to change This may take anywhere from one 1 to thr...

Page 181: ...ctive minerals in the newly added spa water in a state of Solution The term solution means that miner als in the water are being held in a suspended state keeping them from bonding to anything in the spa and causing damage Mineral con trol is a critical part of maintaining spa components performance and longevity In addition to fill up protection from minerals the Clear Water Plan also recommends ...

Page 182: ...Note Adding water clarifier in this case will only further delay the spas ability to clear up 2 Never enter the spa with sunscreen or lotion on your skin Oil is very difficult to remove from the spa water and can cause a reaction with some of the chemicals that you may add to your spa In addition soap and shampoo residues that are normally left on your body after a shower only increase foamy and c...

Page 183: ...ften in a bucket of clean water Use of Cal Spas Multi Purpose Cleaner Cal Spas Multi Purpose Cleaner should not be spayed directly into the spa water Incorrect product usage may cause water clarity issues Fast Sheen Spa finish protecting wax Cal Spas Fast Sheen is an essential part of maintaining your spas finish Through normal use the spas finish can accumulate dirt oil and calcium causing a roug...

Page 184: ...gh speed This is your base bromine level as the tablets will take awhile to dissolve enough to manage 500 gallons of water 2 Add 2 oz of Oxidizer Shock into the spa with all of the jets on high speed and the spa cover at least half off for 30 min This will remove any organic materials that may have been left in the plumbing lines after its last draining 3 Start by placing 3 to 4 bromine tablets in...

Page 185: ...r freeing up your sanitizer to attack more bacteria and other user waste This act greatly improves your sanitizers performance level and reduces spa odor Oxidizer Shock Shock All shock is not created equal The most common shock you will find in pool and home improvement stores is Chlorinating Shock This will destroy your spas Jets Pillows Pump Seals and worse The only shock that you should put in ...

Page 186: ...ing and implementing the Bromine or Chlorine Clear Water Plans Cal Spas Clear Water Plan Bromine Bromine users This plan and its chemical dosages are intended for Cal Spas Chemicals only Most chemical manufactures use different chemical for mulas and strengths Only Cal Spas chemicals are specially formulated to provide proper chemical balance at lower dosages Compare labels and dosages and see for...

Page 187: ...heck the expiration date prior to use 2 Add two tablespoons Granular Chlorine Chlorine dissipation will vary with water temperature 3 Adjust Total Alkalinity then pH if needed See pH and Alkalinity sections for more information 4 Add 2 oz of Stain and Scale Defense 5 Pull the dirty filter from the spa and place into Liquid Filter Cleaner solution 6 Place your extra cleaned fully dried filter cartr...

Page 188: ...are every bit as important to your spa as Bromine or Chlorine are Q My skin is becoming irritated after spa use Why A You are not using your Cal Spas Oxidizer Shock enough and or your sanitizer level is too high Because the spa and its chemicals will strip some of your bodies oils away We recommend that you use a moisturizer after spa use If you still have skin irritation after these steps see you...

Page 189: ...i um scale and mineral deposits Liquid Hardness Increaser CHE07000250 Increases water hardness to reduce corrosion Helps reduce foaming Spa Brite CHE07000580 CHE07000590 Clears up cloudy water in spas and hot tubs Effective at all spa and hot tub temperatures Foam Gone CHE07000800 CHE07000810 Breaks up existing foam in spa water Effective at all spa and hot tub temperatures pH Alkalinity Up CHE070...

Page 190: ... transfer or relo cation Warranty Exclusions Limitations This guarantee is void if the spa has been subject to negligence alteration misuse abuse repairs by non C A I authorized per sonnel incorrect electrical installation acts of God and any other cases beyond the control of C A I Please refer to the Owner s Manual for examples of exclusions and of common acts invalidating this guarantee Disclaim...

Page 191: ... any other spa chemicals not authorized by C A I Damage caused by improper water chemistry High levels of chlorine bromine calcium pH and other excessive chemical levels Damage caused by direct sunlight Spas should always be covered when not in use Damage caused as a result of failure to follow operating instructions as defined within this Owner s Manual Damage caused by incorrect electrical insta...

Page 192: ...Remove drain plugs from the front of the pumps Disconnect the unions from both sides of the pump Use a wet dry vacuum to blow any remaining water out of the jets and equipment area Cover your spa with a good spa cover and all weather tarp to ensure that neither rain nor snow enter the spa If your spa has a gas heater you will need to follow the winterizing instructions for your particular heater i...

Page 193: ...lowing Chemicals Warranty Information Cal Spas Entertainment System Part Numbers In order for your retailer to expedite your order for parts and accessories it is recommended that you have the information that you attained in the Set Up and Delivery section Customer Service will want all this information for warranty purposes ...

Page 194: ...l need to protect it from water and the elements Do not place wet CD s into this unit at any time Always close the CD protection door Remember water damage is not covered by the warranty Entertainment Systems Cal Flame units equipped with the TV DVD systems use this Splash stereo to broadcast the TV or DVD audio signals Set Up 1 Program preset station 1 to 88 7FM to receive the audio signal that t...

Page 195: ...eo source will change in the following sequence TV AV1 AV2 and AUX 4 Sensor Eye Allows the remote control to operate the LCM1502TV s OSD system On Screen Display volume Wired Headphone Jacks and optional external speakers and for control of Video Media Player connected through a source component harness 5 Three Position Dome Light Switch Auto Automatically switched on the dome lights in conjunctio...

Page 196: ...V channels 7 Enter Push button to confirm changes within the menus 8 Return Switch between current channel and last viewed channel 9 Mute Turn off the volume completely 10 Ch Add Press this button to save currently viewed channel 11 S Video Switch to S Video mode 12 Video Change to video mode 13 Aspect Switch the screen ratio between 4 3 and 16 9 14 Ch Erase Erases the currently viewed channel 15 ...

Page 197: ...rtainment Cal Flame unit Each Cal Flame unit that is equipped with the Splash Stereo system is delivered with the manufacturers operating instructions We strongly recommend that you read these instructions prior to operating this unit NOTE Although this unit is marine grade you will still need to protect it from water and the elements Do not place wet CD s into this unit at any time Always close t...

Page 198: ... and it disappears 3 Video A Video B Compo RGB B and RGB A Use this button to switch between components 4 Mute Turns volume completely 5 Menu Exit Use this button to display or erase menus 6 Remote Signal Transmission Window 7 Aspect Use this button to switch between aspect ratios 8 Power Use this button to turn on off the power 9 Volume Up Down Adjusts volume up and down 10 Use these buttons to s...

Page 199: ... POWER on the Stereo Cd player 3 Move the DVD selector switch Located next to the DVD player to the ON position This will allow the Audio signal to be received by the Stereo CD player NOTE When not using the DVD player the Audio selector switch must be in the of position to receive regular AM an FM broadcasts 4 Tune the Stereo Cd player to 88 7 FM to receive the audio signal 5 Press the OPEN butto...

Page 200: ...te Control to switch Video to COMPOSITE TV 3 Press the A V button on the DVD Remote Control to switch the Video from OUT to IN 4 Press the Channel Up or Down buttons on the TV remote control to select TV Channel Switching Back to DVD Operation 1 Press the SELECT button on the TV Remote Control to switch Video to COMPOSITE VIDEO 2 Press the A V button on the DVD Remote Control to switch the Video f...

Page 201: ...DIVERTER VALVE 1 2 WAY SILVER TEARDROP HANDLE 03 PLU21300038 DIVERTER VALVE 2 WAY SILVER TEARDROP HANDLE 03 PLU21700375 VENT 1 AIR CONTROL SILVER TEARDROP 03 PLU21700635 AROMATHERAPY SILVER TEARDROP HANDLE 03 PLU21702402 SURE FLO STAINLESS STEEL JET INSERT BEARINGLESS 03 PLU21702403 MINI STORM MICRO FLOW JET DIR LG FACE 2 TONE CS2127829 2S PLU21702404 MAXI FLOW LRG FACE JET POLY STORM DIR 2 TONE C...

Page 202: ...17 SX PULSE POWER STORM INTERNAL 5 5 OD CS 3 SCLP ESC CS2126539 2S PLU21700753 SX PULSE POWER STORM INTERNAL 5 5 OD W MTL ESC CS2126539 2SS PLU21702718 6 OVAL FIBER LIGHT PLUS POTTING CS6757500 PLU21700754 JX PWR STORM PULSATOR INT LRG W MTL ESC CS2127719 2SS PLU21700755 ZX PWR STORM PULSATOR INT XTRA LRG W MTL ESC CS2127729 2SS PLU21700756 JX PWR STORM SURE FLO LRG W MTL ESC CS2127649 2SS PLU2170...

Page 203: ...AFLO 5 FLOATING WEIR GREY EXT BTM ASSY FIL1100124 FILTER CARTRIDGE 75 SQ FT 2 ANTI BACTERIAL DYNAFLOW II ELECTRICAL ELE09000192 PARTS ONLY CONTROL BOX W 1 ATS PLUG CS 5000 03 ELE09000193 PARTS ONLY CONTROL BOX W 2 ATS PLUGS CS 5000 03 ELE09000194 CONTROL BOX CS 5300 03 3 PUMP ELE09000197 CONTROL BOX CS 5000 03 ELE09000199 CONTROL BOX 1500 1 PUMP END LITE LEADER SYSTEM ELE09000201 CONTROL BOX 1500 ...

Page 204: ...RED WOO27513333 CAB CRNR PNL 26 X 12 CAL SELECT RED WOO27513334 CAB CRNR PNL 32 1 2 X 12 CAL SELECT GREY WOO27513335 CAB CRNR PNL 32 1 2 X 12 CAL SELECT RED WOO27513336 CAB DOOR PNL 24 1 2 X 43 1 2 CAL SELECT RED WOO27513337 CAB DOOR PNL 24 1 2 X 35 1 8 CAL SELECT GREY WOO27513338 CAB DOOR PNL 24 1 2 X 35 1 8 CAL SELECT RED WOO27513339 CAB DOOR PNL 24 1 2 X 43 1 2 CAL SELECT GREY WOO27513341 CAB D...

Page 205: ... 1 2 X 9 1 2 CAL SELECT GREY WOO27513384 CAB FRNT PNL 24 1 2 X 9 1 2 CAL SELECT RED WOO27513385 CAB FRNT PNL 26 X 8 1 2 CAL SELECT GREY WOO27513386 CAB FRNT PNL 26 X 8 1 2 CAL SELECT RED WOO27513387 CAB FRNT PNL 28 X 8 CAL SELECT RED J502 WOO27513388 CAB FRNT PNL 28 X 8 CAL SELECT GREY J502 WOO27513389 CAB FRNT PNL 32 1 2 X 12 CAL SELECT GREY WOO27513390 CAB FRNT PNL 32 1 2 X 12 CAL SELECT RED WOO...

Page 206: ...CAL SELECT GREY WOO27513431 CAB SIDE PNL 26 X 68 1 2 CAL SELECT GREY WOO27513432 CAB SIDE PNL 26 X 68 1 2 CAL SELECT RED WOO27513434 CAB SIDE PNL 34 X 57 1 2 CAL SELECT GREY WOO27513435 CAB SIDE PNL 34 X 57 1 2 CAL SELECT RED WOO27513436 CAB SIDE PNL 34 X 58 1 4 CAL SELECT GREY WOO27513437 CAB SIDE PNL 34 X 58 1 4 CAL SELECT RED WOO27513438 CAB SIDE PNL 34 X 61 CAL SELECT GREY WOO27513439 CAB SIDE...

Page 207: ...C A I Customer Service Department 1462 East Ninth Street Pomona CA 91766 Toll Free 1 800 CAL SPAS Fax 1 909 629 3890 www calspas com ...

Page 208: ...L Duplication without written consent is strictly prohibited This Owner s Manual is for spas manufactured after May 3 2004 Due to continuous improvement programs all models operation and or specifications are subject to change without prior notice LTR17000176 www calspas com 5 00 ...

Page 209: ...ce 13 Operating Instructions 14 9000 and 1500 Electrical Operation 17 Ajustable Therapy System 25 Cal Spa Flow Diverter 27 Multi Colored Spa Light Operation 28 Splash Stereo and Entertainment 29 Cal Spas Clear Water Plan 35 Filters and Filtration 38 Cleaning and Maintenance 39 Water and Your Spa 42 Frequently Asked Questions 49 Chemicals 50 Warranty Breakdown 52 Warranty 53 Parts List 54 Owner s M...

Page 210: ...sible fingers pointing down Bend your elbows and try to touch your thumbs to your shoulders Keep your elbows close to your body You do not have to touch your shoulders Then relax your elbows and straighten your arms down at your sides Wrist Bend Bend both of your wrists upward and then downward You can also exercise one wrist at a time by placing your free hand thumb out under the exercising wrist...

Page 211: ...ate marked on the original suction fitting DANGER RISK OF ELECTRIC SHOCK Install the spa at least 5 feet 1 5 meters from all metal surfaces As an alternative a spa may be installed within 5 feet of metal surfaces if each metal surface is permanently bonded by a minimum No 8 AWG solid copper conductor to the outside of the spas control box DANGER RISK OF ELECTRIC SHOCK Do not permit any electrical ...

Page 212: ...level 3 to 6 above the normal body temperature of 37 C 98 6 F While hypothermia has many health benefits it is important not to allow your body s core temperature to rise above 103 F Symptoms of excessive hyperthermia include dizziness lethargy drowsiness and fainting The effects of excessive hypothermia may include failure to perceive heat failure to recognize the need to exit unawareness of impe...

Page 213: ... sure the spa is covered and securely fastened 2 Set the spas operating temperature within 5 of the desired usage temperature and raise the temperature one or two hours prior to usage NOTE This method is only for spa usage under two hours a week 3 If the spa usage exceeds two hours a week the set temperature should remain at the desired usage temperature 4 The air venturi handles should be used sp...

Page 214: ...t you will need to consider when determining where to place your new spa Safety First Do not place your spa within 10 3m of overhead power lines Make sure the spa is positioned so that access to the equipment compartment and all side panels will not be blocked Be certain that your installation will meet all city and local safety codes and requirements How Will You Use Your Spa How you intend to us...

Page 215: ...t be permanently connected hard wired to the power supply 120V spas may use a G F C I cord plugged into a dedicated grounded outlet Supplying power to a spa which is not in accordance with these instructions will void both the independent testing agency listing and the manufacturer s warranty 2 The power supplied to the spa must be on a dedicated circuit with no other appliances or lights sharing ...

Page 216: ...e slab If you are installing the spa indoors pay close attention to the flooring beneath it Choose flooring that won t be spoiled or stained If you are installing your spa on an elevated wood deck or other structure it is highly recommended that you consult a structural engineer or contractor to ensure the structure will support the weight of 150 Lbs sq ft It is strongly recommended that a qualifi...

Page 217: ...CI cord and plug kit CKIT110 P N ELE09700086 8 GFCI plug should be tested prior to every use To test the GFCI plug version please follow these easy instructions NOTE Spa should already be plugged in and operational A Press the button marked Test on the GFCI The GFCI will trip and the spa will stop operating B Press the button marked Reset on the GFCI The GFCI will reset and the spa will turn back ...

Page 218: ...ase be aware that this is the only acceptable electrical wiring procedure Spas wired in any other way will void your warranty and may result in serious injury NOTE Do not install GFCI breaker in main electrical panel The further away a GFCI is installed from the spa the higher the risk of false tripping or resetting of the GFCI breaker NOTE C A I can only recommend the use of square cover Siemens ...

Page 219: ...Owner s Manual Page 11 Electrical Installation Owner s Manual Figure 3 GFCI Hook Up ...

Page 220: ...a these valves must be in the up or open position 3 Remove the filter basket and cartridge from skimmer filter canister 4 Place a garden hose in the skimmer filter canister and continue filling your spa with regular tap water up to the water level halfway up the skimmer area 5 Open the air relief valve located on the front of the pump housing 6 After the air bubbles stop coming out of the air reli...

Page 221: ...quick and easy filter maintenance The filter cartridge should be cleaned once a week 1 Turn the power off at the breaker 2 Remove the filter s cover if applicable 3 Remove the filter s basket align the flat areas on the filter basket and the canister 4 Remove the filter s by pulling up and out 5 Clean the filter with a garden hose A Hold the filter vertically B Spray the filter cartridges with a p...

Page 222: ...stable jet to the left counter clockwise will decrease the amount of water flow through the jet Rotating the face of an adjustable jet to the right clockwise will increase the amount of water flow through the jet NOTE Neck jets will be reversed when adjusting pressure Owner s Manual Operating Instructions Figure 5 Adjustable Jets Storm ZX Jet 7 Face Storm JX Jet 5 1 2 Face Micro Swirl Jet 3 Face M...

Page 223: ... of operating signals On the topside control panel there is a yellow light labeled OZONE INDICATOR This light indicates that the Ozonator is receiving power from the control box The second operating signal is the most important Located on the front side towards the bottom is the ozone mixing chamber When operating the lens will display a purple black light NOTE Due to the nature of the ozone light...

Page 224: ...ixture of air with the jet pressure This is accomplished by simply rotating the air venturi knob to the left counter clock wise to increase the amount of airflow through the jets To decrease the amount of airflow through the jets simply rotate the handle to the right clockwise Owner s Manual Operating Instructions Figure 7 Air Venturies ...

Page 225: ...ration Owner s Manual LED Temp Indicator Cursor Up Cursor Down Time Mode Prog Light Display Temperature Display Pump Display Pump Display Jets1 Clock Not available with the 7000 Heat Ozone Option Invert Jets 2 Light Safety Suction Figure 9 9000 w Clock Electronic System ...

Page 226: ...ock Locking the Panel Press Time Jets 1 and Cursor within 3 seconds of each other The panel will display PANEL LOCK All buttons are frozen except the Time button To unlock the panel repeat this step Time When time hasn t been set a Time icon flashes To set time press Time then ModeProg then use the Cursor buttons to adjust the hours Repeat this step to set the minutes Preset Filter Cycles You can ...

Page 227: ...as standard mode for one hour time a press of the ModeProg button will revert to Economy Mode immediately Sleep Mode Heats the spa to within 20 F of set temperature and only during filter cycles Safety Suction System The spas are equipped with a state of the art Safety Suction System This will automatically shut down the spa in the event of a filtration or suction restriction SF will display on th...

Page 228: ...ble options Three options are available r reset to full after filling chemical reservoir n disable the chemical from being dispensed y enable dispensing of that chemical Press Jets1 while the value is flashing to accept the currently displayed setting Press Light to exit and retain the original setting Press Light to exit at any time The menu will be exited automatically if there is 30 seconds of ...

Page 229: ...No power OHH Overheat The spa will shut down if the sensor detects 118 F at the heater OHS Overheat The spa will shut down if the sensor detects that the water is 110 F ICE Ice Potential freeze condition SnA Spa is shut down The sensor that is plugged into Sensor A jack is not working Snb Spa is shut down The sensor that is plugged into Sensor B jack is not working SnS Sensors are out of balance I...

Page 230: ...et Light Controls One Pump Systems Depress the Jets pad once to activate the spa light Depress the pad a second time to activate the spa light and the low speed pump Depress the pad a third time to activate the spa light and the high speed pump Depress the pad a fourth time to run the high speed pump with the spa light off Depress the pad a fifth time to turn off the high speed pump Jet Light Cont...

Page 231: ...Spas authorized service technician can reconfigure your system to run two five hour filter cycle 120 240 Conversion The 1500 series spa is a convertible system The conversion from 120 Volts to 240 Volts must be per formed by a licensed bonded electrician See 120 to 240 volt conversion instructions located on the inside cover of the control box Note Only spas equipped with 1 5 BHP pumps may be conv...

Page 232: ...lly operate during the filter cycles and any other time the spa is running on low speed The Ozone Indicator light on Quest 1000 ozonator itself will glow purple letting you know that the system is operational Note Due to the nature of the ozone light it is difficult to see the light in daylight This lens should be checked at night or in a shaded condition Cal Zone Quest 1000 Ozonator General Opera...

Page 233: ...features of this system Pulse Mode This button allows the user to turn the Adjustable Therapy Seat massage control On Off Press the pulse button once to turn on the massage control Once pressed the Orange LED in position number 1will come on signifying the number one pulse mode Each press of either the up or down button will move the Orange LED up or down to the next pulse mode NOTE Allow one seco...

Page 234: ... the panel will continue to blink for a period of 1 minute then shutoff automatically Pulse Mode System Pulse mode system will shut off for two hours unless reset by the following procedure During this time the pump will run at a maximum speed 1 In the off position press the pulse mode 1 time 2 Power green light will flash to indicate reset IMPORTANT This system will automatically turn itself off ...

Page 235: ...onds Immediately following this start up process the valve s will move to the center psoition at which time the center LED will light Figure 10 Cal Spas Flow Diverter Every press will move the valve s one stop The LED that is lit will move up clockwise to the next available position Button Functions Every press will move the valve s one stop The LED that is lit will move down counter clockwise to ...

Page 236: ...nel 2 To filter through the different color choices the user must depress the button within 1 to 2 seconds of each button depression to advance to the next color NOTE If the user waits any longer than the allotted 1 to 2 second time frame the next depression will turn the spa light off 3 To turn the spa light off when not in use depress the Light button Using the Random Light Feature 1 Turn the sp...

Page 237: ...and the elements Do not place wet CD s into this unit at any time Always close the CD protection door Remember water damage is not covered by the warranty Entertainment Systems Cal Spas Entertainment System units equipped with the TV DVD systems use this Splash stereo to broad cast the TV or DVD audio signals Set Up 1 Push the power button untill the cd player displays AUX 2 Set Bass to 3 As descr...

Page 238: ...hange in the following sequence TV AV1 AV2 and AUX 4 Sensor Eye Allows the remote control to operate the LCM1502TV s OSD system On Screen Display volume Wired Headphone Jacks and optional external speakers and for control of Video Media Player connected through a source component harness 5 Three Position Dome Light Switch Auto Automatically switched on the dome lights in conjunction with the vehic...

Page 239: ...V channels 7 Enter Push button to confirm changes within the menus 8 Return Switch between current channel and last viewed channel 9 Mute Turn off the volume completely 10 Ch Add Press this button to save currently viewed channel 11 S Video Switch to S Video mode 12 Video Change to video mode 13 Aspect Switch the screen ratio between 4 3 and 16 9 14 Ch Erase Erases the currently viewed channel 15 ...

Page 240: ...ess the POWER button on the DVD unit or remote control to turn the system on A Welcome DVD Video banner will be displayed across the screen 2 Press POWER on the Stereo Cd player and set it to aux 3 Press the OPEN button on the DVD player and insert a DVD CAUTION DO NOT INSERT WET DVD S 4 Press either the ENTER button on the DVD player or the Play button on the remote control to start the DVD IMPOR...

Page 241: ... button on the TV Remote Control to switch Video 3 Press the A V button on the DVD Remote Control to switch the Video from OUT to IN 4 Press the Channel Up or Down buttons on the TV remote control to select TV Channel Switching Back to DVD Operation 1 Press the TV button on the TV Remote Control to switch Video to TV 2 Press the A V button on the DVD Remote Control to switch the Video from IN to O...

Page 242: ...he following Clear Water Plan Chemicals Warranty Information Part Numbers In order for your retailer to expedite your order for parts and accessories it is recommended that you have the information that you attained in the Set Up and Delivery section Customer Service will want all this information for warranty purposes ...

Page 243: ...ive clothing and eyewear when handling chemicals Spa users that notice skin irritation must immediately suspend spa usage and consult their physician Pregnant women should consult their physician prior to using a spa for both chemical and temperature recom mendations Chemical Storage Chemicals must be stored completely out of the reach of children in an area that is well vented cool and dry Failur...

Page 244: ... a sanitizing chemical Chlorine Bromine etc immediately turn off power to the spa and proceed to drain spa water into a safe locally approved area Carefully rinse pillows jets and spa surface with regular tap water Avoid spray ing water directly into the equipment area Refill spa to proper water level turn power back on and then set the filtration time to F6 This will allow water to completely cir...

Page 245: ...ool Most people think of spas as nothing more than a small pool In fact nothing could be further from the truth If anything spas are more like an overgrown bathtub An average pool contains 30 000 gallons of water and operates at approximately 70 F 20 C An average spa only contains 350 gallons of water and operates at 100 F 38 C Since spas have more than 100 times less water than a swimming pool th...

Page 246: ...ntaminates are very difficult to see and can get lodged deep into the filter fibers causing water flow issues You will need to have an extra filter cartridge on hand for the deep cleaning process It is necessary to always have one filter either cleaning or drying and the other installed in the spa This process will double the filter cartridges overall life and performance Filter Cleaning 1 Place t...

Page 247: ...ally would have cleared up with a little Oxidizer Shock and fil tration time 4 Remember swimming pool chemicals are completely different than spa chemicals Entering a spa with wet clothes from a swimming pool can cause a possible chemical reaction to either the spa user and or the spa water Always rinse thoroughly when transferring between a swimming pool and a spa 5 Clean the spas filter s regula...

Page 248: ...F 1 Increases water evaporation 2 Increases chemical dissipation 3 Increases amount of spa user waste 4 Accumulation of minerals and salts 5 Increases Total Dissolved Solids TDS As you can imagine there is an inverse effect with cooler water temperatures Does this mean that you should not operate your spa at higher water temperatures No We just want you to be aware that your chemical usage will in...

Page 249: ... of circulation with the spa cover half off prior to testing 7 Always add chemicals when the pump s are on high speed 8 Always premix pH Alkalinity Down chemicals in half a bucket of water prior to introducing them to the spa 9 Never attempt to adjust pH or Total Alkalinity in large increments Adjustments are made easier and will stay set longer if you make them in small increments Do Not Use Vine...

Page 250: ... than larger adjustments Then you may start adjusting the pH back up by using pH Alkalinity Up in small amounts at a time Q My pH is high and the Total Alkalinity is low What do I do A Add small amounts of pH Alkalinity UP to bring up the alkalinity level first Be sure to allow plenty of circulation and standing time for the waters chemical levels to change This may take anywhere from one 1 to thr...

Page 251: ...ctive minerals in the newly added spa water in a state of Solution The term solution means that miner als in the water are being held in a suspended state keeping them from bonding to anything in the spa and causing damage Mineral con trol is a critical part of maintaining spa components performance and longevity In addition to fill up protection from minerals the Clear Water Plan also recommends ...

Page 252: ...Note Adding water clarifier in this case will only further delay the spas ability to clear up 2 Never enter the spa with sunscreen or lotion on your skin Oil is very difficult to remove from the spa water and can cause a reaction with some of the chemicals that you may add to your spa In addition soap and shampoo residues that are normally left on your body after a shower only increase foamy and c...

Page 253: ...ften in a bucket of clean water Use of Cal Spas Multi Purpose Cleaner Cal Spas Multi Purpose Cleaner should not be spayed directly into the spa water Incorrect product usage may cause water clarity issues Fast Sheen Spa finish protecting wax Cal Spas Fast Sheen is an essential part of maintaining your spas finish Through normal use the spas finish can accumulate dirt oil and calcium causing a roug...

Page 254: ...gh speed This is your base bromine level as the tablets will take awhile to dissolve enough to manage 500 gallons of water 2 Add 2 oz of Oxidizer Shock into the spa with all of the jets on high speed and the spa cover at least half off for 30 min This will remove any organic materials that may have been left in the plumbing lines after its last draining 3 Start by placing 3 to 4 bromine tablets in...

Page 255: ...r freeing up your sanitizer to attack more bacteria and other user waste This act greatly improves your sanitizers performance level and reduces spa odor Oxidizer Shock Shock All shock is not created equal The most common shock you will find in pool and home improvement stores is Chlorinating Shock This will destroy your spas Jets Pillows Pump Seals and worse The only shock that you should put in ...

Page 256: ...ing and implementing the Bromine or Chlorine Clear Water Plans Cal Spas Clear Water Plan Bromine Bromine users This plan and its chemical dosages are intended for Cal Spas Chemicals only Most chemical manufactures use different chemical for mulas and strengths Only Cal Spas chemicals are specially formulated to provide proper chemical balance at lower dosages Compare labels and dosages and see for...

Page 257: ...heck the expiration date prior to use 2 Add two tablespoons Granular Chlorine Chlorine dissipation will vary with water temperature 3 Adjust Total Alkalinity then pH if needed See pH and Alkalinity sections for more information 4 Add 2 oz of Stain and Scale Defense 5 Pull the dirty filter from the spa and place into Liquid Filter Cleaner solution 6 Place your extra cleaned fully dried filter cartr...

Page 258: ...are every bit as important to your spa as Bromine or Chlorine are Q My skin is becoming irritated after spa use Why A You are not using your Cal Spas Oxidizer Shock enough and or your sanitizer level is too high Because the spa and its chemicals will strip some of your bodies oils away We recommend that you use a moisturizer after spa use If you still have skin irritation after these steps see you...

Page 259: ...d ultraviolet damage Unique water based chemically reactive sili cone sealant and polish Seals shines and protects spa surfaces Sanitizer disinfectant for Spas and Hot Tubs When use as directed this product is effective as a spa and hot tub water disinfecting agent Establishes a bromide bank in spas and hot tubs Breaks down organic an inorganic material Removes calcium scale and mineral deposits I...

Page 260: ...Remove drain plugs from the front of the pumps Disconnect the unions from both sides of the pump Use a wet dry vacuum to blow any remaining water out of the jets and equipment area Cover your spa with a good spa cover and all weather tarp to ensure that neither rain nor snow enter the spa If your spa has a gas heater you will need to follow the winterizing instructions for your particular heater i...

Page 261: ...any other spa chemicals not authorized by C A I Damage caused by improper water chemistry High levels of chlorine bromine calcium pH and other excessive chemical levels Damage caused by direct sunlight Spas should always be covered when not in use Damage caused as a result of failure to follow operating instructions as defined within this Owner s Manual Damage caused by incorrect electrical instal...

Page 262: ...hase and ends either by specified time frame listed above owner transfer or relo cation Warranty Exclusions Limitations This guarantee is void if the spa has been subject to negligence alteration misuse abuse repairs by non C A I authorized per sonnel incorrect electrical installation acts of God and any other cases beyond the control of C A I Please refer to the Owner s Manual for examples of exc...

Page 263: ... VALVE 1 2 WAY SILVER TEARDROP HANDLE 03 PLU21300038 DIVERTER VALVE 2 WAY SILVER TEARDROP HANDLE 03 PLU21700375 VENT 1 AIR CONTROL SILVER TEARDROP 03 PLU21700635 AROMATHERAPY SILVER TEARDROP HANDLE 03 PLU21702402 SURE FLO STAINLESS STEEL JET INSERT BEARINGLESS 03 PLU21702403 MINI STORM MICRO FLOW JET DIR LG FACE 2 TONE CS2127829 2S PLU21702404 MAXI FLOW LRG FACE JET POLY STORM DIR 2 TONE CS2128169...

Page 264: ...17 SX PULSE POWER STORM INTERNAL 5 5 OD CS 3 SCLP ESC CS2126539 2S PLU21700753 SX PULSE POWER STORM INTERNAL 5 5 OD W MTL ESC CS2126539 2SS PLU21702718 6 OVAL FIBER LIGHT PLUS POTTING CS6757500 PLU21700754 JX PWR STORM PULSATOR INT LRG W MTL ESC CS2127719 2SS PLU21700755 ZX PWR STORM PULSATOR INT XTRA LRG W MTL ESC CS2127729 2SS PLU21700756 JX PWR STORM SURE FLO LRG W MTL ESC CS2127649 2SS PLU2170...

Page 265: ... EXT BTM ASSY FIL1100124 FILTER CARTRIDGE 75 SQ FT 2 ANTI BACTERIAL DYNAFLOW II FIL11100193 FILTER CARTRIDGE ANTI BACTERIAL 35 SQ ELECTRICAL ELE09000192 PARTS ONLY CONTROL BOX W 1 ATS PLUG CS 5000 03 ELE09000193 PARTS ONLY CONTROL BOX W 2 ATS PLUGS CS 5000 03 ELE09000194 CONTROL BOX CS 5300 03 3 PUMP ELE09000197 CONTROL BOX CS 5000 03 ELE09000199 CONTROL BOX 1500 1 PUMP END LITE LEADER SYSTEM ELE0...

Page 266: ...RED WOO27513333 CAB CRNR PNL 26 X 12 CAL SELECT RED WOO27513334 CAB CRNR PNL 32 1 2 X 12 CAL SELECT GREY WOO27513335 CAB CRNR PNL 32 1 2 X 12 CAL SELECT RED WOO27513336 CAB DOOR PNL 24 1 2 X 43 1 2 CAL SELECT RED WOO27513337 CAB DOOR PNL 24 1 2 X 35 1 8 CAL SELECT GREY WOO27513338 CAB DOOR PNL 24 1 2 X 35 1 8 CAL SELECT RED WOO27513339 CAB DOOR PNL 24 1 2 X 43 1 2 CAL SELECT GREY WOO27513341 CAB D...

Page 267: ... 1 2 X 9 1 2 CAL SELECT GREY WOO27513384 CAB FRNT PNL 24 1 2 X 9 1 2 CAL SELECT RED WOO27513385 CAB FRNT PNL 26 X 8 1 2 CAL SELECT GREY WOO27513386 CAB FRNT PNL 26 X 8 1 2 CAL SELECT RED WOO27513387 CAB FRNT PNL 28 X 8 CAL SELECT RED J502 WOO27513388 CAB FRNT PNL 28 X 8 CAL SELECT GREY J502 WOO27513389 CAB FRNT PNL 32 1 2 X 12 CAL SELECT GREY WOO27513390 CAB FRNT PNL 32 1 2 X 12 CAL SELECT RED WOO...

Page 268: ... CAL SELECT GREY WOO27513431 CAB SIDE PNL 26 X 68 1 2 CAL SELECT GREY WOO27513432 CAB SIDE PNL 26 X 68 1 2 CAL SELECT RED WOO27513434 CAB SIDE PNL 34 X 57 1 2 CAL SELECT GREY WOO27513435 CAB SIDE PNL 34 X 57 1 2 CAL SELECT RED WOO27513436 CAB SIDE PNL 34 X 58 1 4 CAL SELECT GREY WOO27513437 CAB SIDE PNL 34 X 58 1 4 CAL SELECT RED WOO27513438 CAB SIDE PNL 34 X 61 CAL SELECT GREY WOO27513439 CAB SID...

Page 269: ...CAL SELECT RED W O RAIL WOO27513350 CAB DOOR PNL 34 X 43 1 2 CAL SELECT RED WOO27513375 CAB FRNT PNL 34 X 12 CAL SELECT RED 7 5 WOO27513329 CAB CRNR PNL 34 X 12 CAL SELECT RED WOO27513452 CAB SIDE BACK PNL 34 X 77 1 4 CAL SELECT RED WOO27513442 CAB SIDE PNL 34 X 68 CAL SELECT RED 7 5 OPT98936G H902 H908 CAB CAL SELECT GREY W O RAIL WOO27513349 CAB DOOR PNL 34 X 43 1 2 CAL SELECT GREY WOO27513374 C...

Page 270: ...st Ninth Street Pomona CA 91766 Toll Free 1 800 CAL SPAS Fax 1 909 629 3890 www calspas com S E LF CONTAINED S P A S U I T A B L E F O R INDOOR OR OU T D O O R U S E UL LISTED 77K8 c S E LF CONTAINED S P A S U I T A B L E F O R INDOOR OR OU T D O O R U S E UL LISTED 77K8 ...

Page 271: ...OL Duplication without written consent is strictly prohibited This Owner s Manual is for spas manufactured after January 1 2004 Due to continuous improvement programs all models operation and or specifications are subject to change without prior notice LTR17000176 www calspas com 5 00 ...

Page 272: ... 12 Filter Maintenance 13 Operating Instructions 14 5000 7000 and 9000 Electrical Operation 17 Cal Spa Flow Diverter 22 Cal Spas Clear Water Plan 23 Filters and Filtration 26 Cleaning and Maintenance 27 Water and Your Spa 30 Frequently Asked Questions 37 Warranty 38 Appendix 40 Cal Spas Entertainment System 41 Cal Spas Chemicals 48 Warranty Breakdown 49 Parts List 50 Owner s Manual Page 1 ...

Page 273: ...sible fingers pointing down Bend your elbows and try to touch your thumbs to your shoulders Keep your elbows close to your body You do not have to touch your shoulders Then relax your elbows and straighten your arms down at your sides Wrist Bend Bend both of your wrists upward and then downward You can also exercise one wrist at a time by placing your free hand thumb out under the exercising wrist...

Page 274: ...ternative a spa may be installed within 5 feet of metal surfaces if each metal surface is permanently bonded by a minimum No 8 AWG solid copper conductor to the outside of the spas control box DANGER RISK OF ELECTRIC SHOCK Do not permit any electrical appliances such as lights telephones radios televisions and etc within 5 feet 1 5 meters of the spa Never attempt to operate any electrical device f...

Page 275: ...yperthermia may include failure to perceive heat failure to recognize the need to exit unawareness of impending hazard damage to pregnant women physical inability to exit the spa and unconsciousness Following these instructions will make your first spa session a pleasurable one SAVE THIS INFORMATION CONTACT INFORMATION For customer service please contact your authorized dealer immediately If you n...

Page 276: ...ke sure the spa is covered and securely fastened 2 Set the spas operating temperature within 5 of the desired usage temperature and raise the temperature one or two hours prior to usage NOTE This method is only for spa usage under two hours a week 3 If the spa usage exceeds two hours a week the set temperature should remain at the desired usage temperature 4 The air venturi handles should be used ...

Page 277: ...t you will need to consider when determining where to place your new spa Safety First Do not place your spa within 10 3m of overhead power lines Make sure the spa is positioned so that access to the equipment compartment and all side panels will not be blocked Be certain that your installation will meet all city and local safety codes and requirements How Will You Use Your Spa How you intend to us...

Page 278: ...t be permanently connected hard wired to the power supply 120V spas may use a G F C I cord plugged into a dedicated grounded outlet Supplying power to a spa which is not in accordance with these instructions will void both the independent testing agency listing and the manufacturer s warranty 2 The power supplied to the spa must be on a dedicated circuit with no other appliances or lights sharing ...

Page 279: ...e slab If you are installing the spa indoors pay close attention to the flooring beneath it Choose flooring that won t be spoiled or stained If you are installing your spa on an elevated wood deck or other structure it is highly recommended that you consult a structural engineer or contractor to ensure the structure will support the weight of 150 Lbs sq ft It is strongly recommended that a qualifi...

Page 280: ...CI cord and plug kit CKIT110 P N ELE09700086 8 GFCI plug should be tested prior to every use To test the GFCI plug version please follow these easy instructions NOTE Spa should already be plugged in and operational A Press the button marked Test on the GFCI The GFCI will trip and the spa will stop operating B Press the button marked Reset on the GFCI The GFCI will reset and the spa will turn back ...

Page 281: ...ase be aware that this is the only acceptable electrical wiring procedure Spas wired in any other way will void your warranty and may result in serious injury NOTE Do not install GFCI breaker in main electrical panel The further away a GFCI is installed from the spa the higher the risk of false tripping or resetting of the GFCI breaker NOTE C A I can only recommend the use of square cover Siemens ...

Page 282: ...Owner s Manual Page 11 Electrical Installation Owner s Manual Figure 3 GFCI Hook Up ...

Page 283: ... position 3 Remove the filter basket and cartridge from skimmer filter canister 4 Place a garden hose in the skimmer filter canister and continue filling your spa with regular tap water up to the water level halfway up the skimmer area 5 Open the air relief valve located on the front of the pump housing 6 After the air bubbles stop coming out of the air relief valve hand tighten the valve until it...

Page 284: ...quick and easy filter maintenance The filter cartridge should be cleaned once a week 1 Turn the power off at the breaker 2 Remove the filter s cover if applicable 3 Remove the filter s basket align the flat areas on the filter basket and the canister 4 Remove the filter s by pulling up and out 5 Clean the filter with a garden hose A Hold the filter vertically B Spray the filter cartridges with a p...

Page 285: ...stable jet to the left counter clockwise will decrease the amount of water flow through the jet Rotating the face of an adjustable jet to the right clockwise will increase the amount of water flow through the jet NOTE Neck jets will be reversed when adjusting pressure Owner s Manual Operating Instructions Figure 5 Adjustable Jets Storm ZX Jet 7 Face Storm JX Jet 5 1 2 Face Micro Swirl Jet 3 Face M...

Page 286: ... of operating signals On the topside control panel there is a yellow light labeled OZONE INDICATOR This light indicates that the Ozonator is receiving power from the control box The second operating signal is the most important Located on the front side towards the bottom is the ozone mixing chamber When operating the lens will display a purple black light NOTE Due to the nature of the ozone light...

Page 287: ...ixture of air with the jet pressure This is accomplished by simply rotating the air venturi knob to the left counter clock wise to increase the amount of airflow through the jets To decrease the amount of airflow through the jets simply rotate the handle to the right clockwise Owner s Manual Operating Instructions Figure 7 Air Venturies ...

Page 288: ... F until you change the set temperature as listed in the Temperature Adjustment section 5000 7000 and 9000 Electronic Operation Owner s Manual Figure 8 5000 Electronic System LED Temp Indicator Cursor Up Cursor Down Time Mode Prog Light Display Temperature Display Pump Display Pump Display Jets1 Clock Not available with the 7000 Heat Ozone Option Invert Jets 2 Light Safety Suction Figure 9 7000 an...

Page 289: ...mperature lock Locking the Panel 7000 and 9000 only Press Time Jets 1 and Cursor within 3 seconds of each other The panel will display PANEL LOCK All buttons are frozen except the Time button To unlock the panel repeat this step Time 9000 only When time hasn t been set a Time icon flashes To set time press Time then ModeProg then use the Cursor buttons to adjust the hours Repeat this step to set t...

Page 290: ...vated by pressing Jets 1 while in Economy Mode and operates the same as standard mode for one hour time a press of the ModeProg button will revert to Economy Mode immediately Sleep Mode Heats the spa to within 20 F of set temperature and only during filter cycles Safety Suction System 5000 7000 and 9000 The spas are equipped with a state of the art Safety Suction System This will automatically shu...

Page 291: ... available options Three options are available r reset to full after filling chemical reservoir n disable the chemical from being dispensed y enable dispensing of that chemical Press Jets1 while the value is flashing to accept the currently displayed setting Press Light to exit and retain the original setting Press Light to exit at any time The menu will be exited automatically if there is 30 seco...

Page 292: ...ut down The high limit sensor or water temperature sensor is not working Call your dealer or service organization Sf Vacuum Switch Spa is shut down The LED will show SF as soon as the vacuum switch closes All functions will turn off and the system will be disabled until a panel button is pressed LED LED indicator light There are LED indicator lights on the topside panel corresponding to heat safet...

Page 293: ...onds Immediately following this start up process the valve s will move to the center psoition at which time the center LED will light Figure 10 Cal Spas Flow Diverter Every press will move the valve s one stop The LED that is lit will move up clockwise to the next available position Button Functions Every press will move the valve s one stop The LED that is lit will move down counter clockwise to ...

Page 294: ...ive clothing and eyewear when handling chemicals Spa users that notice skin irritation must immediately suspend spa usage and consult their physician Pregnant women should consult their physician prior to using a spa for both chemical and temperature recom mendations Chemical Storage Chemicals must be stored completely out of the reach of children in an area that is well vented cool and dry Failur...

Page 295: ... a sanitizing chemical Chlorine Bromine etc immediately turn off power to the spa and proceed to drain spa water into a safe locally approved area Carefully rinse pillows jets and spa surface with regular tap water Avoid spray ing water directly into the equipment area Refill spa to proper water level turn power back on and then set the filtration time to F6 This will allow water to completely cir...

Page 296: ...ool Most people think of spas as nothing more than a small pool In fact nothing could be further from the truth If anything spas are more like an overgrown bathtub An average pool contains 30 000 gallons of water and operates at approximately 70 F 20 C An average spa only contains 350 gallons of water and operates at 100 F 38 C Since spas have more than 100 times less water than a swimming pool th...

Page 297: ...ntaminates are very difficult to see and can get lodged deep into the filter fibers causing water flow issues You will need to have an extra filter cartridge on hand for the deep cleaning process It is necessary to always have one filter either cleaning or drying and the other installed in the spa This process will double the filter cartridges overall life and performance Filter Cleaning 1 Place t...

Page 298: ...ally would have cleared up with a little Oxidizer Shock and fil tration time 4 Remember swimming pool chemicals are completely different than spa chemicals Entering a spa with wet clothes from a swimming pool can cause a possible chemical reaction to either the spa user and or the spa water Always rinse thoroughly when transferring between a swimming pool and a spa 5 Clean the spas filter s regula...

Page 299: ...F 1 Increases water evaporation 2 Increases chemical dissipation 3 Increases amount of spa user waste 4 Accumulation of minerals and salts 5 Increases Total Dissolved Solids TDS As you can imagine there is an inverse effect with cooler water temperatures Does this mean that you should not operate your spa at higher water temperatures No We just want you to be aware that your chemical usage will in...

Page 300: ... of circulation with the spa cover half off prior to testing 7 Always add chemicals when the pump s are on high speed 8 Always premix pH Alkalinity Down chemicals in half a bucket of water prior to introducing them to the spa 9 Never attempt to adjust pH or Total Alkalinity in large increments Adjustments are made easier and will stay set longer if you make them in small increments Do Not Use Vine...

Page 301: ... than larger adjustments Then you may start adjusting the pH back up by using pH Alkalinity Up in small amounts at a time Q My pH is high and the Total Alkalinity is low What do I do A Add small amounts of pH Alkalinity UP to bring up the alkalinity level first Be sure to allow plenty of circulation and standing time for the waters chemical levels to change This may take anywhere from one 1 to thr...

Page 302: ...ctive minerals in the newly added spa water in a state of Solution The term solution means that miner als in the water are being held in a suspended state keeping them from bonding to anything in the spa and causing damage Mineral con trol is a critical part of maintaining spa components performance and longevity In addition to fill up protection from minerals the Clear Water Plan also recommends ...

Page 303: ...Note Adding water clarifier in this case will only further delay the spas ability to clear up 2 Never enter the spa with sunscreen or lotion on your skin Oil is very difficult to remove from the spa water and can cause a reaction with some of the chemicals that you may add to your spa In addition soap and shampoo residues that are normally left on your body after a shower only increase foamy and c...

Page 304: ...ften in a bucket of clean water Use of Cal Spas Multi Purpose Cleaner Cal Spas Multi Purpose Cleaner should not be spayed directly into the spa water Incorrect product usage may cause water clarity issues Fast Sheen Spa finish protecting wax Cal Spas Fast Sheen is an essential part of maintaining your spas finish Through normal use the spas finish can accumulate dirt oil and calcium causing a roug...

Page 305: ...gh speed This is your base bromine level as the tablets will take awhile to dissolve enough to manage 500 gallons of water 2 Add 2 oz of Oxidizer Shock into the spa with all of the jets on high speed and the spa cover at least half off for 30 min This will remove any organic materials that may have been left in the plumbing lines after its last draining 3 Start by placing 3 to 4 bromine tablets in...

Page 306: ...r freeing up your sanitizer to attack more bacteria and other user waste This act greatly improves your sanitizers performance level and reduces spa odor Oxidizer Shock Shock All shock is not created equal The most common shock you will find in pool and home improvement stores is Chlorinating Shock This will destroy your spas Jets Pillows Pump Seals and worse The only shock that you should put in ...

Page 307: ...ing and implementing the Bromine or Chlorine Clear Water Plans Cal Spas Clear Water Plan Bromine Bromine users This plan and its chemical dosages are intended for Cal Spas Chemicals only Most chemical manufactures use different chemical for mulas and strengths Only Cal Spas chemicals are specially formulated to provide proper chemical balance at lower dosages Compare labels and dosages and see for...

Page 308: ...heck the expiration date prior to use 2 Add two tablespoons Granular Chlorine Chlorine dissipation will vary with water temperature 3 Adjust Total Alkalinity then pH if needed See pH and Alkalinity sections for more information 4 Add 2 oz of Stain and Scale Defense 5 Pull the dirty filter from the spa and place into Liquid Filter Cleaner solution 6 Place your extra cleaned fully dried filter cartr...

Page 309: ...are every bit as important to your spa as Bromine or Chlorine are Q My skin is becoming irritated after spa use Why A You are not using your Cal Spas Oxidizer Shock enough and or your sanitizer level is too high Because the spa and its chemicals will strip some of your bodies oils away We recommend that you use a moisturizer after spa use If you still have skin irritation after these steps see you...

Page 310: ...i um scale and mineral deposits Liquid Hardness Increaser CHE07000250 Increases water hardness to reduce corrosion Helps reduce foaming Spa Brite CHE07000580 CHE07000590 Clears up cloudy water in spas and hot tubs Effective at all spa and hot tub temperatures Foam Gone CHE07000800 CHE07000810 Breaks up existing foam in spa water Effective at all spa and hot tub temperatures pH Alkalinity Up CHE070...

Page 311: ...nsfer or relo cation Warranty Exclusions Limitations This guarantee is void if the spa has been subject to negligence alteration misuse abuse repairs by non C A I authorized per sonnel incorrect electrical installation acts of God and any other cases beyond the control of C A I Please refer to the Owner s Manual for examples of exclusions and of common acts invalidating this guarantee Disclaimers ...

Page 312: ... any other spa chemicals not authorized by C A I Damage caused by improper water chemistry High levels of chlorine bromine calcium pH and other excessive chemical levels Damage caused by direct sunlight Spas should always be covered when not in use Damage caused as a result of failure to follow operating instructions as defined within this Owner s Manual Damage caused by incorrect electrical insta...

Page 313: ...Remove drain plugs from the front of the pumps Disconnect the unions from both sides of the pump Use a wet dry vacuum to blow any remaining water out of the jets and equipment area Cover your spa with a good spa cover and all weather tarp to ensure that neither rain nor snow enter the spa If your spa has a gas heater you will need to follow the winterizing instructions for your particular heater i...

Page 314: ...lowing Chemicals Warranty Information Cal Spas Entertainment System Part Numbers In order for your retailer to expedite your order for parts and accessories it is recommended that you have the information that you attained in the Set Up and Delivery section Customer Service will want all this information for warranty purposes ...

Page 315: ...l need to protect it from water and the elements Do not place wet CD s into this unit at any time Always close the CD protection door Remember water damage is not covered by the warranty Entertainment Systems Cal Flame units equipped with the TV DVD systems use this Splash stereo to broadcast the TV or DVD audio signals Set Up 1 Program preset station 1 to 88 7FM to receive the audio signal that t...

Page 316: ...eo source will change in the following sequence TV AV1 AV2 and AUX 4 Sensor Eye Allows the remote control to operate the LCM1502TV s OSD system On Screen Display volume Wired Headphone Jacks and optional external speakers and for control of Video Media Player connected through a source component harness 5 Three Position Dome Light Switch Auto Automatically switched on the dome lights in conjunctio...

Page 317: ...to confirm changes within the menus 8 Return Switch between current channel and last viewed channel 9 Mute Turn off the volume completely 10 Ch Add Press this button to save currently viewed channel 11 S Video Switch to S Video mode 12 Video Change to video mode 13 Aspect Switch the screen ratio between 4 3 and 16 9 14 Ch Erase Erases the currently viewed channel 15 Exit Press this button to exit ...

Page 318: ...rtainment Cal Flame unit Each Cal Flame unit that is equipped with the Splash Stereo system is delivered with the manufacturers operating instructions We strongly recommend that you read these instructions prior to operating this unit NOTE Although this unit is marine grade you will still need to protect it from water and the elements Do not place wet CD s into this unit at any time Always close t...

Page 319: ...appears 3 Video A Video B Compo RGB B and RGB A Use this button to switch between components 4 Mute Turns volume completely 5 Menu Exit Use this button to display or erase menus 6 Remote Signal Transmission Window 7 Aspect Use this button to switch between aspect ratios 8 Power Use this button to turn on off the power 9 Volume Up Down Adjusts volume up and down 10 Use these buttons to select menu ...

Page 320: ... POWER on the Stereo Cd player 3 Move the DVD selector switch Located next to the DVD player to the ON position This will allow the Audio signal to be received by the Stereo CD player NOTE When not using the DVD player the Audio selector switch must be in the of position to receive regular AM an FM broadcasts 4 Tune the Stereo Cd player to 88 7 FM to receive the audio signal 5 Press the OPEN butto...

Page 321: ...te Control to switch Video to COMPOSITE TV 3 Press the A V button on the DVD Remote Control to switch the Video from OUT to IN 4 Press the Channel Up or Down buttons on the TV remote control to select TV Channel Switching Back to DVD Operation 1 Press the SELECT button on the TV Remote Control to switch Video to COMPOSITE VIDEO 2 Press the A V button on the DVD Remote Control to switch the Video f...

Page 322: ...IT ODYSSEY PLUMBING PLU21300037 DIVERTER VALVE 1 2 WAY SILVER TEARDROP HANDLE 03 PLU21300038 DIVERTER VALVE 2 WAY SILVER TEARDROP HANDLE 03 PLU21700375 VENT 1 AIR CONTROL SILVER TEARDROP 03 PLU21700635 AROMATHERAPY SILVER TEARDROP HANDLE 03 PLU21702402 SURE FLO STAINLESS STEEL JET INSERT BEARINGLESS 03 PLU21702403 MINI STORM MICRO FLOW JET DIR LG FACE 2 TONE CS2127829 2S PLU21702404 MAXI FLOW LRG ...

Page 323: ...IGHT POWER STORM INTERNAL 5 5 W MTL ESC CS2126529 2SS PLU21702717 SX PULSE POWER STORM INTERNAL 5 5 OD CS 3 SCLP ESC CS2126539 2S PLU21700753 SX PULSE POWER STORM INTERNAL 5 5 OD W MTL ESC CS2126539 2SS PLU21702718 6 OVAL FIBER LIGHT PLUS POTTING CS6757500 PLU21700754 JX PWR STORM PULSATOR INT LRG W MTL ESC CS2127719 2SS PLU21700755 ZX PWR STORM PULSATOR INT XTRA LRG W MTL ESC CS2127729 2SS PLU217...

Page 324: ... II FIL11700138 FILTER SKIM DYNAFLO TOP MT BASKET ASSY GREY FIL11700139 FILTER DYNAFLO 5 FLOATING WEIR GREY EXT BTM ASSY FIL1100124 FILTER CARTRIDGE 75 SQ FT 2 ANTI BACTERIAL DYNAFLOW II ELECTRICAL ELE09000192 PARTS ONLY CONTROL BOX W 1 ATS PLUG CS 5000 03 ELE09000193 PARTS ONLY CONTROL BOX W 2 ATS PLUGS CS 5000 03 ELE09000194 CONTROL BOX CS 5300 03 3 PUMP ELE09000197 CONTROL BOX CS 5000 03 ELE090...

Page 325: ...RED J502 WOO27513328 CAB CRNR PNL 34 X 12 CAL SELECT GREY WOO27513329 CAB CRNR PNL 34 X 12 CAL SELECT RED WOO27513330 CAB CRNR PNL 24 1 2 X 12 CAL SELECT GREY WOO27513331 CAB CRNR PNL 24 1 2 X 12 CAL SELECT RED WOO27513333 CAB CRNR PNL 26 X 12 CAL SELECT RED WOO27513334 CAB CRNR PNL 32 1 2 X 12 CAL SELECT GREY WOO27513335 CAB CRNR PNL 32 1 2 X 12 CAL SELECT RED WOO27513336 CAB DOOR PNL 24 1 2 X 43...

Page 326: ...CT GREY WOO27513379 CAB FRNT PNL 34 X 7 1 2 CAL SELECT RED WOO27513381 CAB FRNT PNL 34 X 9 CAL SELECT GREY WOO27513382 CAB FRNT PNL 34 X 9 CAL SELECT RED WOO27513383 CAB FRNT PNL 24 1 2 X 9 1 2 CAL SELECT GREY WOO27513384 CAB FRNT PNL 24 1 2 X 9 1 2 CAL SELECT RED WOO27513385 CAB FRNT PNL 26 X 8 1 2 CAL SELECT GREY WOO27513386 CAB FRNT PNL 26 X 8 1 2 CAL SELECT RED WOO27513387 CAB FRNT PNL 28 X 8 ...

Page 327: ...IDE PNL 26 X 62 1 2 CAL SELECT RED WOO27513429 CAB SIDE PNL 26 X 62 1 2 CAL SELECT GREY WOO27513431 CAB SIDE PNL 26 X 68 1 2 CAL SELECT GREY WOO27513432 CAB SIDE PNL 26 X 68 1 2 CAL SELECT RED WOO27513434 CAB SIDE PNL 34 X 57 1 2 CAL SELECT GREY WOO27513435 CAB SIDE PNL 34 X 57 1 2 CAL SELECT RED WOO27513436 CAB SIDE PNL 34 X 58 1 4 CAL SELECT GREY WOO27513437 CAB SIDE PNL 34 X 58 1 4 CAL SELECT R...

Page 328: ... SP 1137 U C SP FOUNDED 1926 C A I Customer Service Department 1462 East Ninth Street Pomona CA 91766 Toll Free 1 800 CAL SPAS Fax 1 909 629 3890 www calspas com ...

Reviews: