15” TV Monitor Operation (Optional)
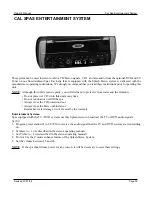
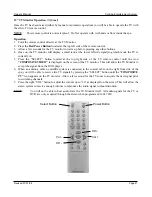
Once the TV has been raised (either by manual or automatic operation) you will be able to operate the TV with
the silver TV remote control.
NOTE:
This remote control is not waterproof. Do Not operate with wet hands or from inside the spa.
Operation:
1. Point the remote control directly at the TV Monitor
2. Press the Red Power Button located at the top left side of the remote control.
3. Allow a few seconds for the TV monitor to warm up before pressing any other buttons.
4. Once on, the TV monitor will display a small icon at the lower left side signifying which mode the TV is
currently in.
5. Press the “SELECT” button located at the top right side of the TV remote control until the icon
“COMPOSITE VIDEO” is displayed on the screen of the TV monitor. This will allow the TV Monitor to
accept the signal from the DVD player.
6. When an antenna, cable or satellite system is connected to the coaxial cable on the right front side of the
spa, you will be able to receive live TV signals by pressing the “SELECT” button until the “COMPOSITE
TV” icon appears on the TV monitor. Allow a few second for the TV tuner to acquire the new signal prior
to switching channels.
7. Press the right “VOL” button to adjust the volume up to “80” as displayed on the screen. This will allow the
stereo system to receive enough volume to reproduce the audio signal without distortion.
NOTE:
You will not be able to hear audio form the TV Monitor itself. All audio signals for the TV or
DVD are only acquired through the stereo when programmed to 88.7FM.
Power Button
Select Button
Vol -
Vol +
CH -
CH+
Revised 01/01/04
Page 41
Owner’s Manual
Cal Spa Entertainment System
Summary of Contents for 1100 Electronic Series
Page 12: ...10 ...
Page 78: ...10 ...
Page 118: ...10 ...
Page 161: ...Owner s Manual Page 11 Electrical Installation Owner s Manual Figure 3 GFCI Hook Up ...
Page 219: ...Owner s Manual Page 11 Electrical Installation Owner s Manual Figure 3 GFCI Hook Up ...
Page 282: ...Owner s Manual Page 11 Electrical Installation Owner s Manual Figure 3 GFCI Hook Up ...


