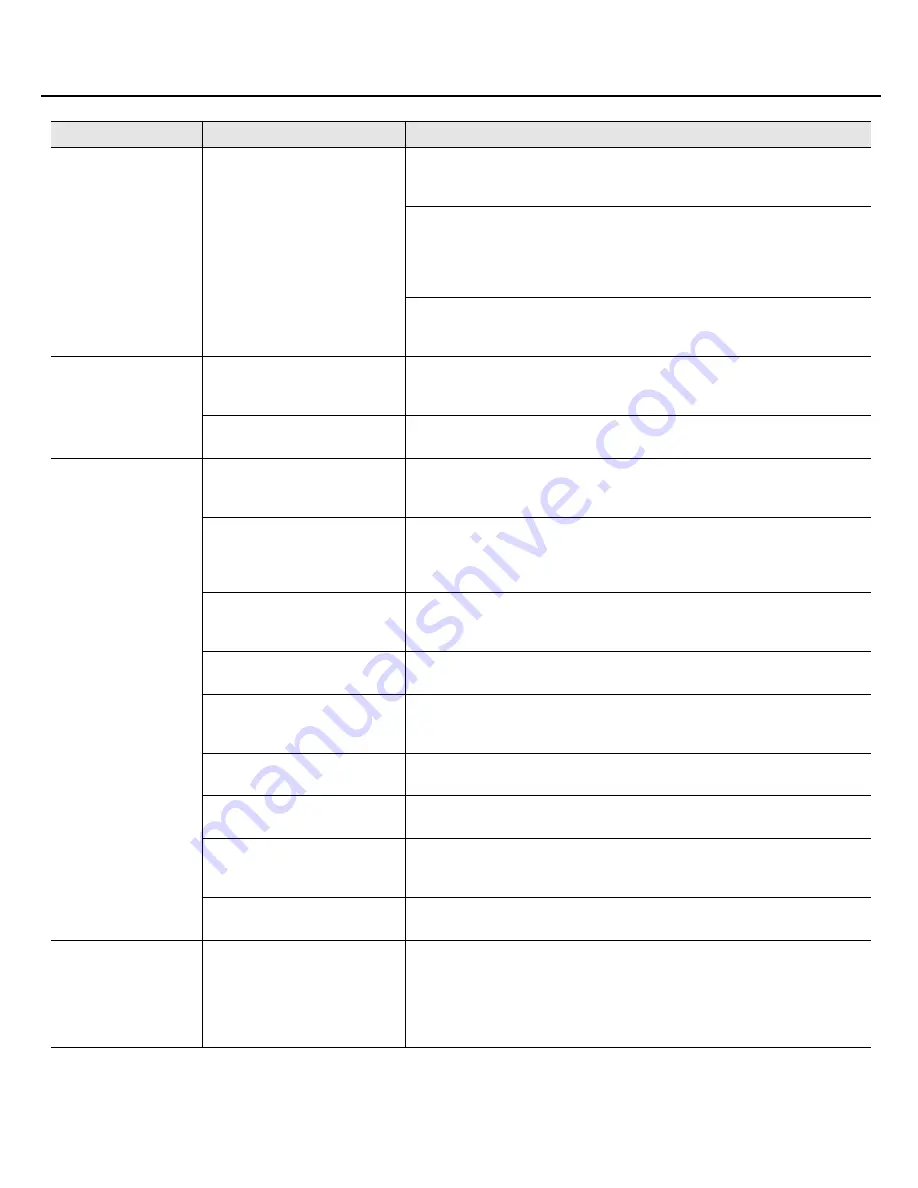
background image


46


Troubleshooting


No sound at all

Could a message be indicating 
“Unable to Open Audio Playback 
Device”?

If Media Player or another application that has audio playback capability is running, 
SONAR won’t be able to use the audio driver, and an error appears when SONAR is 
started. Close the audio playback application, and then start SONAR again.

Make sure that SONAR’s 


“About Sampling Rates”


 (p. 56) is the same as the setting of 

the SONAR V-STUDIO 100’s “Sample Freq” setting. 
If an audio driver not being used by SONAR is installed, try either disabling that driver 
or disconnecting the corresponding audio interface from your computer. 
Try changing the Driver Mode (p. 23).

Make sure that the Sampling Rate of the audio used in your project, the Sampling Rate 
of SONAR, and the setting of the SONAR V-STUDIO 100’s “Sample Freq” all match.


“About Sampling Rates”


 (p. 56)

No MIDI sounds

Could more than one music 
application be running?

If multiple music applications are running at the same time, close the other software. If 
an indication remains in the taskbar even after you close the window, the software is 
still running; you must also close the software that’s shown in the taskbar.

Are the MIDI Devices settings 
correct?

Configure MIDI device settings as described in 


“MIDI Devices Settings”


 (p. 25).

There are Interruptions, 
Dropouts, or Other 
Problems in the Sound 
During Playback

Could you have connected/
disconnected another USB device, 
such as a memory key?

Dropouts may occur during playback or recording if you connect/disconnect another 
USB device (such as a memory key), or switch a device’s power on/off at the same time 
that the SONAR V-STUDIO 100 is being used.

Are you using a hard disk that is 
connected via USB?

Data transfer using USB could get congested if you use the SONAR V-STUDIO 100 and 
a USB-connected hard disk at the same time. As a result, the data transfer speed for the 
hard disk could be significantly reduced. As a storage location for the audio data that 
you record and play back, you should avoid using a hard disk that is connected via USB.

Did the dropout occur immediately 
after the system started up, or after 
it woke from sleep?

Dropouts during playback/recording sometimes occur immediately after the system 
has started up, or after it has woken from sleep. Wait for a while, then try the playback/
recording again.

Windows Update/ Microsoft 
Update

Use Microsoft Corporation’s Windows Update or Microsoft Update to update your 
system to the most recent state.

Windows XP: 
System “Performance Options” 
settings

Follow the procedure described in 


“Giving Priority to Background Service 

(Windows XP)”


 (p. 55).

“Audio Buffer Size” in the setting 
dialog box


1.


Open the Settings dialog box as described in 


“VS-100 Driver settings”


 (p. 51).


2.


Increase the 


“Audio Buffer Size.”


Clicks or pops may occur in the 
sound if a LAN is operating

Try disabling the LAN in Device Manager. If this eliminates the clicks or pops, you may 
be able to solve the problem by updating your LAN driver or BIOS.

Try adjusting the audio buffer size 
in SONAR.

First, try adjusting the audio buffer size in SONAR.(


“Other Audio Driver and Audio-

Related Settings”


 (p. 23)) If you still experience clicks or pops during playback or 

recording, try adjusting the 


“Audio Buffer Size”


 in the driver settings panel.(p. 51)

Could you have connected the VS-
100 to a USB hub?

Try connecting the VS-100 directly to a USB connector on your computer.

Playback Halts Midway, 
and Subsequent 
Playback is Not Possible

While you were using the SONAR 
V-STUDIO 100, could your 
computer have performed a task 
with a heavy processing load, such 
as accessing a CD-ROM drive or the 
network?

If a heavy processing load occurs while the SONAR V-STUDIO 100 is being used, it may 
not work correctly. In this case, stop playback, and then start playback once again.
If you are still unable to play, close all software that was using the SONAR V-STUDIO 
100, disconnect the USB cable from the SONAR V-STUDIO 100 hardware, and then 
reconnect it.


Problem

Points to check

Action

VS-100_install_e.book 46 ページ 2009年3月9日 月曜日 午後8時56分

Summary of Contents for V-STUDIO 100

Page 1: ......

Page 2: ...gard to any infringements of third party copyrights arising through your use of this unit Additional Precautions Unfortunately it may be impossible to restore the contents of data that was stored on a...

Page 3: ...ile menu command New Material that is distinct from the main text or operating procedure such as operating tips or related information is enclosed by a heavy border Unless otherwise specified Windows...

Page 4: ...Other Audio Driver and Audio Related Settings 23 MIDI Devices Settings 25 MIDI Controllers Surfaces Settings 27 Loading the VS 100 Plug in 27 VST VSTi Registration and Settings 28 Playing a Demo Song...

Page 5: ...51 VS 100 Driver settings 51 Windows Users 51 Macintosh Users 52 Uninstalling VS 100 Driver 53 Windows Vista Users 53 Windows XP Users 53 Macintosh Users 54 Giving Priority to Background Service Windo...

Page 6: ...at you should remember Keep this manual at hand for reference SONAR VS Installation DVD ROM This DVD ROM contains SONAR VS VS Production Pack and Guitar Rig 3 LE SONAR V STUDIO 100 Driver CD ROM This...

Page 7: ...cations that are not shown in the Windows taskbar What is a Driver A driver is software that transfers data between the SONAR V STUDIO 100 hardware and application software on your computer when your...

Page 8: ...sc drive If a message informs you that Driver installation must be performed by an administrator you must log on to Windows as a user whose Account Type is Administrator and then perform the installat...

Page 9: ...SONAR V STUDIO 100 hardware s MAIN MIX knob 2 Connect the included AC adaptor to the SONAR V STUDIO 100 hardware 3 Turn on the POWER switch of the SONAR V STUDIO 100 hardware 4 Use the included USB ca...

Page 10: ...once again being careful to follow the instructions for the installation procedure 1 Disconnect all USB cables except those for a USB keyboard and or USB mouse if used then start up Windows 2 Close a...

Page 11: ...this point If any other message appears follow the directions of the message If the Driver Signing Options setting was not set to Ignore a Hardware Installation dialog box appears A dialog box with a...

Page 12: ...SONAR V STUDIO 100 hardware s MAIN MIX knob 2 Connect the included AC adaptor to the SONAR V STUDIO 100 hardware 3 Turn on the POWER switch of the SONAR V STUDIO 100 hardware 4 Use the included USB ca...

Page 13: ...h the installation click OK to cancel the installation and then refer to Driver Signing Options setting 10 If the Completing the Found New Hardware Wizard appears Click Finish 11 When the Installation...

Page 14: ...5 In some cases the display will indicate This Installer package needs to run a program to determine if it can be installed Do you want to continue or This package contains a program that determines i...

Page 15: ...tionality If you ll be using the SONAR V STUDIO 100 as a control surface for DAW software other than SONAR set the SONAR V STUDIO 100 s system setting DAW Select to Other If the system setting DAW Sel...

Page 16: ...Connect the included AC adaptor to the SONAR V STUDIO 100 hardware 3 Turn on the POWER switch of the SONAR V STUDIO 100 hardware 4 Use the included USB cable to connect the SONAR V STUDIO 100 hardwar...

Page 17: ...nt such as headphones or speakers If you connect headphones or monitor speakers as shown in the illustration you ll be able to monitor the playback audio For details about on the SONAR V STUDIO 100 ha...

Page 18: ...g onto http www cakewalk com register or call 888 CAKEWALK U S or 1 617 423 9004 outside the U S between 9 AM and 8 PM Eastern Standard Time If you live outside of North America please visit our distr...

Page 19: ...r 2 Close any open programs that are running 3 Place the SONAR V STUDIO 100 INSTALLATION DVD ROM in your disc drive If you have autorun enabled the SONAR Setup Wizard opens automatically If autorun is...

Page 20: ...vices dialog 5 In the Inputs and Outputs lists select the following VS 100 MIDI devices that you will use with SONAR 6 Click OK to close the MIDI Devices dialog and return to the Controllers Surfaces...

Page 21: ...y SONAR 1 Choose Options Audio to display the Audio Options dialog box 2 In the Audio Options dialog box click the Advanced tab 3 In the Playback and Recording section select ASIO from the Driver Mode...

Page 22: ...the screen indicates Audio Driver Error click Use Anyway If the driver is not shown Did you connect the SONAR V STUDIO 100 hardware before launching SONAR Is the interface driver installed correctly...

Page 23: ...buffer size too far a greater processing load will be placed on your computer potentially causing pops clicks and dropouts interrupted playback If this occurs increase the buffer size About Mixing Lat...

Page 24: ...og Audio Data tab To open the Global Options dialog box choose the menu command Options Global Global Audio Folder This specifies the folder where audio data will be stored temporarily for example whe...

Page 25: ...ar the check box for these devices MIDI Mapper Microsoft MIDI Mapper These are virtual MIDI ports used by Windows and are not used by SONAR Microsoft GS Wavetable SW Synth This monopolizes the audio d...

Page 26: ...lient The ReWire client will be unable to receive MIDI messages from your MIDI keyboard When using a controller or surface that supports bi directional communication Place this device so that it is at...

Page 27: ...and the Output Port 6 Click OK to close the dialog box 7 In the Controllers Surfaces dialog make sure that the WAI check boxes and the ACT check boxes are selected and click Close If you re using an E...

Page 28: ...lick the Add button and specify the folder in which your VST plug ins are installed If a folder in which no VST plug ins are installed is shown click the folder name to select it and then click Remove...

Page 29: ...e File Open command to open the Open dialog box 2 Select the project file SONAR_VS_AudioDemo1 within the Documents Cakewalk SONAR VS Tutorials Tutorial 1 folder 3 Click Open to open the project Wait u...

Page 30: ...or recording if you connect disconnect another USB device such as a memory key or switch a device s power on off at the same time that SONAR is being used Data transfer using USB could get congested...

Page 31: ...DISK meter is staying in the green area there is probably no problem If the meter is reaching the yellow area but you don t hear noise or dropouts interruptions in the playback this means that your co...

Page 32: ...o both MIC jacks INPUT 1L and 2R This means that a mic requiring phantom power cannot be used simultaneously with a microphone that does not require phantom power You must turn phantom power off unles...

Page 33: ...utton Connecting a digital device If you want to make a digital audio connection from a digital mixer or similar device connect its output e g the DIGITAL OUT connector to the SONAR V STUDIO 100 s COA...

Page 34: ...ox 3 In the Name field of the New Project File dialog box enter the name of the song that you want to create fig FileNew eps 4 From the templates choose 16 track audio and click OK 5 A project contain...

Page 35: ...ack 1 fig Input eps 3 Select the appropriate device for the input you connected 3 Select the input for the track Source Selected device Record only INPUT 1L in monaural Left VS 100 1 2 Record only INP...

Page 36: ...ges 1 Press SONAR V STUDIO 100 s DISPLAY button The level meter appears in the display If a different screen is shown press the DISPLAY button once again 2 If your microphone or guitar is connected to...

Page 37: ...trol surface screen If Track1 is not shown press the SONAR V STUDIO 100 s track select button to make the screen indicate Track1 Alternatively you can click SONAR s track 1 icon 3 Press the SONAR V ST...

Page 38: ...Output field select VS 100 OUT 1 2 as the metronome s output port 4 Click OK fig metro01 eps 5 In SONAR s toolbar double click the tempo display and enter the desired tempo Enter a numerical value fro...

Page 39: ...ree to try as many times as you like until you ve captured a performance you re happy with The sound of playback or recording may be interrupted if you connect or disconnect USB memory or another USB...

Page 40: ...appears fig VX64 eps 3 Play back The recorded track will play back with the effect applied In addition to the VocalStrip plug in for vocals SONAR provides a broad range of effects such as Guitar Rig f...

Page 41: ...on Pack Plug ins online document PDF Format This explains how to operate plug ins included in the VS Production Pack This is located in the root directory of the SONAR VS Installation DVD ROM Online H...

Page 42: ...t as described in Installing the SONAR V STUDIO 100 Driver p 7 Can t install the driver according to the procedure What user privileges did you use to log on to Windows You must log on to Windows as o...

Page 43: ...onnecting the SONAR V STUDIO 100 to a different USB connector may cause the Found New Hardware Wizard to appear even though the driver has already been installed This is not a malfunction Install the...

Page 44: ...ling those audio drivers Could your computer s internal sound card be enabled Some internal sound cards may cause problems for other audio drivers In this case try disabling the internal sound card in...

Page 45: ...n File Recovery Mode No sound at all Is your sound reproduction equipment speakers headphones connected correctly Connect your audio reproduction equipment Connecting your audio equipment p 17 Is the...

Page 46: ...be significantly reduced As a storage location for the audio data that you record and play back you should avoid using a hard disk that is connected via USB Didthedropoutoccurimmediately after the sy...

Page 47: ...rd disk could be significantly reduced As a storage location for the audio data that you record and play back you should avoid using a hard disk that is connected via USB Didthedropoutoccurimmediately...

Page 48: ...utput of another USB device is connected to the SONAR V STUDIO 100 noise from your computer may be heard via the SONAR V STUDIO 100 Try connecting via a self powered USB hub a USB hub that has an inte...

Page 49: ...g Latency The default setting is 256 but you can try changing this to 512 if audio related problems occur Install the correct device driver Even for your non audio devices make sure that the correct d...

Page 50: ...memory that are available to SONAR It is best to close all programs that are not needed for your work Change the VS 100 driver s buffer size In some cases reducing the VS 100 driver s buffer size may...

Page 51: ...ion from the left for the buffer size After you ve changed the Audio Buffer Size make sure to restart all applications which are using the SONAR V STUDIO 100 hardware Then if you are using a program t...

Page 52: ...ease this Audio Buffer Size setting For some software it may not be possible to adjust the buffer size Recording Margin If the recorded audio data contains sound dropouts or noise even after you ve ad...

Page 53: ...rm the uninstallation 6 The display will indicate The installed VS 100 Driver will be uninstalled Click the OK 7 When the message Uninstallation was completed is displayed click OK to restart Windows...

Page 54: ...sage appears proceed as directed by that message 4 The display will indicate Are you sure to uninstall the driver click OK 5 The Authenticate dialog box or the dialog that indicates Installer requires...

Page 55: ...ing the SONAR V STUDIO 100 hardware 1 Open the Control Panel and double click System If you don t see the above icon click Performance and Maintenance and then click System 2 Click the Advanced tab cl...

Page 56: ...100 hardware to change the sampling rate 3 Launch SONAR Even if an Audio Driver Error is displayed during startup click Use Anyway An error message will not be displayed if you re using ASIO 4 Execute...

Page 57: ...shorten the latency any further Interruptions or dropouts occur during playback in SONAR You may be able to reduce interruptions or dropouts by increasing the Mixing Latency Procedure for setting the...

Page 58: ...to uninstall that component 1 Log on as a user who has administrative privileges 2 Click the Windows Start button and then click Control Panel 3 Click Programs and Features in Windows XP Add or Remove...

Page 59: ......

Page 60: ...5 1 0 0 0 0 6 4 1 1 0 1...

Reviews: