background image

Chapter 4: Monitoring

Page 4-2

Ethernet Switch Module User Guide

Spanning Tree - the port’s Spanning Tree state, which could be any one 
of the following states:

-

Blocking - The port is not currently the designated port to a LAN 
and is therefore not forwarding any packets. (This means there is 
another route to that LAN and, since the Spanning Tree protocol 
does not allow simultaneous redundant paths, this port is blocked. 
If the other route to that LAN goes down, this port would then start 
forwarding packets.)

-

Listening - The port is listening for other bridges on the network 
to determine if it should go to the forwarding or blocking state.

-

Learning - The port is listening for other bridges on the network 
and making a table of addresses from packets that it has received. 
Once the port goes to the forwarding state, it can then use the 
address information it has learned.

-

Forwarding - The port is the designated port for the LAN and is 
forwarding packets and sending out bridge protocol packets.

-

Broken - The port is not forwarding packets. Reasons include no 
cable connected, no link status, or network management has 
disabled the port.

-

Disabled - The port is not configured for Spanning Tree.

Pkts Transmitted - number of packets transmitted from the port. This 
includes any packets that might have experienced transmission errors. 
(The port’s statistics are reset whenever the port is started.)

Packets Received - number of good packets received through the port. 
Packets with reception errors are not included, nor are packets local to 
that segment that are hardware filtered.

Small Buffers - number of buffers currently assigned to the port (see 
RX_Q Overflows below).

RX_Q Overflows - number of incoming packets dropped by the port 
due to a lack of buffers. After a reboot, the ATX tries to automatically 
re-allocate the Small Buffers among the ports so that the total number 
of RX_Q Overflows is minimized.

Carrier Losses - number of packet transmissions that detected a loss of 
carrier (usually a transceiver problem).

Summary of Contents for 3E02-04

Page 1: ...ETHERNET 10BASE T 3X 4X 5X 6X 7X 8X 2X 1X SEGMENT LINK ACT COL 1 2 3 4 5 6 7 8 RESET PROC RX TX PWR QUAD IEEE 802 3 ETHERNET AUI SEGMENT 4 SEGMENT 3 SEGMENT 2 SEGMENT 1 RX TX RX TX RX TX OFFLINE PROC RX TX PWR QUAD IEEE 802 3 ETHERNET 10BASE2 SEGMENT 4 SEGMENT 3 SEGMENT 2 SEGMENT 1 RX TX RX TX RX TX OFFLINE LINK RX LINK RX COL TX LINK RX COL TX LINK RX COL TX COL TX QUAD IEEE 802 3 ETHERNET 10BASE...

Page 2: ......

Page 3: ...IRECT SPECIAL OR CONSEQUENTIAL DAMAGES WHATSOEVER INCLUDING BUT NOT LIMITED TO LOST PROFITS ARISING OUT OF OR RELATED TO THIS MANUAL OR THE INFORMATION CONTAINED IN IT EVEN IF CABLETRON SYSTEMS HAS BEEN ADVISED OF KNOWN OR SHOULD HAVE KNOWN THE POSSIBILITY OF SUCH DAMAGES Copyright 1996 by Cabletron Systems Inc P O Box 5005 Rochester NH 03866 5005 All Rights Reserved Printed in the United States o...

Page 4: ...e WARNING Changes or modifications made to this device which are not expressly approved by the party responsible for compliance could void the user s authority to operate the equipment DOC NOTICE This digital apparatus does not exceed the Class A limits for radio noise emissions from digital apparatus set out in the Radio Interference Regulations of the Canadian Department of Communications Le pré...

Page 5: ...se Agreement shall be interpreted and governed under the laws and in the state and federal courts of New Hampshire You accept the personal jurisdiction and venue of the New Hampshire courts EXCLUSION OF WARRANTY AND DISCLAIMER OF LIABILITY 1 EXCLUSION OF WARRANTY Except as may be specifically provided by Cabletron in writing Cabletron makes no warranty expressed or implied concerning the Program i...

Page 6: ...rs and c in all respects is proprietary data belonging to Cabletron and or its suppliers For Department of Defense units the product is licensed with Restricted Rights as defined in the DoD Supplement to the Federal Acquisition Regulations Section 52 227 7013 c 1 ii and its successors and use duplication disclosure by the Government is subject to restrictions as set forth in subparagraph c 1 ii of...

Page 7: ...Ds 1 8 1 7 3 Offline Button 1 8 1 8 3E05 04 Ethernet Switch Module 1 8 1 8 1 Connectors 1 8 1 8 2 LEDs 1 9 1 8 3 Offline Button 1 9 1 9 3E02 08 ATX Ethernet Switch Module 1 9 1 9 1 Connectors 1 9 1 9 2 LEDs 1 10 1 9 3 Offline Button 1 10 CHAPTER 2 CONNECTING TO THE NETWORK 2 1 Introduction 2 1 2 2 Power up LED Sequence 2 1 2 3 Connecting to a Network 2 2 2 3 1 Connecting the 3E02 04 Ethernet Switc...

Page 8: ...ostics 5 3 5 2 1 Diagnostic Results 5 4 5 3 Troubleshooting 5 4 5 3 1 If The Module Fails To Power Up 5 4 5 3 2 Connectivity Problems 5 5 CHAPTER 6 ADDING SWAPPING MODULES 6 1 Unpacking The Ethernet Switch Module 6 1 6 2 Adding An Ethernet Switch Module 6 1 6 3 Swapping An Ethernet Switch Module 6 2 APPENDIX A TECHNICAL SPECIFICATIONS APPENDIX B CABLES B 1 Types Connectors B 1 B 2 Cable Specificat...

Page 9: ...describes how to physically attach a module to an Ethernet network Chapter 3 Configuring discusses the software configuration options for the modules Chapter 4 Monitoring provides information on Ethernet port statistics obtained via LCM Chapter 5 Diagnostics and Troubleshooting discusses identifying possible problems with the modules Chapter 6 Adding Swapping Modules gives instructions for adding ...

Page 10: ... need to enter with a command is enclosed in angle brackets For example you must enter a MAC address to execute the address matrix MAC address command ATX address matrix 00 40 27 04 1a 0f Field value options appear in bold typeface For example a filter type can be either Entry or Exit NOTE Note symbol Calls the reader s attention to any item of information that may be of special importance TIP Tip...

Page 11: ... Perlman Addison Wesley 1992 Internetworking with TCP IP Protocols and Architecture 2nd edition Volumes I and II Douglas Comer Prentice Hall 1991 The Simple Book An Introduction to Management of TCP IP based Internets Marshall T Rose Prentice Hall 1991 1 3 GETTING HELP If you need additional support related to this device or if you have any questions comments or suggestions concerning this manual ...

Page 12: ...available in four versions to support various cabling types 3E02 04 provides four Unshielded Twisted Pair UTP connections 3E07 04 provides four thin coaxial cable connections 3E08 04 provides four multimode fiber optic connections 3E05 04 provides four Attachment Unit Interface AUI connections The 3E02 08 ATX module provides eight UTP connections The Ethernet Switch Modules include processing circ...

Page 13: ...ASE T specification P O W E R S T A T U S E N G I N E S T A T U S T U R B O S T A T U S S U P P L Y A S U P P L Y B 1 6 G b p s R E S E T PACKET PROCESSING ENGINE NMS PORT POWER FastNET ATX TM OFFLINE PROC PWR OCTAL IEEE 802 3 ETHERNET 10BASE T 3X 4X 5X 6X 7X 8X 2X 1X SEGMENT LINK ACT COL 1 2 3 4 5 6 7 8 OFFLINE RING 1 RX ST RING 2 RX ST RING 3 RX ST RING 4 RX ST PROC TX 16 TX 16 TX 16 TX 16 PWR Q...

Page 14: ...1 3 provides connection for four independent 10BASE2 LANs to the ATX backplane and packet processing module It includes processing circuitry for receiving and forwarding packets between the connected 10BASE2 LANs The 3E07 04 contains several LEDs to indicate the module s operational status The 3E07 04 supports thin coaxial cable Ethernet and the IEEE 802 3 10BASE2 specification NOTE An internal re...

Page 15: ...s manual 1 6 3 Offline Button Use the offline button before swapping the module to take it offline until the replacement is installed Figure 1 3 3E07 04 Front Panel 1 7 3E08 04 ETHERNET SWITCH MODULE The 3E08 04 Figure 1 4 provides connection for four independent multimode 10BASE FL LANs to the ATX backplane and packet processing module It includes processing circuitry for receiving and forwarding...

Page 16: ... replacement is installed Figure 1 4 3E08 04 Front Panel 1 8 3E05 04 ETHERNET SWITCH MODULE The 3E05 04 Figure 1 5 provides connection for four independent Ethernet IEEE 802 3 LANs to the ATX backplane and packet processing module It includes processing circuitry for receiving and forwarding packets between the connected LANs The 3E05 04 contains several LEDs to indicate the module s operational s...

Page 17: ...E T LANs The 3E02 08 ATX contains several LEDs to indicate the module s operational status The 3E02 08 ATX supports UTP cabling and the IEEE 802 3 10BASE T specification 1 9 1 Connectors The 3E02 08 ATX includes eight 8 pin RJ45 receptacle connectors with built in crossover that you can attach directly to the network using unshielded twisted pair UTP cabling The ATX power supply provides the power...

Page 18: ...gment plus PROC and PWR for the module The LEDs are described in Chapter 5 of this manual 1 9 3 Offline Button Use the offline button before swapping the module to take it offline until the replacement is installed Figure 1 6 3E02 08 ATX Front Panel OFFLINE PROC PWR OCTAL IEEE 802 3 ETHERNET 10BASE T 3X 4X 5X 6X 7X 8X 2X 1X SEGMENT LINK ACT COL 1 2 3 4 5 6 7 8 ...

Page 19: ...r 6 Adding Swapping Modules 2 2 POWER UP LED SEQUENCE Power up the ATX and observe the LED sequence It takes about 1 minute for the ATX to complete the power up diagnostics The ATX begins system diagnostics on the PPE topmost module and then individually on each installed module progressing from top to bottom The specific power up tests run on the Ethernet switch modules are ROM checksum test Inst...

Page 20: ...for 5 seconds then blinks then remains lit The RX COL and TX LEDs flash for 100 milliseconds 3E05 04 The PROC RX and TX LEDs come on for 5 seconds then the RX and TX LEDs go off The PROC LED remains lit 4 After a few seconds the module reboots and the PROC LED comes on 5 All other LED activity beyond this point is a function of the configuration and connection of the ATX 2 3 CONNECTING TO A NETWOR...

Page 21: ... the device doesn t have an RJ45 port connect a 10BASE T transceiver directly to the device s AUI port and then connect the UTP cable to the RJ45 port on the transceiver Figure 2 1 Connecting to the 3E02 04 2 3 2 Connecting the 3E07 04 Ethernet Switch Module You can connect each of the four pairs of BNC ports on the 3E07 04 to a thin coax network or port Each segment has two female BNC connectors ...

Page 22: ...e receive RX connector on the attached device Similarly the receive RX connector on the 3E08 04 must be connected to the transmit TX connector on the attached device see Figure 2 3 Refer to Appendix B for cable specifications Figure 2 3 Connecting the 3E08 04 NOTE You do not need to attach terminators to unattached segments OFFLINE PROC RX TX PWR QUAD IEEE 802 3 ETHERNET 10BASE2 SEGMENT 4 SEGMENT ...

Page 23: ...to an AUI port on the 3E05 04 and the other end to the tap type transceiver a Slide the hold down clip on the female DB15 connector on the module to the open position b Attach the male DB15 connector on the drop cable and then slide the clip back to the closed position To connect the 3E05 04 to an alternate media network you must use a transceiver connected to the module s AUI port There are many ...

Page 24: ...you re connecting to you can use either crossover or straight through UTP cable to connect a device to a port Refer to Appendix B for cable specifications Connect one end of a UTP cable to an open 10BASE T port on the 3E02 08 ATX and the other end to the RJ45 port on the device see Figure 2 5 If the device doesn t have an RJ45 port connect a 10BASE T transceiver directly to the device s AUI port a...

Page 25: ...he following attributes are configurable using LCM Port s IP address for originating and receiving IP packets Enabling disabling a port s Transparent Spanning Tree Source Routing or Source Routing Transparent mode Additionally you can configure the following attributes using network management software platforms refer to the network management software documentation for specific instructions Param...

Page 26: ...ATX Refer to Chapter 2 Connecting to the Network of the ATX User Guide for specific instructions Make sure the ATX is powered on and press Return a few times When the ATX prompt appears LCM is ready to use 3 3 LCM COMMANDS To configure an Ethernet Switch Module refer to the ATX User Guide for LCM commands generic to all modules Familiarize yourself with LCM before configuring the module Specific i...

Page 27: ...sions 184 Excess Collisions 5 Rx FCS Align Errs 0 Internal Rx Errors 0 Internal Tx Errors 0 The status of the port includes the following information Bridging which functions have been enabled for bridging see the bridge command Routing which functions have been enabled for routing see iproute and ipxroute commands in your NMS manual Enabled Disabled enabled if it is operational or disabled if you...

Page 28: ...esignated port for the LAN and is forwarding packets and sending out bridge protocol packets Broken The port is not forwarding packets Reasons include no cable connected no link status or network management has disabled the port Disabled The port is not configured for Spanning Tree Pkts Transmitted number of packets transmitted from the port This includes any packets that might have experienced tr...

Page 29: ...s a received packet was discarded due to a bad checksum or Frame Alignment error Internal RX Errs number of times an inbound packet was dropped due to an internal error Whenever a packet is dropped due to TX_Q Overflows Internal RX Errs may also be incremented Internal TX Errs number of times a packet transmission was aborted due to an internal error NOTE All of the counter values are reset to zer...

Page 30: ...Chapter 4 Monitoring Page 4 4 Ethernet Switch Module User Guide ...

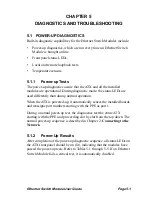
Page 31: ...s are used differently than during normal operation When the ATX is powered up it automatically senses the installed boards and reassigns port numbers starting with the PPE as port 1 During a normal power up test the diagnostics test the entire ATX starting with the PPE and proceeding slot by slot from the top down The normal power up sequence is described in Chapter 2 Connecting to the Network 5 ...

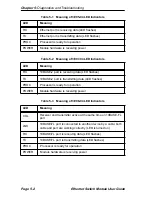
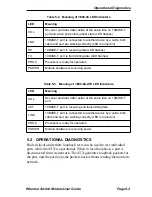
Page 32: ...ort is receiving data LED flashes TX 10BASE 2 port is transmitting data LED flashes PROC Processor is ready for operation POWER Module hardware is receiving power Table 5 3 Meaning of 3E08 04 LED Indicators LED Meaning COL Receiver and transmitter active at the same time on 10BASE FL port LNK 10BASE FL port is connected to another device by a cable both cable and port are working correctly LED is ...

Page 33: ...when port enters jabber state LED flashes LNK 10BASE T port is connected to another device by a cable both cable and port are working correctly LED is turned on RX 10BASE T port is receiving data LED flashes TX 10BASE T port is transmitting data LED flashes PROC Processor is ready for operation POWER Module hardware is receiving power Table 5 5 Meaning of 3E02 08 ATX LED Indicators LED Meaning COL...

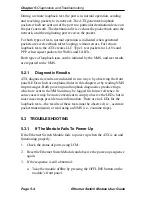
Page 34: ...he NMS 5 2 1 Diagnostic Results ATX diagnostic results are indicated in two ways by observing the front panel LEDs which are explained later in this chapter or by reading NMS trap messages Both power up and loopback diagnostics produce traps which are sent to the NMS and may be logged for future reference In some cases it may be more convenient to simply observe the LEDs but in most cases traps pr...

Page 35: ...ystems Technical Support 5 3 2 Connectivity Problems If the Ethernet Switch Module powers up normally but the workstations are unable to communicate 1 Check the LEDs for abnormalities which may help indicate the source of the problem LED behavior during normal operation is explained earlier in this chapter 2 Check the status of the ports using LCM 3 Check for loose connections between the module t...

Page 36: ...Chapter 5 Diagnostics and Troubleshooting Page 5 6 Ethernet Switch Module User Guide ...

Page 37: ...lease Notes provided with your ATX software for information about software and hardware version numbers and compatibility 6 1 UNPACKING THE ETHERNET SWITCH MODULE Unpack the Ethernet switch module carefully handling it by the edges only and inspect it for possible damage If any damage is evident contact Cabletron Systems Save the original container and antistatic wrap in case the module needs to b...

Page 38: ...WAPPING AN ETHERNET SWITCH MODULE When swapping identical modules it is recommended that you remove power to the ATX However the Ethernet switch module you are replacing must be taken offline first as described below 1 Take the module to be replaced offline either by pressing the OFFLINE button on the front panel or by using the LCM offline command 2 Remove power from the ATX 3 Remove the network ...

Page 39: ...INE button the new Ethernet Switch Module will automatically come back on line when it is inserted in the slot If you used the LCM offline command to take the original module offline you must use the online command to bring the new module online 9 Check the module LED power on sequence as described in Chapter 2 Connecting to the Network 10 Make the connections to the network as described in Chapte...

Page 40: ...Chapter 6 Adding Swapping Modules Page 6 4 Ethernet Switch Module User Guide ...

Page 41: ...ICATIONS Standards Compliance Twisted pair Ethernet Thin Coax Ethernet Fiber Optic Ethernet Ethernet Version 2 IEEE 802 3 10BASE T 10BASE2 10BASE FL Protocol Translations TCP IP IPX AppleTalk Dimensions Length 30 99 cm 12 2 in Width 24 13 cm 9 5 in Weight 1 02 kg 2 25 lb ...

Page 42: ... C to 90 C 22 F to 194 F Relative humidity 0 to 95 non condensing Connectors 3E02 04 RJ45 for UTP 3E07 04 BNC for Thin Coaxial Cable 3E08 04 ST for Fiber Optics 3E05 04 DB15 for AUI 3E02 08 ATX RJ45 for UTP LEDs Power Processor Processor status ready Link Collision 3E02 04 and 3E08 04 only Receive Transmit Bridging Domains Transparent Source Routing Source Routing Transparent ...

Page 43: ...Technical Specifications Ethernet Switch Module User Guide Page A 3 Certifications Safety UL 1950 CSA C22 2 950 EN60950 and IEC 950 Emission FCC Part 15 Class A EN55022 Class A and VCCI Class I Immunity EN50082 1 ...

Page 44: ...Appendix A Technical Specifications Page A 4 Ethernet Switch Module User Guide ...

Page 45: ...s 8 pin RJ45 AUI External Transceiver Drop 15 pin DB15 AUI Thick Coaxial Cable 50 Ohm Coax N Type Thin Coaxial Cable RG58 A U or RG58 C U 50 Ohm Coax BNC Multimode Fiber Optics 50 125 62 5 125 80 125 or 100 140 Micron Core Cladding ST Table B 2 UTP Cable Specifications Type 100 Ohm e g IBM Type 3 or AT T DIW Number of Pairs 2 or 4 Max Link Segment Length 328 ft 100 m Min Link Segment Length 2 0 ft...

Page 46: ...ax Max Cable Segment Length 1640 ft 500 m Min Cable Segment Length 8 2 ft 2 5 m Max Number of Attachments 100 Table B 5 Thin Coax Cable Specifications Type RG58 A U or RG58 C U Coax Max Cable Segment Length 606 ft 185 m Min Cable Segment Length 1 5 ft 0 5 m Max Number of Attachments 30 Table B 6 Duplex Fiber Cable Specifications Type 50 125 62 5 125 80 125 100 140 micron core Max Link Segment Leng...

Page 47: ...erall color is white The white wires will be distinguished from one another by periodically placed usually within 1 2 inch of one another rings of the other four colors Refer to the diagram below and note how the pins are numbered Be sure to hold the connectors in the same orientation when connecting the wires to the pins Figure B 1 RJ45 Connector Pin Numbers Each UTP link segment must have an RJ4...

Page 48: ...g or in the device itself When connecting two identical UTP ports i e both crossover ports or both straight through ports a crossover must be implemented in the wiring Refer to the following table for crossover pin assignments The and signs are used to represent the polarity of the two wires that make up each wire pair Table B 7 RJ45 Crossover Pin Assignments RJ45 Pin Assignment 1 Tx 2 Tx 3 Rx 6 R...

Page 49: ...able B 9 Straight Through RJ45 Pin Assignments Hub Device 1 Tx 3 Tx 2 Tx 6 Tx 3 Rx 1 Rx 6 Rx 2 Rx Table B 10 AUI Pin Assignments Pin Circuit Signal Name 3 DO A Data Out Circuit A 10 DO B Data Out Circuit B 11 DO S Data Out Circuit Shield 5 DI A Data In Circuit A 12 DI B Data In Circuit B 4 DI S Data In Circuit Shield 8 CO S Control Out Circuit Shield 2 CI A Control In Circuit A 9 CI B Control In C...

Page 50: ...ts are unpopulated these are known as inter repeater links or IRLs This distinction between populated and unpopulated segments is significant for coax networks only 14 VS Voltage Shield Shell PG Protective Ground Conductive Shell NOTE Voltage Plus VP and Voltage Common VC use a single twisted pair in the AUI cable NOTE This rule completely consistent with the IEEE 802 3 specification and is meant ...

Page 51: ...on Populated Segment A coax segment to which multiple devices are attached maximum 100 transceivers for thick coax and 30 devices e g stations and hubs for thin coax Coax Segment An electrically continuous length of coax cable with a terminating resistor at each end Stack A method of interconnecting multiple hubs so that multiple hubs appear as one large hub or repeater to the network Unpopulated ...

Page 52: ...Appendix B Cables Page B 8 Ethernet Switch Module User Guide ...

Page 53: ...F Filtering 3 2 Front panel 3E02 04 1 6 3E02 08 ATX 1 10 3E05 04 1 9 3E07 04 1 7 3E08 04 1 8 ATX 1 5 H Help 1 3 L LEDs diagnostic 5 1 power up sequence 2 1 types 1 6 to 1 10 M Module versions 1 4 P Pin assignments AUI B 5 RJ45 crossover B 4 Protocol translations A 1 R Repeater rule B 6 S Specifications A 1 Standards compliance 1 5 to 1 9 swapping a module 6 2 T Technical support 1 3 Troubleshootin...

Page 54: ...Index Index 2 Ethernet Switch Module User Guide ...

Reviews: