

Use the AC power cords supplied with the product.
If you use other AC power cords, they should have
a wire gauge of at least 22 and a 230VAC 5A rating.
Be sure to use three-prong cords and connect them
to sockets with good earth grounds.
To connect input power:
1. Connect the ground stud near the bottom middle
of the rear panel to a good earth ground. Usually
this will be the same as the equipment rack ground.
2. Connect the AC power cords to the power supplies
and plug them into independent power sources.
3. Push the “1” side of the power supplies’ switches
to activate power. The LEDs on the power supplies
illuminate to indicate that power is active.
4. If you power up only a single supply, an alarm
tone sounds. Press the red power supply alarm
reset button just to the right of the power supplies
to turn off the alarm sound.
With DC models of the product, you must supply
your own DC power cables. They should have a wire
gauge of at least 16 and a 72VDC 4A rating. Always
connect the earth grounds first, and keep the earth
grounds connected whenever you are working on
the device. When disconnecting the device from DC
power, remove the earth ground connections last.
Connect to the Network and Tools
Tap the links you want to monitor (using external
fiber or copper taps) and plug the outputs of the taps
into any Director xStream ports that have SFP+ or
SFP modules installed. You can also plug in switch
Span ports that you want to monitor.
Plug tools into any Director xStream ports that have
SFP+ or SFP modules installed.
Quick Install Guide
Director xStream Pro™
Network Controller Switch
Unpacking and Inspection
Carefully unpack Director xStream Pro
TM
and retain
materials for later use. Check the packing slip
and parts list against parts received. If any part is
missing or damaged, contact Net Optics Customer
Service. (Note: SFP+ and SFP modules are
ordered and shipped separately.)
Install SFP+ and SFP modules
Install SFP+ and SFP transceiver modules as
desired in the SFP+ cages in the front of the
chassis. The 8 ProPorts support only 10G SFP+
modules, while the 16 standard ports support 10G
SFP+ and 1G SFP modules. For each module,
remove the temporary plug from the SFP+ cage and
insert the module until it clicks into place. Unused
ports do not need to be populated with transceiver
modules.
Rack Mount the Chassis
Director xStream Pro is designed for mounting in a
19-inch rack, occupying two rack units of height.
To mount the Director xStream Pro device:
1. Expand the mounting rails to fit the depth of your
rack.
2. Attach the mounting rails to the font and rear pillars
of the rack using the supplied screws. The tabs
that Director xStream Pro will sit on should be
located toward the bottom.
3. Slide the Director xStream Pro chassis into the
rack so it rests on the rail tabs.
4. Make sure the rack is properly grounded.
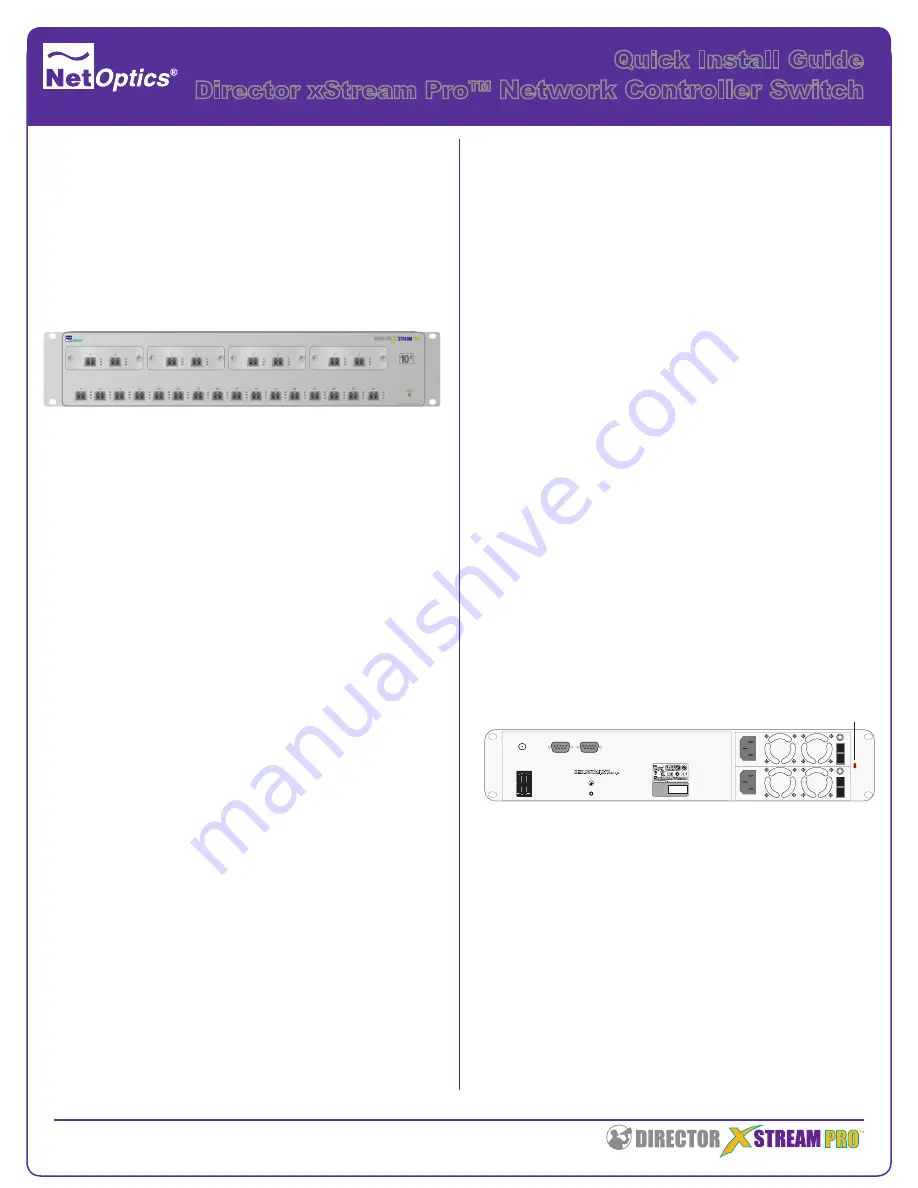
Connect Power
Director xStream Pro’s two redundant power
supplies can be found at the rear of the unit on the
right side. Either power supply can power the unit
by itself, or you can connect both power supplies for
high availability. If you use both supplies, be sure to
connect them to independent power sources.
Power LED
16 SFP+ Standard Ports (10G or 1G)
8 SFP+ ProPorts (10G only, filtering, load balancoing, DPI)
© 2010 by Net Optics, Inc. Net Optics® is a registered trademark of Net Optics, Inc. Director xStream Pro
TM
is a trademark
of Net Optics, Inc.
800-0166-001 Rev C PUBDIRXPQ 12/10
Management
ProPush
GPS
COM A
COM B
0
1
0
1
0
SERIAL
NUMBER
XXXXXX
Ground Stud
Management Port
GPS Console Port (COM A)
Redundant Hot-swappable
Power Supplies
ProPush Port
Power Supply Alarm Reset Button


