background image

6

7

!

Attention!


Disconnect the printer from the electrical outlet before 

mounting or removing the dispenser module.

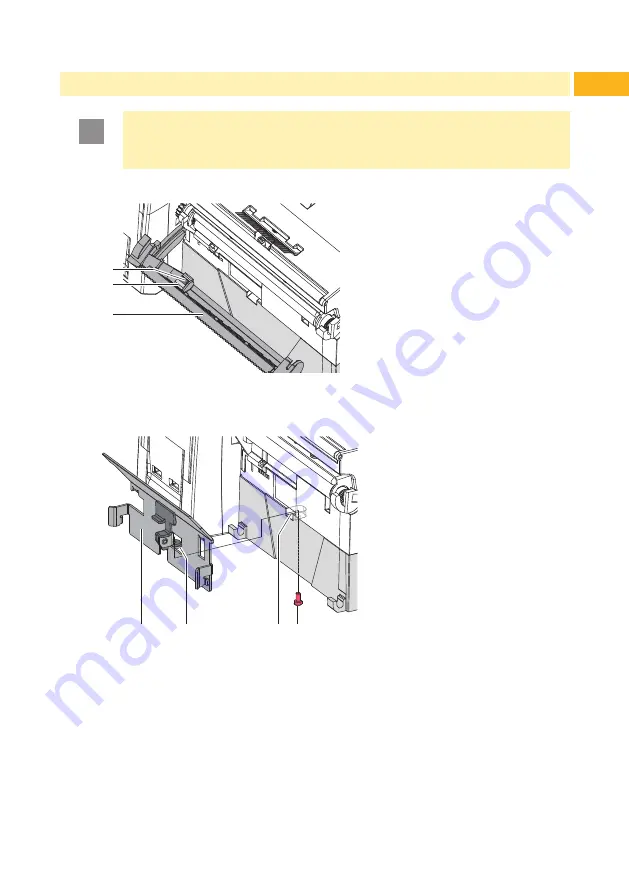
Mounting the peel-off plate

1

2

3

1.  Fold down the cover with the tear-off plate (3).
2.  Press the bars (1) out of the holders (2) an remove the cover. 

8

7

6

5

3.  Insert the lug (6) of the peel-off plate (5) into the slot (7) of the printers 

baseplate. 

4.  Press the peel-off plate against the printer and fix it with screw (8).

Mounting

Summary of Contents for EOS4 P

Page 1: ...Dispenser module EOS4 P Operator s Manual...

Page 2: ...and conditions Deliveries and performances are effected under the General conditions of sale of cab Germany cab Produkttechnik GmbH Co KG Postfach 1904 D 76007 Karlsruhe Wilhelm Schickard Str 14 D 76...

Page 3: ...ns 4 1 2 Intended Use 4 1 3 Safety Instructions 5 1 4 Environment 5 1 5 Technical Data 6 2 Mounting 7 3 Media Loading 8 4 Operation 9 4 1 Synchronizing the Paper Feed 9 4 2 Operation in Peel off Mode...

Page 4: ...he environment Handling instruction Reference to section position illustration number or document Option accessories peripheral equipment special fittings Time Information in the display 1 2 Intended...

Page 5: ...ly be performed by trained personnel or service technicians Unauthorized interference with electronic modules or their software can cause malfunctions Other unauthorized work on or modifications to th...

Page 6: ...o 120 mm Label width single lane 10 116 multi lane 5 116 Label height 20 200 Power supply peripheral connector of the printer Attention Limitations may apply to small labels thin materials or strong a...

Page 7: ...ounting the peel off plate 1 2 3 1 Fold down the cover with the tear off plate 3 2 Press the bars 1 out of the holders 2 an remove the cover 8 7 6 5 3 Insert the lug 6 of the peel off plate 5 into the...

Page 8: ...2 1 Load ribbon and media as described in printers manual Use the tear off mode information for loading media 2 Push both levers 3 downwards and fold down the dispenser module 3 Remove the labels from...

Page 9: ...That way the first label which is detected by the label sensor will be transported to the print position and all labels in front 1 will be fed out of the printer X X Press to start the synchronizatio...

Page 10: ...bel The removal will be registered by two see through sensors 1 If both sensors are free the next label will be printed Attention When operating multi lane media remove at last the labels which are de...

Page 11: ...use sharp objects knives screwdrivers etc to clean the drawing roller 1 3 3 4 2 1 Push both levers 3 downwards and fold down the dispenser module 2 Remove the liner 4 from the dispenser module 3 Remov...

Page 12: ...ereby be made invalid This declaration is valid only when the dispenser module is used together with EOS4 printers Manufacturer cab Karlsruhe Description Dispenser module Type EOS4 P Applied EC Regula...

Reviews: