35
A 3
4.4
Wechsel der Druckwalze
Wechseln Sie die Druckwalze wie folgt:
1. Trennen Sie den Drucker vom Netzanschluss!
2. Schwenken Sie den Druckkopf nach oben und entneh-
men Sie das Material aus dem Drucker.
3. Lösen Sie die Schrauben (3) mit dem Innensechskant-
schlüssel (2,5 mm) mit Griff (7, Bild 17) und hängen
Sie das Abreißblech (2) aus.
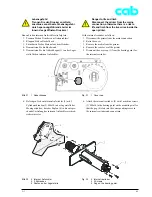
4. Entfernen Sie zwei Schrauben (5a, 5b).
5. Nehmen Sie die Lagerplatine (6) incl. Druckkopfab-
stützung (4) von der Achse der Druckwalze (1) ab.
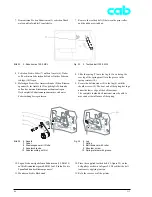
6. Ziehen Sie die Druckwalze (1) von der Zwischenwelle
(8) ab.
7. Schieben Sie die neue Druckwalze auf die Zwischen-
welle (8) auf. Richten Sie dabei die Nut in der Achse
der Druckwalze (1) zur Passfeder (7) in der Zwischen-
welle aus.
8. Montieren Sie die Lagerplatine (6) incl. Druckkopfab-
stützung (4).
9. Ziehen Sie die Schrauben (5) in der Reihenfolge a - b
an.
10. Montieren Sie das Abreißblech (2). Befestigen Sie das
Abreißblech mit den Schrauben (3).
Bild 20
Druckwalze und Zwischenwelle
Fig. 20
Print roller and shaft
Bild 19
Druckwalze und Lagerung
Fig. 19
Print roller and bearing assembly
4.4
Replacing the print roller
Replace the print roller as follows:
1. Disconnect the printer from the mains connection.
2. Lift the printhead up and remove the media from the
printer.
3. Loosen the screws (3) with the 2.5 mm Allen key with
handle (7, figure 17), and remove the tear-off plate (2).
4. Remove the two screws (5a, 5b).
5. Remove the plate (6) and the printhead support (4)
from the print roller axle (1).
6. Pull the print roller (1) off the shaft (8).
7. Slide the new print roller onto the shaft (8). In so doing,
align the slot in the print roller axle (1) with the feather
key (7) in the shaft.
8. Refit the plate (6) and the printhead support (4).
9. Tighten the screws (5) in the order a then b.
10. Refit the tear-off plate (2). Secure the tear-off plate
with the screws (3).


