background image


C-NaviGator III User Manual 


Revision 2


Page 38 of 121


9/27/2013 


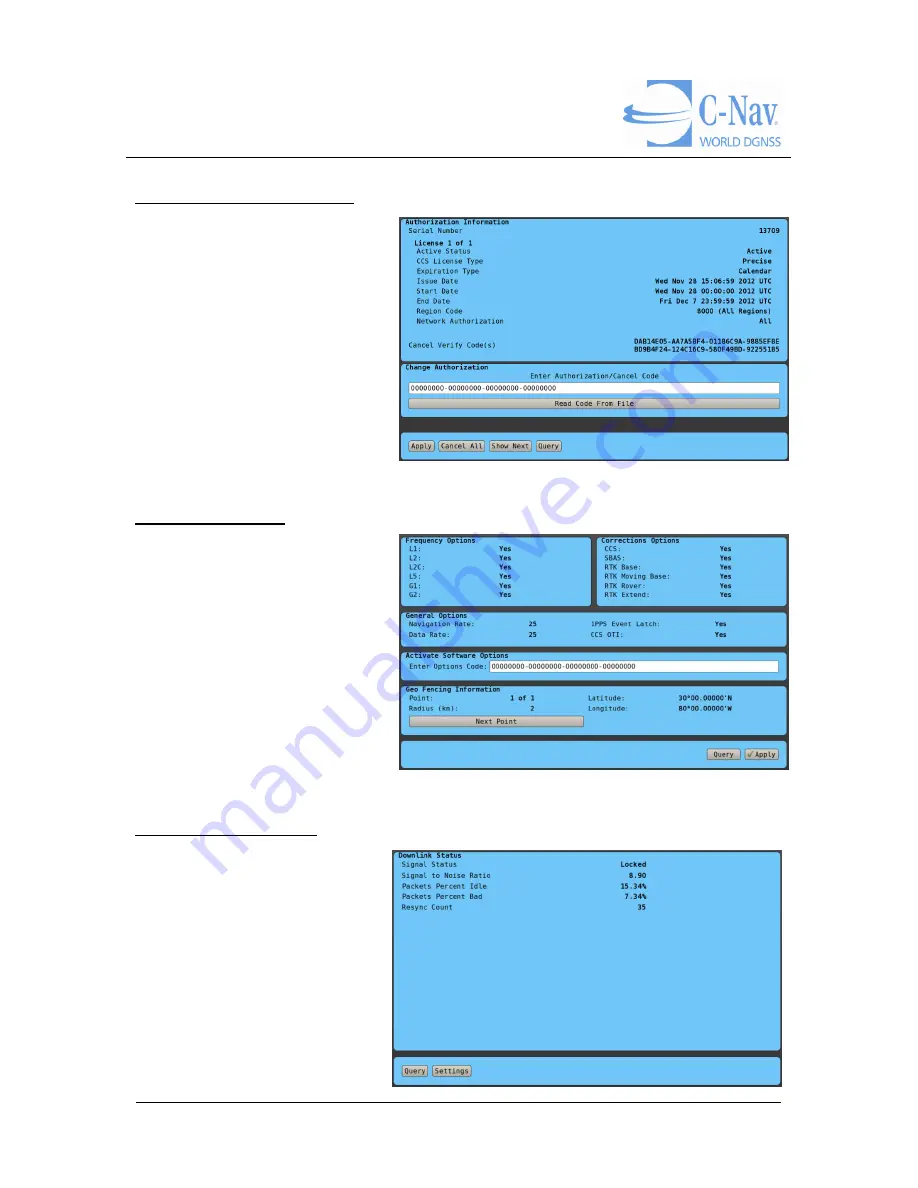
Corrections Authorization 

Current license information is 
displayed here and 
authorization codes can also 
be entered here. 


Software Options 

The options available to the 
user are encoded into and 
activated by the 

Options Code

.  

This determines which settings 
and features are enabled in the 
system.  


Corrections Receiver 

This screen contains status 
indicators relative to GNSS 
corrections received.   


Summary of Contents for C-NaviGator III

Page 1: ...Gator III User Manual Revision 2 Page 1 of 121 9 27 2013 User Manual Revision 2 Revision Date September 27 2013 C C Technologies Inc C Nav DGNSS 730 E Kaliste Saloom Road Lafayette LA 70508 U S A www cnav com ...

Page 2: ...2 of 121 9 27 2013 Release Notice This is the September 2013 release of the C NaviGator III User Manual Revision History 2 09 27 2013 Updated for 7 0 3 C Thompson 1 02 19 2013 Initial document creation C Thompson Revision Date Description Author ...

Page 3: ...ION IS WITH YOU SOME STATES DO NOT ALLOW THE EXCLUSION OF IMPLIED WARRANTIES SO THE ABOVE EXCLUSION MAY NOT APPLY TO YOU Limitation of Liability IN NO EVENT WILL C C TECHNOLOGIES INC OR ANY PERSON INVOLVED IN THE CREATION PRODUCTION OR DISTRIBUTION OF THE C C TECHNOLOGIES SOFTWARE HARDWARE FIRMWARE AND DOCUMENTATION BE LIABLE TO YOU ON ACCOUNT OF ANY CLAIM FOR ANY DAMAGES INCLUDING ANY LOST PROFIT...

Page 4: ...tion 2 Operator Instructions 15 Power Up 15 Screen Layout 15 Menus 16 Active Device Information 16 GNSS Quality Alert Indicators 17 QA QC Status Indicator 17 Main Buttons 18 Operation 19 Section 3 Menus 20 File Menu 21 Load Defaults 21 Save Load Settings 21 Upload File 21 Reset Unit 22 View 23 Error Ellipse 23 Error Ellipse Settings 23 Scatter Plot 24 Scatter Plot Settings 24 Satellite Info 25 Pos...

Page 5: ...ngs 31 Quality Panel Thresholds 32 Serial Ports 32 Network Virtual Ports 33 Logging 33 System Network Settings 34 VNC Interface 35 CCS OTI Configuration 35 Help 36 Contents 36 This Page 36 About 36 Section 4 Devices 37 C Nav3050 37 Receiver Information 37 Solution Control 37 Corrections Authorization 38 Software Options 38 Corrections Receiver 38 Corrections Receiver Settings 39 Output Control 39 ...

Page 6: ...tion 45 Solution Control 45 SBAS Configuration 46 Corrections Authorization 46 Software Options 46 Corrections Receiver 47 Corrections Receiver Settings 47 NMEA Output Control 47 Port Configuration 48 1PPS Configuration 48 RTK Settings 49 RTCM Output Control 49 MultiMediaCard MMC Administration 49 MMC Files 50 Firmware Update 50 Reset 50 C Nav2000 51 Receiver Information 51 Solution Control 51 Cor...

Page 7: ...roubleshooting 60 No Position Information 60 No Serial Input Output 60 Updating Software 60 Hardware 61 Section 6 General 62 Introduction to Hardware 62 A computer and display all in one 62 Supplied Equipment 63 Optional Equipment 63 Section 7 Installation 64 Installation and Mounting 64 General Mounting Instructions 65 Ergonomics 66 Cables 67 Maximum Cable Length 67 Configuring Housing Connectors...

Page 8: ...r Specifications 75 Power Supply 75 Power Consumption 75 Physical Dimensions 75 User Controls 75 Behind Front Bezel Glass Display Control GDC IP66 75 Environmental Considerations 76 Input Output Connectors 76 Section 11 Specifications of Accessories 77 USB Cable 77 Description 77 Specifications 77 External AC DC Power Supply 78 RS 232 COM Module 79 Features 79 Specifications 79 Appendix A Mechanic...

Page 9: ...94 C Nav1010 Alarms 95 Output Alarms 96 Simulator Alarms 96 Appendix F Approvals Certifications 98 IEC IACS 98 Bureau Veritas BV 98 DET NORSKE VERITAS DNV 102 American Bureau of Shipping ABS 105 Germanischer Lloyd GL 107 Appendix G Declaration of Conformity 109 Index 110 GNU GENERAL PUBLIC LICENSE 113 ...

Page 10: ...vices is in Section 4 Devices Page 37 Section 5 Maintenance Page 60 concentrates on maintenance and troubleshooting An overview of the hardware is in Section 6 General Page 62 Section 7 Installation Page 64 discusses how to properly mount and install the C NaviGator III Section 8 Physical Connections Page 69 describes all of the connections to the C NaviGator III General operating procedures are d...

Page 11: ...sed for hyperlinks Arial red italic is used for typed commands Important notes are displayed in shaded text boxes Simple file content is displayed in Courier New Black font in a text box Please note Such note boxes display important information that should not be ignored Sample File Version 0 1 ...

Page 12: ...C NaviGator III User Manual Revision 2 Page 12 of 121 9 27 2013 Software ...

Page 13: ...crease in reliability of the position solution The C NaviGator III s processor based windows style operating environment is straightforward and easy to use Information screens provide the necessary user interface Data entry and command functions are entered through the use of the touch screen Information displays alarm indicators parameter settings data analysis etc are displayed on the C NaviGato...

Page 14: ...ent Quality Information with Alerts Frequency Mode of Solution 2D 3D Status Correction Type Correction Age Number of Satellites used for Solution HDOP VDOP and PDOP Figure of Merit Signal Strength C Nav Specific Features and Functions Control and monitoring of C Nav3050 receivers Control and monitoring of C Nav2050 receivers Control and monitoring of C Nav2000 receivers Control and monitoring of C...

Page 15: ...scribed refer to Troubleshooting Page 60 Screen Layout The C NaviGator III screen provides easy access to system information and control functions Positioning information and time of the active device are shown across the top of the screen Below the position information is the Menu The type of information to be displayed in the center of the screen is selected by the operator using the menus descr...

Page 16: ...guration storage recall and reset View Monitoring screen selection Settings View enter or adjust operating parameters Device Settings Settings for individual receivers Help Display and control screen setting descriptions Active Device Information Position Date and time Course Speed ...

Page 17: ...ure of Merit SVS Number of satellites used in position solution SNR Signal to Noise Ratio VDOP Vertical Dilution of Precision PDOP Position Dilution of Precision Net The Network of the CCS Satellite HDOP Horizontal Dilution of Precision QA QC Status Indicator Sys Health Overall recent health of the system on a scale of 1 5 F Test Recent F Test health on a scale of 1 5 W Test Recent W Test health o...

Page 18: ...8 of 121 9 27 2013 Main Buttons Take Fix Take a fix of the current position Logging Open the Logging Setting screen Screenshot Take a screenshot of the C NaviGator III display Alarms Open the Alarms screen Will be red when there is an active alarm ...

Page 19: ...C NaviGator III automatically recalls the last settings saved and displays the Satellite Info screen System operating modes and status indicators are seen on the right in the Quality Panel To the right are the active ports switch the active port indicator and the general Alarm Indicators The Next Device button provides a means to quickly switch between different input sources for monitoring The ac...

Page 20: ...1 9 27 2013 Section 3 Menus Pull down menus allow operator access to the C NaviGator III configuration display options parameter settings support documentation etc Menus are selected by pressing Menu on the display and pressing each subsequent menu item ...

Page 21: ...d Settings To store the C NaviGator III s current configuration select Save C NaviGator Settings These settings can be recalled with the Load C NaviGator Settings command To store a receiver s configuration select the device in the table and press Save Device Settings These settings can be recalled with the Load Device Settings The Save Snapshot button will store a human readable report of the C N...

Page 22: ...Unit Reset Unit causes the C NaviGator III to restart the internal program The operator is asked to confirm the Reset Unit command Warning Uploading an inappropriate file to the device may render the device inoperable Use care to only upload files designed for the device ...

Page 23: ...rtainty in the system Graphics on the Error Ellipse screen show the error estimate of the PVT solution accuracy in meters based on residual analysis Pressing the Toggle RAIM UKOOA Data button will alternate the display between the standard RAIM error levels and the more UKOOA error levels Error Ellipse Settings Allows the user to set the range of the graph or set it to Auto Range When Auto Range i...

Page 24: ...ed position or set to Track the latest GNSS fix The range is the distance from the center of the graph to the outer ring Scatter Plot Settings Using the Center drop down you can set the position for the center of the graph Select Track Current to track the current position Choose Fixed Manual to enter the latitude and longitude Choose Fixed Here to use the current position as the graph center Ente...

Page 25: ...d in the plot by a circle with the satellite ID number inside All satellites used to compute the PVT solution are identified with green circles Circles turn red if data from the satellite becomes too noisy or obstructed Circles with a blue border represent GPS satellites and those with a yellow border represent GLONASS satellites The graphic center point reference represents a point directly overh...

Page 26: ...ccommodate the largest range between the reference device and any other device The operator can also choose to display distance labels on the graph Graphs Quality information for the previous 30 minutes is displayed in graphs The colors change based on the quality alert settings Graphs Settings Allows the user to select up to 6 Graphs to display The user can choose from any of the Quality Panel Th...

Page 27: ...e Start Update button allows the continuous update of the graphs to be started or stopped If the currently selected graph has extra information to display the Graph Info button will bring up a screen with this information QC Settings The QC Settings screen allows you to configure the quality thresholds used to qualify the QA QC data as displayed in the QC Graphs and the QA QC Status mode of the Qu...

Page 28: ...alculations The Use Current Position button will use the latest position from the active device if position data is available The Use Current Time button will use the latest time from the active device if available The graphs can display either 1 day s or 1 week s worth of data by setting the Duration Satellite Forecast The Satellite Forecast page displays graphs showing several characteristics of...

Page 29: ...memory when the Take Fix button is pressed The Edit button allows the user to name describe the fix Alarms Several alarm conditions are logged and displayed on this screen The Ack button can be used to turn off the alarm indicator in the lower right corner of the display until a new alarm is raised Certain more serious alarms will continuously cause the alarm indicator to light up See Appendix E A...

Page 30: ...een the operator can preview existing screenshots Images can be copied to USB devices Screenshots in the list can be deleted To preview a screenshot select it in the list and press Preview To copy one to a USB device select the screenshot in the list and choose a USB device then press Save ...

Page 31: ...viGator III LCD backlight and screen colors is controlled through settings on this screen It can be adjusted for optimum viewing depending on the time of day and physical location of the unit Night mode settings are necessary for installations on the bridge of a vessel where bright lights interfere with the helmsman s view Display Mode This option selects the Day or Night color palette and backlig...

Page 32: ...when the quality indicators change colors Single Frequency and Auto 2D positioning may or may not indicate a problem depending on the situation So you can select any of the colors for these states For the rest of the alerts you have two columns of settings In the Warn Yellow if not column you select at what point the indicator turns from green to yellow In the Alert Red if not column you select at...

Page 33: ...he Settings to show details of an existing network device connection To copy an existing configuration press the Copy button Pressing Delete will remove a network device connection Logging This screen allows the operator to configure logging of the data from an input device to a USB mass storage device Each port can be configured to log input data Select the Raw port from the list and press the Se...

Page 34: ...SV port from the list and press the Settings button Aside from the normal logging settings which fields are logged can be configured from this screen Once configured you can use the Start and Stop buttons to control logging System Network Settings This screen allows the operator to networking configuration for the unit Choose the Config Type DHCP Static or Disabled Provide settings from your netwo...

Page 35: ...onfigured in order for VNC to function CCS OTI Configuration This page allows for the configuration of the information necessary for supporting receivers currently only the C Nav3050 to receive CCS corrections over the Internet Press the Load Configuration button to upload a new CCS OTI configuration file from a USB mass storage device To learn more about configuring the C Nav3050 to use CCS OTI p...

Page 36: ...n this manual This Page As an operator aid Menu Help This Page contains information about the screen currently displayed It provides a quick reference should there be a question that requires a quick answer About Support contact information from C C Technologies can be found by selecting Menu Help About menu There you will find the current version number contact information etc to assist the opera...

Page 37: ...rial numbers etc is displayed on this screen Message indicators green grey circles indicate when data messages are received The Query button can be used to request updated information from the receiver Solution Control Control settings relevant to computing the position are displayed on this screen The user can configure the use of corrections To learn more about configuring the C Nav3050 to use C...

Page 38: ...ayed here and authorization codes can also be entered here Software Options The options available to the user are encoded into and activated by the Options Code This determines which settings and features are enabled in the system Corrections Receiver This screen contains status indicators relative to GNSS corrections received ...

Page 39: ...ings from the C Nav3050 can be chosen by the settings in this screen Some messages can be output on change thus output at the navigation rate Other strings can be set to output every Fixed number of seconds Settings that affect the type of NMEA messages output are also set from this screen Auxiliary Port Configuration COM1 and COM2 on the C Nav3050 receiver can be configured here Serial data trans...

Page 40: ...odify settings for the 1PPS output from this screen RTK Configuration Use this screen to adjust your RTK settings and MBRTK settings Differential Configuration The RTCM Radio Technical Commission for Maritime Services standard SC 104 correction type and rates for the C Nav3050 are implemented here ...

Page 41: ...c mode of the receiver can be set here Antenna Information Use this screen to adjust the Phase Center Height Slant Range and Radius of your antenna The user can also define reference information for the antenna Warning L1 measurement usage is critical to the operation of the receiver It is not recommended that users turn off L1 measurement usage If L1 is disabled the receiver s behavior is undefin...

Page 42: ...iles within the receiver Hardware Settings This screen allows the user to configure the USB mode control logging to the internal memory and USB devices when in Host USB Mode Ethernet Settings This screen allows users to configure the network settings for the receiver s built in Ethernet interface The user can also configure the virtual ports to use for output or control ...

Page 43: ... This screen allows you to configure the Bluetooth settings for the C Nav3050 Firmware Update The C Nav3050 receiver s firmware can be installed from this screen Ensure that the USB memory device is installed Press the Select Package button to search the USB memory stick for available firmware You can toggle which components are updated by selecting the component and pressing the ...

Page 44: ...omponent button Press Start Update to upload the new code into C Nav3050 memory Information regarding the new version is displayed in the information window Restart Use this screen to restart your C Nav3050 Warning Do not unplug the USB device while the memory is uploading ...

Page 45: ... on this screen Message indicators green white circles indicate when data messages are received The Query button can be used to request updated information from the receiver Solution Control Various status indicators and control settings relevant to the corrections applied in the position solution are displayed on this screen This information verifies system performance with respect to limits set ...

Page 46: ...e which SBAS satellites to use Corrections Authorization Current license information is displayed here and authorization codes can also be entered here Software Options The options available to the user are encoded into and activated by the Options Code This determines which settings and features are enabled in the system ...

Page 47: ...his screen allows the user to choose which CCS satellite to use or to allow the receiver to automatically select which CCS satellite to use NMEA Output Control Output data strings from the C Nav2050 can be chosen by the settings in this screen Some messages can be output On Change and will be delivered when new data is available typically this is at the Navigation Rate of the receiver The Navigati...

Page 48: ...ation COM1 and COM2 on the C Nav2050 receiver can be configured here Serial data transfer parameters Baud Rate and Parity should be set to match that of the C NaviGator III port Input output protocols for the auxiliary port can also be accessed here 1PPS Configuration Settings for the 1PPS output can be modified from this screen ...

Page 49: ...s of the C Nav2050 RTCM Output Control The RTCM Radio Technical Commission for Maritime Services standard SC 104 correction type and rates for the C Nav2050 are implemented here MultiMediaCard MMC Administration Control of the internal MMC Logging is handled here Data can be logged to the internal MMC of the C Nav2050 ...

Page 50: ...re can be installed from this screen Ensure that the USB memory device is installed Press the Select Package button to search the USB memory stick for available firmware Press Update Firmware to upload the new code into C Nav2050 memory Information regarding the new version is displayed in the information window Reset Use this screen to restart your C Nav2050 Warning Do not unplug the USB device w...

Page 51: ... grey circles indicate the Message status Green circles indicate messages are being received by C NaviGator III The Query button can be used to request updated information from the receiver Solution Control General operating parameters and position solution control for the C Nav2000 are accessed here These settings define the acceptable operating limits correction signal settings vertical 3D contr...

Page 52: ... receiver As part of standard procedure operators should periodically check the expiration date to avoid gaps in service Corrections Receiver This screen contains mainly status indicators relative to the GNSS corrections received by the system Also the user can manually set the C Nav Corrections Frequency here Output Control NMEA and RTCM output are controlled from this screen ...

Page 53: ...the USB memory stick for available firmware Press Update Firmware to upload the new code into C Nav2000 memory Information regarding the new version is displayed in the information window Warning Updates of a C Nav2000 typically require 25 30 minutes This process should not be interrupted as it may leave the receiver in an inoperable state if not completed successfully Warning Do not unplug the US...

Page 54: ...ate when data messages are received The Query button can be used to request updated information from the receiver Solution Control Various status indicators and control settings relevant to the corrections applied in the position solution are displayed on this screen This information verifies system performance with respect to limits set by the operator Corrections Authorization Current license in...

Page 55: ...e Options Code This determines which settings and features are enabled in the system Corrections Receiver This screen contains status indicators relative to GNSS corrections received Corrections Receiver Settings This screen allows the user to choose which CCS Satellite to use or to allow the receiver to automatically select which CCS Satellite to use ...

Page 56: ...to output every Fixed number of seconds Port Configuration COM1 and COM2 on the C Nav1010 receiver can be configured here Serial data transfer parameters Baud Rate and Parity should be set to match that of the C NaviGator III port Firmware Update The C Nav1010 receiver s firmware can be installed from this screen Ensure that the USB memory device is installed Press the Select Package button to sea...

Page 57: ...C NaviGator III User Manual Revision 2 Page 57 of 121 9 27 2013 regarding the new version is displayed in the information window Warning Do not unplug the USB device while the memory is uploading ...

Page 58: ...C NaviGator III User Manual Revision 2 Page 58 of 121 9 27 2013 NMEA Input Status Sentence string status indicators identify which information the GNSS receiver supplies ...

Page 59: ...anual Revision 2 Page 59 of 121 9 27 2013 Output Output Settings All output control and data transfer functions are accessible from this screen These include Port information NMEA string selections output filter settings etc ...

Page 60: ... Ports xxxx 2 For C Nav2000 and C Nav2050 the data transfer settings should be 19200 8 None 1 3 For C Nav1010 and C Nav3050 the data transfer settings should be 57600 8 None 1 Updating Software New software versions for the C NaviGator III will be posted on the C Nav website at www cnav com The software can be downloaded and saved to the supplied USB Thumb Drive for use with C NaviGator III To ver...

Page 61: ...C NaviGator III User Manual Revision 2 Page 61 of 121 9 27 2013 Hardware ...

Page 62: ...re reliability and long life time are key prerequisites for the industry The product range combines state of the art display and computer technology with innovative features and options making it all that the integrator needs for top class type approved marine systems The C NaviGator III is delivered with a factory mounted Projected Capacitive Touch Screen Multi touch USB interface and features HA...

Page 63: ... HATC NAVIGATOR III C NaviGator III Power Supply Unit PSU with US UK and EU line cords P N HATHT00255 OPT A1 USB Thumb Drive P N 7CNG002 0 Optional Equipment The C Navigator III also consists of the following items used for mounting or for transporting the C NaviGator III C NaviGator III Rugged Case P N 3GTR005 0 C NaviGator III 19 Rack Mounting Plate P N HATJH 13TAP STD A1 Flat Screen Table Stand...

Page 64: ...y be kept clear coverings which restrict ventilation are not permissible 3 Generally do not install the unit in a horizontal position lying down as this will cause heat to build up inside the unit which will damage the LCD Panel To prevent this problem we recommend installing the unit in a vertical position 30 degrees to improve the airflow through the unit 4 To further improve the cooling of the ...

Page 65: ...rface treatments that differ from the factory default might cause overheating 10 Expose to heavy vibration and acoustic noise might under certain circumstances affect functionality and expected lifetime This must be considered during system assembly and installation Mounting position must carefully be selected to avoid any exposure of amplified vibration General Mounting Instructions 1 The useful ...

Page 66: ...mics 1 Adjust the unit height so that the top of the screen is at or below eye level Your eyes should look slightly downwards when viewing the middle of the screen 2 Adjust screen inclination to remain gaze angle to the center of the screen approximately perpendicular to the line of gaze 3 When products are to be operated both from a sitting position and from a standing position a screen inclinati...

Page 67: ...uring Housing Connectors Housing connectors are available in different sizes 2 pin 4 pin or 5 pin which plugs into the connector area of the unit These housing connectors are by factory default mounted on the unit Below is a brief illustration that might be useful during configuration and installation of such connectors You will need suitable pre configured cable s and tools to configure the conne...

Page 68: ... the cables are firmly in place and do not appear loose or fall out when pulling gently FIG 3 Plug the housing into the appropriate connector area of the unit and check again that the cables secured conform to the markings on the connector area of the unit Finalize the installation by fastening the screws located in front on each side of the housing connector FIG 4 Note Required polarization verif...

Page 69: ...nt COM channels The module is attached to the motherboard via standard USB interface Application software accesses the COM channels as standard COM devices i e in the normal case if there are no requirements for additional software development This module will mainly be integrated electrical and mechanical in the C NaviGator III Network LAN Input Output NET A NET B Supports 10 100 1000Mbps Etherne...

Page 70: ...s is known as COM1 Please note that there is no COM2 Furthermore if required a mechanical and digitally driven relay X1 DIG OUT Mechanical Relay NO NC COM which allows the user via software to control external equipment that require or are compatible with the specifications If relay is off PIN1 and PIN5 are connected When relay is on PIN1 and PIN3 are connected Connect and fasten your cables from ...

Page 71: ...offers both primary Pri and secondary Sec power inputs for secure operation of the unit as well as galvanic isolation and automatic switching between power sources An external AC DC Power Supply Unit PSU is provided with the C NaviGator III bundle Grounding Screw DC models are required recommended to be properly grounded via the screw located on both the Display Unit and the Power Supply Unit ...

Page 72: ...ols Note that these symbols are only visible backlight illuminated when suitable power is connected There are no physical moving knobs potentiometers wheels or push buttons available as everything is touch surface controlled which allows a human finger including several types of gloves to control the unit Power On Off Backlight Decrease Backlight Increase Power Indicator Power On Off Touching this...

Page 73: ...nual Revision 2 Page 73 of 121 9 27 2013 Brightness Adjustment Brilliance brightness adjustment of the displayed image is adjusted by touching the or illuminated symbols Both symbols are visible as long as the unit is powered ...

Page 74: ...esponse Time 6 10ms typical Tr Tf Contrast Ratio 800 1 typical Light Intensity 400 cd m2 typical Viewable Angle 70 deg H 60 deg V typical Active Display Area 286 08 H x 178 8 V mm Max Colors 262000 Computer Specifications Installed OS Linux Based OS CPU Processor 1 x Intel Atom N450 1 66GHz 512KB L2 Cache Installed Storage 1 x 8GB 2 5 SATA SSD Installed Memory 1 x 1GB 200 pin DDR2 667MHz System Ch...

Page 75: ...VDC Model HD 13T21 MMC Exx xxxx Dual input galvanic isolated automatic switch between power sources Power Consumption Operating 20W typ 30W max Physical Dimensions 355 00 W x 248 50 H x 58 00 D mm 13 98 W x 9 78 H x 2 28 D 4 x M4 VESA mounting 75x75mm Max 8mm deep Built in Console mounting 4 x M5x15mm screws Weight 4 4kg 9 7lbs User Controls Behind Front Bezel Glass Display Control GDC IP66 Power ...

Page 76: ...omponents should if possible take place at ambient temperatures of only25 C This is a necessary prerequisite for long life and low service costs Input Output Connectors Connector Rear Primary Power 24VDC 1 x SL SMT 90F 1 x 2 pole Secondary Power 24VDC 1 x SL SMT 90F 1 x 2 pole LAN 1 x RJ45 For customer LAN 1 x RJ45 For C Nav Service USB2 0 10m 2 x Type A Solid State Relay NO over current protectio...

Page 77: ...front panel side for saving snapshots and other data It is in RoHS Compliance Specifications Waterproof Rate IP67 Recommended Panel Thickness 0 8 to 6 0 mm Recommended Torque 6 7 Kgf cm Mating Cap P N GT1C533122 Over Mold Black color PVC USB Type A Plug Thermal plastic black color housing Cable Copper Alloy contacts with Silver plated finish Cold Roll Steel shell with Nickel plated finish 1m UL272...

Page 78: ...y allows AC input voltages of 115VAC to 230VAC 50 60Hz US UK and EU style line cords are provided with the C NaviGator III bundle AC Input Connection There is a 24VDC output on the other side of this power supply The 24VDC output is then connected to the Primary Pri input on the C NaviGator III A DC power cable is provided ...

Page 79: ...g systems will not change COM port number Outputs are short circuit protected Specifications Internal USB to 4 channel x RS 232 non isolated Features All channels have support for all RS 232 DB 9 signals Connector Standard RS 232 DB 9 male housing and pinning Data Rate 230kbps ESD Rating IEC 1000 4 2 Air RS 232 I Os 15 kV ESD Rating IEC 1000 4 2 Contact RS 232 I Os 8 kV ...

Page 80: ...C NaviGator III User Manual Revision 2 Page 80 of 121 9 27 2013 ...

Page 81: ...C NaviGator III User Manual Revision 2 Page 81 of 121 9 27 2013 Appendix A Mechanical Drawings ...

Page 82: ...C NaviGator III User Manual Revision 2 Page 82 of 121 9 27 2013 Appendix B Pin Assignments ...

Page 83: ...C NaviGator III User Manual Revision 2 Page 83 of 121 9 27 2013 ...

Page 84: ...C NaviGator III User Manual Revision 2 Page 84 of 121 9 27 2013 ...

Page 85: ...istortion or bit synchronization errors The Bit Error Rate is considered good if less than 20 The maximum reported value is 500 C Monitor A utility program used to monitor the quality of the position information received from a GNSS receiver No position calculations are done in C Monitor C Monitor simply creates a visual representation of the data received from a GNSS unit C Nav1010 The C Nav GNSS...

Page 86: ... As with other C Nav receivers the C Nav3050 includes dual frequency precision GNSS receiver with two additional channels for receiving SBAS signals and an L Band demodulator for reception of C Nav subscription signals For more information go to www cnav com Correction Signal The Correction Signal to Noise ratio This graph is only available with the C Nav system Correction Type The type or source ...

Page 87: ...agation of all errors affecting the position solution and expressed by its semi major and semi minor axis vectors of greatest and least magnitude and the covariance rotation angle in the reference coordinate system Two dimensional errors are typically propagated at one standard deviation 39 4 probability that the position lies on or within the ellipse or 2 1447 times the standard deviation 95 conf...

Page 88: ...otocol timing and specific sentence formats for up to 38 4K baud serial data bus PDOP Position Dilution of Precision is the most common mathematical expression of the quality of solutions It is based on the geometry of the satellites with the best case being a value of 1 Higher numbers indicate worse quality The best DOP would occur with one satellite directly overhead and three others evenly spac...

Page 89: ...et by propagation delays and other errors including those introduced by selective availability PVT Position Velocity Time RTCM Radio Technical Commission for Maritime Services A Commission set up to define a differential data link to relay GNSS correction messages from a monitor station to a field user The RTCM SC 104 recommendation is the defacto standard for differential GNSS correction transmis...

Page 90: ...rent GNSS satellite locations with reference to the GNSS receiver C NaviGator III refers to this presentation as Position Information Scatter Plot This option displays a plot of satellite positions relative to the receiver and provides an indication of relative signal strength in the two frequency bands Visible Sats The number of Satellites used by the receiver in the position solution WAAS Wide A...

Page 91: ...itioning System Fix Data GLL Geographic Position Latitude Longitude GNS GNSS Fix Data GSA GNSS DOP and Active Satellites GST GNSS Pseudorange Error Statistics GSV GNSS Satellites in View HDT Heading data RMC Recommended Minimum Specific GNSS Data VTG Course Over Ground and Ground Speed ZDA Time Date In addition to standard NMEA messages the C NaviGator III outputs the following C Nav proprietary s...

Page 92: ...r Output data and or commands from this serial port has failed C Nav3050 Alarms Correction Signal Invalid Messages Information received in the correction signal is missing or incorrect Correction Signal Lost Lock Input of the correction signal has failed Too few measurements The number of satellites available is too low to compute a position PDOP too high The positional dilution of precision excee...

Page 93: ...rrections Service is set to expire in 3 days Please contact C Nav Support E mail support cnav com or Phone 1 337 210 0000 C Nav2050 Alarms Correction Signal Invalid Messages Information received in the correction signal is missing or incorrect Correction Signal Lost Lock Input of the correction signal has failed Correction Signal Poor Reception The selected correction signal source is weak Low vol...

Page 94: ...o measure pseudo ranges is compromised C Nav2000 Alarms Correction Signal Invalid Messages Information received in the correction signal is missing or incorrect Correction Signal Lost Lock Input of the correction signal has failed Correction Signal Poor Reception The selected correction signal source is weak Failed Geofence The C Nav receiver is outside the Land Based correction signal area To ext...

Page 95: ... cnav com or Phone 1 337 210 0000 Unstable GNSS Clock The GNSS receiver s internal clock time reference has become unstable The receiver s ability to measure pseudo ranges is compromised C Nav1010 Alarms Correction Signal Invalid Messages Information received in the correction signal is missing or incorrect Correction Signal Lost Lock Input of the correction signal has failed Correction Signal Poo...

Page 96: ...rms Position Filtered Max Error The position solution has exceeded the error allowance Position Filtered Max HDOP The Horizontal Dilution of Precision computation has exceeded the alarm setting See GNSS Quality Alerts Position Filtered Min 2D 3D Time The Min 2D 3D time computation has exceeded the alarm setting See GNSS Quality Alerts Position Filtered Min Satellites The number of usable satellite...

Page 97: ...C NaviGator III User Manual Revision 2 Page 97 of 121 9 27 2013 C NaviGator III is in Simulator mode This alarm cannot be acknowledged ...

Page 98: ...Appendix F Approvals Certifications IEC IACS IEC 60945 4th EN 60945 2002 IACS E10 Bureau Veritas BV ...

Page 99: ......

Page 100: ......

Page 101: ......

Page 102: ...DET NORSKE VERITAS DNV ...

Page 103: ......

Page 104: ......

Page 105: ...American Bureau of Shipping ABS ...

Page 106: ......

Page 107: ...Germanischer Lloyd GL ...

Page 108: ......

Page 109: ...Appendix G Declaration of Conformity ...

Page 110: ... 86 94 C Nav2050 14 45 47 48 49 50 60 86 93 C Nav3050 14 33 35 37 39 40 41 42 43 44 60 86 92 C NaviGator III 2 3 10 13 15 18 19 20 21 22 25 29 31 33 35 39 48 51 56 60 62 63 65 69 70 71 72 77 78 88 90 91 92 96 97 121 COM1 39 48 56 COM2 39 48 56 Correction Signal 86 Correction Type 86 Course 16 86 91 D Data Bits 32 Differential Age 17 86 Differential GPS 86 DOP 87 E Elevation 87 Error Ellipse 14 23 ...

Page 111: ...8 LBAND 85 License 38 46 54 93 94 95 96 Logging 13 18 33 49 M MBRTK 40 MMC 49 50 N NMEA 13 14 39 47 52 58 59 88 91 NTRIP 43 O OTI 35 37 Output 59 P Parity 32 39 48 56 PDOP 14 17 87 88 92 Position 88 Position Comparison 14 25 26 PPS 88 Pseudorange 89 PVT 89 R RAIM 23 RS232 14 RS422 14 RTCM 40 49 52 89 RTG 89 RTK 40 49 86 87 89 S Satellite Info 25 SBAS 46 85 86 90 Scatter Plot 14 24 90 ...

Page 112: ...Screenshot 18 Signal to Noise Ratio 17 Sky Plot 90 Speed 16 91 Stop Bits 32 T TDOP 87 This Page 36 Troubleshooting 60 U UKOOA 23 UTC 31 88 V VDOP 14 17 87 Visible Sats 90 VNC 35 W WAAS 90 WCT 90 ...

Page 113: ...nse instead You can apply it to your programs too When we speak of free software we are referring to freedom not price Our General Public Licenses are designed to make sure that you have the freedom to distribute copies of free software and charge for this service if you wish that you receive source code or can get it if you want it that you can change the software or use pieces of it in new free ...

Page 114: ...or copying distribution and modification follow GNU GENERAL PUBLIC LICENSE TERMS AND CONDITIONS FOR COPYING DISTRIBUTION AND MODIFICATION 0 This License applies to any program or other work which contains a notice placed by the copyright holder saying it may be distributed under the terms of this General Public License The Program below refers to any such program or work and a work based on the Pr...

Page 115: ...hange b You must cause any work that you distribute or publish that in whole or in part contains or is derived from the Program or any part thereof to be licensed as a whole at no charge to all third parties under the terms of this License c If the modified program normally reads commands interactively when run you must cause it when started running for such interactive use in the most ordinary wa...

Page 116: ...m under the terms of Sections 1 and 2 above provided that you also do one of the following a Accompany it with the complete corresponding machine readable source code which must be distributed under the terms of Sections 1 and 2 above on a medium customarily used for software interchange or b Accompany it with a written offer valid for at least three years to give any third party for a charge no m...

Page 117: ...hts under this License However parties who have received copies or rights from you under this License will not have their licenses terminated so long as such parties remain in full compliance 5 You are not required to accept this License since you have not signed it However nothing else grants you permission to modify or distribute the Program or its derivative works These actions are prohibited b...

Page 118: ...of any such claims this section has the sole purpose of protecting the integrity of the free software distribution system which is implemented by public license practices Many people have made generous contributions to the wide range of software distributed through that system in reliance on consistent application of that system it is up to the author donor to decide if he or she is willing to dis...

Page 119: ...romoting the sharing and reuse of software generally NO WARRANTY 11 BECAUSE THE PROGRAM IS LICENSED FREE OF CHARGE THERE IS NO WARRANTY FOR THE PROGRAM TO THE EXTENT PERMITTED BY APPLICABLE LAW EXCEPT WHEN OTHERWISE STATED IN WRITING THE COPYRIGHT HOLDERS AND OR OTHER PARTIES PROVIDE THE PROGRAM AS IS WITHOUT WARRANTY OF ANY KIND EITHER EXPRESSED OR IMPLIED INCLUDING BUT NOT LIMITED TO THE IMPLIED...

Page 120: ...a brief idea of what it does Copyright C year name of author This program is free software you can redistribute it and or modify it under the terms of the GNU General Public License as published by the Free Software Foundation either version 2 of the License or at your option any later version This program is distributed in the hope that it will be useful but WITHOUT ANY WARRANTY without even the ...

Page 121: ...isclaimer for the program if necessary Here is a sample alter the names Yoyodyne Inc hereby disclaims all copyright interest in the program Gnomovision which makes passes at compilers written by James Hacker signature of Ty Coon 1 April 1989 Ty Coon President of Vice This General Public License does not permit incorporating your program into proprietary programs If your program is a subroutine lib...

Reviews: