background image

8–6

Chapter 8: Troubleshooting

®

8

EA1-MG6-USER-M Hardware User Manual, 1st Ed. Rev C, 09/10

No Communications between Panel and PC (Personal Computer) (cont’d)

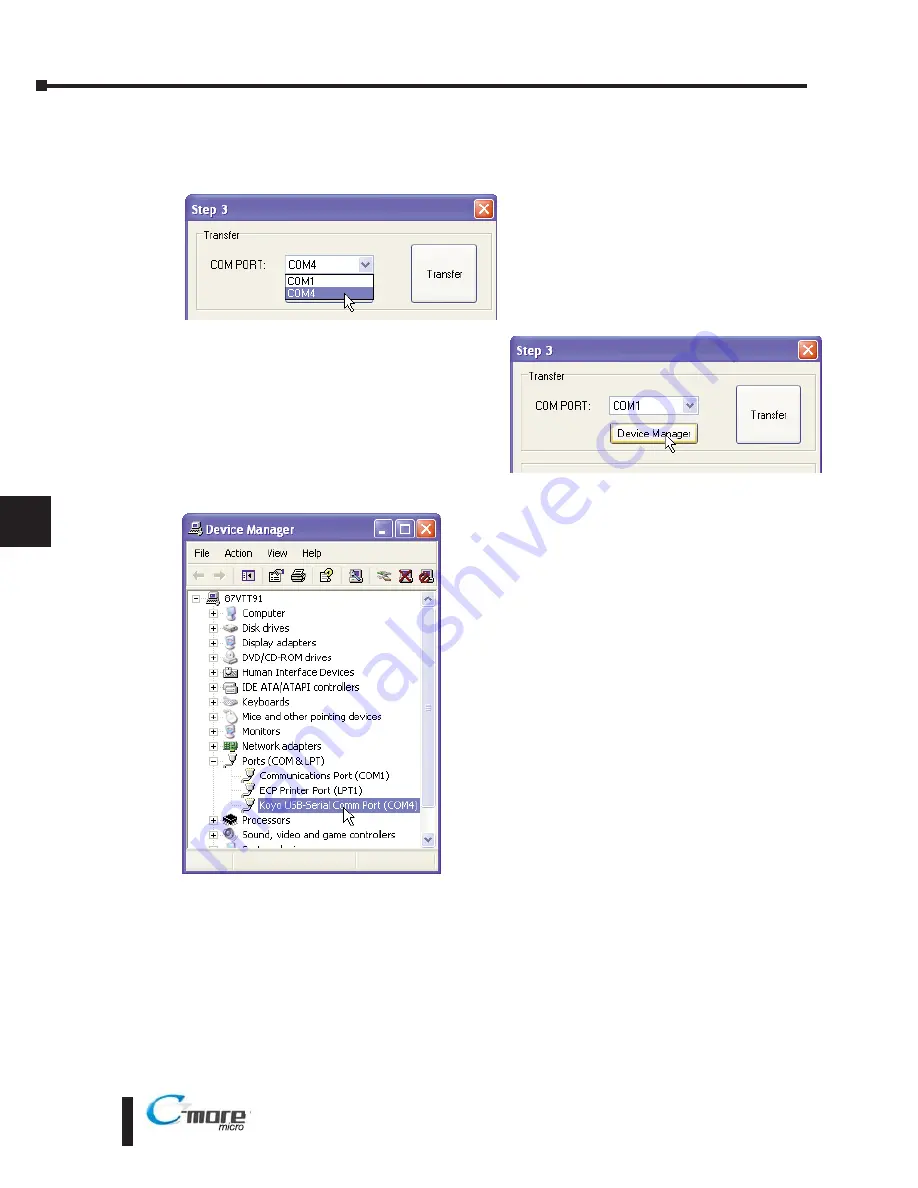
3. Not using the correct COM port assigned to the USB adapter 

- If the 

C-more

Micro-Graphic

panel is on the setup screen and the cable
connection is correct, then check the PC COM
port setting.

If you are unsure which COM port the 

C-more

Micro-Graphic programming cable is connected
to, click on the 

Device Manager

button. This

will open Windows ® 

Device Manager

.

In the 

Device Manager

window, view the active

ports by clicking the + button beside the Ports
(COM & LPT) menu item. The 

C-more

Micro-

Graphic panel uses a USB driver called 

Koyo

USB-Serial Comm Port

.

COM4 is the USB port used in this example. If you
cannot find the Koyo USB-Serial Comm Port under
Ports (COM & LBT) in 

Device Manager

, the USB

driver may not be correctly installed or the driver has
a problem. Disconnect the cable from the PC and
follow these steps to re-install the driver:

• Uninstall the 

C-more

Micro-Graphic programming

software.

• Unplug the cable between the PC and the 

C-more

Micro-Graphic panel.

• Re-install the 

C-more

Micro-Graphic programming

software. Make sure the install USB driver checkbox
is selected.

If you have selected the correct COM port and the
error still occurs, try connecting the programming
cable to a different USB port on the PC and try again.

If the problem persists, call Technical Support at
(770) 844-4200, available from 9:00 A.M. to 6:00
P.M. Eastern Time.

Summary of Contents for EA-MG6-BZ2

Page 1: ...aphic Panel EA1 S6MLW shown in Landscape Mode C more 6 Micro Graphic Panel Installed in a 20 button Landscape Keypad Bezel EA MG6 BZ2 C more 6 Micro Graphic Panel EA1 S6ML shown in Portrait Mode C more 6 Micro Graphic Panel Installed in a 21 button Portrait Keypad Bezel EA MG6 BZ2P ...

Page 2: ......

Page 3: ...chnical Support regarding this publication Manual Number EA1 MG6 USER M Issue 1st Edition Rev C Issue Date 09 10 Publication History Issue Date Description of Changes 1st Edition 07 08 Original issue Rev A 10 08 Added CLICK PLC Rev B 10 08 Added Mitsubishi Q QnA Rev C 09 10 Added Allen Bradley PLC DF1 imformation and made minor corrections ...

Page 4: ......

Page 5: ...n hazardous environments requiring fail safe performance such as in the operation of nuclear facilities aircraft navigation or communication systems air traffic control direct life support machines or weapons systems in which the failure of the product could lead directly to death personal injury or severe physical or environmental damage High Risk Activities AutomationDirect specifically disclaim...

Page 6: ...de vida o sistemas de armamentos en las cuales la falla del producto puede resultar directamente en muerte heridas personales o daños físicos o ambientales severos Actividades de Alto Riesgo Automationdirect com específicamente rechaza cualquier garantía ya sea expresada o implicada para actividades de alto riesgo Para información adicional acerca de garantía e información de seguridad vea la secc...

Page 7: ... nécessitant une sécurité absolue par exemple l exploitation d installations nucléaires les systèmes de navigation aérienne ou de communication le contrôle de la circulation aérienne les équipements de survie ou les systèmes d armes pour lesquels la défaillance du produit peut provoquer la mort des blessures corporelles ou de graves dommages matériels ou environnementaux activités à risque élevé L...

Page 8: ......

Page 9: ...p 3 Become Familiar with Available Communication Ports 1 8 Step 4 Install C more 6 Micro Graphic Panel 1 9 Enclosure Clearances 1 10 Step 5 Connect C more 6 Micro Graphic Panel to Computer 1 11 Step 6 Provide Power to the C more 6 Micro Graphic Panel 1 12 Step 7 Accessing the C more 6 Micro Graphic Panel Setup Screens 1 13 Step 8 Choose C more 6 Micro Graphic Panel to PLC Protocol Cables 1 14 Step...

Page 10: ...n Portrait Vertical Keypad Bezel 3 11 D SUB 15 pin 90 degree Communication Port Adapter 3 14 D SUB 15 pin to Terminal Block Adapter 3 14 Clear Screen Overlay 3 15 Chapter 4 Installation and Wiring 4 1 Safety Guidelines 4 2 Introduction 4 3 Panel Cutout Dimensions all models 4 4 Wiring Guidelines 4 5 Chapter 5 System Setup Screens 5 1 Introduction 5 2 Accessing the System Setup Screens 5 3 System S...

Page 11: ...st 5 18 Exit 5 18 Chapter 6 PLC Communications 6 1 Introduction 6 2 Available PLC Protocols 6 3 C more 6 Micro Graphic Communication Ports 6 4 DirectLOGIC PLCs Password Protection 6 6 PLC Compatibility and Connection Charts 6 6 AutomationDirect CLICK PLC 6 6 Direct LOGIC PLCs RS 422A RS 485A 6 7 Allen Bradley 6 7 GE Mitsubishi Omron Modicon and Siemens 6 7 How to use the PLC Compatibility and Conn...

Page 12: ...ecks from the C more Micro Graphic Programming Software 7 6 Chapter 8 Troubleshooting 8 1 C more Micro Graphic Panel does not Power up 8 2 Display is Blank 8 2 Display is Dim 8 3 No User Program 8 3 Lost Firmware Red Update Mode Screen Displayed 8 4 Updating Firmware 8 4 No Communications between Panel and PC Personal Computer 8 5 No Communications between Panel and PLC 8 7 Panel PLC Error Codes 8...

Page 13: ...nation A 6 Allen Bradley DF1 Protocol PLC Error Code Tables A 7 Allen Bradley DH485 Protocol PLC Error Code Tables A 9 GE Error Code P499 Explanation A 11 GE SNPX Protocol PLC Error Code Tables A 12 Mitsubishi FX Protocol PLC Error Codes A 21 Mitsubishi Q QnA and Q Series PLC Error Codes A 21 Omron Error Code P499 Explanation A 23 Omron Host Link Protocol PLC Error Code Table A 24 Omron FINS Proto...

Page 14: ......

Page 15: ...Step 3 Become Familiar with Available Communication Ports 1 8 Step 4 Install C more 6 Micro Graphic Panel 1 9 Enclosure Clearances 1 10 Step 5 Connect C more 6 Micro Graphic Panel to Computer 1 11 Step 6 Provide Power to the C more 6 Micro Graphic Panel 1 12 Step 7 Accessing the C more 6 Micro Graphic Panel Setup Screens 1 13 Step 8 Choose C more 6 Micro Graphic Panel to PLC Protocol Cables 1 14 S...

Page 16: ...ndustrial control type devices you may be able to get up and running with just the aide of the Quick Start Guide that is included with each panel You may also refer to the online help that is available in the C more Micro Graphic programming software Technical Support We strive to make our manuals the best in the industry We rely on your feedback to let us know if we are reaching our goal If you c...

Page 17: ...ts immediate right will be a warning This information could prevent injury loss of property or even death in extreme cases The word WARNING in boldface will mark the beginning of the text Key Topics for Each Chapter The beginning of each chapter will list the key topics that can be found in that chapter EA1 MG6 USER M Hardware User Manual 1st Ed Rev C 09 10 1 3 Chapter 1 Getting Started 1 Getting ...

Page 18: ... powered from a 12 24 VDC power supply or can operate in low power mode when powered from the serial communications port of select AutomationDirect PLCs Other features include 1792 KB memory Built in RJ12 serial communications port RS 232 Built in 15 pin serial communications port RS 232 422 485 Adjustable contrast 2 optional keypad bezels 20 button landscape and 21 button portrait mount Optional ...

Page 19: ... blank Green Red backlight W White Red backlight Display Size 6 5 7 Backlight Type L LED Series Name EA1 C more Micro Graphic LISTED 7M17 Date code 5 4 3 2 1 R01 D MADE IN CHINA M EA1 S6MLW serialnumber O S6 MODEL EA1 S6MLW 4 5 INPUT 12 24V 6 5W IND CONT EQ EA MG6 XXXX Module Type BZ2 20 Key Bezel for landscape mode BZ2P 21 Key Bezel for portrait mode Series Name EA MG6 C more 6 Micro Graphic Beze...

Page 20: ...ket function key label inserts Quick Start Guide b Unpack any accessories that have been ordered such as Keypad Bezel programming cable PLC communications cable etc c Inspect all equipment for completeness If anything is missing or damaged immediately call the AutomationDirect returns department 1 800 633 0405 Shipping Carton Contents 20 Button Horizontal Keypad Bezel EA MG6 BZ2 21 Button Vertical...

Page 21: ... 2 Use the 4 Panel Mounting Clips EA MG BZ2 BRK that are supplied with the panel to secure panel to keypad bezel and compress the gasket between the panel and the keypad bezel Tighten screws to a torque of 21 28 oz in 0 15 0 2 Nm 3 Use 8 Bezel Mounting Clips EA MG BZ2 BRK to secure keypad bezel through enclosure cutout Tighten screws to a torque of 21 28 oz in 0 15 0 2 Nm Function Key Label Insert...

Page 22: ... for additional details on the available communication ports protocols and cables NOTE The panel has a built in RJ12 serial communications port Port1 RS 232 and a built in 15 pin serial communications port Port2 RS 232 422 485 Only one of the ports can be used with a connected PLC The programming software allows the user to select either Port1 or Port2 under the Panel Manager dialog box When using...

Page 23: ...0 15 0 2 Nm See Chapter 2 Specifications for additional product dimensions Chapter 3 Accessories for accessory specifications and dimensions 0 260 6 6 0 256 6 5 0 256 6 5 0 260 6 6 R 118 R3 CUTOUT CUTOUT OUTLINE BEZEL OUTLINE 122 2 1 0 0 04 0 00 4 811 161 0 1 0 0 04 0 00 6 339 Units Inches mm 0 382 9 7 0 382 9 7 0 382 9 7 0 382 9 7 143 0 1 0 0 04 0 00 5 630 CUTOUT 234 6 1 0 0 04 0 00 9 236 R0 59 R...

Page 24: ...5 9 I T D I T D M 7 M 7 D te o e D te o e R01 R01 MAD IN HI A MAD IN HI A E 1 S6M W se a num er E 1 S6M W se a num er MODE A1 S6M MODE A1 S6M W N UT12 4V 6 5W N UT12 4V 6 5W NDC NT Q NDC NT Q 1 2 30 0 1 2 30 0 1 2 30 0 1 2 30 0 Enclosure units inches mm EA1 S6ML W with EA MG6 BZ2 P EA1 S6ML W NOTE Additional clearance inside the enclosure is required when connecting to the 15 pin serial communicat...

Page 25: ...drive for installing software from the CD or internet access to download free programming software USB port to use with an EA MG PGM CBL USB to RS232 Programming Cable Assembly for project transfer from the programming software to the panel Operating System Windows XP Home Professional Edition Service Pack 2 Windows 2000 with Service Pack 4 or Windows Vista 32 bit Insert the supplied CD ROM into t...

Page 26: ...cations port on the C more Micro Graphic panel as shown below C more 6 inch Micro Graphic Panel USB Cable User PC Serial Cable PC to Panel Programming Cable Assembly Includes serial USB cables EA MG PGM CBL USB to RS232 Converter USB to RS 232 Programming Cable Assembly NOTE When the panel is powered through Port1 from a connected PLC or PC the screen brightness is diminished because the panel is ...

Page 27: ...able from CLICK and DirectLogic PLC RJ12 port DL05 DL105 DL205 DL350 DL450 H2 WINPLC RS 232C p n DV 1000CBL To PLC RJ12 Port To C more Micro Graphic Serial Port1 6 4 GND TXD 1 3 GND Wiring Diagram 3 RXD 2 5 V 1 Sig GND 2 not used 3 RXD 4 TXD 5 5 VDC 6 Sig GND 1 2 3 4 5 6 RJ12 6 pin Phone Plug 6P6C 1 GND 6 GND 1 2 3 4 5 6 RJ12 6 pin Phone Plug 6P6C 1 S g GND 2 5 VDC 3 RXD 4 TXD 5 not used 6 S g GND...

Page 28: ...ions BAK 1 Information 2 Setting 3 Test Menu 4 Exit UP DWN ENT ENT SETUP MENU BAK Total 1835008 Bytes Usage 26206 Bytes Free 1808802 Bytes MEMORY Setup Menu pg 5 5 1 Information pg 5 6 1 Memory pg 5 6 2 Setting pg 5 7 1 LCD Contrast pg 5 7 2 Backlight pg 5 8 3 Beep pg 5 10 4 Calibration pg 5 11 5 Clear User Memory pg 5 12 1 Serial Port1 Loop Back Test pg 5 15 2 Ser al Port2 Loop Back Test pg 5 16 ...

Page 29: ...2 WinPLC RS 232C EA 2CBL DirectLOGIC VGA Style 15 pin port DL06 D2 250 250 1 D2 260 RS 232C EA 2CBL 1 DirectLOGIC PLC RJ 11 port D3 340 RS 232C EA 3CBL DirectLOGIC DL405 PLC 15 pin D sub port DL405 RS 232C EA 4CBL 1 DirectLOGIC PLC 25 pin D sub port DL405 D3 350 DL305 DCU and all DCM s RS 232C EA 4CBL 2 Allen Bradley MicroLogix 1000 1100 1200 1500 RS 232C EA MLOGIX CBL Allen Bradley SLC 5 03 04 05...

Page 30: ...22 or RS 485 communications EA1 MG6 USER M Hardware User Manual 1st Ed Rev C 09 10 1 16 Chapter 1 Getting Started 1 Port 1 Port 2 DV 1000CBL serial cable CLICK PLC C more 6 Inch Micro Graphic Panel Port 2 Port 2 C more to DirectLOGIC VGA 15 pin port serial cable p n EA 2CBL 1 DL 06 PLC PSP 24 024S Power Supply Recommended DC Supply Fuse 750 mA fast acting ADC p n AGC 75 C more 6 Inch Micro Graphic...

Page 31: ...SPECIFICATIONS CH CHAPTER 2 2 CHAPTER In This Chapter Available Models 2 2 Model Specifications 2 3 Panel Dimensions 2 5 Communications Ports 2 6 Chemical Compatibility 2 7 ...

Page 32: ...C more Micro Graphic Touch Panel with STN LCD monochrome 320x240 dot display The panel has red and green LED backlights Supports 5 selectable backlight colors Red Green Amber Lime and Yellow Includes 5 user defined function keys with LED indicators 2 built in serial Ports RS 232 RJ12 port and 15 pin D sub RS 232 422 485 NEMA 4 4X IP 65 when mounted correctly for indoor use only EA1 S6MLW 5 7 inch ...

Page 33: ... 6 o clock axis 40 degrees 12 o clock axis 20 degrees Backlight Type LED Color Model EA1 S6ML 5 user defined colors Red Green Amber Lime and Yellow Model EA1 S6MLW 5 user defined colors White Pink1 Pink2 Pink3 and Red User Replaceable No Touch Screen Type Analog touch panel Operation 82 gram force 0 8 N maximum Life Minimum of 1 000 000 cycles Features User Memory 1792 kBytes Number of Screens Up ...

Page 34: ... Fuse No fuse required when directly connected to a PLC or PC with recommended cable Type AGC fast acting glass fuse 750 mA 250 VAC ADC p n AGC 75 Max Inrush Current 1 A for 500 µs 10 A for 500 µs Acceptable External Power Drop Maximum 1 ms Environmental Operating Temperature 0 to 50 C 32 to 122 F Storage Temperature 20 to 60 C 4 to 140 F Humidity 5 95 RH non condensing Environmental Air No corros...

Page 35: ... 9 2 13 54 1 GASKET MOUNTING CLIP 4 places Units Inches mm 4 770 121 3 5 331 135 4 ENCLOSURE MOUNTING THICKNESS RANGE 0 04 0 2 1 5mm S D M 7 D te od 5 4 3 2 1 R 1 MADE N CH NA 1 EA 6MLW 0 52 15 01 MODE A 6MLW N UT12 2 V 6 5W ND CONTEQ MOUNTING CLIP SCREW TORQUE RANGE 21 28 oz in 0 15 0 2 Nm Panel Dimensions Enclosure Thickness Mounting Clip Screw Torque ...

Page 36: ...are Programming Cable Assembly to transfer projects between the PC and panel IS ED IS ED 7M17 7M17 Date code Date code 5 4 3 2 1 R01 R01 MADE IN CHINA MADE IN CHINA EA1 S6MLW ser alnumber EA1 S6MLW ser alnumber MODEL EA1 S6MLW MODEL EA1 S6MLW INPUT 12 24V 6 5W INPUT 12 24V 6 5W INDCONTEQ INDCONTEQ 6 5 4 3 2 1 Pin Signal 1 Logic GND not used RXD 232C TXD 232C 2 3 4 5 5 VDC RJ12 serial communication...

Page 37: ...er Excellent Good Not Recommended or Not Usable Because the ratings are for ideal conditions at room temperature consider all factors when evaluating your application Areas left blank have not been tested by the manufacturer and therefore information of compatibility is not available Table continued at top of next page Chemicals Screen Sheet PC Density Temperature C Bezel ABS Density Temperature C...

Page 38: ...llent Ammonium nitrate Excellent Ammonium persulfate Excellent Ammonium phosphate Excellent Ammonium sulfate Excellent Amyl acetate Not Usable Amyl alcohol Good Aniline dyes Not Recommended Animal oil lard Good Aqua regia Not Usable Arsenic acid Not Recommended Asphalt Excellent Barium chloride Excellent Barium hydroxide Excellent Barium sulfate Excellent Barium sulfide Excellent Beer Excellent Be...

Page 39: ... chloride Excellent Calcium hydroxide Excellent Calcium hypochlorite 20 20 C Excellent Calcium nitrate Excellent Calcium sulfide Excellent Cane sugar liquors Excellent Carbon dioxide Excellent Carbon disulfide Not Usable Carbonic acid Good Carbon tetrachloride Not Usable Excellent Castor oil Not Recommended China wood tung oil Excellent Chlorine gas dry Not Usable Chlorine gas wet Not Usable Chlor...

Page 40: ... Not Usable Cyclohexane Good Cyclohexanol Good Cyclohexanone Not Usable Not Usable Developing solutions Hypos Excellent Dibutyl phthalate DBP Not Usable Dichlorobenzene Not Usable Diethylene glycol Good Diethyl ether Not Usable Disopropyl ketone Not Usable Dimethyl aniline Not Usable Dimethyl formamide Not Usable Dioxane Not Usable Dipentene Not Usable Epichlorohydrine Not Usable Ethyl acetate Not...

Page 41: ...commended Fluorobenzene Not Usable Fluosilicic acid Not Recommended Formaldehyde 40 20 C Good 25 20 C Excellent 50 20 C Good 90 20 C Not Recommended Freon 45 C Excellent Freon 11 Not Recommended Freon 12 Good Freon 113 Not Usable Freon 114 Not Recommended Fuel oil Good Gasoline Excellent Not Recommended Not Usable Gelatin Excellent Glauber s salt Excellent Glue Excellent Glycerin Excellent Grease ...

Page 42: ...ellent Hydrogen peroxide 5 20 C Not Recommended 5 50 20 C Not Recommended 30 20 C Not Usable Hydrogen sulfide Excellent Hydorquinone Not Recommended Hypochlorous acid Not Recommended Isobutyl alcohol Good Isopropyl acetate Not Usable Isopropyl alcohol Excellent Good JP fuels 1 6 Good Kerosene Good Lacquer Not Usable Lactic acid Excellent Lard Excellent Lead acetate Excellent Lead nitrate Good Lead...

Page 43: ...e Methyl chloride Not Usable Not Usable Methyl ethyl ketone MEK Not Usable Methyl isobutyl ketone MIBK Not Usable Methyl methacrylate Not Usable Methyl dichloride Not Usable Methyl Salicylate Not Usable Milk Excellent Mineral oil Excellent Excellent Monochlorobenzene Not Usable Not Usable Naptha Good Napthalene Excellent Napthenic acid Good Natural gas Excellent Natural oil Excellent Nickel acetat...

Page 44: ...t Recommended Palmitic acid Excellent Perchloroethylene Not Usable Petroleum Excellent Phenol Not Usable Not Usable Phospheric acid 50 20 C Good 50 70 20 C Not Usable 75 20 C Not Usable Pickling solution Sulfuric acid 20 nitric acid 4 Good Sulfuric acid 40 nitric acid 15 Not Recommended Pine oil Good Potassium chloride Excellent Potassium cyanide Excellent Potassium dichromate 10 20 C Excellent Po...

Page 45: ...arbonate 10 Excellent Sodium chloride Excellent Sodium cyanide Excellent Sodium hydroxide 10 20 C Excellent Good 1 Excellent 30 20 C Excellent 30 70 20 C Not Usable 10 Not Usable Sodium hydrochlorite 5 20 C Excellent 5 70 20 C Not Usable Sodium metaphosphate Excellent Sodium nitrate Excellent Sodium perborate Excellent Sodium peroxide Not Usable Sodium phosphate Excellent Sodium thiosulfate Excell...

Page 46: ...t Usable Vapor 20 C Not Usable Sulpherous acid 10 20 C Good Tannic acid Good Tar Not Recommended Tartaric acid Excellent Terpineol Not Recommended Tetrachloroethane Not Usable Excellent Tetraethyl lead Good Tetralin Not Usable Tetrahydrofuran Not Usable Not Usable Thionyl chloride Not Usable Toluene Not Usable Not Usable Not Usable Excellent Trichloroethylene Trichlene Not Usable Triethanol amine ...

Page 47: ... Programming Software 3 3 USB to RS 232 Programming Cable Assembly 3 6 20 Button Landscape Horizontal Keypad Bezel 3 8 21 Button Portrait Vertical Keypad Bezel 3 11 D SUB 15 pin 90 degree Communication Port Adapter 3 14 D SUB 15 pin to Terminal Block Adapter 3 14 Clear Screen Overlay 3 15 ...

Page 48: ...ear screen overlay used to protect C more Micro Graphic displays from minor scratches and wear Package contains 3 clear screen overlays Micro Graphic Programming Software Programming Cable Part Number Description EA MG PGMSW C more Micro Graphic panel Windows based configuration software Requires Windows 2000 with Service Pack 4 XP Home or Professional with Service Pack 2 or Windows Vista Requires...

Page 49: ...t simulator Runs your project on your PC Test all of your screens before downloading Time savings pays for the panel PC Requirements Following are the minimum system requirements for running C more 6 Micro Graphic Programming Software EA MG PGMSW on a PC USB port for project transfer from software to touch panel Personal Computer with a 333 MHz or higher processor CPU clock speed recommended Windo...

Page 50: ... the value stored in up to two PLC tags over a history of up to 24 points each One point is added at each refresh The Pushbutton object is available from the Button Category of the Object List window The Pushbutton object is an electronic version of a typical Pushbutton normally found on control panels The Pushbutton object can be used to activate or deactivate components assigned to a Discrete Ta...

Page 51: ...re features and defaults with data from screens in the project This helps to save time by not having to create Screen change buttons for each screen This object may be edited to various colors and sizes The Lookup Text object is used to display a Frame with a personalized Message This Frame and Message can be placed on any screen and any location within the screen The object is always displayed li...

Page 52: ...al programming cable from the converter s RJ12 port to the panel s RJ12 serial port The panel receives power from the USB port of the PC that it is connected to through the USB to RS 232 converter assembly NOTE Install C more Micro Graphic Programming software before connecting the panel to the PC to ensure the panel drivers install correctly TxD RxD PWR LED Status Indicators EA MG PGM CBL Convert...

Page 53: ... Baud Rate 115 2 kbps Maximum Input Voltage 5 VDC Supplied thru serial interface cable Power Consumption 50 mA Does not include power to panel and or bezel Accessory Cables USB Cable USB Type A plug to PC on one end USB Type B plug to converter on other end 0 30 m 1 foot length Note Serial Cable RJ12 phone plug connectors on both ends 2 0 m 6 56 feet length Note Environmental Operating Temperature...

Page 54: ...R buttons It can also be used to access and navigate the screen selector feature The keypad bezel is designed for easy drop in of a C more 6 Micro Graphic panel No panel configuration is required 7 8 9 4 5 6 1 2 3 0 Menu Menu CLR CLR En er En er E c E c 5 588 141 9 6 394 162 4 0 394 10 0 2 094 53 2 1 882 47 8 9 195 233 5 10 000 254 0 GASKET MOUNTING CLIP Qty 8 SCREW TORQUE RANGE 21 28 oz in 0 15 0...

Page 55: ... 20 to 60 C 4 to 140 F Humidity 5 to 95 RH non condensing Environmental air No corrosive gases permitted Vibration IEC60068 2 6 Test Fc 5 9 Hz 3 5 mm amplitude 9 150 Hz 1 0G sweeping at a rate of 1 octave min 10 10 sweep cycles per axis on each of 3 mutually perpendicular axes Shock IEC60068 2 27 Test Ea 15 G peak 11 ms duration three shocks in each direction per axis on 3 mutually perpendicular a...

Page 56: ...e supplied with the panel to secure panel to keypad bezel and compress the gasket between the panel and the keypad bezel Tighten screws to a torque of 21 28 oz in 0 15 0 2 Nm 3 Use 8 Bezel Mounting Clips EA MG BZ2 BRK to secure keypad bezel through enclosure cutout Tighten screws to a torque of 21 28 oz in 0 15 0 2 Nm Function Key Label Insert 4 Peel Protective Film from front of panel Panel and 2...

Page 57: ...uttons It can also be used to access and navigate the screen selector feature The keypad bezel is designed for easy drop in of a C more 6 Micro Graphic panel No panel configuration is required nter nter 5 588 141 9 6 394 162 4 0 394 10 0 2 094 53 2 1 882 47 8 9 195 233 5 10 000 254 0 GASKET MOUNTING CLIP Qty 8 SCREW TORQUE RANGE 21 28 oz in 0 15 0 2 Nm Units Inches mm MOUNTING CLIP 8 places CLR CL...

Page 58: ...g Temperature 0 to 50 C 32 to 122 F Storage Temperature 20 to 60 C 4 to 140 F Humidity 5 to 95 RH non condensing Environmental air No corrosive gases permitted Vibration IEC60068 2 6 Test Fc 5 9 Hz 3 5 mm amplitude 9 150 Hz 1 0G sweeping at a rate of 1 octave min 10 10 sweep cycles per axis on each of 3 mutually perpendicular axes Shock IEC60068 2 27 Test Ea 15 G peak 11 ms duration three shocks i...

Page 59: ...l EA MG6 BZ2 1 Remove Expansion Connector Protective Cover from rear of panel 2 Use the 4 Panel Mounting Clips EA MG BZ2 BRK that are supplied with the panel to secure panel to keypad bezel and compress the gasket between the panel and the keypad bezel Tighten screws to a torque of 21 28 oz in 0 15 0 2 Nm Function Key Label Insert 4 Peel Protective Film from front of panel Panel and 21 Button Keyp...

Page 60: ... on the rear of the 6 panel to allow wire terminal connections for an RS 422 RS 485 DH 485 PLC communication cable UL Recognized 3 14 Chapter 3 Accessories EA1 MG6 USER M Hardware User Manual 1st Ed Rev C 09 10 EA ADPTR 4 Country of Origin Date code IOIOI PLC 1 605 40 8 1 873 47 6 0 793 20 2 EA ADPTR 4 KOYO ELECTRON CS INDUSTRIES CO LTD Units inches mm Country of O igin EA COMCON 3 GND SD SD RD RD...

Page 61: ...5 96 4 0 197 5 0 0 157 4 0 EA 6 COV2 Dimensions NOTE The protective cover ships with a thin protective sheet on the face of the cover that needs to be carefully removed If your panel is not clear the protective sheet may not have been removed Clear Screen Overlay Installation Step 1 Step 2 Step 3 Step 4 Remove the overlay from the package Remove the paper backing from the overlay Align the overlay...

Page 62: ......

Page 63: ...4 4 INSTALLATION WIRING CH CHAPTER CHAPTER In This Chapter Safety Guidelines 4 2 Introduction 4 3 Panel Cutout Dimensions all models 4 4 Wiring Guidelines 4 5 ...

Page 64: ...s for the proper installation and use of your equipment Plan for Safety The best way to provide a safe operating environment is to make personnel and equipment safety part of the planning process You should examine every aspect of the system to determine which areas are critical to operator or machine safety If you are not familiar with control system installation practices or your company does no...

Page 65: ...venience The C more 6 Micro Graphic panels include four mounting clips They are fitted to the panel by inserting two tabs into mating slots on the panel and then sliding the clip into a narrower slot to secure it in place If using the panel with a Keypad Bezel then install the panel into the keypad bezel and secure with the mounting clips that are provided with the panel to seal the panel gasket C...

Page 66: ...ear of the panel to keep it in place Next tighten the mounting clip screws to pull the rear of the panel s bezel to the control cabinet s mounting surface The screws need to be tightened to the torque rating shown in the illustration below so that the gasket is compressed to form the proper seal between the panel and cabinet surface 0 260 6 6 0 256 6 5 0 256 6 5 0 260 6 6 R 118 R3 CUTOUT CUTOUT OU...

Page 67: ...visions of the product Providing Power to the C more 6 Micro Graphic Panel Power can be supplied to the C more Micro Graphic panel in one of three different ways 1 The C more 6 Micro Graphic panel is powered during programming from the PC through the USB to RS 232 Programming Cable Assembly EA MG PGM CBL The panel will operate in Low Power mode when powered by the PC and result in a dim screen 2 D...

Page 68: ...e next page 4 6 Chapter 4 Installation and Wiring 4 EA1 MG6 USER M Hardware User Manual 1st Ed Rev C 09 10 Power Supplied to Panel through Cable from CLICK and DirectLogic PLC RJ12 port DL05 DL105 DL205 DL350 DL450 H2 WINPLC RS 232C p n DV 1000CBL To PLC RJ12 Port To C more Micro Graphic Serial Port1 6 4 GND TXD 1 3 GND Wiring Diagram 3 RXD 2 5 V 1 Sig GND 2 not used 3 RXD 4 TXD 5 5 VDC 6 Sig GND ...

Page 69: ...nal 12 24 VDC power source when the panel is installed in its application Cable wiring example when power is supplied to panel from an external DC Power Adapter To PLC Port Connector To C more Micro Graphic Serial Port 1 GND RXD TXD 1 3 4 GND RXD Wiring Diagram GND 1 Sig GND 2 do not use 3 RXD 4 TXD 5 5 VDC 6 Sig GND 1 2 3 4 5 6 RJ12 6 pin Phone Plug 6P6C 6 TXD GND 50 feet 15 0 m Maximum L S ED L ...

Page 70: ......

Page 71: ...Setting Menu 5 7 LCD Contrast 5 7 Backlight Model EA1 S6ML 5 8 Backlight Model EA1 S6MLW 5 9 Beep 5 10 Calibration 5 11 Clear User Memory 5 12 Reset to Factory Default 5 12 Hourglass 5 13 Rotation 5 14 Test Menu 5 15 Serial Port1 Loop Back Test 5 15 Serial Port2 Loop Back Test 5 16 PLC Enquiry Test 5 17 Buzzer Test 5 17 Touch Panel Test 5 18 Exit 5 18 SYSTEM SETUP SCREENS 5 5 CH CHAPTER CHAPTER ...

Page 72: ...for the firmware and boot loader Setting This is the area for adjusting the contrast of the display selecting one of the five backlight colors red amber yellow lime or green for EA1 S6ML or white pink1 pink2 pink3 or red for EA1 S6MLW enabling or disabling the internal beeper calibrating the touch panel clearing the user memory resetting all of the settings back to the factory defaults and setting...

Page 73: ...ll be displayed as shown at the bottom of this page Press both the F1 and F5 function keys simultaneously for 3 seconds to bring up the System Setup Screens Setup Menu C more 6 Micro Graphic Panel BAK 1 Information 2 Setting 3 Test Menu 4 Exit UP DWN ENT ENT SETUP MENU BAK 1 Information 2 Setting 3 Test Menu 4 Exit UP DWN ENT ENT SETUP MENU Chapter 5 System Setup Screens 5 3 EA1 MG6 USER M Hardwar...

Page 74: ...8 3 Beep pg 5 10 4 Calibration pg 5 11 5 Clear User Memory pg 5 12 1 Serial Port1 Loop Back Test pg 5 15 2 Serial Port2 Loop Back Test pg 5 16 3 PLC Enquiry Test pg 5 17 Do you want to exit from System Screen No F1 Yes F5 3 Test Menu pg 5 15 4 Exit pg 5 18 2 Protocol pg 5 6 3 Extensions pg 5 6 4 Versions pg 5 6 6 Reset to Factory Default pg 5 12 7 Hourglass pg 5 13 8 Rotation pg 5 14 4 Buzzer Test...

Page 75: ... Pressing ENT F5 with Setting highlighted will take you to the Setting menu screen See page 5 7 Pressing ENT F5 with Test Menu highlighted will take you to the Test Menu screen See page 5 15 Pressing ENT F5 with Exit highlighted will allow the used to decided whether to Exit or not Exit the System Setup Screens See page 5 18 ENT SETUP MENU 1 Information 2 Setting 3 Test Menu 4 Exit BAK UP DWN ENT ...

Page 76: ...e Version 2 0 or later is required with models EA1 S6ML and EA1 S6MLW Available for free download at www automationdirect com 5 6 Chapter 5 System Setup Screens 5 EA1 MG6 USER M Hardware User Manual 1st Ed Rev C 09 10 BAK UP DWN ENT ENT INFORMATION 1 Memory 2 Protocol 3 Extensions 4 Versions BAK UP DWN ENT ENT INFORMATION 1 Memory 2 Protocol 3 Extensions 4 Versions BAK UP DWN ENT ENT INFORMATION 1...

Page 77: ...13 Rotation page 5 14 Setting LCD Contrast With LCD Contrast highlighted press ENT F5 to bring up the screen showing the current value The default is 8 The contrast can be adjusted between 1 and 16 with 1 being the least contrast and 16 being the greatest NOTE When the panel is powered through Port1 from a connected PLC or PC the screen brightness is diminished because the panel is running in Low ...

Page 78: ...er color is choosen from the System Setup Screens Backlight color selection screen The selected color is displayed only when in the System Setup Screens 5 8 Chapter 5 System Setup Screens 5 EA1 MG6 USER M Hardware User Manual 1st Ed Rev C 09 10 BAK UP DWN APL ENT BACKLIGHT Current Value green BAK UP DWN APL ENT BACKLIGHT Current Value lime BAK UP DWN APL ENT BACKLIGHT Current Value amber BAK UP DW...

Page 79: ...ere are the various backlight colors Note Loading a project to the panel will override whatever color is choosen from the System Setup Screens Backlight color selection screen The selected color is displayed only when in the System Setup Screens BAK UP DWN APL ENT BACKLIGHT Current Value white BAK UP DWN APL ENT BACKLIGHT Current Value pink1 BAK UP DWN APL ENT BACKLIGHT Current Value pink3 BAK UP ...

Page 80: ...p on off selection screen The Beep on off choice can be changed through the System Setup Screens after a project is loaded Note When the panel is powered through Port1 from a connected PLC or PC the beep will not function properly because the panel is running in Low power mode To use the beep signal power the panel from an external 12 24 VDC power source ENT SETTING 1 LCD Contrast 2 Backlight 3 Be...

Page 81: ...calibration procedure or allow you to retry If the points that were touched are not within the calibration tolerance you will be returned to the first calibration screen and will need to start over ENT SETTING 1 LCD Contrast 2 Backlight 3 Beep 4 Ca ibration 5 Clear User Memory 6 Reset to Factory Default BAK UP DWN ENT NXT Press Cross Mark Press F1 to Quit Panel will not Communicate in this mode Pr...

Page 82: ...TE User memory is cleared when factory defaults are reset Use the C more Micro Graphic programming software to read the program from the panel iand save a backup copy 5 12 Chapter 5 System Setup Screens 5 EA1 MG6 USER M Hardware User Manual 1st Ed Rev C 09 10 ENT SETTING BAK UP DWN ENT NXT Are you sure you want to clear memory No F1 Yes F5 ENT SETTING 1 LCD Contrast 2 Backlight 3 Beep 4 Calibratio...

Page 83: ... function key to apply the selection Explanation An hourglass icon is displayed on the panel anytime a new screen is being loaded until communication is established with the new screen If communication is established before the delay has timed out no hourglass will be displayed The hourglass icon can also be disabled from being displayed BAK UP DWN APL ENT HOURGLASS Delay Disable ICON 350ms ENT SE...

Page 84: ...en the portrait vertical and landscape horizontal orientation Use the APL F5 function button to apply the selection Note Loading a project to the panel will override the orientation choosen from the System Setup Screens Rotation selection screen The selected orientation is displayed only when in the System Setup Screens BAK UP DWN APL ENT ROTATION Portrait Mode off ENT SETTING 7 Hourglass 8 Rotati...

Page 85: ...structed as shown here and press ENT F5 to start the test If the test is passing the Receive Counts will equal the Bytes Sent If the serial port is not working then the Error Counts will equal the Bytes Sent The test will continue until the BAK F1 key is pressed 3 4 RXD TXD RJ12 Loop back Connector Wiring Diagram 1 2 3 4 5 6 RJ12 6 pin Phone Plug 6P6C Jumper Pin 3 to 4 BAK UP DWN ENT ENT TEST MENU...

Page 86: ...ight The test will continue until the BAK F1 key is pressed 1 15 15 pin D sub male 2 3 TXD RXD 7 8 CTS RTS RS 232 Loop back Connector Wiring Diagram 1 15 15 pin D sub male 7 8 CTS RTS 9 11 RXD TXD 10 12 RXD TXD RS 422 485 Loop back Connector Wiring Diagram BAK UP DWN ENT ESC LOOP BACK TEST Serial Port2 Bytes Sent 124 Rcv Counts 124 Err Counts 0 RTS CTS pass BAK UP DWN ENT ENT TEST MENU 1 Serial Po...

Page 87: ...ne is not selectable The beeper function can not be turned on or off from this screen refer to the Setting menu Note When the panel is powered through Port1 from a connected PLC or PC the beep will not function properly because the panel is running in Low Power Mode To use the beep signal power the panel from an external 12 24 VDC power source BAK UP DWN ENT ENT TEST MENU 1 Serial Port1 Loop Back ...

Page 88: ... press ENT F5 to bring up the screen shown to the left You will be given the choice to either proceed with exiting the System Setup Screens by pressing F5 for YES or allowed to cancel by pressing F1 for NO You will be returned to the project screen if answering YES If there is no user program loaded into the panel then a NO USER PROGRAM message as shown to the left will be displayed BAK UP DWN ENT...

Page 89: ...nd Connection Charts 6 6 AutomationDirect CLICK PLC 6 6 Direct LOGIC PLCs RS 422A RS 485A 6 7 Allen Bradley 6 7 GE Mitsubishi Omron Modicon and Siemens 6 7 How to use the PLC Compatibility and Connection Charts 6 8 Example 6 8 Cables from AutomationDirect 6 15 Cables from AutomationDirect Wiring Diagrams 6 17 User Constructed Cables Wiring Diagrams 6 26 RS 422A RS 485A Multi Drop Wiring Diagram Ex...

Page 90: ...B MicroLogix 1000 1100 1200 1500 15 pin D sub 8 pin DIN EA SLC 232 CBL connects to AB SLC 5 03 04 05 ControlLogix CompactLogix FlexLogix 15 pin D sub 9 pin Dshell female EA PLC5 232 CBL connects to AB PLC5 15 pin Dshell 25 pin Dshell EA DH485 CBL connects to AB MicroLogix SLC500 and any PLC using AB AIC device 15 pin Dshell RJ45 8 pin The PLC Compatibility and Connection Chart tables on the follow...

Page 91: ...contact our technical support group at 770 844 4200 6 3 Chapter 6 PLC Communications 6 EA1 MG6 USER M Hardware User Manual 1st Ed Rev C 09 10 Available PLC Protocols PLC Drivers Serial port1 or port2 Serial port2 only AutomationDirect CLICK Allen Bradley DF1 Half Duplex AutomationDirect K sequence Allen Bradley DF1 Full Duplex AutomationDirect DirectNET Allen Bradley PLC5 DF1 AutomationDirect Modb...

Page 92: ...t Ed Rev C 09 10 Port 2 Port 2 Panel to DirectLOGIC VGA 15 pin port serial cable p n EA 2CBL 1 DL06 PLC C more 6 Inch Micro Graphic Panel Example of panel s Port2 connected to a DL06 PLC Port 1 Port 2 DV 1000CBL serial cable CLICK PLC C more 6 Inch Micro Graphic Panel Example of panel s Port1 connected to a CLICK PLC ...

Page 93: ...ate code Date code 5 4 3 2 1 R01 R01 MADE N CH NA MADE N CH NA EA1 S6MLW ser alnumber EA1 S6MLW ser alnumber MODEL EA1 S6MLW MODEL EA1 S6MLW INPUT12 24V 6 5W INPUT12 24V 6 5W NDCONTEQ NDCONTEQ 6 5 4 3 2 1 Pin Signal 1 Logic GND not used RXD 232C TXD 232C 2 3 4 5 5 VDC RJ12 serial communications Port1 6 Logic GND 8 1 15 9 Pin Signal 1 Frame GND TXD 232C RXD 232C Future 2 3 4 5 Logic GND Pin Signal ...

Page 94: ... PLC port and panel port The charts list the recommended cables and or manufactured devices that can be used to make up the communications link and also refers to wiring diagrams that can be used to construct cables for connecting the PLC s port to the panel s port The constructed cables are referred to as Diagram 1 through 13 and start on page 6 26 Following the charts is a list of cables that ca...

Page 95: ...To enable the built in 120 Ohm Termination Resistor jumper pin 13 termination resistor to pin 9 RXD on the C more 15 pin PLC communications port Allen Bradley As stated in this chapter s introduction the panel also has the ability to communicate with Allen Bradley PLCs that support the Allen Bradley DF1 and DH485 protocols The chart for the various Allen Bradley PLCs includes recommended cables GE...

Page 96: ...abling Components Required for Specific Port and Protocol being used PLC Port Powered or External DC Power Supply External DC Power Supply Using panel s RJ12 Port1 Using panel s Port2 DB 15 pin female Protocol s Supported Components Network Type Protocol s Supported Components Network Type CLICK all versions Port 1 RJ12 6 pin AutomationDirect Modbus CLICK DV 1000CBL RS 232 AutomationDirect Modbus ...

Page 97: ... pin D0 DCM Port 1 RJ12 6 pin K sequence DirectNET Modbus RTU DV 1000CBL RS 232 K sequence DirectNET Modbus RTU EA 2CBL RS 232 Port 2 DB15HD female DV 1000CBL FA 15HD RS 232 EA 2CBL 1 RS 232 See Diagram 1 RS 422 Modbus RTU See Diagram 2 RS 485 Modbus only Direct LOGICDL06 all versions Port 1 RJ12 6 pin K sequence DirectNET Modbus RTU DV 1000CBL RS 232 K sequence DirectNET Modbus RTU EA 2CBL RS 232...

Page 98: ...L RS 232 Port 2 RJ12 6 pin K sequence DirectNET K sequence DirectNET D2 250 1 Port 1 RJ12 6 pin K sequence DirectNET Modbus RTU DV 1000CBL RS 232 K sequence DirectNET Modbus RTU EA 2CBL RS 232 Port 2 DB15HD female DV 1000CBL FA 15HD RS 232 EA 2CBL 1 RS 232 See Diagram 1 RS 422 D2 260 Port 1 RJ12 6 pin K sequence DirectNET Modbus RTU DV 1000CBL RS 232 K sequence DirectNET Modbus RTU EA 2CBL RS 232 ...

Page 99: ... DB 25 pin female Not Possible DirectNET See Diagram 6 RS 422 D3 340 Port 1 RJ11 4 pin DirectNET OP 3CBL 1 RS 232 DirectNET EA 3CBL RS 232 Port 2 RJ11 4 pin DirectNET Modbus RTU DirectNET Modbus RTU D3 350 Port 1 RJ12 6 pin K sequence DirectNET DV 1000CBL RS 232 K sequence DirectNET EA 2CBL RS 232 Port 2 DB 25 pin female K sequence DirectNET Modbus RTU See Diagram 3 RS 232 K sequence DirectNET Mod...

Page 100: ... D4 440 Port 0 DB 15 pin female K sequence D4 1000CBL or DV 1000CBL FA CABKIT RS 232 K sequence EA 4CBL 1 RS 232 Port 1 DB 25 pin female K sequence DirectNET DV 1000CBL FA CABKIT RS 232 K sequence DirectNET EA 4CBL 2 RS 232 See Diagram 4 RS 422 D4 450 Port 0 DB 15 pin female K sequence D4 1000CBL or DV 1000CBL FA CABKIT RS 232 K sequence EA 4CBL 1 RS 232 Port 1 DB 25 pin female K sequence DirectNE...

Page 101: ...GIX CBL RS 232 RJ45 8 pin phone plug DH485 AIC AIC EA DH485 CBL RS 232 Allen Bradley SLC500 5 03 5 04 5 05 9 pin D sub port DF1 Full Duplex DF1 Half Duplex EA SLC 232 CBL RS 232 5 01 5 02 5 03 RJ45 8 pin phone plug DH485 AIC AIC EA DH485 CBL RS 232 Allen Bradley ControlLogix all 9 pin D sub port DF1 Full Duplex DF1 Half Duplex EA SLC 232 CBL RS 232 Allen Bradley CompactLogix all 9 pin D sub port D...

Page 102: ...e GE 90 30 90 70 15 pin D sub port Not Possible SNPX EA 90 30 CBL RS 422 Micro 90 VersaMax Micro RJ45 Port 1 See Diagram 12 RS 232 15 pin D sub port Port 2 EA 90 30 CBL RS 422 Mitsubishi Melsec FX Series 25 pin D sub port CPU Direct EA MITSU CBL RS 422 8 pin mini din port EA MITSU CBL 1 RS 422 Q QnA 9 pin D sub port Q QnA See Diagram 14 RS 232C 6 pin mini din port See Diagram 15 RS 232C Omron C200...

Page 103: ...SLC 232 CBL Allen Bradley PLC 5 DF1 port RS 232C EA PLC5 232 CBL Allen Bradley MicroLogix SLC 5 01 02 03 PLC5 DH485 port RS 232C EA DH485 CBL GE 90 30 90 70 Micro 90 Versamax Micro Port2 15 pin D sub port RS 422A EA 90 30 CBL MITSUBISHI FX Series 25 pin port RS 422A EA MITSU CBL MITSUBISHI FX Series 8 pin mini DIN RS 422A EA MITSU CBL 1 OMRON Host Link C200 Adapter C500 RS 232C EA OMRON CBL Cable ...

Page 104: ...es from AutomationDirect cont d Part No D4 1000CBL Part No FA 15HD Part No FA CABKIT Part No DV 1000CBL Part No OP 3CBL 1 Part No EA MLOGIX CBL Part No EA SLC 232 CBL Part No EA PLC5 232 CBL Part No EA 90 30 CBL Part No EA MITSU CBL Part No EA MITSU CBL 1 Part No EA OMRON CBL Part No EA DH485 CBL ...

Page 105: ... 15 do not use 14 do not use 13 do not use 12 do not use 11 do not use 10 do not use 9 do not use 1 15 1 Sig GND 2 do not use 3 RXD 4 TXD 5 do not use 6 do not use 15 pin D sub male 1 2 3 4 5 6 3 1 TXD RXD GND 3 2 5 1 RXD TXD shield RJ12 6 pin Phone Plug 6P6C Wiring Diagram Note Use the above wiring diagram if you need to make your own cable We recommend using 22 AWG shielded cable To C more Micro...

Page 106: ... GND 12 do not use 11 do not use 10 do not use 9 do not use 1 15 15 pin D sub male 15 1 7 8 GND GND GND YOP CTS YOM See PLC user manual for pin out details To C more Micro Graphic Serial Port2 EA 4CBL 1 6 18 Chapter 6 PLC Communications 6 EA1 MG6 USER M Hardware User Manual 1st Ed Rev C 09 10 DirectLogic PLC RJ11 port D3 340 RS 232C p n EA 3CBL 8 do not use 7 do not use 6 do not use 5 Logic GND 4 ...

Page 107: ... sub male 3 7 TXD RXD GND 3 2 5 1 RXD TXD shield 25 pin D sub male Wiring Diagram Note Use the above wiring diagram if you need to make your own cable We recommend using 22 AWG shielded cable 4 RTS 5 CTS 1 25 25 do not use 24 do not use 23 do not use 22 do not use 21 do not use 20 do not use 19 do not use 18 do not use 17 do not use 16 do not use 15 do not use 14 do not use 13 do not use 12 do not...

Page 108: ... C more Micro Graphic Serial Port1 DirectLogic DL405 PLC Port 0 DL 450 Port 0 RS 232C p n D4 1000CBL To DL405 PLC Port 0 6 4 15 3 Wiring Diagram 3 2 1 14 1 2 3 4 5 6 RJ12 6 pin Phone Plug 6P6C 1 GND 2 do not use 3 RXD 4 TXD 5 5 VDC 6 GND 2 12 5 11 7 13 8 4 1 8 YOM Sense 7 CTS 6 do not use 5 do not use 4 Online 3 RXD 232C 2 TXD 232C 1 YOP Sense 15 Logic GND 14 Logic GND 13 Logic GND 12 do not use 1...

Page 109: ...o not use 1 15 15 pin D sub male 2 5 TXD RXD GND 3 2 5 1 RXD TXD shield 9 pin D sub female Wiring Diagram Note Use the above wiring diagram if you need to make your own cable We recommend using 22 AWG shielded cable 1 9 1 do not use 2 RXD 3 TXD 4 do not use 5 Signal GND 6 do not use 7 do not use 8 do not use 9 do not use To C more Micro Graphic Serial Port2 Allen Bradley PLC5 DF1 RS 232C p n EA PL...

Page 110: ...ote The LE signal is wired in the cable as shown but not required for point to point communications To C more Micro Graphic Serial Port2 DH 485 Peripheral CPU J1 Power Allen Bradley SLC 500 Modular PLC Controller DH 485 Link See manufacturer s literature for details AB 1747 AIC DH485 Link Coupler AB 1747 C11 A Cable J2 DH 485 Peripheral CPU J1 Power J2 C more 6 Micro Graphic Panel Note The above d...

Page 111: ...ley DH485 AIC network using the AB AIC Advanced Interface Converter p n 1761 NET AIC Select the Allen Bradly DH485 AIC SLC500 MircroLogix driver in the C more Micro Programming Software when starting the project Also set the AB channel configuration for DH485 C more EA MLOGIX CBL Cable C more EA SLC 232 CBL Cable Allen Bradley SLC500 5 03 DH 485 AIC to Multiple C more 6 Micro Graphic Panels using ...

Page 112: ...not use 13 Termination 12 SD RS422 11 SD RS422 10 RD RS422 9 RD RS422 1 15 15 pin D sub male 4 GND To C more Micro Graphic Serial Port2 EA MITSU CBL 6 24 Chapter 6 PLC Communications 6 EA1 MG6 USER M Hardware User Manual 1st Ed Rev C 09 10 GE 90 30 90 70 Micro 90 and VersaMax Micro Port 2 15 pin D sub port RS 422A p n EA 90 30 CBL To PLC 15 Pin Port Wiring Diagram Note Use the above wiring diagram...

Page 113: ...cro Graphic Serial Port2 EA MITSU CBL 1 EA1 MG6 USER M Hardware User Manual 1st Ed Rev C 09 10 Omron Host Link C200 Adapter C500 RS 232C p n EA OMRON CBL 8 do not use 7 do not use 6 do not use 5 Logic GND 4 do not use 3 RXD 232C 2 TXD 232C 1 Frame GND To PLC 25 Pin Port 2 15 do not use 14 do not use 13 do not use 12 do not use 11 do not use 10 do not use 9 do not use 1 15 15 pin D sub male 3 7 TXD...

Page 114: ...6 15 To C more Micro Graphic Serial Port2 DirectLOGIC DL06 D2 260 both Port 2 RS 485A To PLC 15 Pin Port Wiring Diagram Note Use the above wiring diagram to make your own cable We recommend Belden 9842 shielded cable or equivalent 13 9 7 RXD TXD GND 9 11 5 1 RD SD shield TXD RXD 10 6 10 12 RD SD Term 13 8 do not use 7 do not use 6 do not use 5 Logic GND 4 do not use 3 do not use 2 do not use 1 Fra...

Page 115: ... and D3 350 Port 2 all RS 422A To PLC 25 Pin Port 25 pin D sub male Wiring Diagram Note Use the above wiring diagram to make your own cable We recommend Belden 8103 shielded cable or equivalent 1 25 25 do not use 24 do not use 23 CTS 22 do not use 21 do not use 20 do not use 19 RTS 18 RTS 17 do not use 16 TXD RS422 15 do not use 14 TXD RS422 13 do not use 12 do not use 11 CTS 10 RXD RS422 9 RXD RS...

Page 116: ...To C more Micro Graphic Serial Port2 DirectLOGIC D2 DCM D3 DCM D4 DCM RS 422A To PLC 25 Pin Port 25 pin D sub male Wiring Diagram Note Use the above wiring diagram to make your own cable We recommend Belden 8103 shielded cable or equivalent 1 25 25 do not use 24 do not use 23 do not use 22 do not use 21 do not use 20 do not use 19 do not use 18 do not use 17 RXD RS422 16 RXD RS422 15 TXD RS422 14 ...

Page 117: ...1 9 1 do not use 2 TXD 3 RXD 4 RTS 5 CTS 6 do not use 7 do not use 8 do not use 9 Signal GND RTS CTS 4 5 To C more Micro Graphic Serial Port2 Omron Host Link CQM1 using CQM1 CIF02 Peripheral Port Connecting Cable RS 232C 8 do not use 7 do not use 6 do not use 5 Logic GND 4 do not use 3 RXD 232C 2 TXD 232C 1 Frame GND To Peripheral Port Cable 3 15 do not use 14 do not use 13 do not use 12 do not us...

Page 118: ... 1 do not use 2 RXD 3 TXD 4 DTR 5 Signal GND 6 DSR 7 RTS 8 CTS 9 do not use 4 DTR 6 DSR 7 RTS 8 CTS To C more Micro Graphic Serial Port2 User Constructed AEG Modicon Micro Series 110 CPU 311 xx 110 CPU 411 xx 110 CPU 512 xx 110 CPU 612 xx RS 232C 8 do not use 7 do not use 6 do not use 5 Logic GND 4 do not use 3 RXD 232C 2 TXD 232C 1 Frame GND To PLC 9 Pin Port 2 15 do not use 14 do not use 13 do n...

Page 119: ...end using 22 AWG shielded cable 6 RTS 7 CTS 1 do not use 2 do not use 3 TXD 4 RXD 5 Logic GND 6 RTS 7 CTS 8 do not use RJ45 8 pin Phone Plug 8P8C To C more Micro Graphic Serial Port2 User Constructed GE VersaMax Micro Port 1 RS 232C 8 do not use 7 do not use 6 donot use 5 Logic GND 4 do not use 3 RXD 232C 2 TXD 232C 1 Frame GND To PLC RJ45 Port 1 4 15 do not use 14 do not use 13 do not use 12 do n...

Page 120: ...0 RD RS485 9 RD RS485 1 15 15 pin D sub male 9 pin D sub male 1 9 1 Logic Com 2 Logic Com 3 RS485 Sig B 4 do not use 5 Logic Com 6 5 VDC 7 24 VDC 8 RS485 Sig A 9 do not use To C more Micro Graphic Serial Port2 8 do not use 7 do not use 6 do not use 5 Logic GND 4 do not use 3 RXD 232C 2 TXD 232C 1 Frame GND To PLC 9 Pin Port 1 15 do not use 14 do not use 13 do not use 12 do not use 11 do not use 10...

Page 121: ...radley PLC5 DF1 RS 422 8 do not use 7 do not use 6 do not use 5 Logic GND 4 do not use 3 do not use 2 do not use 1 Frame GND To PLC 25 Pin Port 2 15 do not use 14 do not use 13 do not use 12 SD 11 SD 10 RD 9 RD 1 15 15 pin D sub male 3 7 TXD RXD GND 10 12 5 1 RD SD shield 25 pin D sub male Wiring Diagram Notes 1 Polarities must be swapped 2 Handshaking is turned off 3 Use the above wiring diagram ...

Page 122: ...le 8 do not use 7 Sig GND 6 RXD 5 do not use 4 do not use 3 do not use 2 do not use 1 do not use 15 CTS 14 CTS 13 RXD 12 RTS 11 RTS 10 TXD 9 TXD 1 6 15 7 RTS CTS CTS RTS RXD RXD TXD TXD GND 10 9 6 13 11 14 12 15 TXD TXD Signal GND Signal GND Typical RS 422 Multi Drop Wiring Diagram Port 2 Shielded Cable Shielded Cable To DL06 PLC port 2 Port 2 To D2 250 1 PLC port 2 RXD RXD TXD TXD RXD RXD Termina...

Page 123: ... do not use 5 Logic GND 4 do not use 3 do not use 2 do not use 1 Frame GND 15 do not use 14 do not use 13 Termination 12 SD RS422 11 SD RS422 10 RD RS422 9 RD RS422 1 15 15 pin D sub male DirectLOGIC DL06 PLC Shielded Cable shield shield 5 Term SHD SD SD RD RD GND 10 9 12 11 13 1 Typical RS 422 Multi Drop Wiring Diagram cont d Signal GND HD High Density 15 pin HD D sub male 8 do not use 7 Sig GND ...

Page 124: ... 15 pin HD D sub male 8 do not use 7 Sig GND 6 RXD 5 do not use 4 do not use 3 do not use 2 do not use 1 do not use 15 CTS 14 CTS 13 RXD 12 RTS 11 RTS 10 TXD 9 TXD 1 6 15 7 RTS CTS CTS RTS RXD TXD RXD TXD GND 6 10 13 9 11 14 12 15 TXD RXD TXD RXD Signal GND TXD RXD TXD RXD Signal GND Typical RS 485 Multi Drop Wiring Diagram Port 2 Shielded Cable Shielded Cable To DL06 PLC port 2 Port 2 To D2 250 1...

Page 125: ...XD RXD TXD RXD Signal GND HD High Density 15 pin HD D sub male 8 do not use 7 Sig GND 6 RXD 5 do not use 4 do not use 3 do not use 2 do not use 1 do not use 15 CTS 14 CTS 13 RXD 12 RTS 11 RTS 10 TXD 9 TXD 1 6 15 Shielded Cable Port 2 To DL06 PLC port 2 To C more Micro Graphic Serial Port2 Note We recommend Belden 88102 shielded cable or equivalent C more 6 Micro Graphic Panel Port2 Shielded Cable ...

Page 126: ......

Page 127: ...erating Voltage 7 2 Check Transmit and Receive Indicators 7 3 Check Physical Conditions 7 3 Run Tests under the System Setup Screens 7 4 Check Settings under the System Setup Screens 7 5 Cleaning the Display Screen 7 5 Check Project Functionality 7 6 Checks from the C more Micro Graphic Programming Software 7 6 ...

Page 128: ...rs and gasses Check Operating Voltage Check the input voltage that is powering the C more Micro Graphic panel to make sure it is within the appropriate range 5 VDC If the panel is being powered with 5 VDC from an AUTOMATIONDIRECT PLC s RJ12 serial communications port to Port 1 on the panel the acceptable voltage range to the panel is 4 75 5 25 VDC 1 05 W 5 VDC 210 mA 24 VDC If the panel is being p...

Page 129: ...here are any signs of deterioration or if there is any evidence that moisture liquids have penetrated to the inside of the enclosure where the panel is mounted Information on replacement gaskets can be found in Chapter 9 Replacement Parts Check to make sure that none of the cooling vents around the inside section of the C more Micro Graphic panel are clogged with dust or debris Also make sure that...

Page 130: ...nnected PLC Is used with both Port1 and Port2 Buzzer Test Use this option to test the internal audible beeper of the panel Touch Panel Test Tests the response of the touch screen area to contact This test is used to make sure the touch screen area is responding properly NOTE Only one of the ports can be used with a connected PLC The programming software allows the user to select either Port1 or Po...

Page 131: ...ing the Display Screen The display screen should be cleaned periodically by wiping it with a lint free damp cloth using a mild soap solution Dry the surface when finished with a lint free cloth Do not use cleaning solvents ammonia alcohol acetone etc which may damage the plastic housing and touch screen The longevity of the touch screen can be increased by the use of a EA 6 COV2 clear screen overl...

Page 132: ...now is a good time to also check these aids Checks from the C more Micro Graphic Programming Software If you have a PC available with the C more Micro Graphic Programming Software EA MG PGMSW installed and the panel is connected to the PC you can check the status of the panel from the Panel Information window The Panel Information window shown below will indicate the panel type if a keypad bezel h...

Page 133: ...Notes 7 7 Chapter 7 Maintenance 7 EA1 MG6 USER M Hardware User Manual 1st Ed Rev C 09 10 ...

Page 134: ......

Page 135: ... 8 2 Display is Dim 8 3 No User Program 8 3 Lost Firmware Red Update Mode Screen Displayed 8 4 Updating Firmware 8 4 No Communications between Panel and PC Personal Computer 8 5 No Communications between Panel and PLC 8 7 Panel PLC Error Codes 8 8 C more Micro Graphic Panel Runtime Errors 8 9 Electrical Noise Problems 8 10 ...

Page 136: ...municating with the PLC The LED indicators should be on or flashing at a fast rate Indicator activity shows that the panel is communicating with the PLC If there is communication activity but the display is still blank there is the possibility the program in the PLC is controlling the display Try pressing the F1 and F5 keys simultaneously for 3 seconds The panel will change to the System Setup Scr...

Page 137: ...contrast should become greater as the value moves toward 16 and it should become less as the value moves toward 1 If this does not happen then the panel may need to be replaced See note above LCD Contrast The contrast of LCD has 16 levels of adjustment The default is a value of 8 No User Program If the panel is displaying the message No User Program after it is powered up then there is no project ...

Page 138: ...ere is still a problem call Tech Support 770 844 4200 Updating Firmware The panel firmware version must match both the programming software version and the version that the program was saved as If a version needs to be updated for example to take advantage of new functionality or product line additions follow these steps 1 Create a backup copy of the project on the PC From the C more Micro Graphic...

Page 139: ...multaneously for three seconds to enter the setup screen 2 Cable not connected Double check the programming cable asembly to make sure the panel is correctly connected to the USB port on the PC No communications between panel and PC continued top of next page NOTE When properly installed the programming cable will look like a serial communications port to the PC C more 6 inch Micro Graphic Panel U...

Page 140: ...panel uses a USB driver called Koyo USB Serial Comm Port COM4 is the USB port used in this example If you cannot find the Koyo USB Serial Comm Port under Ports COM LBT in Device Manager the USB driver may not be correctly installed or the driver has a problem Disconnect the cable from the PC and follow these steps to re install the driver Uninstall the C more Micro Graphic programming software Unp...

Page 141: ...rt is selected Verify that the correct PLC protocol is selected and properly configured The cable is bad and needs to be replaced Try a proven cable Test panel serial port See Chapter 5 Serial Port Loop Back Test If the panel s serial port is defective and if a cable is available switch to the other port on the panel If possible switch the panel with a panel that is communicating properly The seri...

Page 142: ...PLC generated errors are interpreted by the C more Micro Graphic programming software and are displayed across the top of the panel s display embedded as a hexadecimal value in error code P499 If a C more Micro Graphic communication error does occur the error message will be displayed in the upper left of the panel s display screen along with the error code number The error code with error message...

Page 143: ...tive 8 9 Chapter 8 Troubleshooting 8 EA1 MG6 USER M Hardware User Manual 1st Ed Rev C 09 10 Micro Graphic Panel Errors Error Code Error Message Possible Solutions R001 PC software tool Timeout Check cables and connections Cycle power at the panel See Chapter 8 for Electrical Noise Problems Check the area for sources of noise electrical motors transformers etc Check for proper grounding Resend the ...

Page 144: ...e to noise than the other wires in your system Review Chapter 4 Installation Wiring if you have questions regarding how to ground the touch panel Electrical noise can enter the system through the power source for the touch panel Installing a properly wired isolation transformer neutral grounded for all AC sources can help the problem but only if wired correctly DC sources should be well grounded g...

Page 145: ...9 9 REPLACEMENT PARTS CH CHAPTER CHAPTER In This Chapter Replacement Parts Overview 9 2 Replacement Parts 9 2 Customizing the Function Keys Insert Label 9 3 ...

Page 146: ... Replacement mounting gasket for C more 6 Micro Graphic keypad bezels EA MG BZ2 P EA MG S6ML FKL Replacement function key label insert for C more 6 Micro Graphic panels pk of 5 3 blank 1 F1 F5 for landscape 1 F1 F5 for portrait EA 6 COV2 Clear Screen Overlay pk of 3 Mounting Clips for 6 panel or bezel Part No EA MG BZ2 BRK Panel Gasket Part No EA MG6 S6ML GSK Keypad Bezel Gasket Part No EA MG6 BZ2...

Page 147: ...s mm 0 282 7 15 0 709 18 0 Typical Step 1 Remove existing function key label insert using a small tool such as jeweler s screw driver Step 2 Remove the protective film from the blank key label insert Step 3 If desired print and apply self adhesive labels to the blank insert Step 4 Install the new insert into the slot in the side of the panel and lock tab into place ...

Page 148: ......

Page 149: ...rror Codes A 5 Allen Bradley Error Code P499 Explanation A 6 Allen Bradley DF1 Protocol PLC Error Code Tables A 7 Allen Bradley DH485 Protocol PLC Error Code Tables A 9 GE Error Code P499 Explanation A 11 GE SNPX Protocol PLC Error Code Tables A 12 Mitsubishi FX Protocol PLC Error Codes A 21 Mitsubishi Q QnA and Q Series PLC Error Codes A 21 Omron Error Code P499 Explanation A 23 Omron Host Link P...

Page 150: ...he C more Micro Graphic panel also monitors any errors that are generated by the PLC that is connected to it If any of the PLC generated errors are detected they are displayed across the top of the panel s display embedded as a hexadecimal value in error code P499 An explanation of how the specific PLC error is identified in the panel error code P499 is shown preceeding the specific manufacturer s...

Page 151: ... Check CRC control code in the communications packet received from the PLC This is an indication that the data in the packet is corrupted P008 Address NotMatch The address value returned in the data packet from the PLC is incorrect P009 Re INV FUN Code The function code returned in the data packet from the PLC is incorrect P010 DataSizeNotMatch There are an incorrect number of bytes found in the d...

Page 152: ...PLC protocol layer PLC Error Codes Modbus Protocols Panel Error Code Name Meaning 0x0001 ILLEGAL FUNCTION The function code received in the query is not an allowable action for the server or slave This may be because the function code is only applicable to newer devices and was not implemented in the unit selected It could also indicate that the server or slave is in the wrong state to process a r...

Page 153: ...ctLOGIC PLC when using the K Sequence protocol Note The following errors can be generated from the designated PLC are monitored by the C more Micro Graphic panel and displayed on the panel s screen as a hexadecimal value in panel error code P499 if active Please refer to the PLC users manual for additional information DirectLOGIC DirectNET PLC Error Codes There are no PLC generated errors that occ...

Page 154: ... 09 10 A A 1 1 1 0 1 0 0 0 0 0 0 0 1 1 1 1 Local 0 3 bits Remote 4 7 bits EXT STS byte 1 7 F 0 hex P499 Error Code Message Displayed Hexadecimal Value AB DF1 Protocol Error Code P499 Breakdown 16 bit Word Example of an EXT STS error for a Type mismatch 0 1 2 3 4 5 6 7 8 9 10 11 12 13 14 15 Stop Start P499 Recv Err Code F017 Allen Bradley PLC Error Code Displayed Example Local 0 3 bits Remote 4 7 b...

Page 155: ...tion 0x0 Success no error 0x1 DST node is out of buffer space 0x2 Cannot guarantee delivery link layer The remote node specified does not ACK command 0x3 Duplicate token holder detected 0x4 Local port is disconnected 0x5 Application layer timed out waiting for response 0x6 Duplicate node detected 0x7 Station is offline 0x8 Hardware fault PLC Errors for Allen Bradley DF1 Protocol Remote STS Errors ...

Page 156: ...ondition cannot be generated resource is not available 0xD Condition already exists resource is readily available 0xE Command cannot be executed 0xF Histogram overflow 0x10 No access 0x11 Illegal data type 0x12 Invalid parameter or invalid data 0x13 Address reference exists to deleted area 0x14 Command execution failure for unknown reason possible PLC 3 histogram overflow 0x15 Data conversion erro...

Page 157: ...pecified does not ACK command 0x3 Duplicate token holder detected 0x4 Local port is disconnected 0x5 Application layer timed out waiting for response 0x6 Duplicate node detected 0x7 Station is offline 0x8 Hardware fault PLC Errors for Allen Bradley DH485 Protocol Remote STS Errors 4 7 bits Panel Error Code P499 Hex Value Description 0x0 Success no error 0x10 Illegal command or format 0x20 Host has...

Page 158: ...rned 0xB Access denied privilege violation 0xC Resource not available or cannot do 0xE CMD cannot be executed 0x12 Invalid parameter 0x14 Failure during processing 0x19 Duplicate label 0x1A File open by another node owner s local node address 1 byte 0x1B Program owned by another node program owner s local node address 1 byte EA1 MG6 USER M Hardware User Manual 1st Ed Rev C 09 10 A Appendix A Panel...

Page 159: ...ue can be looked up in the specific PLC s error tables to determine the cause of the error The possible PLC generated error codes for the GE 90 30 90 70 Micro 90 and VersaMax Micro SNPX communication protocols breakdown into a four digit hexadecimal value GE Error Code P499 Message Example Stop Start P499 Recv Err Code 020C EA1 MG6 USER M Hardware User Manual 1st Ed Rev C 09 10 A Appendix A Panel ...

Page 160: ...The requested service is either not defined or not supported This value is returned in lieu of the actual 01h value passed in the SNP error message to avoid confusion with the normal successful COMMREQ completion 0x000C Local SNP SNP X Error An error occurred within the SNP task in the CMM module in this PLC This error may occur in either an SNP master or an SNP slave The minor error code contains...

Page 161: ...as unable to transmit the modem autodial output from the serial port May be due to missing CTS signal when the CMM is configured to use hardware flow control PLC Error 0x040F Invalid slave memory address or range in X Request message PLC Error 0x0413 Invalid COMMREQ status word location PLC Error 0x050C Unable to write SNP Status Word to local PLC memory may be due to invalid Status Word memory ty...

Page 162: ...sted command Check the modem command string and modem The modem response is expected to be either CONNECT or OK 0x0C0C COMMREQ Data Block Length is too small When expected COMMREQ length is 6 words or less An improper length may cause other minor error codes 6 11 0x0D0C Invalid Diagnostic Status Word DSW starting word or length 0x0E0C Invalid maximum SNP message data size Must be an even value fro...

Page 163: ...ro If this request will be followed with a buffer message more than 2 byte the Next Message Type must be 54h T and the Next Message Length must specify the length of the X Buffer message Valid X Buffer message lengths are 9 1008 bytes data length plus 8 bytes 0x220C A BCC Block Check Code error has occurred on an Attach Attach Response or Update Realtime Datagram message Communications have not be...

Page 164: ...The COMMREQ did not complete within the configured time interval 0x330C An SNP Request or Response was aborted prior to completion due to reception of a Break 0x340C PLC backplane communications error 0x350C Invalid Piggyback Status data memory type or address Communications have not been established 0x360C Invalid SNP Slave SNP ID Must be a 0 7 ASCII characters plus a terminating null character 0...

Page 165: ... the Establish Datagram COMMREQ command The datagram has been partially established but is not usable the datagram should be cancelled by using the Datagram ID returned by the COMMREQ 0x430F The SNP X slave did not receive a response from the Service Request Processor in the PLC CPU 0x440C An invalid next message type value was detected in an X Attach Response message when establishing a new SNP X...

Page 166: ...onse message 0x600F A parity error has occurred in a received X Request message 0x610C A framing or overrun error has occurred on an X Response message 0x610F A framing or overrun error has occurred in a received X Request message 0x620C A BCC Block Check Code error has occurred on an X Response message 0x620F A BCC Block Check Code error has occurred in a received X Request message 0x630C An inva...

Page 167: ...not be enabled or disabled 0xC805 Password s already enabled and can not be forced inactive 0xC905 Login using non zero buffer size required for block commands 0xCA05 Device is write protected 0xCB05 A comm or write verify error occurred during save or restore 0xCC05 Data stored on device has been corrupted and is no longer reliable 0xCD05 Attempt was made to read a device but no data has been sto...

Page 168: ...ed 0xEC05 Task unable to be created 0xED05 VME bus error encountered 0xEE05 Could not return block sizes 0xEF05 Programmer is already attached 0xF005 Request only valid in stop mode 0xF105 Request only valid from programmer 0xF205 Invalid program cannot log in 0xF305 I O configuration mismatch 0xF405 Invalid input parameter in request 0xF505 Invalid password 0xF605 Invalid sweep state to set 0xF70...

Page 169: ...ge according to size request in header 0x4006 Serial communications could not be initialized 0x4008 CPU busy or buffer full 0x4010 Request cannot be serviced while CPU is running CPU must be stopped 0x4013 Request cannot be serviced while CPU is running CPU must be stopped 0x4021 Drive memory does not exist 0x4022 File ZR memory does not exist 0x4023 File ZR memory name and File ZR memory number d...

Page 170: ...ng executed 0x408B The remote request cannot be performed 0x40A0 A block number out of range was specified 0x40A1 The number of blocks requested exceeds the range of the PLC 0x40A2 A step number was specified out of range 0x40A3 Step range limit exceeded 0x40A4 Specified sequence step number is out of range 0x40A5 Specified SFC device is out of range 0x40A6 Block specification and step specificati...

Page 171: ...message This value can be looked up in the specific PLC s error tables to determine the cause of the error The possible PLC generated error codes for the Omron Host Link communication protocols breakdown into a four digit hexadecimal value Omron Error Code P499 Message Example A 23 Appendix A Panel PLC Error Code Tables A EA1 MG6 USER M Hardware User Manual 1st Ed Rev C 09 10 Stop Start P499 Recv ...

Page 172: ...or 0x12 Overrun 0x13 FCS error 0x14 Format error parameter length error 0x15 Entry number data error parameter error data code error data length error 0x16 Instruction not found 0x18 Frame length error 0x19 Not executable due to Un executable error clear non registration of I O table etc 0x20 I O table generation impossible unrecognized remote I O unit channel over duplication of optical transmitt...

Page 173: ...rk 0x0202 Destination Node Error Unit Missing 0x0203 Destination Node Error Third Node missing 0x0204 Destination Node Error Destination Node busy 0x0205 Destination Node Error Response Timeout 0x0301 Controller Error Communications Controller Error 0x0302 Controller Error CPU Unit Error 0x0303 Controller Error Controller Error 0x0304 Controller Error Unit number Error 0x0401 Service Unsupported U...

Page 174: ...ssing 0x2106 Write Not Possible File missing 0x2107 Write Not Possible File name already exists 0x2108 Write Not Possible Cannot change 0x2201 Not executable in current mode Not possible during execution 0x2202 Not executable in current mode Not possible while running 0x2203 Not executable in current mode Wrong PLC mode Program 0x2204 Not executable in current mode Wrong PLC mode Debug 0x2205 Not ...

Page 175: ...and Error No protection 0x2602 Command Error Incorrect password 0x2604 Command Error Protected 0x2605 Command Error Service already executing 0x2606 Command Error Service stopped 0x2607 Command Error No execution right 0x2608 Command Error Settings not complete 0x2609 Command Error Necessary items not set 0x260A Command Error Number already defined 0x260B Command Error Error will not clear 0x3001 ...

Page 176: ...communication protocols breakdown into a four digit hexadecimal value as shown in the following diagram Siemens Error Code P499 Message Example 0 1 1 0 0 0 0 0 0 0 0 0 0 0 6 0 0 hex P499 Error Code Message Displayed Hexadecimal Value Siemens PPI Error Code P499 Breakdown 16 bit Word Example of a Siemens PPI error for a Address out of range error 0 1 2 3 4 5 6 7 8 9 10 11 12 13 14 15 Main response ...

Page 177: ...ss not allowed 0x8104 Function not supported 0x8105 Address invalid 0x8106 Data Type not supported 0x8107 Data Type is not consistent with size 0x810A Object does not exist 0x8500 PDU Size is incorrect 0x8702 Address is invalid 0xD201 Block name syntax error 0xD202 Error with function parameter 0xD203 Error with block type 0xD204 No linked block 0xD205 Object already exists 0xD206 Object already e...

Page 178: ......

Page 179: ...B B C MORE MICRO GRAPHIC PANEL RUNTIME ERRORS AP APPENDIX APPENDIX In This Appendix Introduction B 2 Panel Errors B 2 ...

Page 180: ...e Solutions R001 PC software tool Timeout Check cables and connections Cycle power at the panel See Chapter 8 for Electrical Noise Problems Check the area for sources of noise electrical motors transformers etc Check for proper grounding Resend the project R002 CRC Error occurred during project transfer from PC R003 Project Check Sum Error Resend Project file to Panel Cycle power Resend the projec...

Page 181: ...more Micro Graphic Panel Runtime Errors 8 9 C more Micro Graphic Programming Software 3 3 Cables 6 15 Cables from AutomationDirect 6 15 Wiring Diagrams 6 17 6 18 6 19 6 20 6 21 6 22 6 23 6 24 6 25 User Constructed Cables 6 26 Wiring Diagrams 6 26 6 27 6 28 6 29 6 30 6 31 Chemical Compatibility 2 7 Clear Screen Overlay 3 15 Communication Port Adapters 3 14 EA ADPTR 4 3 14 EA COMCON 3 3 14 Communica...

Page 182: ...A 4 Entivity Modbus RTU A 4 Modicon Modbus RTU A 4 Omron A 23 Siemens A 28 Exit Menu item 5 18 F Function Keys Insert Label 9 3 Customizing 9 3 I Installation 4 3 Introduction 1 2 K Keypad Bezel 20 Button Landscape 3 8 Assembly 3 10 Dimensions 3 8 Specifications 3 9 Keypad Bezel 21 Button Portrait 3 11 Assembly 3 13 Dimensions 3 11 Specifications 3 12 i 2 Index EA1 MG6 USER M Hardware User Manual ...

Page 183: ...er the System Setup Screens 7 4 Mounting Clip Screw Torque 2 5 Mounting Clips 4 3 P Panel PLC Error Code Tables A 2 Allen Bradley DF1 Protocol A 7 A 8 Allen Bradley DH485 Protocol A 9 A 10 C more Micro Graphic Panel A 3 A 4 DirectLOGIC K Sequence PLC A 5 GE SNPX Protocol A 12 A 13 A 14 A 15 A 16 A 17 A 18 A 19 A 20 Introduction A 2 Mitsubishi FX Protocol A 21 Mitsubishi Q QnA Series A 21 A 22 Omro...

Page 184: ... 3 4 Numeric Entry 3 4 Pushbutton 3 4 Real Time Graph 3 4 Recipe 3 5 Rectangle 3 4 Screen Change Pushbutton 3 5 Screen Selector 3 5 Scroll Text 3 5 Static Bitmap 3 4 Static Text 3 5 Switch 3 4 Part Number Key 1 5 Bezel Part Number Key 1 5 Panel Part Number Key 1 5 Password Protection DirectLOGIC PLC s 6 6 PC Requirements 3 3 PLC Communications Communication Ports 6 4 6 5 Introduction 6 2 6 3 PLC C...

Page 185: ...nstall C more Micro Graphic Panel 1 9 Step 5 Install the Programming Software and Develop a Project 1 11 Step 6 Connect C more 6 Micro Graphic Panel to Computer 1 12 Step 7 Providing Power to the C more 6 Micro Graphic Panel 1 13 Step 8 Accessing the C more 6 Micro Graphic Panel Setup Screens 1 14 Step 9 Choose C more 6 Micro Graphic Panel to PLC Protocol Cables 1 15 R Replacement Parts DC Power C...

Page 186: ...ion 5 14 Setup Menu 5 5 Information Menu 5 6 Extensions 5 6 Memory 5 6 Protocol 5 6 Versions 5 6 Specifications 2 3 System Setup Screens 5 2 Accessing 5 3 Flowchart 5 4 Information 5 2 Introduction 5 2 Setting 5 2 Test Menu 5 2 T Technical Support 1 2 Test Menu 5 15 Buzzer Test 5 17 PLC Enquiry Test 5 17 Serial Port1 Loop Back Test 5 15 Serial Port2 Loop Back Test 5 16 Touch Panel Test 5 18 i 6 In...

Page 187: ... Problems 8 10 No Communications between Panel and PC 8 5 No Communications between Panel and PLC 8 7 No User Program 8 3 PLC Protocol Error Codes 8 8 PLC Protocol Error Example 8 8 U Updating Firmware 8 4 USB to RS 232 Programming Cable Assembly 1 12 3 6 converter 3 6 Specifications 3 7 W Wiring Guidelines 4 5 i 7 Index EA1 MG6 USER M Hardware User Manual 1st Ed Rev C 09 10 ...

Page 188: ......

Page 189: ......

Reviews: