background image

8

or any digital signal is not detected properly the 
indicator won't light up. 

Sampling Frequency / Volume indicator

A sampling frequency of a selected input signal 

being played is displayed. When an input is selected 
without any connection or without any input signal, 
or when any input signal can not be detected 
properly, three bars "- - -" will be displayed instead of 
sampling frequency.

Pressing the D.VOL-UP/DN buttons on the remote 

control unit to adjust the volume (analog outputs 
level) will change to indicate the volume level. Refer 
to "Digital Volume" on page 9 for details. 5 seconds 
later the display will return to show a sampling 
frequency.

Front Panel Functions - continued -

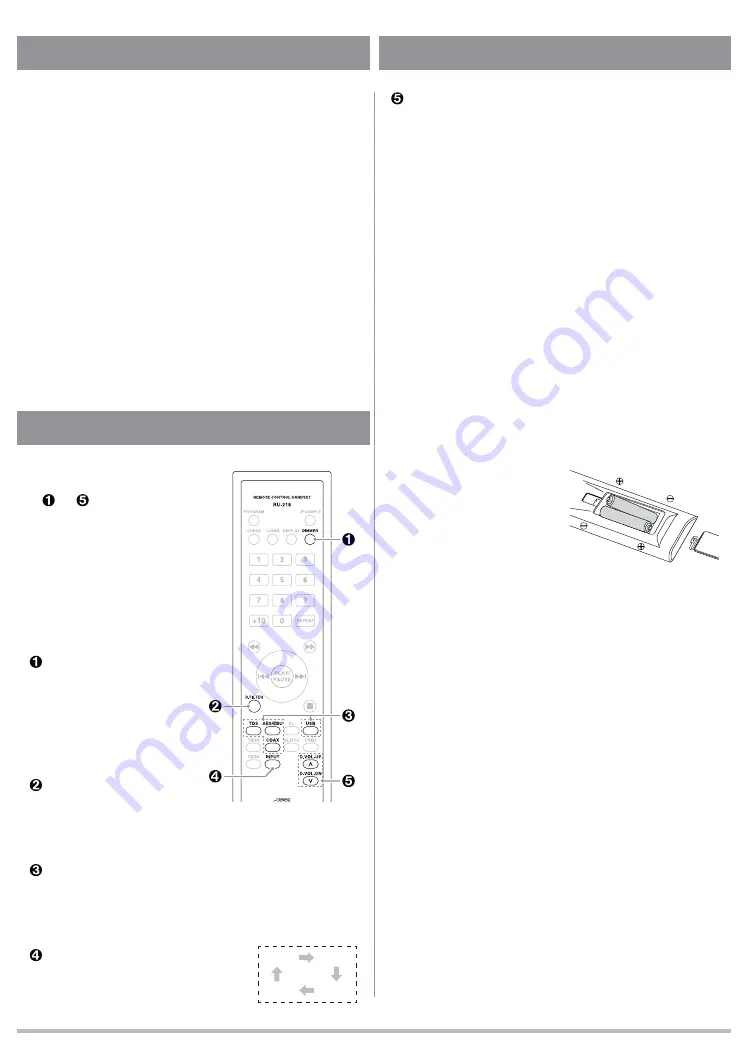
Buttons function

 to

 buttons work for 

DA5 and the others are 
compatible with the other 
C E C   p r o d u c t s   l i k e   C D 
Transport TL5, CD Player 
CD5, D/A Converter DA3N 
and so on. Here refers to 
DA5 function only.

DIMMER button

Press to change the 

display brightness in 
different 3 levels. Refer 
to "DIMMER" on page 11 
for details.

D.FILTER button

Press to select a digital 

filter type FLAT or PULSE. Refer to “Digital Filter” on 
page 11 for details.


Direct input selector buttons (TOS, AES/EBU, 

COAX, USB)

Press TOS, AES/EBU, COAX or USB to select an 

input directly.

INPUT button

Press to change the input in 

an order described right.

D.VOL-UP/DN button

Press D.VOL-UP button to increase or D.VOL-DN 

button to decrease the digital volume. Pressing and 
holding the button allows fast changes. Refer to "Digial 
Volume" on page 9 for details.

Precaution on handling the remote control 
unit

  When operating the remote control, point it towards the 

remote sensor on the front panel.

  Make sure nothing is blocking the front panel where 

the remote sensor is  lolocated.

  Avoid exposing the remote sensor on the front panel to 

direct sunlight or other light sources, as such exposure 
can cause malfunction.

  The remote control unit may malfunction when its 

batteries are running low. Change the batteries to new 
ones of the same type if this seems to be the case.

Battery Installation

Remove the cover of the 

battery compartment. Insert 
two AAA batteries into 
the compartment. Make 
sure that the batteries 
are inserted with their positive (+) and negative (-) poles 
positioned correctly, and put the cover back on.

Battery Replacement Period

If the distance at which the remote control unit can be 

used to operate DA5 seems to be decreasing, replace 
both batteries with new ones. 

Precaution on handling batteries

  Never use different types of batteries together. Both 

rechargeable and non-rechargeable batteries can be 
used, but the two should not be used together.

  If you will not be using the remote control unit for an 

extended period of time (more than a month), remove 
the batteries to prevent leakage.

  If the batteries leak, use a cloth to wipe away the 

liquid inside the battery compartment and replace the 
batteries with new ones.

  Do not heat or disassemble batteries, and never 

dispose of old batteries by throwing them in a fire. 
Dispose of batteries following laws in the local area.

USB

COAX

AES

TOS

Remote Control unit

Remote Control unit - continued -

Summary of Contents for DA5

Page 1: ...VERTER DA5 INPUT FILTER POWER HEADPHONE VOLUME Thank you for purchasing a DA5 Please read through and refer to this Owner s Manual to use your DA5 safely and adequately It is recommended to keep the p...

Page 2: ...U standard COAXIAL and optical TOSLINK to be connected with digital audio players like CD transport support the PCM signal up to 24bits 192kHz USB allows a PC music player to playback high resolution...

Page 3: ...does not fit your outlet consult an electrician for replacement of the obsolete outlet 10 Protect this appliance s power cord from being walked on or pinched especially around the plugs convenience r...

Page 4: ...ations surrounding temperature lower than 10 C may prevent this appliance from functioning adequately Damp locations exceeding 90 humidity may cause this appliance s metal parts to rust causing this a...

Page 5: ...TOS x 1 PCM up to 24bit 192kHz USB2 0 x 1 PCM up to 32bit 384kHz DSD up to 11 2896MHz DAC ESS ES9018K2M x 1 Digital filter FLAT or PULSE only FLAT during DSD playback Analog output digital variable B...

Page 6: ...freeware PC Music player foobar2000 for Windows up to DSD256 11 2896MHz files can be reproduced as well Those drivers are appeared at the download site in CEC home page Visit at www cec web co jp serv...

Page 7: ...jack Excessive sound pressure from the headphones may cause hearing loss to your ears VOLUME knob Turn clockwise to increase or counterclockwise to decrease the headphones volume For headphones listen...

Page 8: ...s Refer to Digial Volume on page 9 for details Precaution on handling the remote control unit When operating the remote control point it towards the remote sensor on the front panel Make sure nothing...

Page 9: ...for approx 5 seconds until the blinking of the volume level ends From the next time DA5 will be turned on at the last volume memorized DA5 has a digital volume function which changes the analog outpu...

Page 10: ...digital filter Note Connecting with a digital audio player which generates the signal for locking only under playback the sampling frequency indicator may show three bars during stopping or skipping E...

Page 11: ...better result may depend on the whole system as well as personal preferences Differences in ringing of FLAT and PULSE Wavy form of the digital signal passing through the circuit FLAT PULSE Digital Fi...

Page 12: ...all the devices probably due to interferences Hum noise Connect the RCA plugs completely Sound skipping Place the player on stable board Clean up the disc Interference on tuner Install DA5 away or tur...

Page 13: ...13 Memo...

Page 14: ...http www cec web co jp service download driver index_ex html Note It is not abnormal to see SECURITY WARNING upon downloading and or installation You may continue to download and or install according...

Page 15: ...r at ex desktop 1 2 Double click and open the saved da5_usb_win folder 1 3 Double click setup exe in the folder to start the installation 1 4 BRAVO HD install wizard will start Click Next to continue...

Page 16: ...io device property If not select DA5 as output device USB Driver Installation continued Ex Windows7 1 10 Starting a PC music after selecting the USB input on DA5 you can listen to the playback music t...

Page 17: ...2000 for Windows PC DSD64 2 8224MHz to DSD256 11 2896MHz files can be played through DA5 Before starting these steps install foobar2000 to your Windows PC which can be downloaded from http www foobar2...

Page 18: ...will finish soon and click Close to complete the installation Installation and Setup for DSD Playback continued 4 DSD Driver Installation on foobar2000 4 1 Double click foo_input_sacd fb2k component...

Page 19: ...D on the left side tree and select DSD at Output Mode Installation and Setup for DSD Playback continued 5 3 Click Playback Output ASIO on the left side tree and double click foo_dsd_asio listed at ASI...

Page 20: ...ion to the other than CEC DA5 HS USB Audio at Sound and Audio Device property at your PC refer to page 16 The volume control and or mute function can be operated by foobar 2000 DA5 and or amplifier Wh...

Page 21: ...he current setting and playback via foobar2000 ASIO output are displayed And click to change the bit rate and buffer size Note does not work on playback via other than ASIO BRAVO HD Control Panel cont...

Page 22: ...for output is less than the original Note By smaller buffer size setting against a higher resolution music file a continuous noise on music from the beginning pop noise or interruption may happen In t...

Page 23: ...t DSD Playback Method refer to page 19 the bit rate and buffer size during DSD playback are fixed at 32 bits and 10 0 ms Ex Displaying a DSD128 5 6MHz playback Ex Displaying a DSD256 11 2MHz playback...

Page 24: ...1708 B CEC Holdings Co Ltd Japan...

Reviews: