Noise emission
Refer to the table “Technical data” for the permissible noise leveling
free field conditions according to EN ISO 2151.
CAUTION
The sound level of the vacuum pump within a certain perimeter of
the pump is high.
Risk of hearing damage.
Users who are spending a longer period of time in the vicinity of a
non-insulated vacuum pump must wear suitable ear protection.
Safety area
Before any maintenance action, ensure a safety perimeter of a least
610 [mm] around the pump.
Electrical safety
Types of Electrical Work
The following are the four types of electrical work defined by the
SEMI S2, latest version, guideline:
Type 1
Equipment is fully deenergized.
Type 2
Equipment is energized. Energized circuits are covered or insulated.
NOTE
: Type 2 work includes tasks where the energized circuits are or
can be measured by placing probes through suitable openings in the
covers or insulators.
Type 3
Equipment is energized. Energized circuits are exposed and inadvertent
contact with uninsulated energized parts is possible. Potential exposure
s are no greater than 30 volts rms, 42.4 volts peak, 60 volts dc or 240
volt-amp in dry locations.
Type 4
Equipment is energized. Energized circuits are exposed and inadvertent
contact with uninsulated energized parts is possible. Potential
exposures are greater than 30 volts rms, 42.4 volts peak, 60 volts dc, or
240 volt-amp in dry locations. Potential exposures to
radio-frequency currents, whether induced or via contact, exceed the
limits in Table A5-1 of Appendix 5 (SEMI S2 guideline).
Lock Out/ Tag Out procedure (Type 1 of
electrical work)
Stop the pump with the LCD controller (press on STOP button
during 10s)
Press on emergency stop button
Switch off the main circuit breaker
Switch off the customer’s power supply
Switch off the water and nitrogen quick connections (inlet first,
then outlet)
Put the label or warning board “Maintenance processing” on or
next to the pump
Emergency off circuit description
The Emergency off circuit may be opened by pressing on emerge
ncy stop button. If this element occurs, then the DP and MB
pumps will immediately stop. The PLC will remain energized to
save the pump status.
If the emergency stop button was pressed, check the start up of
the pump then release this button to restart the pump. Press on
Start button on the LCD controller, the pump will restart.
Installation of the vacuum pump in a
seismic zone
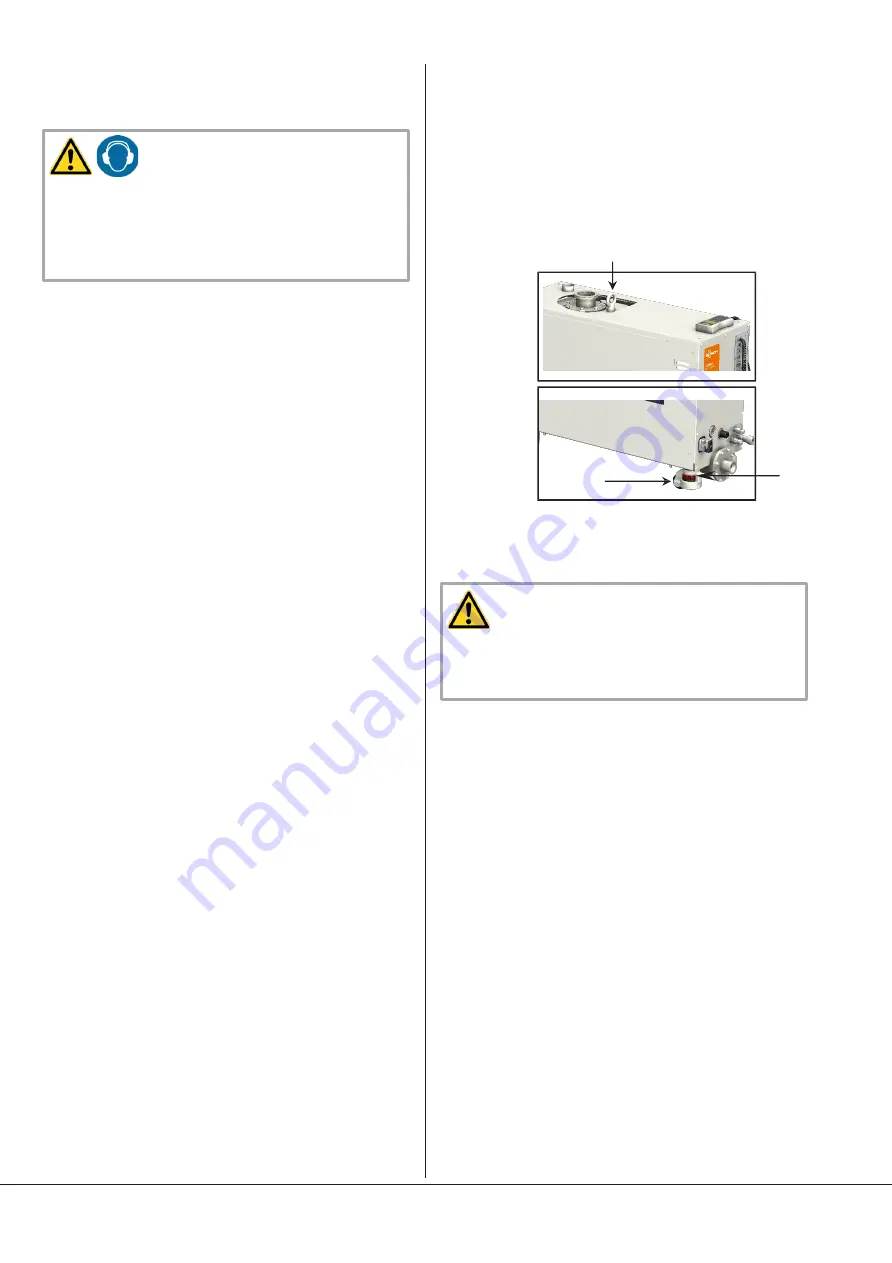
Upon receipt, the vacuum pump is fixed on the transport pallet with
two brackets.
Convey the pump to its final location with a pallet truck before
removing it from its support
Unscrew the fixing screws of the pump on the transport pallet and
remove the machine from its support with an appropriate lifting
system by using the lifting brackets made for this purpose
The pump must not lay only on the brackets. Unscrew the four
adjusting nuts until the machine legs touch the ground
Check that the wheels no longer touch the ground
CAUTION
The vacuum pump is fixed to the ground with four M10 screws, two
screws per bracket. The fixing screw must stand a 1200 N tensile force
(per bracket).
The final user must adapt the type of screws depending on the
ground material.
Information over the lubricants
Oil
Busch YLC 250 B, Art. No. 0831 131 400 (0,5 l
≅
1 kg)
Busch YLC 250 B)
Quantity BC 0601 G
:
–
WY 0700 D-MB: 1,4 l
–
NW 0090 A-DP: 0,12 l
Replacement: After 16'000 h (see Maintenance program)
Technical data sheet: Please refer to chapter "Oil type/ Quantity".
Decommissioning procedure
When the product arrives at the end of the lifetime, it is necessary to
proceed to the decontamination of the vacuum pump
Safety
Page 8
BC 0601 G
0870235875
(En)
Wheel
Adjusting nut
Lifting bracket
Summary of Contents for COBRA BC 0601 G
Page 22: ...Note ...
Page 23: ...Note ...


