www.bullard.com
6
Br
eathing T
ube A
ssembly / Climate Contr
ol De
vices
Installing Breathing Tube Assembly
in RT Series Respirator Hoods
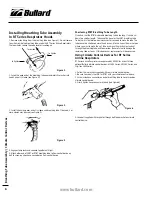
1. Remove nylon clamp from the breathing tube (see Figure 3). Do not remove
foam from inside the breathing tube, used with RT Series Airline Respirators.
The foam helps reduce the noise level of incoming air.
2. Insert the open end of the breathing tube approximately five inches into
hood’s air entry sleeve (see Figure 4).
3. Install nylon clamp over air entry sleeve and breathing tube. If desired, 2 or
more clamps may be used(see Figure 5).
4. Engage clamp locks and squeeze together until tight.
5. Attach other end of 20BT or RTBT breathing tube to flow control device on
belt by screwing nylon hose connector on flow control device.
Shortening RTBT Breathing Tube Length
If you find that the RTBT disposable breathing tube is too long, it can be cut
down to a shorter length. This cannot be done for the 20BT breathing tube.
To do this, first determine how much shorter you need to make the tube. The
tube cannot be shortened more than 6 inches. Mark a line with a marker pen
where you want to make the cut. Take a sharp cutting instrument and cut
through the breathing tube and foam inside. Be careful not to damage the
remaining tube or foam. If this does occur, replacement will be necessary.
Using Climate Control Devices for RT Series
Airline Respirators
RT Series Airline Respirators are approved by NIOSH for use with three
optional Bullard climate control devices: AC1000 Series, HC2400 Series, and
Frigitron 2000 Series.
1. Follow the instructions supplied with your climate control device.
2. Be sure to use only the 20BT or RTBT with your climate control device.
3. Screw nylon hose connector on end of breathing tube to hose thread on
climate control device.
4. Firmly tighten hose connector by hand (see Figure 6).
5. Lace belt supplied with respirator through belt loop bracket on climate
control device.
Figure 3
Figure 4
Figure 5
to remove
to tighten
to tighten
Figure 6

