background image

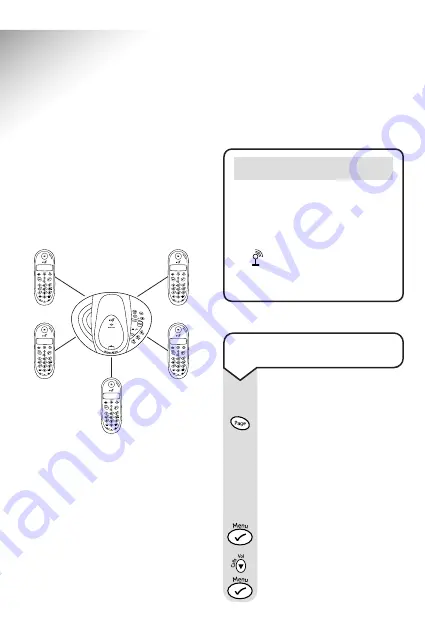
To register a handset to
another base

At the base:

Press 

and hold

the base

PAGE

button for at least

10 seconds, until you hear
the validation tone (two
beeps), then 

release

the

button.

At the handset:

Press the 

button to

enter the menu.

Use the 

DOWN

button 

to scroll to 

REGISTER

and

press the 

button.

52

Freelance XC 500  ~ 1st Edition ~ 6th March ’03 ~ 5165

Using additional handsets 
and bases

Up to 5 handsets can be
registered and operated from any
one Freelance XC 500 base. This
allows you to make internal calls
between two handsets while a
third is making an external call.

Each handset can be registered 
on up to 4 bases.

Each additional handset you
purchase must be registered with 
the base. (If you have purchased
the Twin, this will already be 
pre-registered.)

Your handset supplied is 
pre-registered as Handset 1 to its
base (

Base 1

).

Note

Remember to charge batteries 
of new handsets for at least 16
hours before use.

If the display shows 

NOT REG

and

the 

symbol is flashing, your

handset is not yet registered with

the base. 

Summary of Contents for Freelance XC 500

Page 1: ...lternative arrangements should be made for access to emergency services This product is intended for connection to analogue public switched telephone networks and private switchboards in the United Ki...

Page 2: ...Freelance XC 500 1st Edition 6th March 03 5165 Please open this page for an At a glance guide to your Freelance XC 500...

Page 3: ...Freelance XC 500 1st Edition 6th March 03 5165 Please open this page for a further At a glance guide to your Freelance XC 500...

Page 4: ...call button For use with a switchboard PBX and BT Calling Features Also used to switch the handset on or off Keypad Delete Secrecy button Use to delete digits entered incorrectly and numbers in the Ca...

Page 5: ...he handset is on the base Stop To stop message playback Skip forward Lets you skip forward through your messages and memos Also allows you to set the answer delay Allows you to select your Answer Only...

Page 6: ...eady Flashing EXT External line in use Incoming call INT Internal call Internal call from another handset New call in Calls list 3 way conversation in progress Battery exhausted Battery weak Battery h...

Page 7: ...Auto Del HS PIN Handset 1 5 Pin Code PIN New PIN Retype Priority On Off Select Base Handset 1 5 Dial Mode Tone Pulse Recall Recall 1 Recall 2 PABX PBX1 PIN PBX2 PIN Pause 3 Sec 5 Sec Default PIN Cont...

Page 8: ...On Off Name Language English Francais Deutsch Nederl Italiano Espanol Portuges Norsk Dansk Svenska Suomi Register Base 1 4 PIN Important If you make a mistake you can return to the previous menu headi...

Page 9: ...ssage display on the base station 33 Answer delay 34 Audible message alert 35 Outgoing messages 35 Using the Freelance XC 500 answering machine via the base unit 41 Call screening 43 Using the Freelan...

Page 10: ...ndset systems Please read the instructions carefully before use and retain this user guide for future reference Unpacking your Freelance XC 500 If anything is missing please contact your place of purc...

Page 11: ...t the Freelance XC 500 Helpline for all repairs Radio signals transmitted between the handset and base may cause interference to hearing aids It is recommended that advice from a qualified expert be s...

Page 12: ...We recommend that you unplug the power and telephone line cord for the duration of the storm Battery performance The charge capacity of rechargeable batteries will reduce with time as they wear out so...

Page 13: ...the power socket on your Freelance XC 500 base The green Power In Use light comes on 2 Plug the power supply adaptor into the wall socket Your Freelance XC 500 will announce the default settings of t...

Page 14: ...d the Freelance XC 500 Twin the additional handset will show HANDSET 2 4 Charge the handset batteries for at least 16 hours Before you use your Freelance XC 500 for the first time it is important to h...

Page 15: ...50 metres indoors This is in ideal conditions The range will be reduced when there is no clear line of sight between the base and the handset Thick stone walls can severely affect the range If you hav...

Page 16: ...e day and time Press the button The prompt will announce Please enter new day and time after the tone After the tone enter the day followed by the time using the 24 hour clock 1 Sun 2 Mon 3 Tues 4 Wed...

Page 17: ...47 Please see the table below for your Freelance XC 500 default settings Freelance XC 500 Default Settings Table Feature Default Setting Day Time Stamp Sunday 12 01 pm Answer Delay Your answering mach...

Page 18: ...call Press the TALK button You will hear the dial tone and the display will show the EXT symbol Enter the number you want Or Preparatory dialling Enter the number to be dialled The number is shown in...

Page 19: ...book will be displayed Press the TALK button to answer the call Or If the handset is on the base simply lift it up and speak To adjust the earpiece volume During a call You can adjust the earpiece vol...

Page 20: ...me and number Phonebook opposite Secrecy When on a call you can talk to someone in the same room without your caller hearing To switch secrecy on off During a call press the DEL button The display wil...

Page 21: ...NUMBER Enter the telephone number you want to store Press the button You will hear a confirmation beep Alternatively press the button to continue storing entries in the phonebook Press and hold the DE...

Page 22: ...t Press the DOWN button The display will show PHONEBK press the button Use the DOWN button to scroll to MODIFY and press the button Use the UP or DOWN button to find the name you want to edit Press th...

Page 23: ...button The display will show CONFIRM press the button You will hear a confirmation beep The number is now deleted Press and hold the DEL button to return to the idle screen To page a handset from the...

Page 24: ...ll hear a confirmation beep To adjust the handset ringer volume There are 5 levels to choose from 1 5 or you can turn the ringer off altogether Press the button to enter the menu Use the DOWN button t...

Page 25: ...the UP or DOWN button to select the required melody You will hear a sample melody Press the button to confirm the new melody You will hear a confirmation tone To switch auto talk on off When the hands...

Page 26: ...on the handset display You can choose from English Francais Deutsch Nederl Italiano Espanol Portuges Norsk Dansk Svenska Suomi Press the button to enter the menu Use the DOWN button to scroll to HAND...

Page 27: ...the required volume VOLUME 1 5 or VOL OFF You will hear a sample ring Press the button to confirm the new setting You will hear a confirmation beep To adjust the base ringer melody There are 5 melodi...

Page 28: ...l need to use your base station PIN for registering handsets and for some other optional settings Press the button to enter the menu Use the DOWN button to scroll to SETUP and press the button Use the...

Page 29: ...on tone at the base and handset The handset display will flash BASE 1 and then HANDSET 1 Your Freelance XC 500 is now reset to the factory settings See page 16 for default settings on the answering ma...

Page 30: ...number including the area code otherwise the name will not match the number stored in the phonebook Whether you take a call or not the caller s details are stored in the Calls list You can display scr...

Page 31: ...s will be displayed Press the button and the number will be displayed Press the button and the time of the call will be displayed Press the DEL button to go back to the Calls list To call back a numbe...

Page 32: ...eted from the Calls list When the number you want to delete is displayed press the button until DELETE is displayed Press the button again The number is now deleted from the Calls list To delete a num...

Page 33: ...coming messages you can record memos for other users You can operate your Freelance XC 500 from The base unit The handset Remotely from any external TouchtoneTM telephone Your Freelance XC 500 comes w...

Page 34: ...e memory A flashing Handset menu and Remote access in progress E flashing Error F flashing Memory full P flashing Message paused P 1 Alternating When selecting or playing Answer Record outgoing messag...

Page 35: ...is switched off The display on the base unit will flash between a dash and the number of messages saved in the memory To adjust the base unit loudspeaker volume The loudspeaker volume ranges from 0 9...

Page 36: ...the SKIP button The current setting will be announced and also shown on the base unit display Audible Message alert When new messages have been received your Freelance XC 500 will beep every 10 second...

Page 37: ...record your own Answer Only outgoing message if you wish see To record your own Answer Only outgoing message page 37 Note You can only record your own outgoing messages via the handset To record your...

Page 38: ...12 minutes but you should try to keep it short to allow time for recording memos or incoming messages when using the alternative Answer and Record outgoing message Your own outgoing message will repla...

Page 39: ...unit You can check and play back your current outgoing message at any time via your Freelance XC 500 base unit Press the ANSWER ON OFF button The prompt will announce either Answer on your outgoing me...

Page 40: ...ress and hold the ANSWER ON OFF button until you hear Please select outgoing message then release the button Either To set Answer and Record press and release the Skip button Or To set Answer Only pre...

Page 41: ...ill hear a short beep then the default pre recorded outgoing message will be played To delete your own outgoing message and re instate the pre recorded outgoing message via the handset Pick up the han...

Page 42: ...e received At the start of each message the number of the message is announced The message number will also be shown on the base unit display Note Press the STOP button at any time during playback to...

Page 43: ...ck Press the Skip button to return to the start of the current message Press again to return to the start of the previous message To delete an individual message Press the red DELETE button on the bas...

Page 44: ...reening You can let your answering machine pick up a call even if you are in This allows you to identify the caller and decide whether to take the call Make sure the volume on the base unit is set to...

Page 45: ...ssage and to screen incoming calls Note If you try to access the answering machine via the handset when the base unit is in use the handset display will flash TAM BUSY Accessing your messages from the...

Page 46: ...ing message menu To play Outgoing Message Press 2 To record Answer and Record Outgoing Message Press 3 To record Answer Only Outgoing Message Press 4 To select Answer and Record Outgoing Message Press...

Page 47: ...art of each message the number of the message is announced The message number will also be shown on the base unit display Press and hold the DEL button to return the handset to standby To play new mes...

Page 48: ...the 5 button during message playback to delete an individual message The prompt will announce Message deleted To delete all messages When all messages have been played the prompt will announce End of...

Page 49: ...to standby Call screening Call intercept You can let your answering machine pick up a call even if you are in This allows you to identify the caller and decide whether to take the call Make sure the...

Page 50: ...e DEL button to return to standby Note After 15 seconds the handset will automatically return to standby To change your security PIN code Press the button twice Press the 9 button To set a new securit...

Page 51: ...l hear Answer On and your answering machine will now be switched on to answer incoming calls Note If you have new messages they will be played after you have entered your security code You have 15 sec...

Page 52: ...nswering machine functions Simply follow the instructions as announced To play all messages press 2 To play new messages press 3 To skip back during messages press 4 To delete during messages press 5...

Page 53: ...egistered and operated from any one Freelance XC 500 base This allows you to make internal calls between two handsets while a third is making an external call Each handset can be registered on up to 4...

Page 54: ...digit PIN number is 0000 unless you have previously allocated a new PIN number as explained on page 49 Note Handsets can only be de registered via another handset 53 Freelance XC 500 1st Edition 6th M...

Page 55: ...To make an internal call to another handset Press the INT button Enter the number of the handset you wish to call 1 5 The handset will be called To end the call press the TALK button Transferring call...

Page 56: ...e DOWN button to scroll to the number of rings you require Press the button PRIORITY is displayed denoting that handset priority is on Press the button to confirm The display shows ON 55 Freelance XC...

Page 57: ...ing Check that The mains power cable is connected at the base and switched on You are in range of the base station The batteries are not low or flat You are connected to the correct base if you are us...

Page 58: ...is plugged into a working socket and that the socket is switched on You are using the correct power adaptor Freelance XC 500 base station power supply Item Code is 005391 Freelance XC 500 charger powe...

Page 59: ...of purchase is provided The equipment is returned to BT or its agent as instructed This guarantee does not cover the batteries and any faults or defects caused by accidents misuse fair wear and tear n...

Page 60: ...REN which is used to calculate the number of items which may be connected to any one telephone line Your Freelance XC 500 has a REN of 1 A total REN of 4 is allowed if the total REN of 4 is exceeded t...

Page 61: ...ation beep To automatically insert a pause after an access code With some switchboards it may be helpful to dial a pause after entering the switchboard access code e g 9 11 etc to enable you to get an...

Page 62: ...n also adjust the length of the pause to be inserted Press the button Use the DOWN button to scroll to SETUP Press the button Use the DOWN button to scroll to PABX Press the button Use the DOWN button...

Page 63: ...ial requirements for the Radio Equipment and Telecommunications Terminal Equipment Directive 1999 5 EC Declaration of Conformance Hereby Suncorp Technologies declares that this BT Freelance XC 500 is...

Page 64: ...ices and equipment are provided subject to British Telecommunications plc s respective standard conditions of contract Nothing in this publication forms any part of any contract British Telecommunicat...

Reviews: