- 9 -
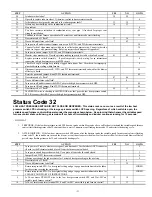
START HERE - If a problem exists, the service technician should always begin
troubleshooting here.
SPECIAL NOTE
: ALL VOLTMETERS ARE NOT THE SAME - YOUR VOLTAGE READINGS WILL VARY. THIS APPLIES TO THE
ENTIRE CONTENT OF THIS TROUBLESHOOTING MANUAL. THEY ARE NOT ABSOLUTE VALUES. CORRECT 115-VAC VOLTAGE,
CURRENT, AND POWER MEASUREMENTS CANNOT BE TAKEN ON VARIABLE SPEED FURNACES UNLESS USING A TRUE RMS
METER.
STEP ACTION YES
NO
GO
TO
1.
Remove main furnace door first. DO NOT REMOVE BLOWER ACCESS PANEL! Record
status of AMBER LED. See Service/Status Code Instructions.
Is AMBER LED status light on?
2 19
2.
Is the AMBER LED status light blinking rapidly without a pause?
3
4
3.
Go to the page number indicated in the Index for RAPID FLASHING LED.
INDEX
4.
Is the AMBER LED status light blinking ON/OFF slowly with a combination of short and
long flashes?
5 7
5.
Determine status code. The status code is a 2 digit number with the first digit determined by
the number of short flashes and the second digit by the number of long flashes.
6
6.
Go to page number indicated in the Index for the section covering the status code.
INDEX
7.
To retrieve previous codes, disconnect the User Interface ABCD connector (if used) or the R
thermostat lead (if used) from the furnace control board and wait for the blower to turn off if it
is running. Put setup switch SW1-1 in the ON position and record the status codes listed in the
status code history. The status codes will flash in the order of occurrence. Read status codes
until an 11 code flashes. After the 11 code flashes the status codes will repeat.
8
8.
Was there a previous status code other than code 11?
Note:
Status codes are erased after 72 hours or can be manually erased by putting setup switch
SW1-1 in the ON position and jumpering R, W/W1, and Y/Y2 simultaneously until status
code 11 is flashed.
9 10
9.
Go to page number indicated in the Index for the section covering the first previous status
code.
INDEX
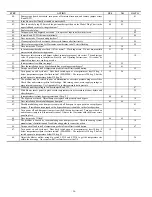
10.
Does the problem appear to be low cooling airflow?
11
12
11.
Go to page number indicated in Index for the section covering IMPROPER COOLING
AIRFLOW.
INDEX
12.
Set thermostat to call for heat and set the thermostat fan control to AUTO position if equipped.
13
13.
Does the furnace respond to the call for heat?
14
28
14.
Observe operation of furnace for 20 minutes or until AMBER LED status light starts blinking.
15
15.
Does the AMBER LED status light blink ON/OFF slowly with a combination of short and
long flashes?
5 16
16.
Is the temperature rise below the range specified on the rating plate when the unit is operating
in high heat?
Note:
If the temperature rise is above the range specified on the rating plate refer to the Start-
Up and Adjustment section in the Installation, Start-Up, and Operating Instructions.
17 18
17.
Go to page number indicated in Index for the section covering HIGH HEAT
TEMPERATURE RISE TOO LOW (COLD BLOW).
INDEX
18.
Go to page number indicated in Index for CLEANUP AND START-UP INSTRUCTIONS.
INDEX
19.
Make sure power is being supplied to the furnace.
20
20.
Check fuses, breakers, or manual disconnects to be sure they are correctly set. If not, reset
them and go back to step 1.
21
21.
Remove blower access panel and depress door switch. Use a piece of tape to hold switch
closed.
22
22.
Is 115-vac across L1 and L2?
24
23
23.
Turn power off. Check continuity of power leads and door switch. If necessary repair power
leads and/or replace door switch.
18
24.
Is 24-vac across SEC-1 and SEC-2?
25
26
25.
Replace the variable speed furnace control.
18


