
- 26 -
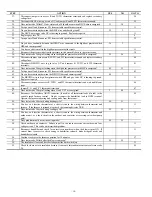
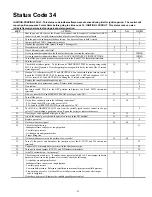
STEP ACTION YES
NO
GO
TO
32.
Clean flame sensor with fine sandpaper and make sure it is properly positioned then recheck
current. Current is typically 4.0 to 6.0 microamps.
33
33.
Is current near typical value?
35
34
34. Replace
electrode.
8
35.
Will main burners ignite and stay on?
8
13
36.
Do you have burner pulsation’s?
37
38
37.
Check the following:
- Make sure perforated disks are in combustion-air vent inlet.
- Pressure tubing going to gas valve air pressure fitting for kinks.
- Remove gas valve air pressure fitting and check gas valve for blockage.
- Ensure vent and combustion-air pipes are not reversed.
- Burner orifice size and alignment.
- Inadequate flame carryover.
- Add restriction to combustion-air pipe or lengthen a few feet if possible.
8
38.
While the unit is operating in low heat jumper R and W2.
39
39.
Do you have burner pulsation’s in high heat?
37
8
40.
Turn off the power and disconnect the jumper across the R and W/W1 thermostat terminals.
41
41.
Turn power on and jumper R, W/W1, and W2 thermostat terminals.
42
42.
Do the main burners ignite?
43
25
43.
Do the main burners stay on longer than a few seconds?
44
27
44.
Do you have burner pulsation’s?
37
45
45.
Disconnect jumper from R and W2.
46
46.
Do the main burners remain ON?
47
48
47.
Furnace will operate at low-heat but will not ignite on low-heat. Check the following:
- Inadequate flame carryover.
- Low manifold pressure. Reference installation instructions for proper low-heat manifold
pressure.
- Slow opening gas valve. Gas should flow at full pressure within 4 seconds after the gas
valve is energized.
- Flame sensor location.
- Air leakage around igniter bracket.
8
48.
Furnace will not operate or ignite on low-heat. Check the following:
- Flame sensor location.
- Very low manifold pressure.
Reference installation instructions for proper low-heat manifold pressure. Turn low-heat
regulator adjustment clockwise 1/4 turn. Repeat until furnace will operate in low-heat. Then
set to the proper manifold pressure. Re-orifice if necessary.
8
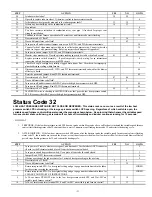
Status Code 41
BLOWER MOTOR FAULT - This status code indicates the blower failed to reach 250 RPM or the blower failed to communicate
to the variable speed furnace control within 30 seconds after being turned ON or within 10 seconds during steady-state
operation.
STEP ACTION YES
NO
GO
TO
1.
Shut the power off, remove the blower access panel and disconnect User Interface ABCD
connector (if used) or the R thermostat lead (if used) from the furnace control board.
2
2.
Turn the power on and depress the door switch. Use a piece of tape to hold it closed.
3
3.
Jumper the R and W/W1 thermostat terminals.
4
4.
Observe the operation of the furnace for the next 5 minutes or until fault occurs.
5
5.
Does status code 41 flash?
9
6
6.
Does a different status code flash?
7
8
7.
Go to page number indicated in the Index for the section covering the status code.
INDEX
8.
Go to page number Indicated in Index for CLEANUP AND START-UP INSTRUCTIONS. INDEX
9.
Did the blower motor turn ON and come up to speed before status code flashes?
35
10
10.
Remove tape from door switch and turn power off at main disconnect.
11
11.
Does the blower wheel rub against blower housing?
12
13
12.
Fix the problem.
8
13.
Does the blower wheel turn freely?
14
15
14.
Is blower wheel firmly mounted on motor shaft?
16
12















![Roberts Gorden Combat UHD[S] 150-400 Specifications preview](http://thumbs.mh-extra.com/thumbs/roberts-gorden/combat-uhd-s-150-400/combat-uhd-s-150-400_specifications_1469644-1.webp)


