background image

 35

Insta

llin

g the


so

ft

w

are

Installing P-touch Quick 
Editor only

Install P-touch Quick Editor to design labels 
using simple operations.

1

Start the personal computer, and then 
insert the CD-ROM into the CD-ROM 
drive.

The Brother Setup dialog box 
appears.

• It may take a short time until the 

Brother Setup dialog box appears.

• If the Brother Setup dialog box does not 

appear, double-click the My Computer 
icon, and then double-click the P-touch 
icon.

2

Click the button for Advanced setup.

The dialog box to select the software 
to install appears.

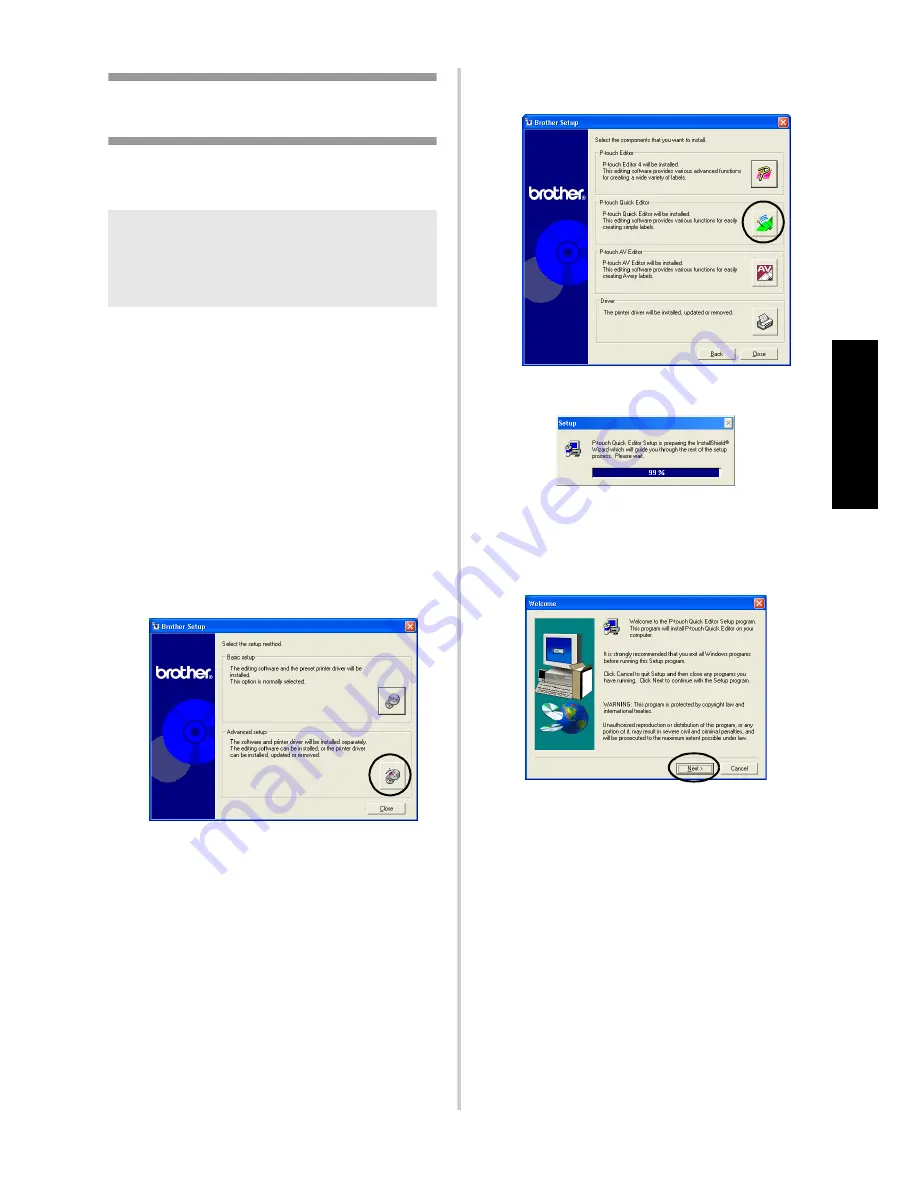
3

Click the button for P-touch Quick 
Editor.

The installation preparation begins.

When the preparation is complete, 
the Welcome dialog box appears.

4

Read the contents, and then click [Next].

The User Information dialog box 
appears.

Note

P-touch Quick Editor cannot be used 
with computers running Windows

®

 95/

NT 4.0.

Summary of Contents for PT-9500PC - P-Touch 9500pc B/W Thermal Transfer Printer

Page 1: ...Quick Reference Referencia rápida ...

Page 2: ... designed to provide reasonable protection against harmful interference in a residential installation This equipment generates uses and can radiate radio frequency energy and if not installed and used in accordance with the instructions may cause harmful interference to radio communications However there is no guarantee that interference will not occur in a particular installation If this equipmen...

Page 3: ...Accessory Items that expired in accordance with a rated life and 5 Problems arising from other than defects in materials or workmanship This limited warranty is VOID if this Product has been altered or modified in any way including but not limited to attempted warranty repair without authorization from Brother and or alteration removal of the serial number What to do if you think your Product is e...

Page 4: ... do not return your original Product to Brother within five 5 business days ii the problems of your original Product are not covered by the limited warranty iii the proper packaging instructions are not followed and has caused damage to the product or iv the warranty period on your original Product has expired or has not been sufficiently validated with a copy of the proof of purchase bill of sale...

Page 5: ...e record your model and serial number and your date and location of Purchase below for your records Keep this information with your proof of purchase bill of sale in case your Product requires service Model Serial Date of purchase Store where purchased Location of store Important We recommend that you keep all original packing materials in the event you ship this product Save Time Register On Line...

Page 6: ...uick Reference this manual Software help files CD ROM User s Guide For preparation and operation of the PT 9500PC and soft ware installation Not Available Not Available Using P touch Editor Version 4 0 for Windows Not Available Using P touch Editor Version 3 2 for Macintosh Using P touch Quick Editor Not Available Using P touch AV Editor Not Available ...

Page 7: ...not touch directly with your hands Use only the interface cables USB interface cable serial interface cable included with the PT 9500PC Use only genuine Brother accessories and supplies Do not use any unauthorized accessories or supplies AC adapter Use only the AC adapter included with the PT 9500PC If the PT 9500PC will not be used for an extended period remove the power supply cord from the elec...

Page 8: ...gh or extremely low temperatures Do not put heavy objects on the CD ROM or apply force to the CD ROM Regarding software use The software contained on the CD ROM is meant for use with the PT 9500PC only It may be installed on multiple personal computers for use at an office etc ...

Page 9: ...lling using basic setup 28 Installing P touch Editor only 34 Installing P touch Quick Editor only 35 Installing P touch AV Editor only 37 Installing the printer driver only 39 Setting the personal computer and PT 9500PC baud rate 45 Uninstalling the software 48 Printer is no longer used 49 Using Mac OS 8 6 9 x 51 Installing P touch Editor and the printer driver 51 Installing P touch Quick Editor a...

Page 10: ...els Macintosh version 93 Creating labels 94 Creating labels using P touch Editor 95 Starting P touch Editor 95 Layout window 96 Creating a name badge 97 Label printing 98 Using the CD ROM User s Guide 101 Creating labels using P touch Quick Editor 103 Starting P touch Quick Editor 103 Using P touch Quick Editor 103 After printing 104 5 Appendix 105 Creating bar code labels 106 Bar code summary 106...

Page 11: ...10 Accessories For USA Only 118 Index 122 Contact Information For USA Only 124 ...

Page 12: ...on that should be confirmed before using the PT 9500PC Confirming the included accessories 12 PT 9500PC terms 14 Preparations before creating labels 16 Connecting the PT 9500PC 17 Installing the tape cassette 22 Installing the collection tray 24 ...

Page 13: ...lectrical outlet AC 120 V USB interface cable Use this cable to connect the PT 9500PC to the USB port of a personal computer Serial interface cable Use this cable to connect the PT 9500PC to the serial port of a personal computer Tape cassette This cassette contains the tape for the labels Label stick Use when the backing of a printed label is difficult to remove The label stick is installed insid...

Page 14: ...nce this manual Keep for future reference CD ROM The CD ROM contains software etc to install on a personal computer Tape catalog This catalog contains a list of tape cassettes designed exclusively for the P touch series printers ...

Page 15: ...ust will collect on the print head Always close the cover Note The USB ID switch is usually set to 2 For details refer to Changing the USB ID mode P 108 Tape compartment cover Label outlet Collection tray support Cover release button ERROR lamp Power button including lamp Feed cut button USB ID switch USB port AC adapter jack Serial port ...

Page 16: ...g No tape cassette Incorrect tape cassette Install the correct tape cassette and close the tape compartment cover During printing Tape compartment cover is open Close the cover Empty tape cassette Install a tape cassette containing tape and close the tape compartment cover Transmission error The PT 9500PC will return to standby after 5 seconds Lit Flashing fast Cutter error Confirm that the tape i...

Page 17: ...he software P 25 Installing the software Install the printer driver to use the PT 9500PC as a printer with the personal computer and install the label design software For details refer to Installing the software P 25 Connecting the PT 9500PC Connect the PT 9500PC to the power source and a personal computer For details refer to Connecting the PT 9500PC P 17 Creating labels After preparing the PT 95...

Page 18: ...ck on the back of the PT 9500PC 3 Plug the power supply cord into an electrical outlet AC 120 V Note After using the PT 9500PC remover the power supply cord from the electrical outlet and the AC adapter from the PT 9500PC and store for future use When removing the AC adapter do not pull the AC adapter cord The wire in the AC adapter cord may break Do not use any AC adapter other than the one inclu...

Page 19: ...e same time The PT 9500PC may malfunction Note Do not connect the USB interface cable to a personal computer until the software has been installed If the USB interface cable is connected to a personal computer before the software is installed the following dialog box will appear Click Cancel and then remove the USB interface cable Windows 95 NT4 0 Windows 98 98 SE Me 2000 Pro XP Mac OS 8 6 9 x Mac...

Page 20: ...The USB interface cable is connected to a personal computer running Windows while the software is being installed and is connected to a Macintosh after the software has been installed Do not connect the PT 9500PC to a personal computer until instructed to do so Note When making a USB connection through a hub a proper connection may not be possible due to the type of hub used If this occurs connect...

Page 21: ...er The location and shape of the serial port varies according to the personal computer For details refer to the instruction manual for the personal computer Note When the USB interface cable is connected to the PT 9500PC the serial port cannot be used for communication Remove the USB interface cable from the PT 9500PC When connecting the PT 9500PC to a personal computer using a serial connection c...

Page 22: ...he power button on the PT 9500PC The power button will light green 6 Turn on the computer Note To use the PT 9500PC the software must be installed on the personal computer Proceed to Installing the software P 25 Power button ...

Page 23: ...Laminated Tape Extra Strength Adhesive Tape Laminated Flexible ID tape Laminated Tamper Evident Tape Laminated Fabric Iron On Tape Non Laminated AV Labels Installing the tape cassette This section explains the procedures to install the tape cassette 1 Remove the stopper on the tape cassette Note that some tape cassettes may not have stoppers 2 Press the cover release button and open the tape compa...

Page 24: ...tte is not installed correctly the ERROR lamp will light In this case repeat the procedure from step 2 7 Press the feed cut button Remove the tape slack Tape guides End of the tape Note If no additional operation is performed within 10 minutes after printing a label the roller holder will automatically release and a sound may be produced Due to this function the tape cannot be removed if the AC ad...

Page 25: ...9500PC Use the collection tray when printing a lot of labels etc 1 Assemble the collection tray Refer to the illustrations below to assemble the collection tray 2 Open the collection tray support 3 Install the collection tray to the PT 9500PC Refer to the illustrations below to install the collection tray Collection tray support ...

Page 26: ...ing the software This chapter contains the procedures to install the necessary software to operate the PT 9500PC Types of software used 26 Using Windows 27 Using Mac OS 8 6 9 x 51 Using Mac OS X 10 1 or later 58 ...

Page 27: ...al connection cannot be used Software P touch Quick Editor P touch AV Editor P touch Editor Printer driver OS Software to print labels using simple operations Software to format text for AV labels Software to create labels with various designs Software to enable the personal computer to use the PT 9500PC as a printer Microsoft Windows 98 Microsoft Windosw 98 SE Microsoft Windows Me Microsoft Windo...

Page 28: ...uick Editor P touch AV Editor installation P touch Editor installation Select connection method Windows 95 NT 4 0 is not supported USB interface cable Serial connection Network connection When using PS 9000 PT 9500PC is connected to the personal computer during installation Printer driver installation for USB connection Printer driver installation for serial connection Printer driver installation ...

Page 29: ...puter administrator authority Installing using basic setup To enable the personal computer to use the PT 9500PC install P touch Editor 4 0 to design labels and the printer driver software Install P touch Editor and then install the printer driver 1 Start the personal computer and then insert the CD ROM into the CD ROM drive The Brother Setup dialog box appears It may take a short time until the Br...

Page 30: ...reparation begins If P touch Quick Editor is selected refer to steps 3 8 in Installing P touch Quick Editor only P 35 Then proceed to step a P 31 If P touch AV Editor is selected refer to steps 3 8 in Installing P touch AV Editor only P 37 Then proceed to step a P 31 When the preparation is complete the InstallShield Wizard dialog box appears with the message Welcome to the InstallShield Wizard fo...

Page 31: ...x appears 7 Select the destination folder where the files will be installed and then click Next To select another destination folder click Browse The Setup Type dialog box appears 8 Select the type of setup you prefer and then click Next The following items will be installed Typical P touch Editor P touch Library Western language fonts Symbol fonts Help Clip Art Auto Format Templates and Layout st...

Page 32: ...then click Next If P touch Quick Editor was selected in step 3 the following Question dialog box appears Click Yes If P touch AV Editor was selected in step 3 the following Question dialog box appears Click Yes When connecting to a personal computer running Windows 95 NT 4 0 proceed to step 5 in the Connecting to a serial port section of Installing the printer driver only P 41 The Confirmation dia...

Page 33: ...l computer P 18 When connecting to a personal computer running Windows 98 98 SE Me 2000 Pro proceed to step h P 33 If the personal computer detects that the PT 9500PC is connected The Found New Hardware Wizard dialog box appears e Select Install the software automatically Recommended and then click Next The necessary programs will be detected The Hardware Installation dialog box appears f Click Co...

Page 34: ...r only P 36 If P touch AV Editor was selected in step 3 refer to steps 9 0 in Installing P touch AV Editor only P 39 The User Registration dialog box appears i Select Yes display the page and then click Next When the P touch Editor installation is complete the InstallShield Wizard Complete dialog box appears j Click Finish Installation is complete When installing P touch Quick Editor proceed to In...

Page 35: ...ck the button for Advanced setup The dialog box to select the software to install appears 3 Click the button for P touch Editor 4 Follow the instructions on each dialog box and start installation Refer to steps 4 0 in Installing using basic setup P 29 The User Registration dialog box appears 5 Select Yes display the page and then click Next The InstallShield Wizard Complete dialog box appears 6 Cl...

Page 36: ...f the Brother Setup dialog box does not appear double click the My Computer icon and then double click the P touch icon 2 Click the button for Advanced setup The dialog box to select the software to install appears 3 Click the button for P touch Quick Editor The installation preparation begins When the preparation is complete the Welcome dialog box appears 4 Read the contents and then click Next T...

Page 37: ...on Location dialog box appears 7 Select the destination folder where the files will be installed and then click Next To select another destination folder click Browse The Setup dialog box appears and installation begins During installation the Add shortcut dialog box appears 8 Specify where to add shortcuts for P touch Quick Editor and then click Next To add no shortcuts clear all of the check box...

Page 38: ...Start the personal computer and then insert the CD ROM into the CD ROM drive The Brother Setup dialog box appears It may take a short time until the Brother Setup dialog box appears If the Brother Setup dialog box does not appear double click the My Computer icon and then double click the P touch icon 2 Click the button for Advanced setup The dialog box to select the software to install appears No...

Page 39: ...and then click Next The Registration Confirmation dialog box appears 6 Confirm that the name and company name are correct and then click Yes To correct the registration information click No The Choose Destination Location dialog box appears 7 Select the destination folder where the files will be installed and then click Next To select another destination folder click Browse The Setup dialog box ap...

Page 40: ...ersonal computer will restart Installing the printer driver only When installing the printer driver only follow the following steps Connecting to a USB port 1 Start the personal computer and then insert the CD ROM into the CD ROM drive The Brother Setup dialog box appears It may take a short time until the Brother Setup dialog box appears If the Brother Setup dialog box does not appear double clic...

Page 41: ...nd the personal computer will restart Connecting to a serial port 1 Start the personal computer and then insert the CD ROM into the CD ROM drive The Brother Setup dialog box appears It may take a short time until the Brother Setup dialog box appears If the Brother Setup dialog box does not appear double click the My Computer icon and then double click the P touch icon 2 Click the button for Advanc...

Page 42: ... appears 5 Select Install and then click Next The dialog box to select the port that the PT 9500PC will be to connected to appears 6 Select the port that the PT 9500PC will be connected to and then click Next The dialog box to confirm the installation information appears 7 Confirm that the driver and port are correct and then click Next To correct the installation information click Back Installati...

Page 43: ...bps for the serial port baud rate using a personal computer that supports a baud rate of 115 200 bps If the personal computer does not support a serial port baud rate of 115 200 bps select the appropriate baud rate A dialog box to confirm the baud rate settings appears a Click Next The baud rate will be set When the baud rate settings are complete the PT 9500PC and personal computer can communicat...

Page 44: ... PS 9000 print server the PT 9500PC can be used as a network printer This function can only be used in a Windows environment Note When the USB interface cable is connected to the PT 9500PC the serial port cannot be used for communication Remove the USB interface cable from the PT 9500PC When using a personal computer that does not support a serial port baud rate of 115 200 bps change the PT 9500PC...

Page 45: ...ouble click the My Computer icon and then double click the P touch icon 2 Click the button for Advanced setup The dialog box to select the software to install appears 3 Click the button for Driver The Driver Setup dialog box appears 4 Select Network Connection and then click OK The Driver Setup Brother PT 9500PC dialog box to indicate setup will begin appears 5 Select Install and then click Next 6...

Page 46: ...the PS 9000 print server Setting the personal computer and PT 9500PC baud rate Follow the following steps to change or confirm the baud rate for the personal computer and the PT 9500PC The following procedure is shown based on Windows XP 1 On the taskbar click the Start button and then click Control Panel Control Panel appears For Windows 95 98 98SE Me NT 4 0 2000 Pro On the taskbar click the Star...

Page 47: ...ties The Brother PT 9500PC Properties sheet appears 5 Click the Device Setting tab For Windows 95 98 98 SE Me click the Advanced tab The Device Setting window appears 6 Click Utilities and then click Properties that appears next to Utilities For Windows 95 98 98 SE Me click Utilities The Brother PT 9500PC Utility dialog box appears ...

Page 48: ...Brother PT 9500PC Properties sheet appears again 0 Click OK Setup is complete and the Brother PT 9500PC Properties sheet will close Note When using a personal computer that does not support a serial port baud rate of 115 200 bps change the PT 9500PC baud rate to 9 600 bps For details refer to Changing the baud rate P 109 ...

Page 49: ... click the Start button point to Settings click Control Panel and then double click the Add Remove Programs icon 2 Select Brother P touch Editor Version 4 0 P touch Quick Editor or P touch AV Editor For Windows 95 98 98SE Me NT 4 0 Select Brother P touch Editor Version 4 0 or P touch Quick Editor from the list in the Add Remove Programs Properties sheet 3 Click Change Remove The Confirm File Delet...

Page 50: ...Brother Setup dialog box appears It may take a short time until the Brother Setup dialog box appears If the Brother Setup dialog box does not appear double click the My Computer icon and then double click the P touch icon 3 Click the button for Advanced setup The dialog box to select the software to install appears 4 Click the button for Driver The Driver Setup dialog box appears 5 Click OK The Co...

Page 51: ...ing Windows 2000 Pro XP and changing to a PT 9500PC with a different serial number If Add Brother PT 9500PC is selected a new printer driver is added Select this option when connecting and using multiple PT 9500PCs with the same personal computer For Windows 98 98 SE Me only a new port is added without adding it as a new printer 8 Click Yes Deletion of the printer driver begins The dialog box to i...

Page 52: ...lick the Mac OS 9 folder The Mac OS 9 window appears 3 Double click the P touch Editor 3 2 folder The P touch Editor 3 2 window appears 4 Double click the P touch Editor 3 2 Installer icon The Installer starts 5 Confirm the drive to install the software to and then click Install To change the drive click Drive Clicking Custom Install displays a dialog box that allows you to select which options to...

Page 53: ...cintosh will restart 8 After the Macintosh restarts connect the PT 9500PC to the Macintosh with the USB interface cable and then turn on the PT 9500PC For details refer to Connecting to a personal computer P 18 Proceed to Selecting the printer P 56 Program Description P touch Editor 3 2 P touch Editor software PT 9500PC Driver Printer driver for the PT 9500PC Fonts 13 typefaces Can install fonts f...

Page 54: ...splays a dialog box that allows you to select which options to install Only the options with a check mark beside them are installed Clear the check marks from the programs you do not want to install The programs that can be installed are listed below If custom installation is not selected all of the programs will be installed Approximately 20 MB of available hard disk space is required Note Do not...

Page 55: ...ng the printer P 56 Installing the printer driver only Install only the necessary printer driver to use the PT 9500PC as a printer 1 Start the Macintosh and then insert the CD ROM into the CD ROM drive The P touch window appears 2 Double click the Mac OS 9 folder The Mac OS 9 window appears 3 Double click the P touch Editor 3 2 folder The P touch Editor 3 2 window appears Note Do not connect the U...

Page 56: ...he check boxes for all of the printer drivers except for PT 9500PC Driver 7 Click Install Installation begins When installation is complete the message Installation is done appears 8 Click Quit 9 Click Restart Installation of the printer driver is complete and the Macintosh will restart 0 After the Macintosh restarts connect the PT 9500PC to the Macintosh with the USB interface cable and then turn...

Page 57: ... steps to uninstall the software Uninstalling P touch Editor 1 Double click the drive where P touch Editor is installed 2 Delete the P touch Editor 3 2 folder 3 Double click the drive where the Macintosh operating system is installed 4 In the System Folder open the Preferences folder and delete P touch Editor 3 2 Prefs Uninstalling P touch Quick Editor 1 Double click the drive where P touch Quick ...

Page 58: ...d to the PT 9500PC from the Macintosh USB port 2 Double click the drive where the Macintosh operating system is installed 3 In the System Folder open the Extensions folder and delete PT 9500PC and USB PT 9500PC Extension 4 In the System Folder open the Preferences folder and delete PT 9500PC Prefs ...

Page 59: ...art the Macintosh and then insert the CD ROM into the CD ROM drive The P touch CD ROM icon appears 2 Double click the P touch icon The P touch window appears 3 Double click the Mac OS X folder The Mac OS X window appears 4 Double click the P touch Editor 3 2 folder The P touch Editor 3 2 window appears Note When installing the software log on using a user name with administrator authority For Mac ...

Page 60: ...f the programs will be installed Approximately 100 MB of available hard disk space is required Minimal Only P touch Editor will be installed Approximately 20 MB of available hard disk space is required Custom You can select the programs to install The Choose Alias Folder dialog box appears Program Description P touch Editor 3 2 P touch Editor software Fonts 13 typefaces Can install fonts for Engli...

Page 61: ...nstallation continues the alias will not be created in the Dock and the Dock icon may return to Preferences The Pre Installation Summary dialog box appears 0 Click Install Installation begins When installation is complete the Install Complete dialog box appears a Click Done Installation of P touch Editor is complete Proceed to Installing the printer driver P 63 ...

Page 62: ...ick the P touch Quick Editor folder The P touch Quick Editor window appears 5 Double click the Quick Editor Installer icon The Installer starts 6 Click Next The Important Information dialog box appears Note When installing the software log on using a user name with administrator authority For Mac OS X 10 1 operation of the P touch Editor Installer may be slow When installing or uninstalling the so...

Page 63: ...ock is clicked and installation continues the alias will not be created in the Dock and the Dock icon will return to the initial settings The Pre Installation Summary dialog box appears 9 Click install Installation begins When installation is complete the Install Complete dialog box appears 0 Click Done Installation of P touch Quick Editor is complete Proceed to Installing the printer driver P 63 ...

Page 64: ...e administrator appears 3 Type the name and password of the administrator and then click OK The Welcome to the PT 9500PC Driver Installer dialog box appears 4 Click Continue The necessary operating environment for installation is displayed Note Do not connect the USB interface cable to the Macintosh until the printer driver has been installed and the Macintosh has been restarted If the USB interfa...

Page 65: ...nd then click Continue The dialog box to confirm the license agreement appears 7 To continue with installation click Agree The Select a Destination dialog box appears 8 Select the drive to install the printer driver to and then click Continue Select the drive where Mac OS X is installed The Easy Install dialog box appears ...

Page 66: ...gins When installation is complete the message Software was installed correctly appears a Click Restart Installation of the printer driver is complete and the Macintosh will restart b After the Macintosh restarts connect the PT 9500PC to the Macintosh with the USB interface cable and then turn on the PT 9500PC For details refer to Connecting to a personal computer P 18 ...

Page 67: ...s window appears 4 Double click the Print Center icon No printers available to select The message You have no printers available appears Proceed to step 5 Printers available to select The names of available printers are displayed in the Printer List dialog box Proceed to step 6 PT 9500PC is already registered PT 9500PC appears in the Printer List Proceed to step 8 5 Click Add The Printer List dial...

Page 68: ... printer Proceed to Creating labels Macintosh version P 93 Uninstalling the software If the PT 9500PC will no longer be used with the Macintosh follow the following steps to uninstall the software Uninstalling P touch Editor 1 Double click the Applications folder in the drive where Mac OS X is installed The Applications window appears 2 Double click the P touch Editor 3 2 folder The P touch Editor...

Page 69: ... InstallAnywhere Uninstaller starts 5 Click Uninstall The software is deleted When uninstallation is complete the Uninstall Complete dialog box appears 6 Click Quit 7 Double click the Preferences folder in Macintosh HD Users User Name Library Preferences 8 Delete P touch Editor 3 2 Prefs and P touch Editor 3 2 plist P touch Editor is deleted ...

Page 70: ...s 2 Double click the P touch Quick Editor folder The P touch Quick Editor window appears 3 Double click the Uninstall Quick Editor folder The Uninstall Quick Editor window appears 4 Double click Uninstall Quick Editor The InstallAnywhere Uninstaller starts 5 Click Uninstall The software is deleted When uninstallation is complete the Uninstall Complete dialog box appears ...

Page 71: ...interface cable connected to the PT 9500PC from the Macintosh USB port 2 Double click the Applications folder in the drive where Mac OS X is installed The Applications window appears 3 Double click the Utilities folder The Utilities window appears 4 Double click the Print Center icon The Printer List dialog box appears 5 Select PT 9500PC and then click Delete The printer is deleted 6 Close the Pri...

Page 72: ... chapter contains the procedures to design and print labels using Windows Creating labels 72 Creating labels using P touch Editor 73 Creating labels using P touch Quick Editor 81 Creating labels using P touch AV Editor 86 After printing 91 ...

Page 73: ...loading the software on the computer you can start creating labels Designing printing labels Proceed to Creating labels using P touch Editor P 73 Printing labels simply Proceed to Creating labels using P touch Quick Editor P 81 ...

Page 74: ...log box to select the layout appears For Windows 95 98 98 SE Me NT 4 0 2000 Pro On the taskbar click the Start button point to Programs point to P touch Editor 4 0 and then click P touch Editor The dialog box to select the layout appears Note This chapter contains an outline of P touch Editor Details on using P touch Editor are contained in the on line help menu Refer to Using Help P 78 The exampl...

Page 75: ...perty box for setting the font layout etc Click the button again to close the property box Print properties Set the label printing method printer and number of copies Page properties Set the label size margins and orientation Text properties Set the font font size text alignment and spacing and line spacing Layout properties Set the graphic or text alignment and rotation Draw toolbar Tools for dra...

Page 76: ...p a bar code Decorative Frame Add a decorative frame Table Create a table Image Retrieve a saved image Screen Capture Capture an image from the desktop and add it to the label Clip Art Retries various graphics Symbol Retrieve various symbols Make Picture Assemble different elements to create an illustration Date and Time Display the date time on the label Calendar Display a part of a calendar on t...

Page 77: ...text is c entered 7 Click in the object dock The Frame Property dialog box appears 8 Select the Category and Style In this example Simple is selected for Category and a rounded rectangular frame thin line is selected for Style 9 Click OK The label layout will be 0 If the print properties box is not displayed click in the property dock The print properties box appears a Click in the print propertie...

Page 78: ...tting the backing making it easier to remove the label backing Chain Printing The printed label will remain in the printer without being ejected until the next label is printed Extra space is not inserted between the labels To discharge the label press the feed cut button Mirror Printing A mirror image of the data is printed When using clear tape this is very convenient for affixing to the inner g...

Page 79: ...point to P touch Editor 4 0 and then click P touch Editor P touch Editor 4 0 starts and the dialog box to select the layout appears 2 Select one of the layouts and then click OK To display Help any layout method can be selected 3 From the Help file on the menu bar select P touch Editor Help The P touch Editor4 Help window appears Toolbar Toolbar buttons to operate Help Topics Explanation appears f...

Page 80: ...ts tab click Description of operations 3 Click on the toolbar The Print Topics dialog box appears 4 Select the contents to print Printing the selected topic Select Print the selected topic Printing the selected heading and all subtopics or the entire help file Select Print the selected heading and all subtopics 5 Click OK The Print dialog box appears 6 Select the printer to print to in the Select ...

Page 81: ...erting clip art illustrations Combining multiple labels using the Sheet function Printing using the numbering con secutive num bers function Specifying a numbering field and printing Creating tables Inserting a table Combining cells Typing text into a table Creating labels for telephone exten sion numbers Creating tables with no outlines Setting table cell width Creating bar code labels Selecting ...

Page 82: ...k Editor For Windows XP On the taskbar click the Start button point to All Programs and then click P touch Quick Editor For Windows 95 98 98 SE Me NT 4 0 2000 Pro On the taskbar click the Start button point to Programs and then click P touch Quick Editor P touch Quick Editor starts Note The examples of dialog boxes from Windows XP are mainly used in this chapter Toolbar Label view ...

Page 83: ...he P touch Quick Editor Specifying the label size Specify the size of the label 1 Click of The drop down list box appears 2 Select Tape Settings The tape settings properties box appears 3 Select the label Format Length Width etc Note The width of the tape in the tape cassette installed in the PT 9500PC will be detected automatically Note If you right click in the label view or the toolbar the menu...

Page 84: ...fy the Font Style Size etc 4 Click in the label view and then type the text Using the text history Up to 10 previously printed texts are saved These texts can be typed easily 1 Click The text history list appears 2 Select the text you want to use The selected text appears in the label view Note Click to display the text box so that the text can be checked when it too small to be displayed in the l...

Page 85: ...he newly selected symbol Changing the background color The background color in the label view can be changed 1 Right click in the label view and then point to Background Color 2 Select the color you want to use from the available colors To use a color not displayed in the available colors list click User Settings Select the color you want from the basic colors or create a custom color and then cli...

Page 86: ...abel will be printed Minimizing P touch Quick Editor 1 Click P touch Quick Editor is removed from the desktop and reduced to a button on the task tray Click in the task tray to display P touch Quick Editor on the desktop Exiting P touch Quick Editor Exit P touch Quick Editor 1 Right click in the toolbar or in the label view and then select Exit The P touch Quick Editor window closes Importing text...

Page 87: ...r Windows XP On the taskbar click the Start button point to All Programs and then click P touch AV Editor For Windows 98 98 SE Me 2000 Pro On the taskbar click the Start button point to Programs and then click P touch AV Editor P touch AV Editor starts up Note Dialog boxes from Windows XP are mainly used in this chapter as examples Label view Print button Symbol button Text History button Exit but...

Page 88: ... Other functions This section explains various other functions available with P touch AV Editor Formatting the text The entire text can easily be formatted by changing the font style and alignment either before or after the text is typed in In the Text Properties select the desired font text style and text alignment Note As the text is typed in its size is automatically adjusted so that all of the...

Page 89: ...ol Importing text P touch AV Editor can be set up so that text from different applications can easily be imported into the label Specifying the shortcut key for importing 1 Right click in the P touch AV Editor window and then click Options in the menu that appeared The Options dialog box appears 2 Select the desired import keys and then click OK Importing text from a different application 1 Select...

Page 90: ...og box appears 3 Specify the printing options Auto Cut Select this option to automatically feed out and cut off the label after it is printed Half Cut Select this option to cut only the label tape without cutting the backing making it easier to remove the label backing Mirror Printing Select this option to print a mirror image of the data so that the label can be affixed to a window and read from ...

Page 91: ...ss tape from the previous printing session that would normally be fed out before the first label in the current session is printed After the last label is printed press the feed cut button 4 Click OK The label will be printed Exiting P touch AV Editor Perform the operation described below to exit P touch AV Editor Click The P touch AV Editor window closes ...

Page 92: ...ress the cover release button and open the tape compartment cover 2 Remove the label stick installed inside the PT 9500PC tape compartment cover 3 Hold one end of the printed label with one hand and hold the label stick with the other hand 4 Insert half of the printed label into the hole in the label stick with the printed side facing up 5 Turn the label stick and quickly pull as shown in the illu...

Page 93: ...PT 9500PC tape compartment cover 8 Close the cover Note There may be some cases where the use of the label stick may cause some of the printed text to wear off Some tapes may have cut lines in the backing Peel the backing from the label using the cut lines ...

Page 94: ...acintosh version This chapter contains the procedures to design and print labels using Macintosh Creating labels 94 Creating labels using P touch Editor 95 Creating labels using P touch Quick Editor 103 After printing 104 ...

Page 95: ...els After preparing the Macintosh start creating labels Designing printing labels Proceed to Creating labels using P touch Editor P 95 Printing labels simply Proceed to Creating labels using P touch Quick Editor P 103 ...

Page 96: ...le click the alias icon The layout window appears For Mac OS X 10 1 or later 1 Double click the Applications folder in the drive where Mac OS X is installed The Applications window appears 2 Double click the P touch Editor 3 2 folder The P touch Editor 3 2 window appears 3 Double click If an alias was created double click the alias icon The layout window appears Note This chapter contains an outli...

Page 97: ... property box for setting the font layout etc Click the button again to close the property box Page properties Set the label size and orientation Font properties Set the font size italics etc Layout properties Set the figure or text alignment Text properties Set the text alignment line spacing etc Draw toolbar Draw characters or figures ...

Page 98: ...lustration or photograph Date and Time The current date and time can be displayed as a line of text Merge Database Field Make a database field Creating a name badge The chapter contains an example of creating a nametag using Mac OS 8 6 9 x 1 Start P touch Editor 2 Click The page properties box appears 3 Set the label length to 4 100 mm 4 Set the label width to 1 24 mm 5 Click in the page property ...

Page 99: ...ter of the layout window b Click The print dialog box appears c Click Print The label will be printed Label printing Printed the label you created Printing 1 Click The print dialog box appears 2 Click Print For Mac OS X 10 1 or later Click Print The label will be printed Setting the printing options and label printing Mac OS 8 6 9 x 1 Click The print dialog box appears ...

Page 100: ... press the feed cut button Mirror printing A mirror image of the data is printed This is very convenient for affixing to the inner surface of glass Use clear tape Numbering When numbering consecutive numbers is set for labels the number that appears in the label can be set to increase by a specified amount on each successive label 3 Click Print The label will be printed Setting the printing option...

Page 101: ...without being ejected until the next label is printed Extra space is not inserted between the labels To discharge the label press the feed cut button Mirror printing A mirror image of the data is printed This is very convenient for affixing to the inner surface of glass Use clear tape Halftone Color Specify the halftone brightness and contrast P touch Editor Numbering When numbering consecutive nu...

Page 102: ...If you double click the main htm icon the CD ROM User s Guide file will open 5 Follow the information in the dialog boxes and install the CD ROM User s Guide file The CD ROM User s Guide will be installed 6 Double click the main htm icon in P touch Editor 3 2 User s Guide in the drive where the CD ROM User s Guide is installed The browser starts and the CD ROM User s Guide main menu appears Note D...

Page 103: ...ith Internet Explorer 4 01 or later The CD ROM User s Guide may not be displayed correctly with other browsers The operation methods are classified by function Click the operation methods to display the explanation window Click Home to return to the main menu The items for each menu appear The explanation for the selected item appears ...

Page 104: ...pplications folder in the drive where Mac OS X is installed The Applications window appears 2 Double click the P touch Quick Editor folder The P touch Quick Editor window appears 3 Double click If an alias was created double click the alias icon P touch Quick Editor starts Using P touch Quick Editor The basic operations for P touch Quick Editor for Macintosh are the same as those for Windows Opera...

Page 105: ...104 After printing For details refer to After printing P 91 in Creating labels Windows version ...

Page 106: ...hooting and a list of available accessories and supplies Creating bar code labels 106 Changing the P touch settings 108 Maintenance 110 Troubleshooting 114 Product specifications 116 Accessories For USA Only 118 Index 122 Contact Information For USA Only 124 ...

Page 107: ... space 1 250 I 2 5 ITF One dimensional code 0 9 1 250 UPC A One dimensional code 0 9 11 1 check digit UPC E One dimensional code 0 9 6 1 check digit EAN13 One dimensional code 0 9 12 1 check digit EAN8 One dimensional code 0 9 7 1 check digit CODABAR NW 7 One dimensional code 0 9 A D 3 250 CODE128 One dimensional code All ASCII 128 characters Control code 37 types 1 250 up to 30 characters EAN128 ...

Page 108: ...he bar code The entire bar code image including left and right margins must be within the dimensions of the label image area Please note that the foregoing is solely for your information This is not a warranty or representation about the fitness of P touch label printers to print bar code labels or the quality or legibility of bar code labels printed with your P touch label printer Brother and its...

Page 109: ...cognized as a different printer by the personal computer Recognizing the PT 9500PCs as a single printer If the ID mode is set to 2 install the printer driver one time only and then multiple PT 9500PCs can be used as the same printer Even if you connect a different PT 9500PC to the personal computer the PT 9500PC can be used without any additional setup 1 Turn off the PT 9500PC and the personal com...

Page 110: ...to 9 600 bps 1 Turn off the PT 9500PC 2 With the PT 9500PC power off press the power button on the PT 9500PC for 5 seconds or more The ERROR lamp red and power button lamp green will flash alternately 3 After the lamps flash alternately release the power button The baud rate is now set to 9 600 bps Note The common use settings for the printer vary according to the operating system running on the p...

Page 111: ...may be dirty Self cleaning Use the PT 9500PC self cleaning function to remove any dirt from the print head 1 Press the cover release button and open the tape compartment cover 2 Remove the tape cassette 3 Close the tape compartment cover 4 Press the feed cut button Self cleaning will start 5 Press the cover release button and open the tape compartment cover After rollers stop press the cover relea...

Page 112: ...he tape cassette 4 Use a cotton swab to clean the print head and head roller Print head Head roller 5 Install the removed tape cassette and then close the tape compartment cover Cotton swab Print head Note The PT 9500PC contains a cutter to cut printed labels Take special care not to touch the cutter when cleaning the PT 9500PC The print head is very hot during use and immediately after use Do not...

Page 113: ... cover When the rollers stop press the cover release button 6 Remove the cleaning tape reinstall the tape cassette and then close the tape compartment cover Cleaning the cutter If the printed labels are not ejected from the PT 9500PC correctly clean the cutter for cutting the labels 1 Turn off the PT 9500PC 2 Press the cover release button and open the tape compartment cover 3 Remove the tape cass...

Page 114: ...e and then close the tape compartment cover Note Take special care not to touch the cutter when cleaning the PT 9500PC The print head is very hot during use and immediately after use Do not clean the PT 9500PC immediately after printing labels ...

Page 115: ...power supply cord is connected correctly If the power button still does not light up or flash contact the retail outlet where the PT 9500PC was purchased or your local authorized service center The printed label contains a blank horizontal line The print head or head roller is dirty Refer to Label is not printed clearly P 110 and clean the print head and head roller A data transmission error appea...

Page 116: ...00PC to a COM port that is not being used Depending on the personal computer the COM port may be turned off as a default at the factory Refer to the instruction manual for the personal computer or contact the personal computer manufacturer to turn on the COM port Check the COM port For Windows 95 98 Double click the System icon in Control Panel Click the Device Manager tab and then click the plus ...

Page 117: ...cassettes 360 dpi Printing speed For TZ tape cassettes Up to 3 4 sec 20 mm sec Maximum printing width 27 1 mm Buttons Power button Feed cut button Interface Serial RS 232C USB USB 1 1 compliant Power source AC 120 V 60 Hz AC adapter model AD 9000 Power consumption Approx 30 W during printing Measurements 4 1 2 W 7 1 2 D 5 H 116 W 189 6 D 127 H mm Weight Approx 2 6 lb 1 2 kg Cutter Auto full cutter...

Page 118: ...r For a serial connection Windows 95 2 98 98 SE Me NT 4 0 2 2000 Pro 1 XP Pre installed device Serial RS 232C port device For a USB connection Windows 98 98 SE Me 2000 Pro XP Pre installed device USB port preparation device Macintosh Mac OS 8 6 9 x Mac OS X 10 1 10 2 6 USB port preparation device Interface Serial port USB port USB 1 1 compliant Hard disk IBM PC or compatible personal computer Over...

Page 119: ... No Description Price TZS111 Black on Clear 1 4 6 mm 15 99 TZS121 Black on Clear 3 8 9 mm 17 99 TZS131 Black on Clear 1 2 12 mm 18 99 TZS135 White on Clear 1 2 12 mm 18 99 TZS141 Black on Clear 3 4 18 mm 21 99 TZS145 White on Clear 3 4 18 mm 21 99 TZS151 Black on Clear 1 24 mm 25 99 TZS155 White on Clear 1 24 mm 25 99 TZS161 Black on Clear 1 1 2 36 mm 32 99 TZS211 Black on White 1 4 6 mm 15 99 TZS...

Page 120: ...1 Black on White 3 4 18 mm 21 99 TZFX251 Black on White 1 24 mm 25 99 TZFX261 Black on White 1 1 2 36 mm 32 99 Stock No Description Price TZSE4 Black on White 3 4 18 mm 29 99 Stock No Description Price TZFA3 Navy Blue on White 1 2 12 mm 24 99 Stock No Description Price TZCL6 1 1 2 36 mm approx 100 uses 27 99 Stock No Description Price TZ161 Black on Clear 27 99 TZ261 Black on White 27 99 TZ661 Bla...

Page 121: ...99 TZ641 Black on Yellow 20 99 TZ741 Black on Green 20 99 TZB41 Black on Fluorescent Orange 16 4 ft tape length 24 99 TZM41 Black on Matte Clear 20 99 TZWB41 Black on Bugs Bunny Pattern 23 99 TZWS41 Black on Sylvester Tweety Pattern 23 99 TZWT41 Black on Tazmanian Devil Pattern 23 99 Stock No Description Price TZ131 Black on Clear 16 99 TZ135 White on Clear 17 99 TZ231 Black on White 17 99 TZ232 R...

Page 122: ... PT9500PC 499 95 There are 4 easy ways to order directly from Brother 1 Call us Toll Free at 1 888 879 3232 and use a major credit card 2 Visit us online at www brothermall com and use a major credit card 3 Complete the order form on the later and fax it to us at 1 800 947 1445 4 Complete the order form on the later and mail it to us as directed If you haven t already returned your machine warrant...

Page 123: ...to the power source 17 Contact Information 124 Cover release button 14 22 Cutter 112 D Date and Time 75 97 Decorative Frame 75 Delete the PT 9500PC printer driver 49 Deleting the printer driver 57 70 Draw toolbar 74 96 E ERROR lamp 14 F Feed cut button 14 23 Font properties 96 Formatting the text 87 Front view 14 G General precautions 6 H Head roller 111 Help 78 I Image 75 97 Importing text 85 88 ...

Page 124: ...4 Remove 48 56 67 Removing the label backing 91 S Screen Capture 75 Selecting the printer 56 66 Self cleaning 110 Serial interface cable 12 20 Serial port 14 20 Software 26 Specifications 116 Specifying the label size 82 Specifying the text form 83 Starting P touch AV Editor 86 Starting P touch Editor 73 95 Starting P touch Quick Editor 81 103 Symbol 75 T Table 75 Tape cassette 12 22 118 Tape cata...

Page 125: ... may call toll tree 1 888 879 3232 or complete the order form in your user s guide and fax both sides of the form to 1 800 947 1445 For purchasing accessories on the Internet http www brothermall com To order by mail or pay by check please complete the accessory order form and mail it along with payment to Brother International Corporation Attn Consumer Accessory Division P O Box 341332 Bartlett T...

Page 126: ...me and address in the space below 6 Place your order a Call toll free anytime 1 888 879 3232 b Order on line at www brothermall com c Fax completed form to 1 800 947 1445 d Mail completed form along with proper payment to BROTHER INTERNATIONAL CORP Attn Consumer Accessory Div P O Box 341332 Bartlett TN 38184 1332 Supply Accessory Subtotal AZ CA CO CT FL GA IL LA MA MD MI MN MO NC NJ NV NY OH PA TN...

Page 127: ......

Page 128: ...me and address in the space below 6 Place your order a Call toll free anytime 1 888 879 3232 b Order on line at www brothermall com c Fax completed form to 1 800 947 1445 d Mail completed form along with proper payment to BROTHER INTERNATIONAL CORP Attn Consumer Accessory Div P O Box 341332 Bartlett TN 38184 1332 Supply Accessory Subtotal AZ CA CO CT FL GA IL LA MA MD MI MN MO NC NJ NV NY OH PA TN...

Page 129: ...Referencia rápida ...

Page 130: ...tiva de la FCC Estos límites se han diseñado para proporcionar una protección razonable contra las interferencias indeseables en una instalación doméstica Este equipo genera utiliza y puede emitir energía de radiofrecuencia y si no se instala y se usa según las instrucciones puede causar interferencias perjudiciales a las comunicaciones de radio No obstante no se garantiza que no se producirán int...

Page 131: ...nual Referencia Rápida este manual Archivos de ayuda sobre el software Manual de CD ROM Para la preparación y el funcionamiento de la PT 9500PC y para la instalación del software Utilización del P touch Editor Versión 4 0 para Windows Utilización del P touch Editor Versión 3 2 para Macintosh Utilización del P touch Quick Editor Utilización del P touch AV Editor ...

Page 132: ...cabezal de impresión El cabezal de impresión se calienta mucho durante el uso e inmediatamente después No lo toque directamente con las manos Utilice sólo los cables de interfaz incluidos con la PT 9500PC cable de interfaz USB cable de interfaz en serie Utilice sólo accesorios y repuestos originales de Brother No utilice ningún accesorio o repuesto no autorizado Adaptador de CA Utilice sólo el ada...

Page 133: ...NISON CORPORATION CD ROM No raye el CD ROM No someta el CD ROM a temperaturas extremadamente altas ni extremadamente bajas No ponga objetos pesados sobre el CD ROM ni lo someta a presiones Con respecto al uso del software El software contenido en el CD ROM está destinado exclusivamente para su uso con la PT 9500PC Puede ser instalado en varias computadoras personales para su empleo en oficinas etc...

Page 134: ...ión de P touch Editor exclusivamente 32 Instalación de P touch Quick Editor exclusivamente 33 Instalación de P touch AV Editor exclusivamente 35 Instalación del controlador de impresora exclusivamente 37 Configuración de la velocidad en baudios de la computadora personal y la PT 9500PC 43 Desinstalación del software 46 La impresora ya no se utiliza 47 Sistemas con Mac OS 8 6 9 x 49 IInstalación de...

Page 135: ...ción de etiquetas 92 Creación de etiquetas utilizando P touch Editor 93 Activación de P touch Editor 93 Ventana de diseño 94 Creación de un rótulo 95 Impresión de etiquetas 96 Utilización de la Guía de usuario del CD ROM 99 Creación de etiquetas utilizando P touch Quick Editor 101 Activación de P touch Quick Editor 101 Utilización de P touch Quick Editor 101 Después de la impresión 102 5 Apéndice ...

Page 136: ...8 Accesorios sólo para EE UU 116 Índice alfabético 120 Información de contacto sólo para EEUU 122 ...

Page 137: ...firmada antes de utilizar la PT 9500PC Confirmación de los accesorios incluidos 10 Términos relacionados con la PT 9500PC 12 Preparaciones previas a la creación de etiquetas 14 Conexión de la PT 9500PC 15 Instalación del casete de cinta 20 Instalación de la bandeja de recogida 22 ...

Page 138: ...e interfaz USB Este cable se utiliza para conectar la PT 9500PC al puerto USB de una computadora personal Cable de interfaz en serie Este cable se utiliza para conectar la PT 9500PC al puerto en serie de una computadora personal Casete de cinta Este casete contiene la cinta para las etiquetas Palillo para etiquetas Se utiliza cuando resulta difícil quitar la parte trasera de una etiqueta impresa E...

Page 139: ...delo para futuras consultas CD ROM El CD ROM contiene entre otras cosas el software que debe instalarse en una computadora personal Catálogo de cintas Este catálogo contiene una lista de casetes de cinta diseñados exclusivamente para la serie de impresoras P touch ...

Page 140: ...e impresión Cierre siempre la cubierta Nota El interruptor de ID USB generalmente se configura en la posición 2 Para obtener más información consulte Cambio del modo ID USB P 106 Cubierta del compartimiento de la cinta Salida de etiquetas Soporte para la bandeja de recogida Botón de apertura de la cubierta Lámpara de ERROR Botón de encendido con lámpara Botón FEED CUT Interruptor de ID USB Tomacor...

Page 141: ...impresión No hay casete de cinta Casete de cinta incorrecto Instale el casete de cinta correcto y cierre la cubierta del compartimiento de la cinta Durante la impresión La cubierta del compartimiento de la cinta está abierta Cierre la cubierta Casete de cinta vacío Instale un casete de cinta que tenga cinta y cierre la cubierta del compartimiento de la cinta Error de transmisión La PT 9500PC volve...

Page 142: ...el controlador de impresora para utilizar la PT 9500PC como impresora con la computadora personal e instale el software de diseño de etiquetas Para obtener más información consulte Instalación del software P 23 Conexión de la PT 9500PC Conecte la PT 9500PC a la fuente de alimentación y a la computadora personal Para obtener más información consulte Conexión de la PT 9500PC P 15 Creación de etiquet...

Page 143: ...CA situado en la parte trasera de la PT 9500PC 3 Inserte el cable de alimentación en el enchufe CA 120V Nota Cuando haya terminado de utilizar la PT 9500PC desenchufe el cable de alimentación de la fuente de alimentación y el adaptador de CA de la PT 9500PC y guárdelos para futuros usos Al retirar el adaptador de CA no tire del cable Los hilos del cable del adaptador de CA podrían romperse No util...

Page 144: ...o La PT 9500PC podría fallar Nota No conecte el cable de interfaz USB a una computadora personal hasta que el software haya sido instalado Si conecta el cable de interfaz USB a una computadora personal antes de que el software haya sido instalado aparecerá el siguiente cuadro de diálogo Haga clic sobre Cancel y retire el cable de interfaz USB Windows 95 NT4 0 Windows 98 98 SE Me 2000 Pro XP Mac OS...

Page 145: ...a a una computadora personal que funciona con Windows mientras el software se está instalando y se conecta a una Macintosh después de que el software se haya instalado No conecte la PT 9500PC a una computadora personal hasta que aparezca una instrucción que le indique que debe hacerlo Nota Cuando realice una conexión USB a través de un concentrador de red es posible que no se realice una conexión ...

Page 146: ...ción y la forma del puerto en serie varían según la computadora personal Para obtener más información consulte el manual de instrucciones de la computadora personal Nota Al conectar el cable de interfaz USB a la PT 9500PC el puerto en serie no se puede utilizar para funciones de comunicación Retire el cable de interfaz USB de la PT 9500PC Al conectar la PT 9500PC a una computadora personal utiliza...

Page 147: ...otón de encendido de la PT 9500PC Se iluminará el botón de encendido verde 6 Encienda la computadora Nota Para utilizar la PT 9500PC se debe instalar el software en la computadora personal Consulte Instalación del software P 23 Botón de encendido ...

Page 148: ...te laminada Cinta de ID flexible laminada Cinta indicadora de alteraciones laminada Cinta de tela para transferencia con plancha no laminada Etiquetas AV Instalación del casete de cinta En esta sección se explica el procedimiento para instalar el casete de cinta 1 Quite el tapón del casete de cinta Tenga en cuenta que algunos casetes de cinta pueden no tener tapón 2 Presione el botón de apertura d...

Page 149: ... de cinta no está instalado correctamente se encenderá la lámpara de ERROR En este caso repita el procedimiento desde el paso 2 7 Presione el botón FEED CUT Quite la parte sobrante de la cinta Guías de la cinta Extremo de la cinta Nota Si no se realiza ninguna otra operación durante los 10 minutos posteriores a la impresión de una etiqueta el soporte del rodillo se soltará automáticamente y es pos...

Page 150: ...por ejemplo cuando se disponga a imprimir muchas etiquetas 1 Monte la bandeja de recogida Consulte las ilustraciones que se incluyen más abajo para montar la bandeja de recogida 2 Abra el soporte de la bandeja de recogida 3 Instale la bandeja de recogida en la PT 9500PC Consulte las ilustraciones que se incluyen más abajo para instalar la bandeja de recogida Soporte de la bandeja de recogida ...

Page 151: ...te capítulo se detallan el procedimiento de instalación del software necesario para utilizar la PT 9500PC Tipos de software utilizados 24 Sistemas con Windows 25 Sistemas con Mac OS 8 6 9 x 49 Sistemas con Mac OS X 10 1 o posterior 56 ...

Page 152: ...nexión USB no se puede utilizar 4 La conexión en serie no se puede utilizar Software P touch Quick Editor P touch AV Editor P touch Editor Controlador de impresora OS Software para imprimir etiquetas utilizando operaciones simples Software para dar formato al texto de las etiquetas AV Software para crear etiquetas con varios diseños Software para que la computadora personal utilice la PT 9500PC co...

Page 153: ...ción de P touch Quick Editor AV Editor Instalación de P touch Editor Seleccione el método de conexión Windows 95 NT 4 0 no es compatible Cable de interfaz USB Conexiónen serie Conexiónen red Cuando utilice PS 9000 La PT 9500PC se conecta a una computadora personal durante la instalación Instalación del controlador de impresora para una conexión USB Instalación del controlador de impresora para una...

Page 154: ...utadora Instalación mediante la Instalación básica Para permitir que la computadora personal utilice la PT 9500PC instale el P touch Editor 4 0 para diseñar etiquetas y el software del controlador de impresora Instale el P touch Editor y luego instale el controlador de impresora 1 Encienda la computadora personal y luego inserte el CD ROM en la unidad de CD ROM Aparece el cuadro de diálogo Brother...

Page 155: ...aración para la instalación Si selecciona P touch Quick Editor consulte los pasos 3 8 Instalación de P touch Quick Editor exclusivamente P 33 Luego continúe con el paso a P 29 Si selecciona P touch AV Editor consulte los pasos 3 8 de Instalación de P touch AV Editor exclusivamente P 35 Luego continúe con el paso a P 29 Cuando se completa la preparación aparece el cuadro de diálogo InstallShield Wi...

Page 156: ...e la carpeta de destino donde se instalarán los archivos y luego haga clic sobre Next Para seleccionar otra carpeta de destino haga clic sobre Browse Aparece el cuadro de diálogo Setup Type 8 Haga clic sobre el tipo de instalación que prefiera y luego haga clic sobre Next Se instalarán los siguientes elementos Typical Se instalarán P touch Editor P touch Library fuentes de idiomas occidentales fue...

Page 157: ...haga clic sobre Next Si seleccionó el P touch Quick Editor en el paso 3 aparece el siguiente cuadro de diálogo Haga clic sobre Yes Si seleccionó P touch AV Editor en el paso 3 aparecerá el siguiente cuadro de diálogo Question Haga clic sobre Yes Si va a realizar la conexión a una computadora personal que funciona con Windows 95 NT 4 0 continúe con el paso 5 en Conexión a un puerto en serie de la s...

Page 158: ...a a realizar la conexión a una computadora personal que funciona con Windows 98 98 SE Me 2000 Pro continúe con el paso h P 31 Si la computadora personal detecta que la PT 9500PC está conectada aparece el cuadro de diálogo Found New Hardware Wizard e Haga clic sobre Install the software automatically Recommended y luego haga clic sobre Next Se detectarán los programas necesarios Aparece el cuadro d...

Page 159: ...touch AV Editor en el paso 3 consulte los pasos 9 0 de Instalación de P touch AV Editor exclusivamente P 37 Aparece el cuadro de diálogo User Registration i Seleccione Yes display the page y a continuación haga clic sobre Next Al completarse la instalación del P touch Editor aparece el cuadro de diálogo InstallShield Wizard Complete j Haga clic sobre Finish La instalación se ha completado Si va a ...

Page 160: ... cuadro de diálogo en el que puede seleccionar el software que desea instalar 3 Haga clic sobre el botón correspondiente a P touch Editor 4 Siga las instrucciones de cada cuadro de diálogo y comience la instalación Consulte los pasos 4 0 en Instalación mediante la Instalación básica P 27 Aparece el cuadro de diálogo User Registration 5 Seleccione Yes display the page y a continuación haga clic sob...

Page 161: ...rece haga doble clic sobre el icono My Computer y a continuación haga doble clic en el icono P touch 2 Haga clic sobre el botón de Instalación avanzada Aparece un cuadro de diálogo en el que puede seleccionar el software que desea instalar 3 Haga clic sobre el botón correspondiente a P touch Quick Editor Comienza la preparación para la instalación Cuando la instalación se ha completado aparece el ...

Page 162: ...Location 7 Seleccione la carpeta de destino donde se instalarán los archivos y luego haga clic sobre Next Para seleccionar otra carpeta de destino haga clic sobre Browse Aparece el cuadro de diálogo Setup y comienza la instalación Durante la instalación aparece el cuadro de diálogo Add shortcut 8 Especifique dónde desea agregar accesos directos para P touch Quick Editor y luego haga clic sobre Nex...

Page 163: ...al y luego inserte el CD ROM en la unidad de CD ROM Aparece el cuadro de diálogo Brother Setup Puede transcurrir algún tiempo hasta que aparezca el cuadro de diálogo Brother Setup Si el cuadro de diálogo Brother Setup no aparece haga doble clic sobre el icono My Computer y a continuación haga doble clic sobre el icono P touch 2 Haga clic sobre el botón de instalación avanzada Aparece un cuadro de ...

Page 164: ...ción haga clic sobre Next Aparece el cuadro de diálogo Registration Confirmation 6 Compruebe que su nombre y el nombre de la empresa son correctos y luego haga clic sobre Yes Para corregir la información de registro haga clic sobre No Aparece el cuadro de diálogo Choose Destination Location 7 Seleccione la carpeta de destino donde se instalarán los archivos y luego haga clic sobre Next Para selecc...

Page 165: ...personal se reiniciará Instalación del controlador de impresora exclusivamente Para instalar sólo el controlador de impresora siga estos pasos Conéctese a un puerto USB 1 Encienda la computadora personal y luego inserte el CD ROM en la unidad de CD ROM Aparece el cuadro de diálogo Brother Setup Puede transcurrir algún tiempo hasta que aparezca el cuadro de diálogo Brother Setup Si el cuadro de diá...

Page 166: ...a computadora personal se reiniciará Conexión a un puerto en serie 1 Encienda la computadora personal y luego inserte el CD ROM en la unidad de CD ROM Aparece el cuadro de diálogo Brother Setup Puede transcurrir algún tiempo hasta que aparezca el cuadro de diálogo Brother Setup Si el cuadro de diálogo Brother Setup no aparece haga doble clic sobre el icono My Computer y a continuación haga doble c...

Page 167: ... luego sobre Next Aparece un cuadro de diálogo donde podrá seleccionar el puerto al que estará conectada la PT 9500PC 6 Seleccione el puerto al que desea conectar la PT 9500PC y luego haga clic sobre Next Aparece un cuadro de diálogo en el que podrá confirmar la información de la instalación 7 Verifique que el controlador de impresora y el puerto para la instalación son los correctos y luego haga ...

Page 168: ...audios del puerto en serie cuando utilice una computadora personal que sea compatible con esta velocidad Si la computadora personal no es compatible con una velocidad en baudios de 115 200 bps para el puerto en serie seleccione la velocidad en baudios apropiada Aparece un cuadro de diálogo en el que podrá confirmar la configuración de la velocidad en baudios a Haga clic sobre Next La velocidad en ...

Page 169: ...de impresora PS 9000 se puede utilizar la PT 9500PC como impresora de red Esta función sólo se puede utilizar en un entorno de Windows Nota Al conectar el cable de interfaz USB a la PT 9500PC el puerto en serie no se puede utilizar para funciones de comunicación Retire el cable de interfaz USB de la PT 9500PC Si utiliza una computadora personal que no es compatible con una velocidad en baudios de ...

Page 170: ...doble clic en el icono P touch 2 Haga clic sobre el botón de Instalación avanzada Aparece un cuadro de diálogo en el que puede seleccionar el software que desea instalar 3 Haga clic sobre el botón del controlador Aparece el cuadro de diálogo Driver Setup 4 Haga clic sobre Network Connection y luego haga clic sobre OK Aparece el cuadro de diálogo Driver Setup Brother PT 9500PC que indica que la ins...

Page 171: ...000 consulte el manual de instrucciones para el servidor de impresoras PS 9000 Configuración de la velocidad en baudios de la computadora personal y la PT 9500PC Siga los siguientes pasos para cambiar o confirmar la velocidad en baudios de la computadora personal y de la PT 9500PC 1 En la barra de tareas haga clic sobre el botón Start y luego haga clic sobre Control Panel Aparece el cuadro de diál...

Page 172: ...ecerá la ventana Printers and Faxes 4 Haga clic con el botón derecho del mouse en el icono Brother PT 9500PC y a continuación haga clic sobre Properties Aparecerá la ventana Brother PT 9500PC Properties 5 Haga clic sobre la ficha Device Setting Para Windows 95 98 98 SE Me haga clic sobre la ficha Advanced Aparece la ventana Device Setting ...

Page 173: ...e cambiará la velocidad en baudios 9 Haga clic sobre Close Aparecerá nuevamente la ventana Brother PT 9500PC Properties 0 Haga clic sobre OK La instalación se ha completado y la ventana Brother PT 9500PC Properties se cerrará Nota Si utiliza una computadora personal que no es compatible con una velocidad en baudios de 115 200 bps para el puerto serie cambie la velocidad en baudios de la PT 9500PC ...

Page 174: ...e el botón Start seleccione Settings haga clic sobre Control Panel y luego haga doble clic sobre el icono Add Remove Programs 2 Seleccione Brother P touch Editor Version 4 0 P touch Quick Editor o P touch AV Editor Para Windows 95 98 98SE Me NT 4 00 Seleccione Brother P touch Editor Version 4 0 o P touch Quick Editor de la lista que aparece en la ventana Add Remove Programs Properties 3 Haga clic ...

Page 175: ...n tiempo hasta que aparezca el cuadro de diálogo Brother Setup Si el cuadro de diálogo Brother Setup no aparece haga doble clic sobre el icono My Computer y a continuación haga doble clic en el icono P touch 3 Haga clic sobre el botón de Instalación avanzada Aparece un cuadro de diálogo en el que puede seleccionar el software que desea instalar 4 Haga clic sobre el botón del controlador Aparece el...

Page 176: ...por otra con un número de serie diferente If Add Brother PT 9500PC is selected a Si selecciona Add Brother PT 9500PC se agregará un nuevo configurador de impresora Seleccione esta opción cuando necesite conectar varias PT 9500PC operativas a la misma computadora personal En el caso de Windows 98 98 SE Me sólo se agrega un puerto nuevo sin que lo haga como una impresora nueva 8 Haga clic sobre Yes ...

Page 177: ...e clic sobre la carpeta Mac OS 9 Aparece la ventana Mac OS 9 3 Haga doble clic sobre la carpeta P touch Editor 3 2 Aparece la ventana P touch Editor 3 2 4 Haga doble clic sobre el icono P touch Editor 3 2 Installer Comienza el instalador 5 Confirme la unidad en la que desee instalar el software y luego haga clic sobre Install Para cambiar la unidad haga clic sobre Drive Al hacer clic sobre Custom ...

Page 178: ...e la Macintosh se reinicie conecte la PT 9500PC a la Macintosh con el cable de interfaz USB y luego encienda la PT 9500PC Para obtener más información consulte Conexión a una computadora personal P 16 Continúe con Selección de la impresora P 54 Programa Descripción P touch Editor 3 2 Software de P touch Editor PT 9500PC Driver Controlador de impresora para la PT 9500PC Fonts 13 tipografías Se pued...

Page 179: ...r clic sobre Custom Install se muestra un cuadro de diálogo que le permite seleccionar las opciones que desea instalar Sólo se instalan las opciones que tengan una marca de verificación al lado Anule las marcas de verificación de los programas que no desea instalar Abajo se detallan los programas que se pueden instalar Si no se selecciona la instalación personalizada se instalarán todos los progra...

Page 180: ...Selección de la impresora P 54 Instalación del controlador de impresora exclusivamente Instale sólo el controlador de impresora necesario para utilizar la PT 9500PC como impresora 1 Encienda la Macintosh y luego inserte el CD ROM en la unidad de CD ROM Aparece la ventana P touch 2 Haga doble clic sobre la carpeta Mac OS 9 Aparece la ventana Mac OS 9 3 Haga doble clic sobre la carpeta P touch Edito...

Page 181: ...dros de verificación de todos los controladores de impresoras excepto de PT 9500PC Printer Driver 7 Haga clic sobre Install Comienza la instalación Cuando se completa la instalación aparece el mensaje Installation is done 8 Haga clic sobre Quit 9 Haga clic sobre Restart La instalación del controlador de impresora se ha completado y la Macintosh se reiniciará 0 Una vez que la Macintosh se reinicie ...

Page 182: ...nstalar el software Desinstalación de P touch Editor 1 Haga doble clic sobre la unidad en la que está instalado el P touch Editor 2 Elimine la carpeta P touch Editor 3 2 3 Haga doble clic sobre la unidad en la que está instalado el sistema operativo de la Macintosh 4 En System Folder abra la carpeta Preferences folder y elimine P touch Editor 3 2 Prefs Desinstalación de P touch Quick Editor 1 Haga...

Page 183: ... a la PT 9500PC desde el puerto USB de Macintosh 2 Haga doble clic sobre la unidad en la que está instalado el sistema operativo de la Macintosh 3 En System Folder abra la carpeta Extensions folder y elimine PT 9500PC y USB PT 9500PC Extension 4 En System Folder abra la carpeta Preferences folder y elimine PT 9500PC Prefs ...

Page 184: ...Macintosh y luego inserte el CD ROM en la unidad de CD ROM Aparece la icono P touch CD ROM 2 Haga doble clic sobre el icono P touch Aparece la ventana P touch 3 Haga doble clic sobre la carpeta Mac OS X Aparece la ventana Mac OS X 4 Haga doble clic sobre la carpeta P touch Editor 3 2 Aparece la ventana P touch Editor 3 2 Nota Al instalar el software regístrese utilizando un nombre de usuario con a...

Page 185: ...amas Se requiere aproximadamente 100 MB de espacio disponible en el disco duro Minimum Sólo se instalará P touch Editor Se requiere aproximadamente 20 MB de espacio disponible en el disco duro Custom El usuario puede seleccionar los programas que desea instalar Aparece el cuadro de diálogo Choose Alias Folder Programa Descripción P touch Editor 3 2 Software de P touch Editor Fonts 13 tipografías S...

Page 186: ...ión el alias no se creará en Dock y el icono Dock puede volver a las preferencias Aparece el cuadro de diálogo Pre installation Summary 0 Haga clic sobre Install Comienza la instalación Al completarse la instalación aparece el cuadro de diálogo Install Complete a Haga clic sobre Done La instalación del P touch Editor se ha completado Continúe con Instalación del controlador de impresora P 61 ...

Page 187: ...Quick Editor Aparece la ventana P touch Quick Editor 5 Haga doble clic sobre el icono Quick Editor Installer Comienza el instalador 6 Haga clic sobre Next Aparece el cuadro de diálogo Important Information Nota Al instalar el software regístrese utilizando un nombre de usuario con autoridad de administrador Para Mac OS X 10 1 el funcionamiento de P touch Editor Installer puede ser lento Al instala...

Page 188: ...ck y continúa con la instalación el alias no se creará en Dock y el icono Dock volverá a tener la configuración inicial Aparece el cuadro de diálogo Pre installation Summary 9 Haga clic sobre Install Comienza la instalación Al completarse la instalación aparece el cuadro de diálogo Install Complete 0 Haga clic sobre Done La instalación de P touch Quick Editor se ha completado Continúe con Instalac...

Page 189: ...podrá escribir el nombre y la contraseña del administrador 3 Escriba el nombre y la contraseña del administrador y luego haga clic sobre OK Aparece el cuadro de diálogo Welcome to the PT 9500PC Driver Installer 4 Haga clic sobre Continue Se muestra el entorno operativo necesario para la instalación Nota No conecte el cable de interfaz USB a la Macintosh hasta que el controlador de impresora haya s...

Page 190: ...cuadro de diálogo en el que podrá confirmar el contrato de licencia 7 Para continuar con la instalación haga clic sobre Agree Aparece el cuadro de diálogo Select a Destination 8 Seleccione la unidad en la que desee instalar el controlador de impresora y luego haga clic sobre Continue Seleccione la unidad en la que está instalado Mac OS X Aparece el cuadro de diálogo Easy Install ...

Page 191: ...lación Al completarse la instalación aparece el mensaje Software was installed correctly a Haga clic sobre Restart La instalación del controlador de impresora se ha completado y la Macintosh se reiniciará b Una vez que la Macintosh se reinicie conecte la PT 9500PC a la Macintosh con el cable de interfaz USB y luego encienda la PT 9500PC Para obtener más información consulte Conexión a una computad...

Page 192: ...e clic sobre el icono Print Center No hay impresoras disponibles para seleccionar Aparece el mensaje You have no printers available Continúe con el paso 5 Impresoras disponibles para seleccionar Se muestran los nombres de las impresoras disponibles en el cuadro de diálogo Printer List Continúe con el paso 6 La PT 9500PC ya está registrada La PT 9500PC aparece en la lista Printer List Continúe con ...

Page 193: ...ntinúe con Creación de etiquetas Versión para Macintosh P 91 Desinstalación del software Si la PT 9500PC no se va a utilizar en el futuro con una computadora Macintosh siga los siguientes pasos para desinstalar el software Desinstalación de P touch Editor 1 Haga doble clic sobre la carpeta Applications en la unidad en la que está instalado Mac OS X Aparece la ventana Applications 2 Haga doble clic...

Page 194: ...nstallAnywhere Uninstaller 5 Haga clic sobre Uninstall Se elimina el software Al completarse la desinstalación aparece el cuadro de diálogo Uninstall Complete 6 Haga clic sobre Quit 7 Haga doble clic sobre la carpeta Preferences en Macintosh HD Users User Name Library Preferences 8 Elimine P touch Editor 3 2 Prefs y P touch Editor 3 2 plist Se elimina P touch Editor ...

Page 195: ...doble clic sobre la carpeta P touch Quick Editor Aparece la ventana P touch Quick Editor 3 Haga doble clic sobre la carpeta Uninstal Quick Editor Aparece la ventana Uninstall Quick Editor 4 Haga doble clic sobre Uninstall Quick Editor Comienza InstallAnywhere Uninstaller 5 Haga clic sobre Uninstall Se elimina el software Al completarse la desinstalación aparece el cuadro de diálogo Uninstall Compl...

Page 196: ...tá conectado a la PT 9500PC desde el puerto USB de Macintosh 2 Haga doble clic sobre la carpeta Applications en la unidad en la que está instalado Mac OS X Aparece la ventana de Applications 3 Haga doble clic sobre la carpeta Utilities Aparece la ventana Utilities 4 Haga doble clic sobre el icono Print Center Aparece el cuadro de diálogo Printer List 5 Seleccione la PT 9500PC y luego haga clic sob...

Page 197: ...edimientos para diseñar e imprimir etiquetas utilizando Windows Creación de etiquetas 70 Creación de etiquetas utilizando P touch Editor 71 Creación de etiquetas utilizando P touch Quick Editor 79 Creación de etiquetas utilizando P touch AV Editor 84 Después de la impresión 89 ...

Page 198: ...preparar el PC comience a crear etiquetas Creación de etiquetas con varios diseños Continúe con Creación de etiquetas utilizando P touch Editor P 71 Impresión sencilla de etiquetas Continúe con Creación de etiquetas utilizando P touch Quick Editor P 79 ...

Page 199: ...ro de diálogo para seleccionar el método de diseño que se desea activar Para Windows 95 98 98 SE Me NT 4 0 2000 Pro En la barra de tareas haga clic en el botón Start apunte a Programs apunte a P touch Editor 4 0 y después haga clic sobre P touch Editor Aparece el cuadro de diálogo para seleccionar el método de diseño que se desea activar Nota Este capítulo contiene un resumen de P touch Editor Los...

Page 200: ...dro que permite ajustar la fuente el diseño etc Para cerrar el cuadro de propiedades haga clic sobre el botón nuevamente Propiedades de impresión Establezca el método de impresión de etiquetas Propiedades de la página Establezca el tamaño y la orientación de la etiqueta Propiedades del texto Establezca la fuente utilizada la alineación del texto el espaciado de línea etc Propiedades de diseño Esta...

Page 201: ...rativo Agregue un marco decorativo Tabla Cree una tabla Imagen Recupere una ilustración o fotografía guardada Captura de pantalla Capture una imagen del escritorio y agréguela a la etiqueta Clips de arte Recupere diferentes ilustraciones Símbolo Recupere diferentes símbolos Crear imagen Reúna diferentes elementos para crear una ilustración Fecha y hora Se puede visualizar la fecha y la hora actual...

Page 202: ...c sobre en el cuadro de propiedades del texto El texto está centrado 8 Haga clic sobre en el banco de objetos Aparece el cuadro de diálogo Frame Property 9 Seleccione Category y Style En este ejemplo se selecciona Simple para Category y se selecciona un marco rectangular redondeado línea fina para Style 0 Haga clic sobre OK El diseño será como el que se muestra en la siguiente ilustración a Si no ...

Page 203: ...ja de respaldo lo que facilita quitar la hoja de respaldo de la etiqueta Chain Printing La etiqueta impresa se mantendrá en la impresora sin ser expulsada hasta que se imprima la etiqueta siguiente No se inserta espacio extra entre las etiquetas Para expulsar las etiquetas pulse el botón FEED CUT Mirror Printing Se imprime una imagen reflejada de los datos Esto resulta muy cómodo para pegar en la ...

Page 204: ...or 4 0 y luego haga clic sobre P touch Editor P touch Editor se activa y aparece el cuadro de diálogo para seleccionar el método de diseño 2 Seleccione uno de los métodos de diseño y luego haga clic sobre OK Para visualizar Help se puede seleccionar cualquier método de diseño 3 Desde el archivo Help de la barra del menú seleccione P touch Editor Help Aparece la ventana P touch Editor4 Help Barra d...

Page 205: ...rations 3 Haga clic sobre en la barra de herramientas Aparece el cuadro de diálogo Print Topics 4 Seleccione el contenido que desea imprimir Impresión del tema seleccionado Seleccione Print the selected topic Impresión del encabezado y todos los subtemas seleccionados Seleccione Print the selected heading and all subtopics 5 Haga clic sobre OK Aparece el cuadro de diálogo Print 6 Seleccione la imp...

Page 206: ...s etiquetas utilizando la función Sheet Impresión utili zando la función de numeración núme ros consecutivos Especificación de un campo de numeración e impresión Creación de etique tas Inserción de una tabla Combinación de celdas Ingreso de texto en una tabla Creación de etique tas para números de teléfonos internos Creación de tablas sin borde exterior Configuración del ancho de la celda de la ta...

Page 207: ... XP En la barra de tareas haga clic sobre el botón Start apunte a All Programs y luego haga clic sobre P touch Quick Editor Para Windows 95 98 98 SE Me NT 4 0 2000 Pro En la barra de tareas haga clic sobre el botón Start apunte a Programs y luego haga clic sobre P touch Quick Editor Se activa P touch Quick Editor Nota En este capítulo se utilizan principalmente los ejemplos de cuadros de diálogo d...

Page 208: ...tamaño de la etiqueta Especifique el tamaño de la etiqueta 1 Haga clic sobre de Aparece el cuadro de la lista desplegable 2 Seleccione Tape Settings Aparece el cuadro de propiedades de los ajustes de la cinta 3 Seleccione Format Length Width etc de las etiquetas Nota Se detectará automáticamente el ancho de la cinta incluida en el casete de cinta instalado en la PT 9500PC Nota Si hace clic con el ...

Page 209: ...el texto 3 Especifique Font Style Size etc 4 Haga clic sobre el cuadro de texto y escriba el texto Utilización del historial de texto Se guardan hasta 10 textos anteriormente impresos Estos textos pueden ingresarse fácilmente 1 Haga clic sobre Aparece la lista del historial de texto 2 Seleccione el texto que desea utilizar El texto seleccionado aparece en el cuadro de texto Nota Haga clic sobre pa...

Page 210: ...ente seleccionado Cambio de color del fondo Se puede cambiar el color del fondo en el cuadro de texto 1 Haga clic con el botón derecho sobre el cuadro de texto y luego apunte a Background Color 2 Seleccione el color que desea utilizar entre los colores disponibles Para usar un color que no aparece en la lista de colores disponibles haga clic sobre User Settings Seleccione el color que desee entre ...

Page 211: ... Minimización de P touch Quick Editor 1 Haga clic sobre Se quita P touch Quick Editor del escritorio y se reduce a un botón en la barra de tareas Haga clic sobre en la barra de tareas para visualizar P touch Quick Editor en el escritorio Salida de P touch Quick Editor Salga de P touch Quick Editor 1 Haga clic con el botón derecho sobre la barra de herramientas o en el cuadro de texto y luego selec...

Page 212: ...eas haga clic sobre el botón Start seleccione All Programs y luego haga clic sobre P touch AV Editor Para Windows 98 98 SE Me 2000 Pro En la barra de tareas haga clic sobre el botón Start seleccione Programs y luego haga clic sobre P touch AV Editor Se inicia P touch AV Editor Nota En este capítulo se utilizan principalmente los ejemplos de cuadros de diálogo de Windows XP Vista de la etiqueta Bot...

Page 213: ...imprimirá la etiqueta Otras funciones Esta sección explica otras funciones disponibles con P touch AV Editor Formato del texto Es posible aplicar formato al texto cambiando la fuente el estilo y la alineación antes o después de escribir el texto En las propiedades del texto seleccione la fuente el estilo y la alineación que desee asignar al texto Nota Mientras se escribe el texto el tamaño se ajus...

Page 214: ...ch AV Editor se puede configurar de forma que sea posible importar texto de diferentes aplicaciones en la etiqueta Especificación del método abreviado de teclado para la importación 1 Haga clic con el botón derecho sobre la ventana de P touch AV Editor y luego haga clic en Options en el menú que aparece Se abre el cuadro de diálogo Options 2 Seleccione las teclas de importación que desee y haga cl...

Page 215: ...specifique las condiciones de impresión Auto Cut Seleccione esta opción para que la etiqueta salga y se corte automáticamente una vez impresa Half Cut Seleccione esta opción para cortar solamente la cinta de la etiqueta sin cortar el papel al que va adherida De esta forma será más fácil separar la etiqueta del papel Mirror Printing Seleccione esta opción para imprimir una imagen especular de los d...

Page 216: ...esión anterior que normalmente se expulsaría antes de imprimir la primera etiqueta de la sesión en curso Una vez impresa la última etiqueta presione el botón FEED CUT 4 Haga clic sobre OK Se imprimirá la etiqueta Salida de P touch AV Editor Lleve a cabo el procedimiento que se describe a continuación para salir de P touch AV Editor Haga clic con el botón derecho sobre La ventana P touch AV Editor ...

Page 217: ...e el botón de apertura de la cubierta y abra la cubierta del compartimiento de la cinta 2 Quite el palillo para etiquetas que se encuentra dentro de la cubierta del compartimiento de la cinta de la PT 9500PC 3 Sostenga un extremo de la etiqueta impresa con una mano y sujete el palillo con la otra mano 4 Inserte la mitad de la etiqueta impresa en el orificio del palillo para etiquetas con el lado i...

Page 218: ...se utiliza el palillo para etiquetas el texto impreso puede despegarse de la etiqueta si se trabaja con una cinta que no sea una cinta laminada cinta de seguridad o cinta de acabado mate Para la cinta no laminada y algunas cintas laminadas quite la hoja de respaldo de la etiqueta impresa utilizando las líneas cortadas en la hoja de respaldo ...

Page 219: ...capítulo contiene los procedimientos para diseñar e imprimir etiquetas utilizando Macintosh Creación de etiquetas 92 Creación de etiquetas utilizando P touch Editor 93 Creación de etiquetas utilizando P touch Quick Editor 101 Después de la impresión 102 ...

Page 220: ... el equipo Macintosh comience a crear etiquetas Creación de etiquetas con varios diseños Continúe con Creación de etiquetas utilizando P touch Editor P 93 Impresión sencilla de etiquetas Continúe con Creación de etiquetas utilizando P touch Quick Editor P 101 ...

Page 221: ...cono del alias Aparece la ventana de diseño Para Mac OS X 10 1 o posterior 1 Haga doble clic sobre la carpeta Applications de la unidad en la que está instalado Mac OS X Aparece la ventana Applications 2 Haga doble clic sobre la carpeta P touch Editor 3 2 Aparece la ventana P touch Editor 3 2 3 Haga doble clic sobre Si se creó un alias haga doble clic sobre el icono del alias Aparece la ventana de...

Page 222: ...rrar el cuadro de propiedades haga clic sobre el botón nuevamente Propiedades de la página Establezca el tamaño y la orientación de la etiqueta Propiedades de fuentes Especifique la fuente el tamaño la letra cursiva etc Propiedades de diseño Establezca la alineación de la figura o del texto Propiedades del texto Establezca la alineación del texto el espaciado de línea etc Barra de herramientas de ...

Page 223: ...alizar la fecha y la hora actual como una línea de texto Fusión de un campo de base de datos Cree un campo de base de datos Creación de un rótulo En este capítulo se describe un ejemplo para crear un rótulo utilizando Mac OS 8 6 9 x 1 Active P touch Editor 2 Haga clic sobre Aparece el cuadro de propiedades de la página 3 Establezca el largo de la etiqueta en 4 100 mm 4 Establezca el ancho de la et...

Page 224: ...Haga clic sobre Aparece el cuadro de diálogo Print c Haga clic sobre Print Se imprimirá la etiqueta Impresión de etiquetas Imprima la etiqueta creada Impresión 1 Haga clic sobre Aparece el cuadro de diálogo Print 2 Haga clic sobre Print Para Mac OS X 10 1 o posterior Haga clic sobre Print Se imprimirá la etiqueta Configuración de las condiciones de impresión e impresión de la etiqueta Mac OS 8 6 9...

Page 225: ...e imprime una imagen reflejada de los datos Esto resulta muy cómodo para pegar en la superficie interna de vidrios Utilice cinta transparente Numbering Cuando se ha definido una numeración números consecutivos para las etiquetas se puede establecer que el número que aparece en la etiqueta aumente en una cantidad concreta en cada etiqueta sucesiva 3 Haga clic sobre Print Se imprimirá la etiqueta Co...

Page 226: ... la impresora sin ser expulsada hasta que se imprima la etiqueta siguiente No se inserta espacio extra entre las etiquetas Para expulsar las etiquetas pulse el botón FEED CUT Mirror printing Se imprime una imagen reflejada de los datos Esto resulta muy cómodo para pegar en la superficie interna de vidrios Utilice cinta transparente Halftone Color Especifique el semitono el brillo y el contraste P ...

Page 227: ...de usuario del CD ROM 5 Siga la información de los cuadros de diálogos e instale el archivo de la Guía de usuario del CD ROM Se instalará la Guía de usuario del CD ROM 6 Haga doble clic sobre el icono main htm de P touch Editor 3 2 User s Guide en la unidad en la que está instalada la Guía de usuario del CD ROM El buscador se inicia y aparece el menú principal de la Guía de usuario del CD ROM Nota...

Page 228: ...s posible que la Guía de usuario del CD ROM no se visualice correctamente con otros buscadores Los métodos de funcionamiento están clasificados por función Haga clic sobre los métodos de funcionamiento para visualizar la ventana de explicación Haga clic sobre Home para regresar al menú principal Aparecen los elementos de cada menú Aparece la explicación de cada elemento seleccionado ...

Page 229: ...la unidad en la que está instalado Mac OS X Aparece la ventana Applications 2 Haga doble clic sobre la carpeta P touch Quick Editor Aparece la ventana P touch Quick Editor 3 Haga doble clic sobre Si se creó un alias haga doble clic sobre el icono del alias Se activa P touch Quick Editor Utilización de P touch Quick Editor Las operaciones básicas para P touch Quick Editor para Macintosh son las mis...

Page 230: ...102 Después de la impresión Para obtener más información consulte Después de la impresión P 89 en Creación de etiquetas Versión para Windows ...

Page 231: ...con los accesorios disponibles Creación de etiquetas de códigos de barras 104 Cambio de los ajustes del P touch 106 Mantenimiento 108 Solución de problemas 112 Especificaciones del producto 114 Accesorios sólo para EE UU 116 Índice alfabético 120 Información de contacto sólo para EEUU 122 ...

Page 232: ...es Windows Macintosh CODE39 Código unidimensional 0 9 A Z espacio 1 250 I 2 5 ITF Código unidimensional 0 9 1 250 UPC A Código unidimensional 0 9 11 1 dígito de control UPC E Código unidimensional 0 9 6 1 dígito de control EAN13 Código unidimensional 0 9 12 1 dígito de control EAN8 Código unidimensional 0 9 7 1 dígito de control CODABAR NW 7 Código unidimensional 0 9 A D 3 250 CODE128 Código unidi...

Page 233: ...a PT 9500PC Si es posible utilice cinta blanca con tinta negra cuando imprima las etiquetas de código de barras Es posible que el lector de códigos de barras no pueda leer las etiquetas creadas con otro tipo de cinta Establezca la máxima anchura posible para el código de barras Si la anchura del código de barras es demasiado pequeña es posible que el lector de códigos de barras no pueda leer el có...

Page 234: ...para cada PT 9500PC El PC reconocerá cada PT 9500PC como una impresora diferente Reconocimiento de todas las PT 9500PC como una sola impresora Si el modo ID está establecido en 2 instale el controlador de la impresora una sola vez y las distintas PT 9500PC se podrán utilizar como la misma impresora Incluso si conecta al PC una PT 9500PC diferente ésta se podrá utilizar sin ninguna configuración ad...

Page 235: ...n la PT 9500PC apagada presione el botón de encendido de la PT 9500PC durante 5 segundos o más El indicador de ERROR rojo y el del botón de encendido verde parpadearán alternativamente 3 Después de que los indicadores parpadeen alternativamente suelte el botón de encendido La velocidad en baudios está establecida en 9 600 bps Nota Los ajustes para uso común de la impresora varían en función del si...

Page 236: ...n estar sucios Autolimpieza Utilice la función de autolimpieza de la PT 9500PC para eliminar la suciedad del cabezal de impresión 1 Presione el botón de apertura de la cubierta y abra la cubierta del compartimiento de la cinta 2 Quite el casete de cinta 3 Cierre la cubierta del compartimiento de la cinta 4 Presione el botón FEED CUT La autolimpieza comenzará 5 Presione el botón de apertura de la c...

Page 237: ...para limpiar el cabezal de impresión y el rodillo del cabezal Cabezal de impresión Rodillo del cabezal 5 Instale el casete de cinta que quitó y cierre la cubierta del compartimiento de la cinta Palillo de algodón Cabezal de impresión Nota La PT 9500PC contiene un cortador para cortar las etiquetas impresas Tenga especial cuidado de no tocar el cortador cuando limpie la PT 9500PC El cabezal de impr...

Page 238: ... la cubierta del compartimiento de la cinta 6 Quite la cinta limpiadora ponga en su lugar el casete de cinta que quitó y cierre la cubierta del compartimiento de la cinta Limpieza del cortador Si las etiquetas impresas no se expulsan correctamente de la PT 9500PC limpie el cortador para cortar las etiquetas 1 Apague la PT 9500PC 2 Presione el botón de apertura de la cubierta y abra la cubierta del...

Page 239: ... compartimiento de la cinta Nota Tenga especial cuidado de no tocar el cortador cuando limpie la PT 9500PC El cabezal de impresión se calienta mucho durante el uso y puede seguir caliente inmediatamente después No limpie la PT 9500PC inmediatamente después de imprimir etiquetas ...

Page 240: ...l cable de alimentación está conectado correctamente Si el botón de alimentación sigue sin encenderse ni parpadear contacte con el establecimiento en el que adquirió la PT 9500PC o con un representante de mantenimiento autorizado Aparece una línea hori zontal en blanco a lo largo de la etiqueta impresa El cabezal de impresión o el rodillo está sucio Consulte La etiqueta no se imprime claramente P ...

Page 241: ...COM que no esté en uso Dependiendo del PC el puerto COM puede desactivarse como puerto por defecto en la fábrica Consulte el manual de instrucciones del PC o contacte al fabricante del PC para activar el puerto COM Compruebe el puerto COM Para Windows 95 98 Haga doble clic sobre el icono System en Control Panel Haga clic sobre la ficha Device Manager y a continuación haga clic sobre el signo más s...

Page 242: ...s de cinta TZ 360 ppp Velocidad de impresión Para casetes de cinta TZ Hasta 20 mm seg Ancho de impresión máximo 27 1 mm Botones Botón de encendido Botón FEED CUT Interfaz Serie RS 232C USB compatible con USB 1 1 Fuente de energía CA 120V 60 Hz adaptador de CA modelo AD 9000 Consumo de energía Aprox 30 W durante la impresión Medidas 4 1 2 an 7 1 2 prof 5 al 116 an 189 6 prof 127 al mm Peso Aprox 2 ...

Page 243: ...e Windows 95 2 98 98 SE Me NT 4 0 2 2000 Pro 1 XP Dispositivo preinstalado Dispositivo de preparación de puerto en serie RS 232C Para una conexión USB Windows 98 98 SE Me 2000 Pro XP Dispositivo preinstalado Dispositivo de preparación de puerto USB Macintosh Mac OS 8 6 9 x Mac OS X 10 1 10 2 6 Dispositivo de preparación de puerto USB Interfaz Puerto en serie puerto USB compatible con USB 1 1 Disco...

Page 244: ...121 Negro sobre fondo transparente 3 8 9 mm 17 99 TZS131 Negro sobre fondo transparente 1 2 12 mm 18 99 TZS135 Blanco sobre fondo transparente 1 2 12 mm 18 99 TZS141 Negro sobre fondo transparente 3 4 18 mm 21 99 TZS145 Blanco sobre fondo transparente 3 4 18 mm 21 99 TZS151 Negro sobre fondo transparente 1 24 mm 25 99 TZS155 Blanco sobre fondo transparente 1 24 mm 25 99 TZS161 Blanco sobre fondo t...

Page 245: ...4 18 mm 21 99 TZFX251 Negro sobre fondo blanco 1 24 mm 25 99 TZFX261 Negro sobre fondo blanco 1 1 2 36 mm 32 99 Nº de producto Descripción Precio TZSE4 Negro sobre fondo blanco 3 4 18 mm 29 99 Nº de producto Descripción Precio TZFA3 Azul marino sobre fondo blanco 1 2 12 mm 24 99 Nº de producto Descripción Precio TZCL6 1 1 2 36 mm aprox 100 usos 27 99 Nº de producto Descripción Precio TZ161 Negro s...

Page 246: ...fondo amarillo 20 99 TZ741 Negro sobre fondo verde 20 99 TZB41 Negro sobre fondo naranja fluorescente cinta de 16 4 pies de longitud 24 99 TZM41 Negro sobre fondo transparente mate 20 99 TZWB41 Negro sobre motivo de Bugs Bunny 23 99 TZWS41 Negro sobre motivo de Silvestre y Piolín 23 99 TZWT41 Negro sobre motivo del Diablo de Tasmania 23 99 Nº de producto Descripción Precio TZ131 Negro sobre fondo ...

Page 247: ...C 499 95 Existen 4 sencillas formas de hacer pedidos directos a Brother 1 Llámenos al número gratuito 1 888 879 3232 y pague con una de las principales tarjetas de crédito 2 Visite nuestra página Web www brothermall com y pague con una de las principales tarjetas de crédito 3 Rellene el formulario de pedido al dorso y envíenoslo por fax al número 1 800 947 1445 4 Rellene el formulario de pedido al...

Page 248: ... 87 96 Conéctese a un puerto USB 37 Conexión a la fuente de alimentación 15 Conexión a un puerto en serie 18 38 Conexión a un puerto USB 17 Conexión a una computadora personal 16 Conexión de la PT 9500PC 15 Contact Information 122 Controlador de impresora 24 37 49 52 Cortador 110 Crear imagen 73 95 Cubierta del compartimiento de la cinta 12 D Desinstalación de P touch Editor 54 65 Desinstalación d...

Page 249: ...de la página 72 94 Propiedades del texto 72 94 PS 9000 119 PT 9500PC 10 P touch AV Editor 24 35 84 P touch Editor 24 32 49 56 71 93 P touch Quick Editor 24 33 51 59 79 101 Puerto en serie 12 18 Puerto USB 12 17 R Referencia Rápida 11 Rodillo del cabezal 109 Rótulo 74 95 S Salida de etiquetas 12 Selección de la impresora 54 64 Servidor de impresión 119 Servidor de impresora PS 9000 41 Símbolo 73 Si...

Page 250: ...ar el formulario de pedido que encontrará en la Guía del usuario y enviar ambas caras del formulario por fax al número 1 800 947 1445 Para adquirir accesorios en Internet http www brothermall com Para hacer su pedido por correo o pagar con talón rellene el formulario de pedido de accesorios y envíelo con el abono a nombre de Brother International Corporation Attn Consumer Accessory Division P O Bo...

Page 251: ...guiente Sólo en territorio continental de EEUU 14 75 TOTAL A PAGAR No se admiten pedidos contra reembolso Método de abono marque uno Nombre Visa Master Card Discover Dirección Talón Giro postal American Express Localidad Estado Número de cuenta Código postal Fecha de caducidad Nº de teléfono durante el día Firma Nº de fax durante el día Dirección de facturación si es distinta de la dirección de en...

Page 252: ......

Page 253: ...guiente Sólo en territorio continental de EEUU 14 75 TOTAL A PAGAR No se admiten pedidos contra reembolso Método de abono marque uno Nombre Visa Master Card Discover Dirección Talón Giro postal American Express Localidad Estado Número de cuenta Código postal Fecha de caducidad Nº de teléfono durante el día Firma Nº de fax durante el día Dirección de facturación si es distinta de la dirección de en...

Page 254: ...Printed in China LN2975001 ...

Reviews: