EMBROIDERING TUTORIAL
———————————————————————————————————————————————————
22
Screen overview
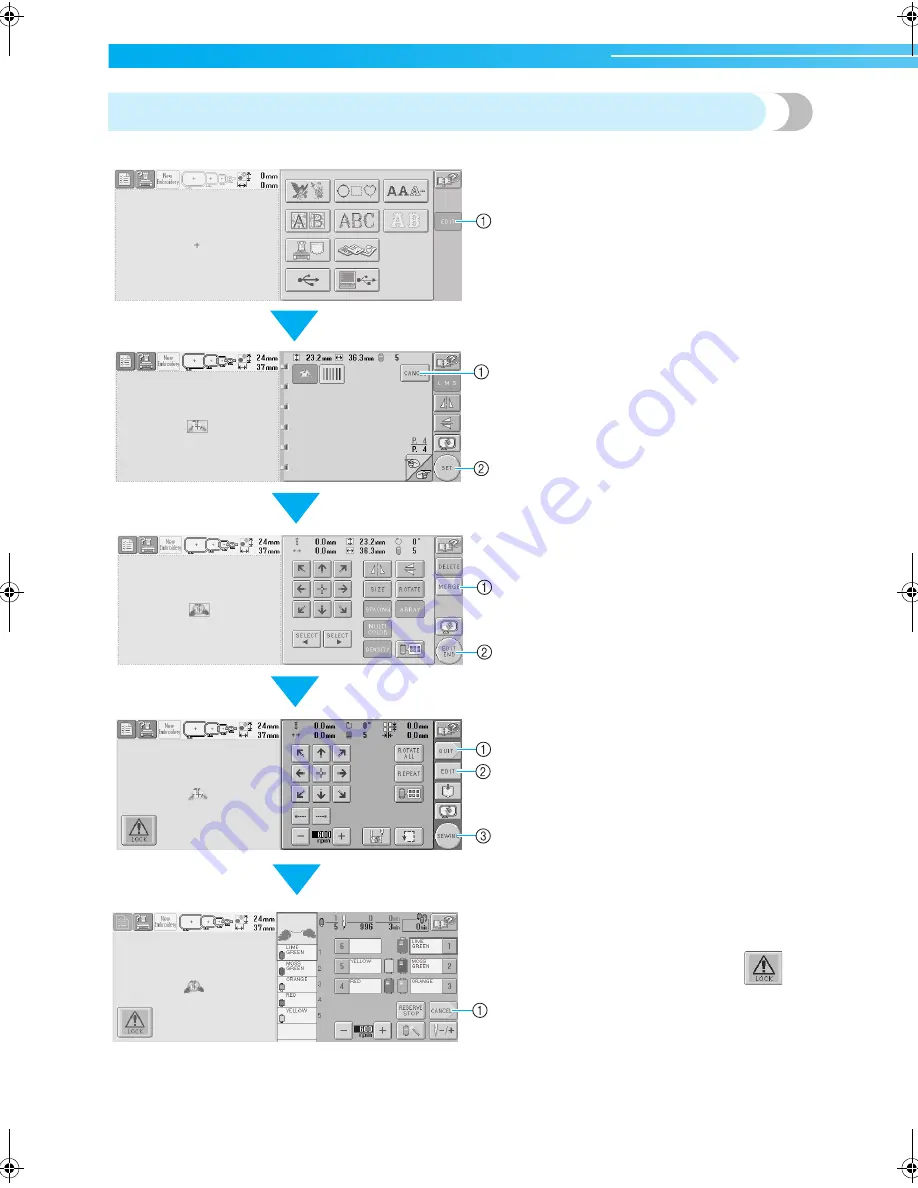
The basic operation flow is shown below.
In the
pattern type selection screen
, select
a pattern type. (Refer to page 23, 50)
1
Touch this key to continue to the
pattern
editing screen
. This key is not available
unless a pattern type is selected.
In the
embroidering settings screen
, if it is a
combined pattern , edit the entire pattern, specify the
embroidering settings and check the embroidery area.
(Refer to page 26, 54)
1
Touch this key to quit the current operation
and return to the
pattern type selection
screen
.
2
Touch this key to return to the
pattern editing
screen
.
3
Touch this key to continue to the
embroidering
screen
.
In the
pattern editing screen
, edit the
pattern. (Refer to page 25, 52)
1
Touch this key to return to the
pattern type
selection screen
and add another pattern.
2
Touch this key to continue to the
embroidering settings screen
.
In the
pattern list screen
, select the
pattern. (Refer to page 23, 51)
1
Touch this key to return to the
pattern type
selection screen
.
2
Touch this key to continue to the
pattern
editing screen
.
In the
embroidering screen
, check the thread
colors assigned to the needle bars, and then install
the upper threads.Touch the unlock key
so
that the start/stop button starts flashing in green and
the embroidery machine is ready to begin sewing.
After the embroidery is sewn, the
embroidering
settings screen
appears. (Refer to page 33, 56)
1
Touch this key to return to the
embroidering
settings screen
.
Sapphire_brother.book Page 22 Thursday, November 17, 2005 2:48 PM
Summary of Contents for PR-600II
Page 1: ...EMBROIDERY MACHINE PR 600 O P E R A T I O N M A N U A L ...
Page 77: ...EMBROIDERING TUTORIAL 60 ...
Page 115: ...EMBROIDERING SETTINGS 98 ...
Page 171: ...BASIC SETTINGS AND HELP FEATURE 154 ...
Page 229: ...APPENDIX 212 ...
Page 236: ...Index 219 7 ...
Page 237: ......


